The Grow Awards 2026 🏆
Likes
Comments
Share
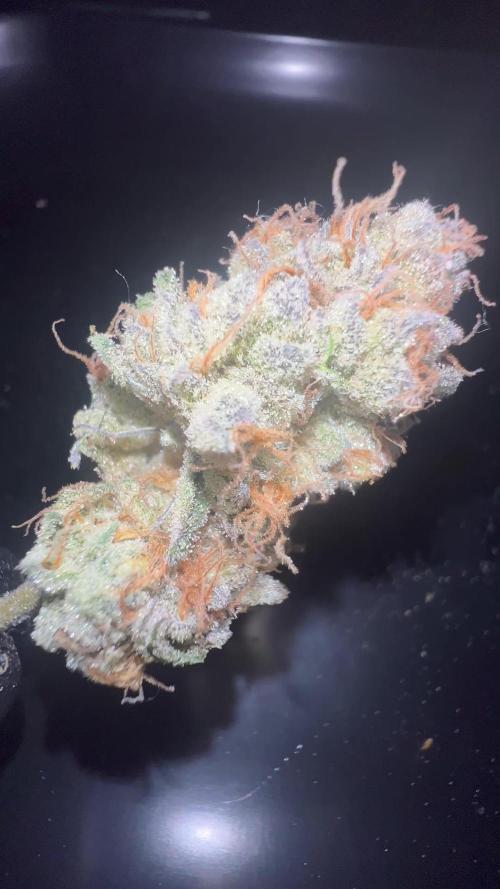
Our Fruit Punch Automatic are both doing great. Remember that we are growing 1 Plant worked with the techniques and one left to grow without cutting techniques to preserve its speed. In this diary we find the plant that is growing straight, just a little defoliation. I exaggerated with the Nitrogen a little and we have some yellow tips, we will use it to explain the problems on Zamnesia, but I did not do it on purpose, it remains a small mistake that if possible is to be avoided. Small if it does not go much further now the plant is taking bloom but up to a couple of days before the photos it took ALga Grow. The comparison is the salt of the experience so the plant in the other diary will be worked very differently go and see it to compare them. We have started the Plagron fertilization program, we are in 100% organic configuration, the soil is recycled Promix + 1/3 fresh soil + 10% Perlite + RQS Mycorrhiza Mix (4 g in the mix, 1 g under the small fiber pot). We are administering // 1 ml/l Power Roots - 1 ml/l Pure Zym - 1 ml/l Sugar Royal - 3 ml/l Alga Grow We have sprayed Vita Race Foliare 3 ml/l. https://plagron.com/en The doubts about the compatibility between Pure Zym and mycorrhizae have been dispelled, they can get along according to Plagron experts. If someone tells you that enzymes eat mycorrhizae, which in principle may seem possible, explain to them that it is not true. https://www.royalqueenseeds.it/growing/452-easy-roots-mix-di-micorrhize.html One of the best in recent years with a very high THC level -------------------------------------------------------- https://www.zamnesia.io/en/10965-zamnesia-seeds-fruit-punch-automatic.html Brief description of Zamnesia // Sativa strains are very rewarding to grow, but their long flowering times and their greater susceptibility to disease and overfertilization can make them a little more difficult to manage. Also, their imposing heights are less suitable for indoor use and can attract unwanted attention if grown outdoors. However, with the arrival of Fruit Punch Automatic, growing sativa strains at home just got a whole lot easier. Combining Skunk #1, Haze and ruderalis, Fruit Punch Auto is 70% sativa dominant and produces up to 21% THC, along with a delicious blend of terpenes. Plus, it can be grown indoors, outdoors and in greenhouses. With their bright green hues, golden pistils and thick layer of resin, Fruit Punch Auto buds always have a great appeal. When you smoke her, you will be amazed by her flavours, aromas and effects! As the name suggests, Fruit Punch Automatic boasts delicious tropical aromas reminiscent of banana, pineapple, mango and citrus. When you open the jars you will feel like you are in a tropical cocktail bar on an exotic beach. Fruit Punch Auto will delight your palate with pungent fruity notes followed by light notes of Skunk and spice on the exhale. Within minutes of your first hit, this potent sativa will stimulate your mind, leaving you in an energetic and carefree state, ideal for morning or daytime sessions, as well as social settings or creative pursuits. You can find the entire world of growing on Zamnesia and more, just take a look at the site and you will find "all the best that nature has to offer" in various shapes and colors. The new strains are fantastic and the old ones are no exception... The new strains are great and the old ones are no exception... p.s. no Hermaphrodites yet, growers, can you say the same? --- // www.zamnesia.com
Likes
16
Share
@valiotoro
Follow
Blessed with the result as you can see the buds looks fantastic💎 The trim was super easy(make sure you have enough gloves)😂 Now 7-10 days on the dry rack then see you in 2025 for the smoke review Take care😁
Likes
12
Share
@Pedro_88
Follow
solo me fui dos días de la casa y cuando llegue así estaba, va muy bien su crecimiento Bueno como ven e ido podando las hojas bajas para que pueda coger más luz su tallo, ahora mismo la tengo en un indoor casero que tengo por qué el clima está muy lluvioso
Likes
5
Share
This week brought some challenges—I discovered thrips on the leaves of my plant. Thankfully, the infestation isn’t too severe yet, and I acted quickly to address the issue: 1. Sprayed the plant with plain water to knock off any pests. 2. Removed the top layer of soil. 3. Applied BioBizz Leaf Coat as a protective measure. I really hope this will help. After reading up on these nasty pests, I learned that they can completely devastate the leaves if left unchecked. Unfortunately, I have only myself to blame for their appearance. Due to the cold weather, I’ve been using a heater in the room with my growbox, which has caused the humidity to drop significantly. It sometimes dips as low as 30%, and it rarely goes above 50%. Most of the time, the humidity hovers around 35-40%, which is an ideal breeding ground for thrips. To answer the obvious question—yes, I do have a humidifier. However, my growbox has a very powerful exhaust fan (315 m³/h for an 80x80 space), so the air is refreshed too quickly for the humidifier to make a lasting difference. Aside from fighting thrips, I also made some adjustments to my grow this week. On Day 20, I did a little LST. Honestly, I wasn’t planning on using any training techniques in this grow, but I decided to give it a try anyway. One thing I can say for sure—I want to skip LST in my next grow. It’s quite inconvenient to water the plant when the leaves are practically touching the soil. Additionally, I defoliated the first two sets of leaves. I felt this was necessary to improve airflow around the plant and reduce the risk of pests spreading further. Watering: Day 17: 400 ml Day 20: 500 ml I’m keeping a close eye on the plant and hope to overcome these challenges successfully.
Likes
20
Share
@Mamaweed
Follow
Last week with fertilizer Purplematic is Beautiful Strong buds Trichomes are almost ready !
Likes
2
Share
@Comfrey
Follow
Cactus Candy Berry wächst munter vor sich hin. Nach dem Toppen hat sie innerhalb weniger Tage die Stachelproduktion verdoppelt. Ich mache es mir mit einer Tasse Tee auf dem Balkon gemütlich und dampfe ein paar Blüten von meiner Ernte aus dem Sommer. Schaue nach CBD Blüten auf GD und überlege welche Strains in meinen ersten Indoor Garten kommen. Noch ist das Zelt nicht vollständig. Aber Ende Dezember will ich spätestens starten, es wird ein CBD grow werden.
Likes
Comments
Share
Start these by mistake, wasn't quite prepared or set up correctly, these are being grown in a two by four budget
Processing
Likes
5
Share
Started watering plants every 72hours with a pint of water. Seem to be starting to grow faster now and I can now tell which one is the sweet tooth auto 😂😂😂
Likes
10
Share
So far the dosi seems to be further into flowering than the bride cake. I’m noticing a potential cal/mag lock out with the dosi but I’ll continue to monitor over the course of these next few days. If signs worsen I’ll attempt to flush with lighter EC until run off readings of PH & EC are stable and will tone down the feed. 11/5/21 seems that my “mag & calcium deficiency” seems to really be nutrient burn. I am pushing these plants on their bloom diet (2.8-3.0EC) so it is to be expected however I shall continue to keep them at the same EC unless things begin to worsen 🤷‍♂️🏽 I like to limit test 😅
Likes
30
Share
Simply put I am so very pleased with the way this plant has performed my only worry is how to properly dry and cure this magnificent specimen
Likes
6
Share
We don't hide behind a finger, nor behind a rolled joint nor behind anything, the Permanent Marker is the strain that has the most Hype at the moment in a few years and we also expect a lot from this one from Zamnesia. The cover of the seed pack alone is something spectacular, it seems to have been made by the best Street Writers. I know he is a master of Tattoo but here I see at least a minimum of past in Writing, in the hip hop sense of the term. If you only look at them a week ago it doesn't seem true, but when the plants start, they go and the Permanent Marken go like a rocket. In this diary you will find the plant worked with the techniques in this case the first topping was done, we cleaned everything else creating the Mainfold and we are going to work everything with the main lining. We are at the first topping and we have two mini branches growing. The other one you can find in the diary next worked without the application of techniques that involve cuts to preserve its speed. The comparison is the salt of the experience. We have started the Plagron fertilization program, we are in 100% organic configuration, the soil is recycled Promix + 1/3 fresh soil + 10% Perlite + RQS Mycorrhiza Mix (4gr in the mix, 1 gr under the small fiber pot). We are administering // 1 ml/l of Power Roots - 1 ml/l of Pure Zym - 1 ml/l of Sugar Royal - 3 ml/l of Alga Grow I have doubts about the compatibility of Pure Zym with mycorrhizae. If in doubt, ask the experts, don't mix too much at random. https://plagron.com/en Doubts about Pure Zym / Mycorrhizae compatibility have been dispelled, they can go well together according to Plagron experts. If someone tells you that enzymes eat mycorrhizae, which in principle may seem possible, explain to them that it is not true. https://www.royalqueenseeds.it/growing/452-easy-roots-mix-di-micorrhize.html Try this variety, it is a top strain of recent years very high level of thc ---- // https://www.zamnesia.io/it/12508-zamnesia-seeds-permanent-marker.html Brief description of Zamnesia // Here is a good opportunity to enrich your genetic library with another award-winning variety: Permanent Marker was crowned Strain of the Year 2023 by Leafly, thanks to its intense aromas, high levels of THC and its physical vivacity. Originally created by JBeezy and Seed Junky Genetics, our team managed to secure a cutting of this modern top cultivar, so you can grow it comfortably at home, whether indoors, outdoors or in a greenhouse. Permanent Marker fits perfectly in any environment! You can find the whole world of growing on Zamnesia and much more, take a tour of the site and you will find "all the best that nature has to offer" in various shapes and colors. The new strains are exceptional and the old ones are no less... p.s. for now zero Hermaphrodites, growers can you say the same? ---- // www.zamnesia.com
Likes
18
Share
im literally seeing them once a week. growth exploded since last week. started giving pk booster by hand watering. buds start to form. defoliated lots of fan leaves. first compost tee is being brewed.
Likes
5
Share
15th day into flowering- Trim some Fan leaves /anything cover canopy. 18TH DAY FLOWER- LOLI POPPING. JUST WATER EVERY 3 DAYS PH 6.5
Likes
55
Share
High GD community Week 16, Zuchinis all around, tomatoes getting ready on a daily. Cucumbers are getting almost mature proportions. Everything going well. Terra preta Location: center perma garden Surface: 125cm x 105cm Depth: 115cm The hole was dug out over 3 days, it were very sunny days. 😅 Theres mostly loamsand with a small sandloam bottom that was very hard. The sand was also very compressed and hard. The top layer is this grey dusty soil of about 40cm deep. At the bottom theres pure sand thats soft, easy drainable. First step is to fill up the entire bottom with fine chopped wood, progressively using bigger pieces of wood. I try to use some hardwood like oak to for its extra K (potassium = pot ash). A bit of charcoal to. This will take the entire first day, bcs it needs to have a minimal ticknes of pure ashes of around 5cm. Otherwise, after compressing it with the upcoming layers, the ash-line would almost disappear. Not all the wood needs to be burned entirely. Its a first layer with lots of N and K. Bones can be used to in the fire making the NPK complete. But it can be added also as a separated layer. I dont have that much bone material because my 2 dogs, or eating, or burry them somewere. Little warning at the end, be aware of your local laws applied to open fires. 😅😉 After a good burn ive got between 8 and 12cm of ashes in total over the entire surface. A small layer of soil (5cm) is put on top of that. Theres no need to harden out that layer, pressure will to the work and the layers will compress over time into ideal circumstances. On to the next layer!! Next is a layer of the compost, but the part that isnt allready decomposed. Its green/brown/yellow of color. And a bit of everything, grass, weeds, leafs and some thin branches. Another layer soil to cover that up. Now i formed a thin layer of chopped(10mm) wood(beech), just enough to make a thin,almost 1 piece high, layer. On to this i added a complete wheelbarrel of compost(black) with small pieces of still not completly decomposed materials. Lots of worms here. On that, you guessed it, an other layer of soil. I try to have both types of soil in that mix, the almost pure sand and the more grey type. Next, back to the beech. This time the rest of the bag follows. Theres a good layer of around 3cm deep. On this ive layed down some new small woodsticks to make a small fire again. Starting at the center and adding some last branches i found. It turned out really smoky!! Half way the burn ive opend the core of the fire, trying to spread the small pieces of char over the complete surface. After that, i added for the first time some water here. And an other layer of soil again, this is just covering up each time. Max 5cm!! Now we are at the upper half of the pit. Still 50cm to go. Now ive added some compost again, the green/brown/yellow one, with on top of that, a 15 liter bucket with compressed bokashi fermentated kitchen leftovers. Making a layer out of that and some fresh bokashi juice with 10 liters of water to drain those benificial bacteria into to compost layer just underneath it. This layer is almost 20cm tick. Again, yeah, soil, 5cm. Ive bought some blond peat to at to to toplayers. Last 25 to 30cm of soil, is a mix of the peat(20%) and the two other types of soil. First ill do tiny layers of each, last 10cm i try to mix it. And to finish the job, ive took some 100% reused and composed soil with some perlite in it from past use. I havent watered a lot, but the meteo predicts a good amount of water in the upcoming days. The soil that stayed and didnt get back to its original place, ive used to make a new top layer on the rest of the mini field. I havent used clay because it was hard to find or just to expensive. Beside the peat(250l), i didnt buy anything. So its labor intensive, but real cheap. If you dont get a sanction by the community ofcours! 😅😅😅 Feel free to comment and give your toughts. 🙏🌿🌿🌿🙏 Thats it for this week boys and girls, Thanks for reading and passing by and 💚💚💚👏👏👏👍👍👍 for Marshydro leds. Quality/price top! Grow safe buds and feel free to check out my other ladies doing fine thanks! 🙏🌿🌿🌿🙏 Weedseedsexpress!!!! 👏👏👏 LarfxWSE for discount at weedseedsexpress!!! 15% off!!! Zamnesia!!! 👽👽👽 Add OrganicLarF as a code when buying your own MarsHydro LED light and get a nice reduction!!!👽🚀🛸
Likes
9
Share
Week 10 of flowering! This last week has been one of the most challenging when it came to climate, After I stopped C02 the humidity levels just continued to climb and the AC and Dehumidifier could not keep up. I'm guessing this has to do with the sheer volume of the plants in the airspace, and without the additional C02 keeping the stomas partway closed. I've decided to just leave the tent open during the day and its sits right at 55% humidity. Now on to the flush...
Likes
6
Share
@Tiozin
Follow
Hi! I switched the light schedule to 12/12 and did a heavy defoliation on both plants. They were really bushy and filled with fan leaves, I was bending and adjusting the bigger leaves daily, to leave space for the bud sites to get more light, but now they can really see the light. I didn’t amend the soil with more nutrients, as I said on the last weeks report. The humidity and temperature are pretty stable, I just watered with 4ml of compositing juice on 1L of water to try to eliminate the dry spots on the pot. On September 18 (21 days from the 12/12 start) I’ll do a final major defoliation. I’m hoping that they stretch a lot on the following weeks, I have plenty of space for vertical growth. That’s it for now, let the pistils begin!
Likes
8
Share
Spider mites are getting worse. Also have to harvest soon cause I start travelling next week and I can’t finish and dry them in time. But the trichomes are almost ready
Likes
13
Share
12/9: Fed today...I feel better and my plants are looking better....whew! 12/10: Will switch to 12/12 tonight. and turn on the extra reds. Will also begin UVB stressing immediately. 12/11: Flipped to flower. 12/12: Fed today and sprayed with boom boom spray and axiom harpin proteins. I also added a tablespoon of Happy Frog Cavern Culture to the pots before watering it in. Got the DIY CO2 generator going with a fresh batch of sugar and yeast. 12/16: Fed today. Good week in the garden...plants are looking great...stretching has commenced.
Likes
52
Share
@Hashy
Follow
Grow diary 11 Stage 1 Days 1-10 By day 4 all was looking good, she had a few roots coming out the bottom of the cube. Day 6 I transplanted her to the 3 inch rockwool cubes that had been soaked for 15 mins in this stage nutrient solution and left to drain for 15 mins, then she went into the bigger propagator. Day 10 she had 1 root coming out the bottom of the 3 inch cube. Over the last few days she has been getting more exposure to the fan, with the lid of the propagator the humidity is on the low side, but i want to get some air movement around her. She has grown o.k over the last 10 days. She looks healthy enough and is where I would expect her to be in growth. She is the best looking seedling out of the grow at 10 days. Temp Max 30.6c Avg 26.6c Min 21.2c Humid Max 85% Avg 69.7c Min 45.7% VPD Max 1.86 Avg 1.03 Min 0.44 Hopefully back in 10 days
Likes
57
Share
It's finally here 😀. Both phenotypes are in the fermentation phase 😍. The grow was a lot of fun, so I thought I'd make an Iolator hash out of leaves and a little bud and a little oil out of both phenotype buds. Cannabis: The grow: Both grew beautifully. Your stretch was normal and it didn't cause any problems. Feeding : You received GHSC bio Grow once in the vegi phase and GHSC Bio bloom twice in the flowering phase. GHSC enhancers were added every 2 weeks. That was just the right amount for both : 1:. Optic: The appearance of Phenotype 1 is almost completely purple 😍. Pheno 2 is coated a bit purple with a mixture of silver from the resin :-). Smell / taste Pheno 1 tastes very fruity. You can really say that it tastes like a tangerine in the finish : 1:. Pheno 2 also tastes a little fruity but with its distinctly stronger note in the Kush direction. Both very tasty : 1:. Storage: The cannabis is stored in glasses in a dark place where the temperature is between 19-22 degrees. The first 2 months of fermentation are boveda packs 62% in the jars. Then the 58% come in. Since I was in the mood for a few specialties again, as mentioned above, I also made Hash Oil and Ice Oilator hash. Let's start with Video 1 (BHO) Hash Oil production: Hash Oil: Process: Small grated cannabis goes into the Dexso tube. Below is a container in the PTFE film that serves as a base so that the oil can be easily removed at the end. At the top we give the Dexso gas through the Dexso tube filled with cannabis. The result is a mixture of the gas and the cannabis oil. We put the bowl with the mixture in a hot shot of water but make sure that no water comes in at the top. We let the whole thing simmer for 20 minutes so that the first gases can evaporate. Then everything goes into the vacuum chamber so that all remaining vapors can really escape and we have a pure product 😁. The whole thing is carried out for 2-3 days until the oil is ready 😀. I can only recommend everyone to vaporize oil in a dabbing rig 😍. Taste: The taste is extremely delicious. In the finish, it tastes much more like mandarin than the buds 😀. Optic: The oil is very shiny to matt. If you pull it apart, it becomes light as honey :-). If you roll it up, it's very conceit. Consistency: The oil will become a little harder in the silicone storage after a short time. However, if you take it in your hand, it can be pulled and kneaded very easily after a few seconds. That was it with the oil production. So let's continue with the Ice o Lator 😀. Making the Ice o Lator: I took all the remains of the leaves and placed them in the small net. Then the IO maker is first made about 1/3 full of cold water with water. I add 3-4 kg of ice cubes and wait about 15 minutes until the water is below 0 degrees. As soon as the temperature is reached, I put in the net with the leftovers and set the timer to 15 / on and 10 / off. I run the whole thing 3 times. Then the complete broth is passed through the sieves (160, 120, 73 and 25) in a bucket. After sifting everything is spread out on a ceramic plate and poked very small with a knife. The whole thing comes in a dark place and is then allowed to dry for about 3-4 days. As soon as the hash has dried, it comes into the press for a few hours at a little temperature. The result is a kneading oily Ice o Lator 😍😍😍. Optic: The optic is partly reminiscent of that of oil :-). Consistency: The ice o lator has a very soft consistency :-). You can roll up small sausages while smoking 😁. Taste: The taste is very medicinal. But very earthy and smoky finish : 1:. All the screenings are very good but the 25 and 73 are the best 😃. That was it with the production to see everything again in Video 2. So we come to the end of a beautiful passage ☺️. Finally, I would like to say that I would like to thank Sweet Seeds for the sponsorship and for providing two such great genetics 🙏🏻. If anyone has any questions about this type, oil or ice, I will answer as soon as I can. I wish you all a lot of fun with this big update :-). Have a nice start to you and your families into the new year and everyone stays healthy 🙏🏻. Let it grow 🍀 MadeInGermany You can buy this Strain at : https://sweetseeds.es/de/red-mandarine-f1-fast-version/ Type: Red Mandarine F1 Fast Version ☝️🏼 Genetics: Red Poison Auto®️ (SWS39) X Tangie (California Orange x Hybrid Skunk) : 1: Vega lamp: 2 x Todogrow Led Quantum Board 100 W 💡 Bloom Lamp : 2 x Todogrow Led Cxb 3590 COB 3500 K 205W 💡💡☝️🏼 Soil : Canna Coco Professional ☝️🏼 Fertilizer: Green House Powder Feeding ☝️🏼🌱 Water: Osmosis water mixed with normal water (24 hours stale that the chlorine evaporates) to 0.2 EC. Add Cal / Mag to 0.4 Ec Ph with Organic Ph - to 5.5 - 5.8 .