
Likes
Comments
Share


@SwabianMadness
Follow
The Canopy was so full and i decide today to make another Defoliation for better Light Penetration. I have just 11-16 Days left for the original Harvest Date. Just hope that i don’t get some Bananas now somewhere in the Buds 😌😃 better to make it right the last two times. But i don’t want to take to much
In Future Runs i know now how to do it
Only give Water with PH 6.8 until harvest. No Nutrients anymore
Maybe wait one or two Weeks longer to get bigger Buds and more Couchlock Effect from it

Processing
Likes
9
Share


@homiegrown
Follow
This week has scary. I think I may have taken to much off of the big G14 and stressed it to much. She is not happy but is showing steady growth. Hopefully she will continue to recover.


Likes
6
Share

@kdifiori_
Follow
Week four for this beauty!
This week, one and half liter of water, a few tweaks to the LST, and, as always, lots of love! It doesn’t seem to have been stressed by the topping.
You can see how fast it’s growing.
Stay tuned!


Likes
16
Share


@Bigbankbossshit
Follow
Preparation is key so I’m getting ready to start laying down my trellis net to SCROG from here out. In preparation for a flip 12-12. Plants looking lovely my cereal milk which is my right looking like it’s bouncing back can’t wait to take off. Here are a couple of pictures of my plants before and after lollipopping. Please follow my Instagram which is linked to my page.


Likes
2
Share

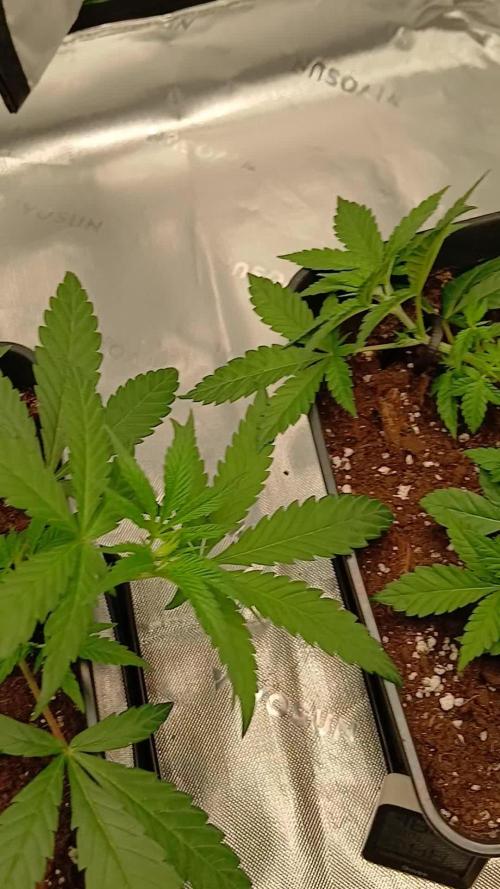
@BenandLippisfinest
Follow
100% Krönungsrate wie immer bei Fastbuds bisher, wir sind wieder sehr gespannt auf die terps
Likes
5
Share

@Hardy_
Follow
Day 29, please give feedback, thought i stunted them, not sure, have nothing to compare against! Thanks folks

Likes
22
Share


@PlaguedGardens
Follow
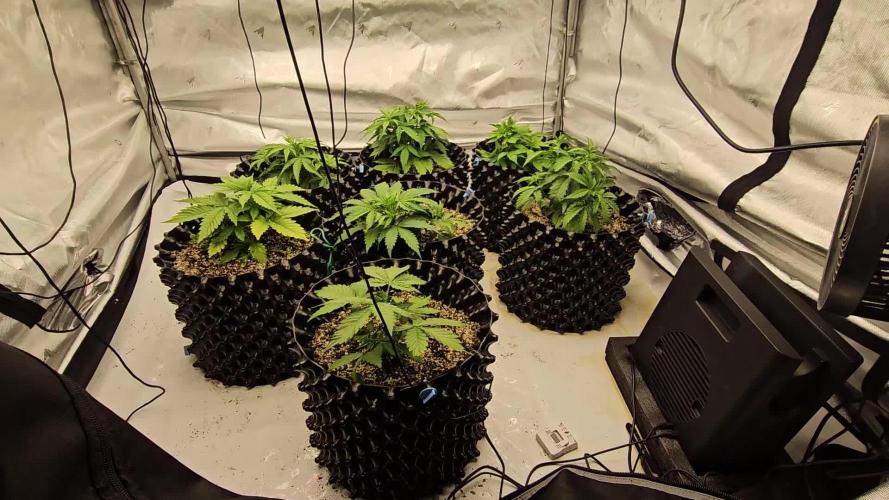
OBJECTIVE
-New nutrient ratios for flower
-Maintained our pH range
SUBJECTIVE
-Defoliation and scrogging as needed
CONVERSATION
-Our subjective and objective are going to get a little boring these upcoming weeks ):
We were worried about frank not filling in (or at least I was) but everything is looking beautiful. We took 10 clones from B and 9/10 have rooted, cannot wait for that grow.
Our scrog has filled out very nicely and we have nice spread out plants, still baffles us that they are only 8 inches apart from the top of the bucket to the scrog level.
Everyone should keep a look out for when we introduce Project- Red Tide

Likes
60
Share


@Secretflower
Follow
Hello my friends,
...June 24, 2022.. ..Day N°104...
...Flowering day N°59...
My two Feminized Royal THCV are fine, Sativa style. Smells very gud.
I give them water with a tablet of Easy Plus Micronutrients from RQS Organics Nutrients.
They are under a MarsHydro TSW 2000 at 80%of power and at 20cm of the canopy.
www.royalqueenseeds.com
www.mars-hydro.com
www.marshydro.eu
Thank you very much for passing by.
Wish you the best with your green projects, peace.
See you soon 💨💨💨


Likes
4
Share


@Dirizhor
Follow
Budds are fattening...but.. one day I forgot to turn back the fan after inspection, and it was off for a week almost. As a result i have found little fluffy white patch of mold on my biggest budd.
So far I just sort of collected it, with a cotton stick.. hesitant to chop it down.
Lowering watering, to 1l every 2 days, to keep humidity below 70.
By the plan I am keepimg it through the June, 4 more weeks. Unless trychoms will call earlier.
Thanks for checking
See you next week
Likes
39
Share


@ParadiseCrew
Follow
a bit of nut burn on tips, nothing to worry about that, healthy as water, trichomes starting to develop stronger day by day, next week i expect to see some litlle leafs covered with thrics.
Smell is stronger
Regards, AlgarvP.


Likes
39
Share


@Bluemels
Follow
Tag 91: Noch 5 Wochen bis zur Ernte...leider sind ihre Blätter schon etwas hell geworden. Aber die doppelte Menge an Alg a mic hat doch schon ein wenig mehr grün in die Blätter der Shogun zurück gebracht 😉
Likes
38
Share


@Green_Mountains
Follow
A lot going on this week!! Feeding 3 quarts every Sunday and Wednesday at this point. I did a light defoliation on Monday and did a more thorough defoliation on Friday! I opened up a lot of bud sights and it shows in the pics from late in the week!!
I just turned the fan and carbon filter on. Temps are currently holding at 73-74F and the humidity is between 43-45%. I'm very happy with that!
I hope to keep them both happy!!
Enjoy!
Likes
5
Share


@Mr_nugs_lover_David
Follow
She has stretched quite s bit, really wonderful leafs and she's developing her flowrs little by little, let's see how this performs, I expect the best from gea seeds genetics.

Likes
21
Share


@gottagrowsometime
Follow
Welcome to my Kush mint x gelato 41 diary..
Sorry about the gap in wks. I lost my device with all my pics.
This girl is really slow on the uptake.. she is the furthest behind and was started on my 1st batch for this round.
She has gone through pre flower and fattening and seems to be throwing off some Amber's. But very slowly. After her nanners I can't see anymore. She did show some purple leafs at the back. So, this could of slowed the process down
Thanks to my sponsors from Green House Seeds and Mars Hydro.
COUPON FOR MARSHYDRO
Use code "ggs" at any official marshydro site for a discount..

Likes
52
Share


@Salokin
Follow
The High intensity was to strong (clearly my fault) in the beginning which stunted her overall stretch, she however still delivered super dense, terpene and trichome loaded buds.


