
Likes
Comments
Share


@Trinidad
Follow
8th.05.25 68
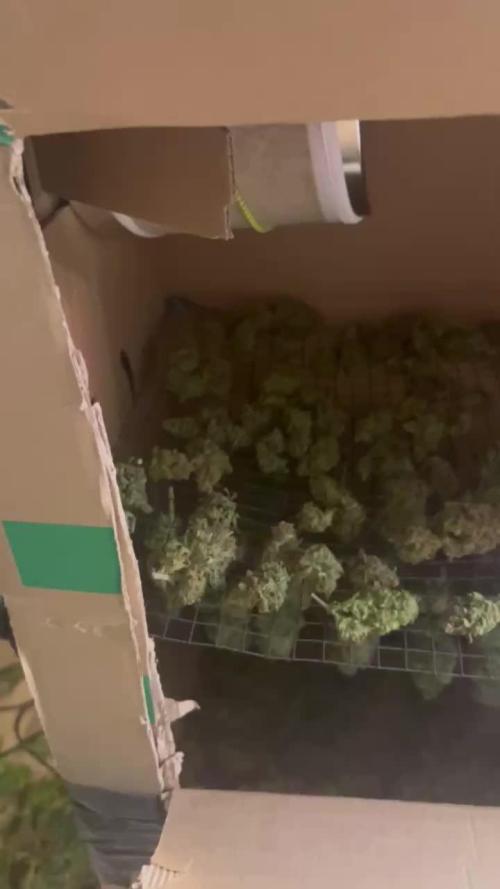
Been so busy I don't even know what day it it. Last night I gave the chem dawg defoliation and add bloom booster and calmag to revervoir. Pumps where out so root rot was developing on all of them, however I think I caught it in time. Smell on tropicana cookies moved from sour citrus to sweet cirtus. Trichomes are clear and starting to trun milky. They are ripening nicely. I don't know how much longer I can hold out. I started counting days as the seeds were placed in water however I should start my count after germination so actually days are less than what I think. Still learning. I must say chem dawg was my least favorite because of longer grow time and less thc which is about 20% compared to other. But after seeing the stucture and how she is shaping up i must say i am quite impressed. No wonder she is a cassic strain which stood the test of . We shall see how things progress.

Likes
16
Share


@Sublyme_ness
Follow
To start the week i'm seeing the buds start to swell, i've also had to give a peroxide foliar spray to be sure i'm not going to be ingesting mites... shall see how it goes.
----
sprayed some dilute 3% peroxide mixed 2-1 with water. misted the shit out of it with distilled to get the humidity up afterwards the ladybugs were having a field day on all the water fleeing spider mites. see video
Likes
46
Share

@valiotoro
Follow
The smell on this one is next-level for real!
I got 2–3 different phenos, but they all carry that same loud scent I’d describe it as sweet and fruity
I honestly can’t wait to smoke it, and judging by the insane layer of trichomes she’s rocking, I already know she’s gonna hit hard.😝😝

Likes
51
Share


@cheetah844
Follow
Still growing leaves nicely. She's already looking beautiful, I think this is going to be a pretty girl.
I've had several different GSC flowers and they've all hit a little differently, I'm interested to see how this one will hit - granted she gives me flower.

Likes
13
Share


@StoneyMelony
Follow
I liked growing this strain very much, it was very easy growing and everything worked out nice, I like the structure of this plant the node spaces are not so big and everything filled in nicely when she was flowering. The fastbuds zkittelz has giant huge buds they where one of the biggest buds i grow on auto's. It was a plesure to see em getting bigger and bigger. I found that the plant was very forgiving as in mistakes you make, so i recomend this to every grower out there. They only thing is it takes a little bit longer then they advertise. But then again maybe the company's are giving you the most early time you can harvest if you do everything as perfect as you can. I think you cannot do much more perfect as you have a plant that grow as big as this one. So that being said i think if you let em go for 2 weeks more then in the last 2 weeks the buds are really fattening up and they double in size sometimes. In the end i had some foxtails on my buds, not all of them but still a few, I was thinking about it, and maybe it is because i pushed her a little bit too much in the end with the nutrients, She was not that close to the lights i think. Or maybe it is also a little bit in the strain. I definitely grow this strain again.
(no rights to the music in the video)
Likes
167
Share


@PapaNugs
Follow
An exciting week here training this girl. Was spacing her out throughout the week using the low stress ties. You can see all of them pulling her out. Idk what to do with the middle ones. I've tried those before but they kinda stunt for me.
Watering every other day right now. And I know, I've gotta defoliate her. I'll do that when I lollipop mid week. Having said that, there won't be much this run as I trained while in flower.
At 100% power
Here are the lights details:
Medic Grow Mini Sun-2 150W LED
Model: MN150-022
Spectrum mode: V1
Efficacy: 2.8 umol/J
Thanks for stopping by!
You can find the light on Grow Diaries:
https://growdiaries.com/grow-lights/medic-grow/mini-sun-2-150-watts
You can find the light on Medic Grow's website:
https://medicgrow.com/

Likes
23
Share


@420DeepGrow
Follow
Toda esta fantasía se hace realidad gracias a Royal Queen Seeds y @James por confiar en mí. 🚀💥
Fiel a su linaje genético, la Hyperion F1 ofrece un aroma intenso que está dominado por notas frescas de pino y hierba, junto con un trasfondo terroso y un delicioso toque especiado. Aunque todos nuestros híbridos F1 producen excelentes concentraciones de cannabinoides y terpenos, no hay duda de que la Hyperion destaca entre el resto. Sus cogollos alargados y escarchados producen una resina rica y cargada de cannabinoides (sobre todo THC), y terpenos como mirceno, ocimeno, farneseno, terpinoleno, cariofileno y humuleno. Esto no solo da lugar a un aroma muy fuerte, sino también a un efecto bien equilibrado que combina una relajación física (en gran parte gracias al mirceno y al farneseno) con la euforia, risa y efecto motivador de otros terpenos. Al igual que el dios de la luz del mismo nombre, la Hyperion F1 causa un subidón esclarecedor que se puede disfrutar a cualquier hora del día.
🌻🚀 Consigue aqui tus semillas:
https://www.royalqueenseeds.es/semillas-de-marihuana-hibridas-f1/622-hyperion-f1.html
🍣🍦🌴 Xpert Nutrients es una empresa especializada en la producción y comercialización de fertilizantes líquidos y tierras, que garantizan excelentes cosechas y un crecimiento activo para sus plantas durante todas las fases de cultivo.
Consigue aqui tus Nutrientes:
https://xpertnutrients.com/es/shop/
📆 Semana 9:
Gran semana, la planta parece que ha terminado de crecer y centra toda su energía en desarrollar los futuros cogollos, los erizos 🦔 son apreciables.
@xpertnutrients está haciendo un buen trabajo, ella consume algo de sus recursos lentamente como a mi me gusta .
Vienen lluvias 😡


Likes
18
Share


@Grower_Of_Persia
Follow
my dry and cure style is this:
4 days of hanging upside down to get water activity lower to around 0.6 in 50% humidity and 26 C temp (i know its a little high but we are in a hot summer right now and i cant get it lower even with air conditioner) and then after 4 days of drying i remove leaves and stalks, trim buds and move them to jar for the rest of their life :D . and in the first 4 days of curing i open the jar door and let hem get some fresh air in the jar for about 5 minutes and close the jar door again, after 4 days of curing like that buds are smokable but they will get better as they getting cured about 1 month.
buds are one of the hardest as fucking rocks type of buds! very dense , compact , sticky , smelly , amazing at every aspect
growing stage was 56 days and flowering stage was 75 days total (harvested tops at day 64th)
the total weight of dry buds was : (plant #1 & #3 top buds 56 G + lower buds 22 G ) 78 G + (plant #2 top buds 47 G + lower buds 18 G ) 55 G + (plant #4 top buds 120 G + lower buds 67 G ) 187 G = 367 G

Likes
6
Share


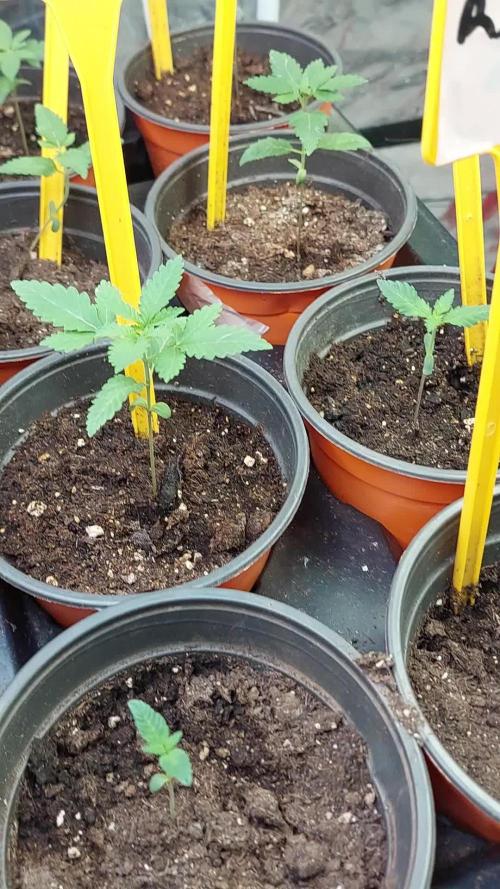
@organicman
Follow
6 plants temporary moving out to the new room until new seeds arrive
4 days later:
9 more (all) plants moving out to the new room
____________________________________________
light- and watering schedule: see photos
now:
15 plants
3 x Auto Orange Bud > Dutch Passion (early80's)
1 x Haze Berry Automatic > Royal Queen Seeds (2018)
2 x Auto Euforia > Dutch Passion (late 90's)
2 x Auto Bubblegum > TH Seeds (late 80's)
2 x Original Auto BubbleGum > Fast Buds Company (late 80's)
1 x Strawberry Pie Auto > Fast Buds Company
1 x Gorilla Cookies Auto Seed Stockers (2015)
2 x Auto White Widow x Big Bud > Female Seeds
setup + strategy:
18 seeds
3 x Auto Orange Bud > Dutch Passion (early80's)
3 x Haze Berry Automatic > Royal Queen Seeds (2018)
3 x Auto Euforia > Dutch Passion (late 90's)
2 x Auto Bubblegum > TH Seeds (late 80's)
2 x Original Auto BubbleGum > Fast Buds Company (late 80's)
2 x Strawberry Pie Auto > Fast Buds Company
1 x Gorilla Cookies Auto Seed Stockers (2015)
2 x Auto White Widow x Big Bud > Female Seeds
setup:
18 x gronest 2 liter
60 cm x 120 cm x 180 cm (2 x 4) growtent
4 l humidifier
25 watt axial fan
15 watt clip fan
ro-filter
bath room with a 50 watts room fan (-> carbon filter not necessary)
...and a lot of odds and ends.
grow strategy:
max yield by stressing with:
1. tiny shoes (2 l fabric pots standing on 3 plastic rings (4 cm) for max oxygen)
2. tiny growspace (18plants on 0.72 sqm)
3. many strains (8 strains)
4. annoying neighbourhood (mixing old - i.e. bubblegum (late 80's) - with young- i.e. hazeberry (2018) - genetics)
5. no stress by light or food or water
6. unintentionally too much food
plus:
- no lst - no hst - just leaf tucking
- positioning bigger strains (euphoria, orange bud, haze berry) or just bigger phenos on less intense light spots (end of tent + edges)
- music-rotation: 24 hrs reggae (for sativas) - 24 hrs classicals (because it's scientifically proofed) - 24 hrs traditionals from the hindukush region (for the indicas)
max efficiency (min electricity - max yield):
- light: 23 h on - 1 h off
- keeping the distance of 18" (45 cm) and dimming to the right par (lux) - value depending on growing stages (see sheet: beginning 185 par ( 10000 lux/100 watt )/end 340 par ( 18000 lux/175 watt )) => ends up in approx. 170 watts in average over max 15 weeks
temperatur management:
- using approx. max. half of what the lamp can do keeps temperature low:
my tsl 2000 is pulling max. 360 watts of the wall - i need only 175 watts, results in less temperature than using a 175 watts lamp
- adjusting the temperature by using a humidifier outside of tent:
blown in humidity is soaking degrees and is transported out by fan, works much better than doing the same with pure air
summer extreme: no humidifier: 36°C / 35 rh - with humidifier: 29°C / 65 rh
works for 1-2 weeks of real hot summer days, no mould, no signs of stress in two summers
germination:
seeding in waterglass
spraying "basic"-water: ro-water (22 ppm) + calmag to 180 ppm every 4 - 8 hours until sprouted
man versus fungus gnat:
5 days before seeding i'm running the tent with "basic"-watered pots as if there were plants inside - led on, fans on, humidifier on. Fungus gnats coming with the soil might take the chance to come out now for breeding. i'm waiting with a 9 mm rifle. in the past i found 6 gnats in 2 of 8 x 50 l biobizz lightmix bags coming out of the soil. i could eliminate every single gnat successfully ;)
rotating harvest:
the little ones will be harvested completely when ready. at this point only the top branches of the big ones will be cut...and the new (basic-watered) pots of the new grow will move into the tent. 2-3 weeks later the secod half of the big ones will be cut and the second half of the new grow will move in...
nutes:
biobizz / soil: biobizz lightmix
bloom,grow,topmax,activera,algamic
+ aminopower instead of bio heaven (too expensive)
individual feeding schedule/once a week:
veg: 200 - 600 ppm
bloom: 600 - 900 ppm
water:
ro-water with:
veg: 100-150 ppm calmag
bloom: 150 ppm calmag


Likes
4
Share


@CalGonJim
Follow
7/14 MONDAY 428am.
7/15 1140am Tuesday . These are the nutrients and amino acids enzymes I will be using and a new way to use germination station experiment . mesh fits 10 inch planter can be outside tent safe from bugs!!!
7/16 245pm putting her in 4 inch glass cube thing or maybe Bud Cups, or put the rock wolll in the Bud Cup

Likes
33
Share


@Titoff
Follow
Depuis la fin de la semaine 10, j’avais commencé mon rinçage après avoir observé les trichomes à l’aide de différents appareils, microscope de poche vendu dans les Growshops, microscope à fixer sur son smartphone ou encore les lentilles macro de type Apexel lens 2 en 1.... Les lentilles macro m’ont permis de voir de manières assez aisées que ceux-ci étaient pour la plus pars laiteux, j’avais donc pensé que c’était le moment pour moi, d’entreprendre ma période de rinçage. J’avais lu sur différents sites qu’il fallait effectuer 2 semaines de rinçages afin d’éliminé tous trace de nutriments et d’avoir un weed savoureuse. Je pensais donc que le timing était bon et que mes 2 semaines supplémentaires me donneraient les 15 à 20% de trichomes ambrés mais j’arrive à la fin de la première semaine de rinçage et très peu d’ambré. J’ai donc ce weekend redonné un peu d’engrais, car les feuilles sont en pleines sénescences et la maturation des trichomes demande encore un peu de temps. Un peu perdu, pour être honnête, le contrôle de ce jour montre un stress plutôt bénéfique pour les filles qui vont être à nouveaux rincées. Afin de m’aider au mieux, j’ai commandé l’appareil Higrade analyseur de cannabis que je recevrais lundi, je vous donnerais donc plus de détails par la suite mais cet appareil est sensé nous donné de précieuses données quand coupé, taux de THC, carence, maladie bref un gadget qui promet de belle prouesse à voir donc. Cependant après plusieurs recherches, j’ai appris que l’on commençait son rinçage seulement quand les trichomes devenaient ambrés et après 10 jours de rinçages et après on coupe....


Likes
9
Share

@Z420Organics
Follow
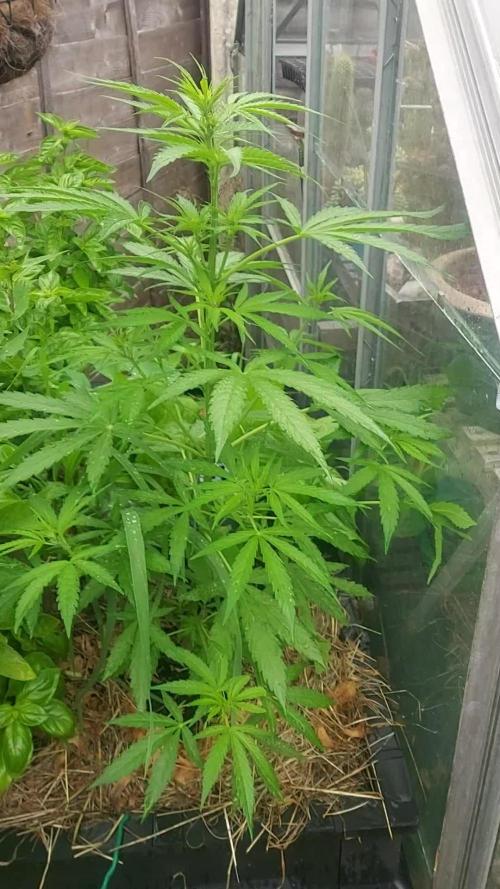
Another Week Down – Things Are Moving Fast!
Wow, another week flew by and we barely noticed! The plants are growing beautifully and developing nicely.
One surprise this week: one of the Monkey Grease plants is definitely not a monkey... it’s a Gorilla Grease! 😄
This one is thriving — strong, fast-growing, and clearly the most vigorous of the whole bunch. It really stands out compared to the others, and we’re excited to see how it continues to develop!
This week we also started light feeding:
One watering with Fish Mix at 1ml/L (around 280 ppm)
Followed by a watering with Alg-A-Mic at the same ratio (around 150 ppm)
Both feedings were well-received, and the girls are loving it so far! 🌱💪

Likes
6
Share


@jahredi
Follow
It’s-a-growing... Not too stoked on how quick the top layer of soil is drying out with the hot weather. Definitely see a decrease in predator mite activity on the surface... hopefully they’re still busy down below. I added straw to help keep the upper layer from drying out...
This decrease in beneficial bug activity could also be from switching to tap water... I did some rain water from my barrel to begin with, but got scared of pathogens because I know crows take lunch breaks on my roof and their scraps definitely means rodents coming in to clean up 😩 The tap water has no chloramide in it, so that’s a good thing. Hopefully my tiny air pump and stones bubbling a 5 gallon bucket for 24 hours gets rid of enough chlorine to keep the micro biological ecosytem in balance 🙏


Likes
35
Share


@MadeInGermany
Follow
Info:
Unfortunately, I had to find out that my account is used for fake pages in social media.
I am only active here on growdiaries.
I am not on facebook instagram twitter etc All accounts except this one are fake.
Have fun with the update.
Hey everyone 😃.
Every day is a joy when I take the lid down and see how the lady comes to life 😊.
She is developing great :-)
It only had to be poured once with 300 ml because it is under the hood with a very high humidity :-).
The hood was sprayed every day.
I think I'll start training this week :-).
Otherwise, as always, the humidifier was refilled and the entire tent was cleaned.
I wish you a lot of fun with the update :-).
Stay healthy 🙏🏻 and let it grow 👍.
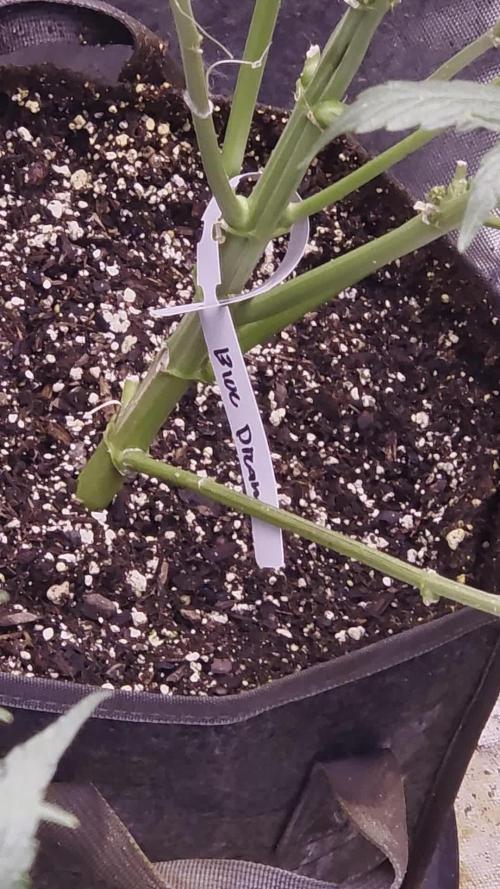
You can buy this Strain at :
https://www.zamnesia.com/de/3271-zamnesia-seeds-blue-dream-feminisiert.html
Type:
Blue Dream
☝️🏼
Genetics:
Blueberry x Haze
20% Indica / 80% Sativa
👍
Vega lamp:
2 x Todogrow Led
Quantum Board 100 W
💡
Bloom Lamp :
2 x Todogrow Led
Cxb 3590 COB 3500 K 205W
💡💡☝️🏼
Soil :
Canna Coco Professional +
☝️🏼
Fertilizer:
Green House Powder Feeding
☝️🏼🌱
Water:
Osmosis water mixed with normal water (24 hours stale that the chlorine evaporates) to 0.2 EC. Add Cal / Mag to 0.4 Ec Ph with Organic Ph - to 5.5 - 5.8 .


Likes
102
Share

@Schnabeldino
Follow
For my first trial run with Grand Cru Genetics, I’m definitely impressed. This strain shows great potential for flavor lovers and will be interesting to run again in the future.
With a little more care and training, she could have achieved more, but she stood in the far corner of the tent and was difficult to reach.
Drying takes place in our Dryomat; delivery of the Dryrocket has been delayed. According to my information, it will not arrive until October...perfect for winter growing.
Photos are wet buds. Once they are dry, the smoke report will follow!!!
See you again in 2-3 weeks 😇😇
Likes
29
Share


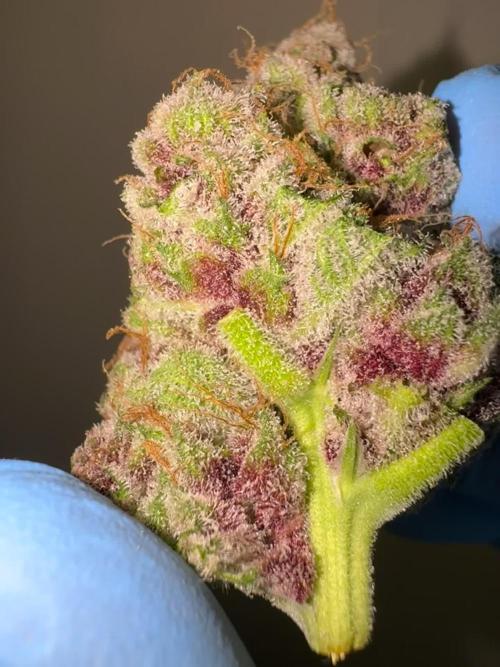
@Lysidious
Follow
Not much crystal on her as yet but the pixies are sprinkling, I’m guesstimating around 9-10 weeks of flower needed.