


Likes
33
Share


@Master_weeda
Follow
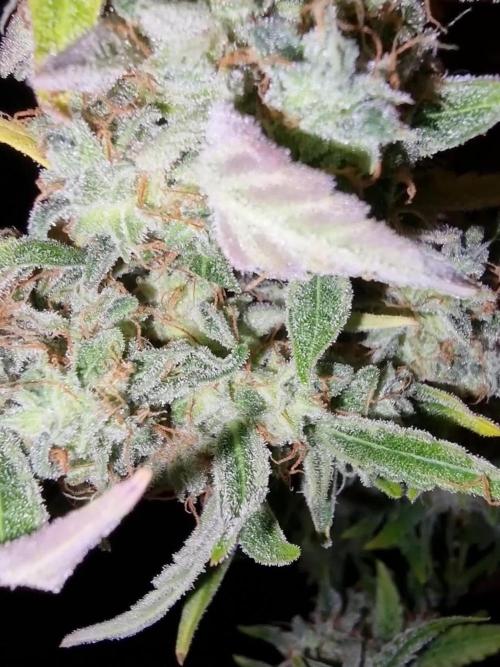
Bonjour à tous les padawans et maîtres jedis
Si vous voulez des buds d'apparence bien givré et "gras" c'est ici les gars.
Les trichomes sont bien laiteux et certains sont ambrés je fini mon rinçage et je procéde à la récolte bientôt
Les bourgeons sont bien purples ils sont vraiment beaux un vrai plaisir à les voir mûrirs
Je me languis la récolte

Likes
11
Share

@LittleBigTrees
Follow
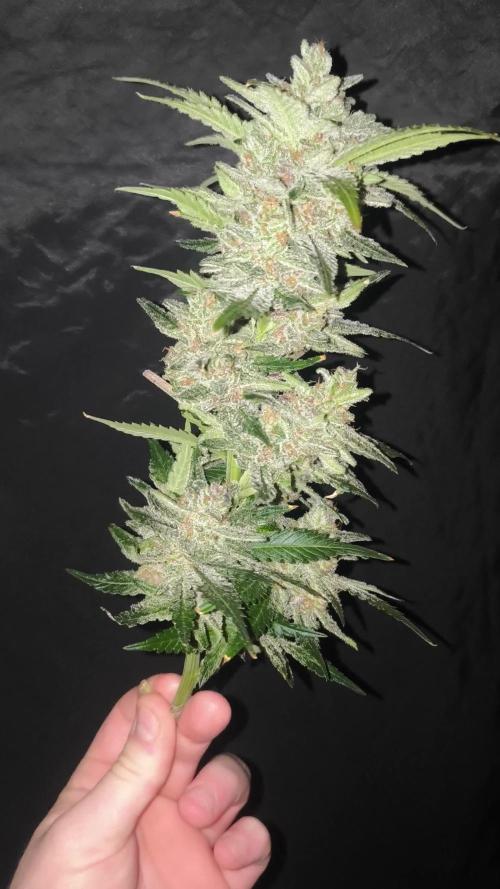
Defoliated then cut down. They are full of autumn colours 😍 after drying they averaged 65-70g per plant, not bad for 1ltr pots.
The high has an old school feel to it, it's very tastey but I don't smell or taste pineapple at all, more a car Polish/strong parsnip smell in the background.
Recommended and after a 2 week cure very strong for an auto.
I will grow again at some point.

Likes
4
Share

@HeavyHittah
Follow
Real easy plant to grow. A dream for LST she takes it very well and will give you a uniform plant. Some real nice looking buds with hints of purple. They are dense too. After a week curing it is a very nice indica with white ash, a relaxing strain that packs a punch.
The yield is average but the buds are high quality. Autos just seem to get better each year.
Next up I will be trying the new and improved Banana purple punch RF3. I also have a strawberry gorilla seed I will use. Going for 4 big XXL yielders next.
I am happy with the yield in total this run but I can improve that.
Final result :
Gorilla Z 130gram
Frostbanger 142 gram total : 272g
300 watts used = 0.91 gram per watt.
Great results
I recommend frostbanger to anyone it's finished in 65 to 70 days grows just like a feminised and it's very easy to train. 10/10 auto genetics.

Likes
22
Share


@donovanliam
Follow
Flowers are coming along nice. Im happy with my new light. Just changed my fertilizer from pre bloom to blooming. Thinking about getting big bud and bud candy.

Processing
Likes
7
Share


@Stonesgrowing
Follow
She's doing so well now. She also got her darkgreen color back. She is also showing her sex (female) on day 9 in flower. Will enjoy to see her fatten up🍁💯


Likes
1
Share


@bms1208
Follow
FIMed her for the last time, continuing to train her throughout.
Nutes will be adjusted to size of pot as well as water.
Just letting her spread her wings and fly 🦅


Likes
30
Share


@XperencdGmanXG
Follow
This girl is stacking so nicely for someone who got very little grow time outdoors before the onset of flower. 2nd generation of shogun I have grown but never smoked, so I still don't know if its any good. LoL Something tells me this one is going to be something special. Lets see.

Likes
5
Share


@Gingercannacat
Follow
Smooth week to be honest. Nothing major to report. Growing green and are stretching well.
Fertilizers.
Plagron: dropping the grow and roots fertilizers. Only feeding bloom, power bud, and vita Race this week.
I hope this smooth ride continues till harvest.

Likes
8
Share


@Dysons12
Follow
I missed last week unfortunately due to a few things going on so there is quite a step up.
****It’s been in flower 9-10 days so far and all bar 3 are flowering nicely please look at the pictures of the plants that just don’t seem to be budding? Are they duds or slow developers? Am I wasting my time or will they start too do you think?****
They are getting tall now and I have had to crank the extraction up a bit. Over the course of next week I am going to put them back into the smaller tents (half in each) with a scrog net to even the canopy out and add support them if they continue to grow taller
Whacked the nutrients right up to near on 1500ppm and so far so good this 2nd week of flower they have shot up.
Watering 5-600ml per 24 hours but to be honest I am going to up that over the coming days to near 800ml as they are almost drying out before I water again. Perhaps twice daily may come sooner than I think

Likes
4
Share


@HeitorLeao
Follow
Will be harvesting Anandamida in the next few days, I placed her inside to protect from the rain


Likes
54
Share

@GERGrowDesigns
Follow
Dear Growers ,
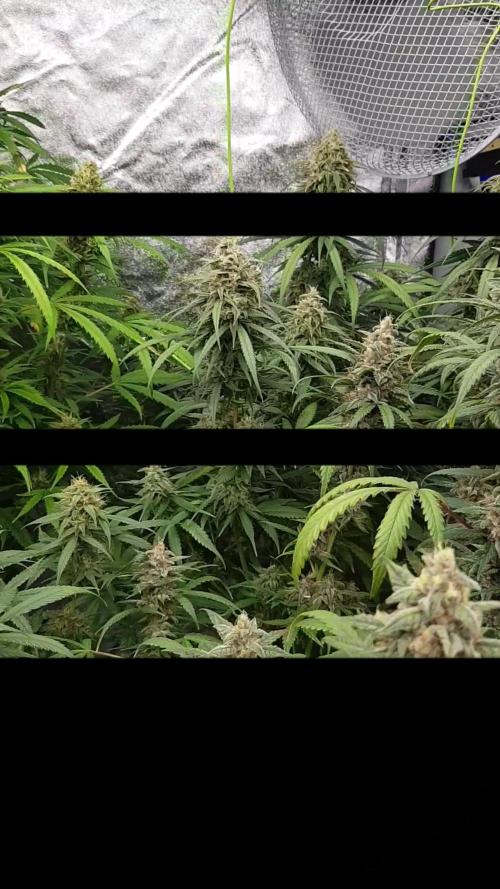
Welcome to Week 9 or Flower week 6 // Day 63-70 from Kannabia Purple Dream Auto .
Incase of Moving to a New Home . I Decided to skip Weeks from every Diarie of the 12x12 Automatic Project . Everything should be Normal in the next Weeks .
Whether you're a beginner or an expert, you are warmly invited to join, ask questions, and share your own experiences along the way!
Project Setup & Conditions:
• Brand/Manufacturer: Kannabia Seeds
• Tent: 222cmx150cmx150cm
• Light: 2x 720 Watt Full Spectrum
• Humidity: 50%
• Soil: Narcos Organix Mix
• Nutrients: Narcos Products
• pH Value: 6
The Pictures Showing Genetic 1 and 2 of Kannabia Purple Dream Auto .
If you want Germinitation results like mine , check out Kannabia Seeds with my link [https://www.kannabia.com/de?ref=61966] and grab the germination device or the strains I used . Trust me – it’s worth it for sure !
Get another 20% Discount at all products using the code [GGD] at the Checkout .
Stay curious and keep up Growing —we look forward to welcoming you back for the next chapter soon!

Likes
9
Share

@420DeepGrow
Follow
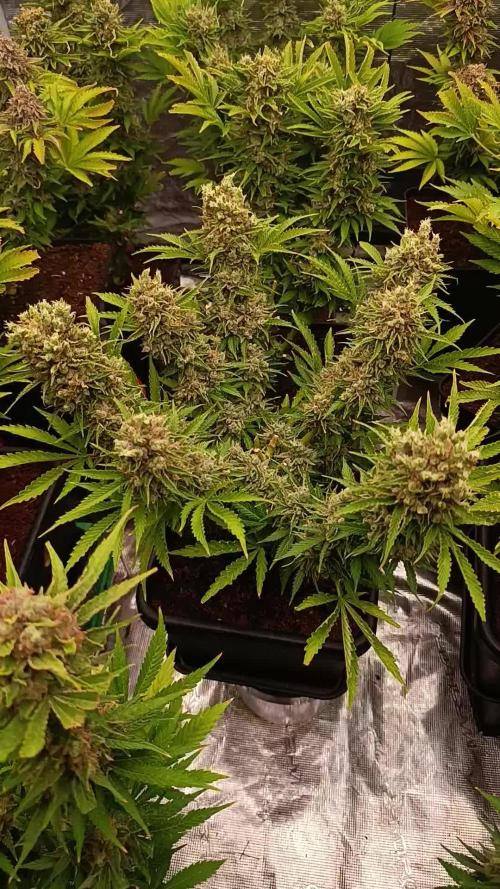
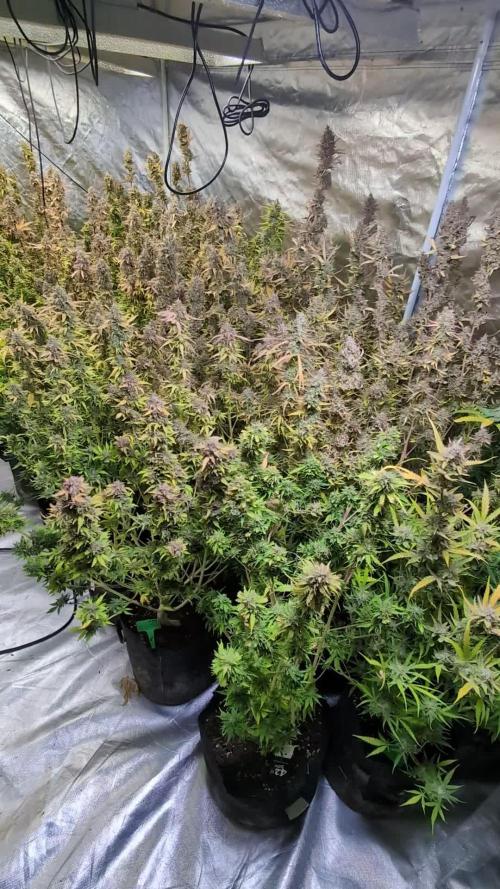
📆 Semana 10
El cultivo entra en su fase final de maduración, con plantas muy cercanas al punto óptimo de corte. Los cogollos se muestran duros, densos y completamente formados, con el peso ya definido en todas las ramas.
La resina alcanza niveles máximos, con tricomas mayoritariamente lechosos y presencia de ámbar empezando a ser más visible, marcando claramente la ventana de corte abierta. Los pistilos continúan oxidándose de forma progresiva, reforzando la maduración avanzada.
La planta reduce su actividad y comienza a consumir reservas internas, provocando un ligero fade en las hojas grandes y una mejora en el perfil final de aroma y terpenos.
Cultivo en recta final, afinando el punto exacto de cosecha.
Seguimos creciendo fuerte 💪!

Likes
2
Share


@bbs42
Follow
Plant is chugging away. Starting cut back on nutes now. Lady buy is a beneficial insect.

Processing
Likes
21
Share


@Daddylongleggz
Follow
Omfg I have missed a Whole month and those four wrks was kinda hard for me. I don't know how in godz name my ph run off has been 5.5 5.2 5.7 shit like that and it has been showing in the ladies.. So as i have always said I Top one plant which is gina And Trina isn't Top. So that has been the biggest problem trying to fix my PH. So please help but i think i have About three to four weeks left. Imma start giving plan water in two weeks
Processing
Likes
7
Share


@Grow420pice
Follow
Hopefully :-)
Barney's Pineapple Express Auto
Week 1
HomeBox 120x90
12.5l Potsize, soil Biobizz light mix
LED 2xGC4 250w, 1x GC-BAR Single 70w, 4x Secret Jardin per 26w (Flowering)
Biobizz nutrients
Likes
6
Share


@DaddyPrime2
Follow
i was surprised that she was done on 2/15/25
spidermites had completely taken over one bud so i decided to check trichomes and she seemed ready.
Likes
6
Share

@smoking_hills9
Follow
Harvested around 1 week ago, slowly drying with around 22° and 60% humidity. N2 the frostiest from the start but no smell at all, another 2 are quite stinky. N3 got some nice colours .I definitely prefer Opium auto.

Likes
17
Share


@kizdog
Follow
Honestly not much to say about the dry and trim, which is definitely a good thing. 12 days hanging in the tent, and the plants were ready to trim. me & the Mrs. absolutely sailed through it. Stores like a dream, and smokes the same. Not a crazy amount of flavour, but the aroma that it has is lime and cream. And the taste is more earthy and spicy. Loving and savouring every bit of it. Sorry I’m very late with this, but I’ve been busy getting my next plants started! You should see them come up soon, as I’m quite behind in my posting. I’m very happy! 🤟💚