


Likes
9
Share


@TheGreenGroomer
Follow
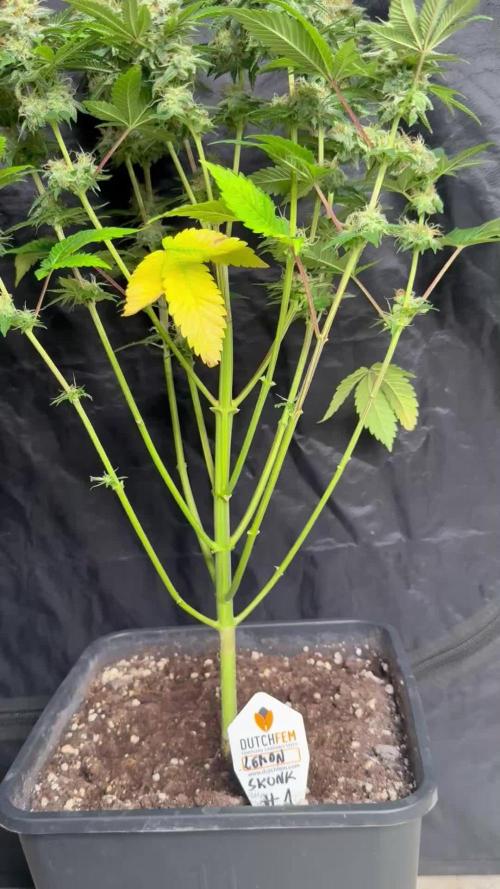
*WEEK 1 DAY 6 OF FLOWER*
Flipped the light to 12/12 6days ago and started scrogging I also gave her quite a huge defol 5days after the switch for better light penetration and airflow, for the first week everday ill be checking on the canopy any tops that are growing too tall compared to others will be trained underneath the scrog net, resulting in even light penetration throughout the whole canopy giving lower buds better light and of course the main reason - keeping the plants small :)
started to implement the boost additives to boost K intake and i have also added a exhale co2 bag above the canopy to hopefully boost the co2 levels and promote faster, better growth!
the deficiency i mentioned in the last week of veg, is not looking to get worse or worsening hmmmm strange effected leaves have been removed and overall she looks great!
i dont wanna get to ahead of myself yet! as we still have a long way to go, but for my first run as from up to know i am pretty happy with myself and the growth of plant, i see so many growers with basic and even really bad deficiencys/diseases from early growth! even throughout there whole growth cycle... yes i have noticed a few weird things throughout the cycle but nothing extreme no NPK deficiencys so i am really pleased with this run! roll on the next ;)
Wish me further look guys, Lets Grow!


Likes
5
Share


@TJHeadley
Follow
RSQ Wedding Cake has just start producing hairs but still not in flower yet. FB Cherry Cola has already started producing some Icy . SS Bruce Banner has an issue going on, I've got mixed reviews on what it could be. Added about 8ml of Athena IPM to the water for that one. Hopefully she snaps back and grows strong


Likes
33
Share


@NuggetPawn
Follow
Howdy,
This week has gone well, plant seems healthy with no noticeable deficiencies. My res leaked because a tube I had in the back was in the wrong place but all is sorted now. Thinking it was a crack in the tub, I drained it... So I had to replenish with a new set of nutes which I'm going to drag out for another 5/6 days.
PPM's are steadily dropping and PH is increasing so shes definitely ready for a richer feed.
Also learned about different TDS with the whole 0.5/0.7 conversion rate.
When topping for the 3rd time, I was a little too rough with one of the colas and it snapped without me realizing. I noticed about 2 hours later by which time it had already dried out a bit, its still alive but the growth is stunted.
Added a bit of PK as I noticed a few fan leaves had purple stems, cleared up within 2 days and back to lime green 🙃🌱
Update 22/08 - Day 30 from Sprout.
Changed out res as PH kept dropping and leaves started to go very slightly yellow. New nodes are already growing well, 3 times bigger than 2 days ago.
I think I'm going to flip on or around the 6th of September, which means a total of 45 days veg, or 6 and a half weeks. Next couple of weeks will just be about pruning lower leaves and some HST/LST. Might get a scrog net, tried using a tomato hoop but the one I have is shit...
Going well so far anyway!

Likes
20
Share


@NOLOGIK
Follow
1/8 prepare Easy combo bloom:
hello then this day I prepared the easy combo bloom of the royal in 6 liters of water with controlled ph, this nutrients make the flowers become big, among other things this will be like a booster! on i bud
30/07/2019
I can say that this strain drinks! in fact, he drinks a lot and the nutrients don't seem to bother even at higher doses ...
has anyone noticed the same?
17/06
if you have seen the diary from the beginning you have understood that the counting of the weeks starts when I put the seed to sprout ....
Likes
9
Share


@Goldbud
Follow
6 cm in the first week flowering not bad it's getting bether. I Have defoliated in the basement giving her more Fresh air under the skirt! For the stretch phase added some molasses Orgatrex together with Bactrex.

Likes
81
Share


@JuanHaze_Arg
Follow
Las flores más lindas del condado son las de strawberry banana, que hermosa genética! Perdón por no cuidarla y alimentarla como correspondía
27/04 Se riega con 2.5 litros de agua + calmag + top auto. PH:5.5 EC:0.9
29/04 encontré una placa de saltahojas del mismo color que los tallos, por este motivo fue muy difícil darme cuenta. Se estaban chupando la sabia de mi planta, al menos 6 capture con mis dedos.
30/04 se riega con 2,5 L de agua + Monster Bloom 0.1g x L. PH:6.2 EC 0.8
Likes
21
Share


@Staffedition
Follow
Привет друзья. Моей растихе сегодня 129 дней
Сегодня температура упала до +8°
Замёрзла моя девочка((
Буду делать сверху водяное отопление) а то так дело не пойдёт зимой)
20.10 перевёл свет в режим 12/12
Начал применять LST технику на 19 дне, а 18 августа добавил ДЕФОЛИЗАЦИЮ
С 20.08 ДЕФОЛИЗАЦИЮ делаю каждые 3,4 дня
С 20.08 LST технику делаю каждые 4.6 дней
На сегодняшний день влажность 54%
5.09.2023 заметил высокий Ph 7.9
С 48 дня Ph не ниже 5.8
На сегодняшний день Ph 6.0
Начал кормить с 60 дня Canna Terra Vega
PPM 870
Всем мира и добра!
Не забудь поставить лайк❤️, если понравилась как прошла неделя
И читайте наш TELEGRAM: https://t.me/smail_seeds
#Smail_Seeds 😀
Likes
28
Share


@Felloffthegrid420
Follow
So it’s been hot and dry storm came throw didn’t seem bother any of the feed some blood meal and bone mean and the same stuff I use lee do it smell o so sweet can’t wait

Likes
77
Share


@Ukfarmer420
Follow
Light = bloomplus bp2500 250watt actuall draw.
Exhaust is a ac infinity 6inch with digital controller
Inkbird humidity controller with a ram 5l humidifier. Veg only!
Soil= biobizz light mix
Nutes= biobizz using the 10 week schedule at half dose this run.
Heaven =2ml avti vera=2ml
Topmax =1ml bloom = 1 calmag=2ml
Grow=1ml
All nutes mixed to 1l of water
Ph= 6.4
Room humidity is 60%
Day Temp is 25°c
So entering week 3 and the girls are growing fast, gelatocake are putting out pistils to show there sex.
The sherbert mimosa are still growing strong and I will bend them and tie them down today.
Happy growing guys 👌💪💚

Likes
13
Share


@tresplantes
Follow
Smell is Even more amazing now al swellin up pretty good
Bluezy has a lil lighter bud structure for now but started swellin up just now
Dantes Inferno has already some good nuggs
Tomb Rider is really headbound and a lil too close to the lamp
Starting to lower the EC from 3 to 2.5
Starting With fade 2 days earlier than planed will give them a 5 day flush instead of 3

Likes
10
Share


@Lodzik
Follow
Maybe next week a 14-day flush will begin. The G13 smells very interesting ;).
Likes
248
Share


@Ju_Bps
Follow
Hello my friends 👨🌾👩🌾,
The Banana Purple Punch 🍌🍌🍌💜💜💜🥊🥊🥊looking good, preflowering stage.
Week wasn't really well, I had several issues,
I've founded silver on the leaves, so I've make a treatment for the thrips.
This end week while my training, I've broken the main stem,
And now I'm again in GD Jail, so I can't reply you my friend.
I've given
1 l water + rhizo + canna tera
1 l water + cannazym
PH@6
Lamp @75% and 50 cm above the canope.
I hope next week will be better 🤞🤞
See you next week and have a good week end my friends 🔥👨🌾👩🌾
Thank to Mars Hydro and @marshydrococo2 for sponsoring the FC3000 ❤️❤️, as well as @Fast_Buds for sponsoring the Seeds ❤️❤️
If you want a litle discount on your Mars Hydro order, add this coupon to your cart,
"Ju_Bps"
Thanks community for follow, likes, comments, always a pleasure 👩🌾👨🌾❤️🌲
Mars Hydro - FC3000
https://www.mars-hydro.com/fc-3000-samsung-lm301b-led-grow-light
42 Fast Buds - BANANA PURPLE PUNCH🍌🌲
https://2fast4buds.com/seeds/banana-purple-punch-auto
Likes
8
Share


@NoProbation4Weed
Follow
Very Nice looking and good Smelling Plant. Buds after Trim are medium dense but very tasty.
Flavourwise it goes into ripe Berrys with a hint of Citrus and Soapyness in the background.
The Plant looks exactly like on the pictures High-Giraffe-Seeds shows on their website.
All in all definetly a recommendable Plant to grow.
Likes
3
Share


@Dash58
Follow
1.4. Buds fatening up, looking good. 34DLI
8.4. Had some problems around, not with plants. I have to discard them, it’s tearing my hearth but it’s what it is.

Likes
2
Share


@TheBudWhisperer
Follow
Week 4’s in the box and these plants are lightning quick outta veg. We’ve confirmed the presence of at least 3 males and 1 guaranteed female so far. They’ve all started to hit vegetative maturity in full stride so it won’t be long until we look to flip. A couple have been topped once more for the sake of additional colas and if we get lucky, the remaining females may be suitable for a scrog. Either way, can’t be much happier about how well they’re growing at this stage. Here’s hoping it remains so through flower🤞.
***Notes: strongest plant to this week is first confirmed female. Prob a prime candidate for cuts and back pollination with the F1 pollen dump.***
Likes
8
Share


@Budhunter
Follow
As I stated before this is my mutant plant hehehhe.. looks like buds are fattening up a bit and more light penetrating in the colas.. she seems to be growing.. happy days
Likes
12
Share


@Zoe_Spacecake
Follow
Primera experiencia de scrog y no estoy muy satisfecho. Las plantas han tenido un estres y han madurado más rápido de lo normal. El resultado son cogollos pequeños.
La calidad parece igual. Supongo que ha tocar demasiado las ramas para controlarla con la red es la origen del estres.
Era un experimento de defoliación. Lo he hecho en varias plantas para comparar. Es un desastre, vale mejor no tocar las hojas salvo en ciertos casos.
Likes
3
Share

@Drobubba
Follow
Week 16 Day 56F see ya! The ladies are thriving and almost ready for me to unalive them 😆. I think ill let them go another week or two. Earlier this week i pull my garlic budder out of the race due several reason i am not up for writing about. The little cunt gave me problems from jump street. I thought she'd pull through but never really seam to recalibrate and earn her keep like the others despite the stress they endured. No harm no foul. Grow grow gadget!!!

Likes
116
Share


@Kitties_and_Colas
Follow
~_~_~_~_~_~_~_~_~_~_~_~_~_~_~_~_~_~_~_~_~_~_~_~_~_~_~_~_~_~_~_~_~_~_~_~_~_~_~_~_~_~_~_~_~_~_~_~_~_~_~_~_~_~_~_~_~_~_~_~_~_~_~_~_~_~_~_~_~_~_~_~_~_~_~_~_~_~_~_~_~_~_~_
😺💡🌱 Start week 4!! Plants seem good but 2 are still looking a little hungry,.. there was little change in their color 3-4 days after their last feeding so we fed them again but set PH to 6.5 this time to see if this helps them take it., we also gave 2ml/gal bloom solution to all plants..these seem a little on the small side but we've had a few auto strains start out this way before, i guess time will tell! 😺👌...The MarsHydro is running super cool in that tent, temps have looked great since fixing the timer issue..we'll be sure to update again midweek..thanks for stopping by and happy harvests everyone!! ❤️❤️❤️
⚡Mars Hydro/SP-3000⚡ Specifications ⚙️:
Diodes: Samsung LM301B / Osram 660nm (960 total!)
Driver: Meanwell 300watt 🔌 (300W±5% @AC120V-277V)
PPF: 824umol/S ☢️
PPE: 2.8 µmol/j 〰️〰️
Lifespan: >50k hrs ⌛
Veg Coverage: 3 x 5 ft 🌱
Flowering Coverage: 2 x 4 ft 🌼
Weight: 10.1 lbs (4.6kg)
-The SP-3000 uses an aluminum heatsink (no fan) and the driver can be placed outside the tent 🌡️⬇️
-IP65 waterproof ratings, tolerant to high humidity grow environments 💦 ..
-Up to 30 can be daisy-chained together and all controlled from a single light!
💡~💡~💡~💡~💡
~_~_~_~_~_~_~_~_~_~_~_~_~_~_~_~_~_~_~_~_~_~_~_~_~_~_~_~_~_~_~_~_~_~_~_~_~_~_~_~_~_~_~_~_~_~_~_~_~_~_~_~_~_~_~_~_~_~_~_~_~_~_~_~_~_~_~_~_~_~_~_~_~_~_~_~_~_~_~_~_~_~_~
11/9/21
😺 We moved the MarsHydro again to approx 18inches, I think this is the sweet spot, all the girls are praying again..I found a PAR chart done by a different grower at 19inches using the SP-3000 and numbers are incredible (I included a pic if his results)...we've been giving all plants 2ml/gal grow solution with every watering, i know its trace but I've overfed way too many autos and just assume play it safe..one of the autos is further along than the rest and she's now showing a little calcium deficiency, we added 3ml/gal calmag with her last feeding and will just monitor for now..thanks for reading my novel lol and happy harvests everyone!!! 😽 💨
~_~_~_~_~_~_~_~_~_~_~_~_~_~_~_~_~_~_~_~_~_~_~_~_~_~_~_~_~_~_~_~_~_~_~_~_~_~_~_~_~_~_~_~_~_~_~_~_~_~_~_~_~_~_~_~_~_~_~_~_~_~_~_~_~_~_~_~_~_~_~_~_~_~_~_~_~_~_~_~_~_~_~
