
Likes
Comments
Share


@Mo_Powers
Follow
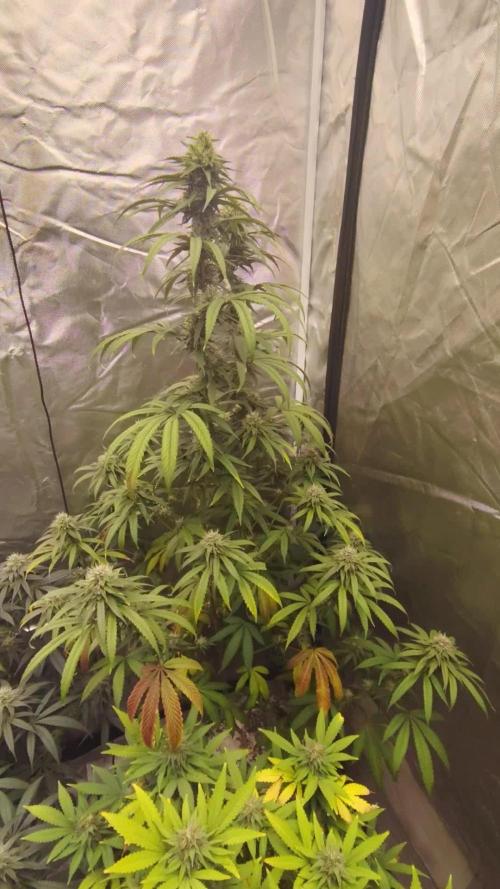
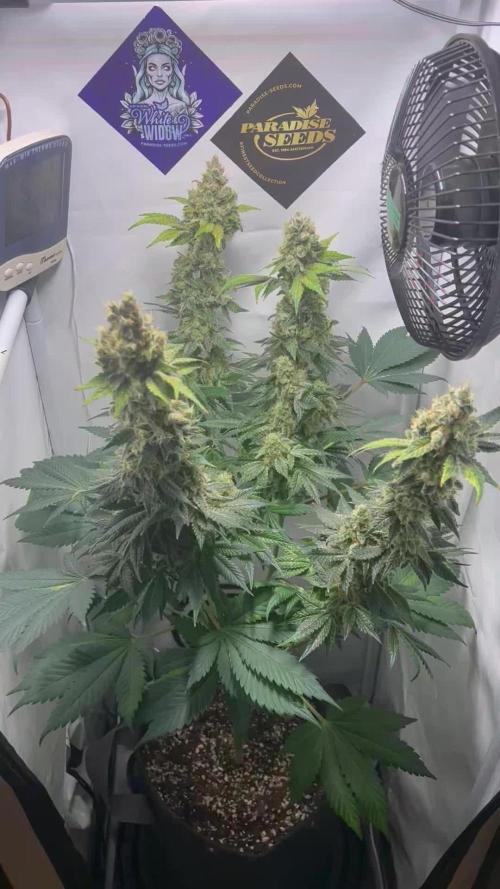
i was on holiday for 14 days and left the plant to its own (AUTOPOT takes care of that) and when i came home i was amazed. it tolerated the topping very well and is now twice as tall as it was two weeks ago. i topped it again straight away. so 4 times in total this time. if it continues to grow like this, it will be a monster in october. a few leaves are already bigger than my hand. unfortunately i broke one stem with light LST, which is why i'm not using the LST after all. i hope it recovers from the injury. 😵💪

Likes
4
Share

@CBDLord
Follow
K.imagasló hozammal sikerült letermeszteni az autómata növényeket. Semmilyen betegség vagy kártékony élőlénytől mentes volt a teljes növelési ciklus alatt.,


Likes
Comments
Share


Likes
45
Share


@GreenHouseLab
Follow
Big shout out to @wicked_stix for these. Frosty Frosty Frosty Sweet Smells last water, 48hrs darkness - Chop.


Likes
25
Share


@Sators
Follow
Keep watering with same nutrients mix, because I had add before to soil some extra worm castings, palm tree ash, bat guano and egg shells.
Day 24. keep doing all the same feeding with 2.5L nutrients mix.


Likes
Comments
Share


@Chamed33
Follow
She stretched out double her size in the past few days and looking great so far .. no nutrients deficiency till now

Processing
Likes
37
Share


@Mr_Motalovah
Follow
Hello growers and tokers! 👋 👩🌾 🧑🌾.🔥💨
If you've read the other diaries you might have seen that it's been a great week! 😃
Finally got my new lights installed in the tent, they're working as advertised and the ladies are proof of it.
Amazing overall growth noticed this week in all the strains, this one included.
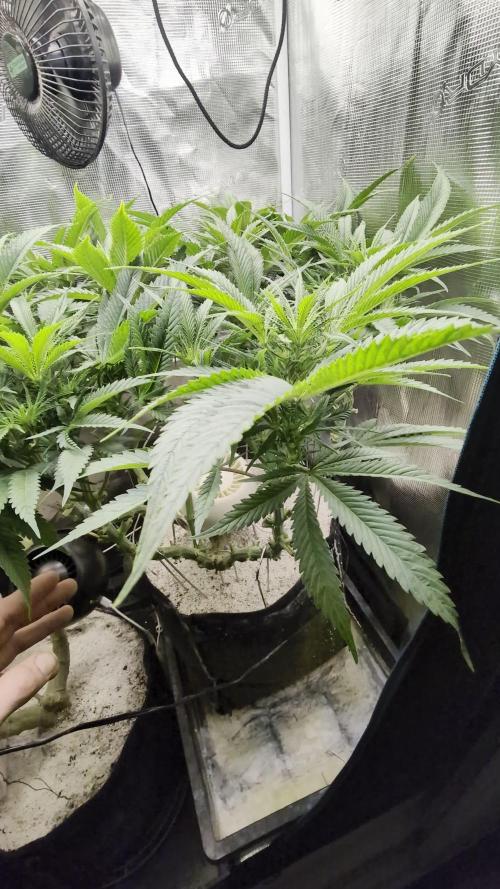
New growth sites are coming out, she looks to be a fast grower.
Stay posted to find out.
Hope you all have a great week! Happy Growing! 😃

Likes
39
Share


@Belverde
Follow
Hello guys😊.. Final week with this two beautiful PEYOTE CRITICAL❤️😪🤗...
very good strain, for now..
The smell is intense...kushy definitely..but with some other notes.. Trichomes was super milky and, at list, 10% ambra..
The leafs still a little bit green, for my usual harwest time.. sometimes this happens with some genetics...but the final product always beeing clean and super tasty... But honestly, the one Peyote C. in the other diary, with S.Soil , was much more light green leafs and purple..
I don't know.. We will to see it.. Anyway... Next time.. Harwest day😎..
See you in 5/7 days..
Thank you so much for reading 🙏...
Hope you enjoy..
bye ✌️


Likes
3
Share

@kdifiori_
Follow
Week seven and this beauty continues to grow. This week it drank 2 L and I slowly started adding Overdrive to the magic mixture. Let's see what happens next week!
Likes
29
Share


@Spliffing_Around
Follow
I fudged up one pot , when lifting it the down part popped and root parts went away. The plant already had his main branch broken and is still hanging.
Please advice on the deficiencies of the biggest plant.
What other nutrients can I add here ? I have humic acid in little pallets.
Dutch pro bloom is coming on it’s way, I’m still watering with hand distributed nutes that could have the emblems “A”+”B” mixed up. To everyone telling that it brings a big issues to the company - no - it’s just a dude most of the time buying bulk amounts and selling per liter, having the original packaging on the bottle glued up.
Anyway, any advice is appreciated.

Likes
2
Share


@MrWeeedWorld
Follow
🍋 Drei Pflanzen. Ein Ziel. Eine Krone.
Diese Woche zeigt mein wohl ungewöhnlichstes Outdoor-Projekt seine ganze Schönheit. Anstatt drei Pflanzen unabhängig wachsen zu lassen, habe ich sie von Anfang an so trainiert, dass sie wie eine einzige große Pflanze zusammenarbeiten.
Mittlerweile verschwimmen die Grenzen immer mehr. Die drei Wurzelsysteme versorgen gemeinsam eine große, offene Krone voller Triebe und Budsites. Genau das war das Ziel dieses Experiments.
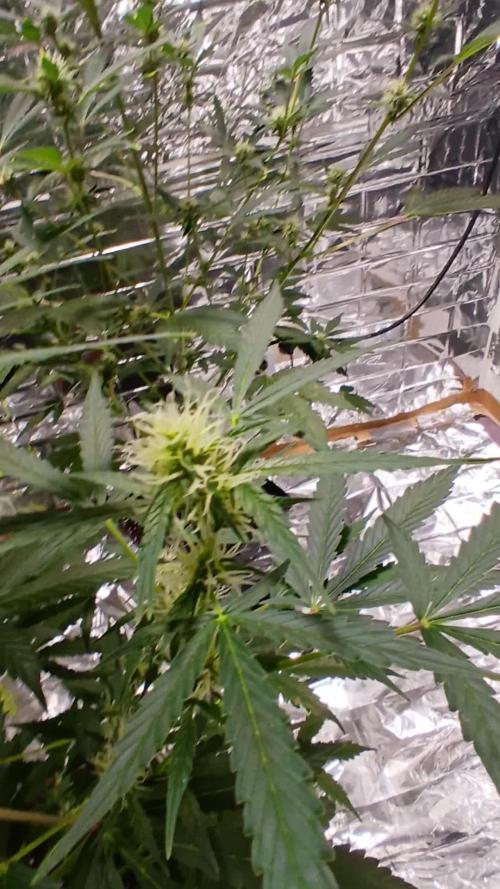
Trotz mehrerer Regentage entwickeln sich die Lemon Cherry Cookies fantastisch. Die Pflanzen stehen kräftig da, zeigen sattgrünes Laub und produzieren inzwischen an nahezu jedem Trieb frische weiße Blütenstempel. Die ersten Buds beginnen sichtbar an Volumen zuzulegen und die Struktur verspricht eine hervorragende Lichtverteilung bis tief ins Innere.
Besonders gefällt mir, wie unterschiedlich die drei Pflanzen wachsen und sich trotzdem perfekt ergänzen. Eine übernimmt die Hauptcola, während die anderen die Seiten mit unzähligen zusätzlichen Blütenständen füllen. Zusammen entsteht eine natürliche "Superpflanze", die ich so vorher noch nie kultiviert habe.
Mit jeder Woche wird dieses Projekt spannender. Wenn das Wetter in den kommenden Wochen mitspielt, könnte diese Kombination aus drei Fast Buds Lemon Cherry Cookies noch für eine echte Überraschung sorgen.
Vielen Dank an Fast Buds für diese fantastische Genetik und die Möglichkeit, mit solchen außergewöhnlichen Ideen am Outdoor Contest teilzunehmen. 💚🍋
--------------------------------------------------------------------------------------------------------------------------------------------------------------------
🍋 Three plants. One vision. One canopy.
This has become one of the most exciting outdoor projects I've ever grown.
Instead of letting the three Lemon Cherry Cookies grow individually, I trained them from the beginning to behave like one single plant. Week after week the borders between them disappear a little more, creating one large shared canopy supported by three independent root systems.
Even after several rainy days, the ladies remain healthy and vigorous. Rich green foliage, strong branching and fresh white pistils are appearing everywhere. Bud development is accelerating nicely and almost every branch is now stacking flowers.
What fascinates me most is how each plant contributes differently to the final structure. One dominates the central cola while the others perfectly fill the sides, creating dozens of additional flowering sites. Together they form one balanced "super plant" that captures light from every angle.
This experiment is becoming more exciting every week. If the weather stays on our side, these three Lemon Cherry Cookies could become something truly special before harvest.
A huge thank you to Fast Buds for providing such incredible genetics and for making projects like this possible in the Outdoor Contest. 💚🍋🍒
Likes
9
Share


@Alejangrow
Follow
Thanks for checking out my grow. 😉👍🏼
Feel free to check out my others, and follow along for more to come. 🌿🌺
Likes
54
Share


@PointNShoot
Follow
Week 7 of flower 🌸
Day 126: watered
Day 127:
Day 128: watered
Day 129:
Day 130: fed
Day 131:
Day 132: watered
This week has gone without any issues; which is a nice change lol, RH is stead at 50 during the day and up to 55 at night.
Debating wether to start 2 weeks flush now and ride it out or push these ladies a few more weeks 🤔
Colas Getting nice and fat tho, a sweet sweaty stink.

Likes
71
Share


@xmackobox
Follow
Hola que tal? yo me he levantado en domingo a las 08:30 me he tomado un café y me pegado un bongazo de aúpa jaja después, musica y hacerles una sesión de fotos a las plantitas 😇👌🏽
Pues hoy es el último día de la 7ª semana de floración, veo a 3-4 plantas listas para cosecha. Esta semana en los directos de twitch usaremos la lupa para ver el punto de maduracion de los tricomas.
Deciros que estoy muy sorprendido con las Harlequin CBD ya que están sacando unas porras muy interesantes con aromas súper inciensados, son plantas mega compactas ideales para espacios pequeños y súper productivas!! vaya tela! Una de ellas está súper oscura y tiene mitad planta color verde mitad morada/negra de locos.
Sobre las mimosa pues más de lo mismo, más resina, más cogollos, más aroma y plantas muy fáciles de llevar sinceramente... Los colores morados rojizos y naranjas que están sacando me encantan
Que deciros de la Mimosa GB que mutó y desarrolló Fasciacion en una de sus ramas satélite. Da cierto miedo ver el cogollo parece que me vaya a engullir jjajjjaja
90 dias desde que se empezaron a germinar son semillas de gbstrains bajo los leds de gblightning y abonadas con boom nutrients todo gracias a @gbthegreenbrand @growbarato

Likes
145
Share

@yan402
Follow
🌸🍊✨🍭🌸🍊✨🍭🌸🍊✨🍭🌸
Back at it with Kannabia — huge thanks for the NEW EXCLUSIVE Upcoming Kannabia's seed Launch 🙏🍨🍊
Grateful for the trust and for everyone following along, I’ll run her clean and showcase what she can do.
Dessert-party goals: berry–citrus sherbet terps, creamy finish, tight stacks, easy trim, zero drama.
Veg 24/0, clean manifold + LST, flip on a happy, even canopy.
Coco’s fresh, seed goes in now. 🚀
Added on 12.10.2025
🌞 Light conditions: Limited direct light for the first 4 weeks — ~4 h/day on weekdays and ~10–11 h on weekends due to tent sharing and work schedule.
🌸🍊✨🍭🌸🍊✨🍭🌸🍊✨🍭🌸
💭❗💭❗💭❗💭❗💭❗💭❗💭
❗Events & thoughts worth noting❗
💭❗💭❗💭❗💭❗💭❗💭❗💭
10.08.25 GW1 Sowed seed, soaked starter pot with #1
12.08.25 GW1 Seed popped hip hip hurray
28.08.25 VW2 Stopped using GreenBuzzBloom, took it out of the schedule.
01.09.25 VW3 TriPartMicro 10→30ml, TriPart bloom 10→30ml
12.09.25 VW4 Applied nemadodes against thrips and fungus gnats.
20.09.25 VW6 topped and trained for first time, decided against a full manifold as I lost a few weeks already.
26.09.25 VW7 Topped her one more time for 8 mains
27.09.25 VW7 Topped up the pot with perlite instead of clay pebbles this time, just trying things out, TriPartMicro 30→40ml , TriPartBloom 30→20ml
10.10.25 VW9 have her a haircut, umm be trimming the side shoots tomorrow, rest in the video 📹
12.10.25 VW9 done some extra trimming to clean up a bit and chose two extra side shoots to nurture info mains, so kept the 8 original mains plus 2 rest in the video 📹
17.10.25 VW9 FfJ/fpj fish mix 30 → 60 ml
20.10.25 VW10 Feed tweak: added 3 g Calcium Nitrate/ 30 L (≈ 15 ppm N + 10 ppm Ca)
24.10.25 VW11 did a defoliation and trimming session 📹
27.10.25 VW11 Epsom Salt 0 → 2.5, Calcium Nitrate 3 → 9 g
01.11.25 VW12 CalMag 60 → 30ml, TriPartBloom 20 → 30ml, Magnesium 2.5 → 3.5g
02.11.25 VW12 Did a cleanup in preparation for flowering, rest in the video 📸
13.12.25 VW13 Did another cleanup in the tent 🎥, also switched to the FERMAKOR PK Micro schedule,(I'll update later)
🌱💦🌱💦🌱💦🌱💦🌱💦🌱
🌿 Day to day tasks & actions 🌿
🌱💦🌱💦🌱💦🌱💦🌱💦🌱
14.11.25 VW13 – Fed 5l of FERMAKOR PK → 2l runoff
15.11.25 FW1 – Fed 5l of #1 → 2l runoff
16.11.25 FW1 – Fed 5l of #1 → 2l runoff
(*RUNOFF reused for tomato plants)
💧💦💧💦💧💦💧💦💧
💧 Nutrients in 30 L #1 💧
💧💦💧💦💧💦💧💦💧
💧 TriPart Micro: 10 → 30 → 40 ml
= 0.33 → 1.00 → 1.33 ml/L
💧 TriPart Grow: 0 ml
= 0.00 ml/L
💧 TriPart Bloom: 10 → 30 → 20 → 30 ml
= 0.33 → 1.00 → 0.67 → 1.00 ml/L
💧 Cal-Mag: 60 → 30 ml
= 2.00 → 1.00 ml/L
💧 Home-made FFJ/FPJ (new batch): 30 → 60 ml
= 1.00 → 2.00 ml/L
💧 Calcium Nitrate (Calcinit): 3 → 9 g
≈ 15 → 45 ppm N + 20 → 60 ppm Ca
💧 Magnesium (Epsom Salt / MgSO₄·7H₂O): 0 → 2.5 → 3.5 g
≈ 0 → 8–9 → 11–12 ppm Mg
💧 pH Down: Citric acid (BuxXtrade) — adjust to ~ pH 5.8 – 6.0
📦 TOTAL: ≈ 110 → 180 → 170 → 190 ml liquids
+ 3 → 11.5 → 12.5 g solids per 30 L
≈ 5.9 → 6.4 ml/g active mix per L
💧💦💧💦💧💦💧💦💧
⚙️✂️⚙️✂️⚙️✂️⚙️✂️⚙️
✂️ Tools & equipment ✂️
⚙️✂️⚙️✂️⚙️✂️⚙️✂️⚙️
✂️ 2× MarsHydro SP3000
⚙️ MarsHydro 150mm ACF Ventilator
✂️ Trotec dehumidifier (big unit)
⚙️ Mini no-name dehumidifier
✂️ Kebab skewers (LST – stainless)
⚙️ Wire + roast skewers (LST assist)
✂️ Scissors (HST)
⚙️ Vacuum (for spills & cleanup)
✂️⚙️✂️⚙️✂️⚙️⚙️✂️⚙️✂️⚙️✂️⚙️
---
🍊🍧🌬️🍬🍊🍧🌬️🍬🍊🍧🌬️🍬 Mystery seed (Kannabia Seeds) — NEW EXCLUSIVE
🍊🍧🌬️🍬🍊🍧🌬️🍬🍊🍧🌬️🍬
Species: Hybrid (GF / swift-flowering line)
Genetics: TBA (breeder sheet pending)
THC: TBA
Effect: Euphoric, relaxed, creative (target profile)
Flavor: Berry–citrus sherbet, sweet candy, creamy finish
Flowering (indoors): ~6–7 weeks target (GF)
Resistance: High (aim: no drama)
Indoor yield: TBA
Outdoor yield: TBA
Structure: TBA
Notes: Brand-new exclusive from Kannabia’s GF line — I’ll update specs when the breeder card drops. Goal is rich sherbet terps (berry–citrus + cream), low leaf-to-calyx, easy trim. Stage harvest stays on the table if tops finish early.
YouTube Link: https://youtube.com/-m8h?si=A7x4Zlr2kj-_ga31
Likes
13
Share

@Mr_Juice
Follow
Biela vdova - Zimná kráľovná❤️Nepotrebuje žiadne živiny-2 tablety biotabs pridaných na začiatku úplne postačujú, bola dvakrát prihnojená vo fáze kvitnutia, ale nebola spokojná.

Likes
152
Share


@FrenchxFarmer63
Follow
Bonjour à tous !
Une triste nouvelle est arrivé cette semaine , mon premier pied "Black Domina 1" manquais d'azote la semaine dernière , ajout cette semaine , Sur arrosage de ma part.... + attaque d'araignée rouge que je n'avais pas vus.... J'ai donc décider de supprimer ce pied pour ne pas perturbé le reste des autres plantes.......
Après avoir enlever ce pied j'ai donc commencé à traiter les autres ! Avec un vaporisateur contenant de l'eau , du jus de citron et du concentré de savon noir de Marseille , ceux sont des répulsif naturel , à ça je vais arroser ma serre tous les jours pour y garder un taux d'humidité plus élevé car ces bestioles n'aime pas du tout l'humidité , elles prolifères quand il y a des fortes chaleurs sèches !!!
Attention ,
En plus d'avoir augmenter l'humidité dans ma serre , j'ai utiliser un conseil de ma grand mère , oui oui , ma grand mère pour asphyxier les araignée rouge , il serait conseiller de faire brûler du café , l'odeur dégager serait très désagréable pour ces sales bestioles !!! Attention les yeux , ça fume !!!!!!! (désolé pour la mauvaise qualité vidéo)
Mis à part ça le reste de la troupe continue d'avancer , les têtes grossissent et ce dessine de plus en plus , l'odeur et juste incroyable... ET je continue de palisser les branches !!! 😂 (LST🙌)
Je vous montre mes engrais maisons dans les dernières photos ( Cendre de bois + Marc de café )
Bonne soirée à tous
