
Likes
Comments
Share


@MADMANk
Follow
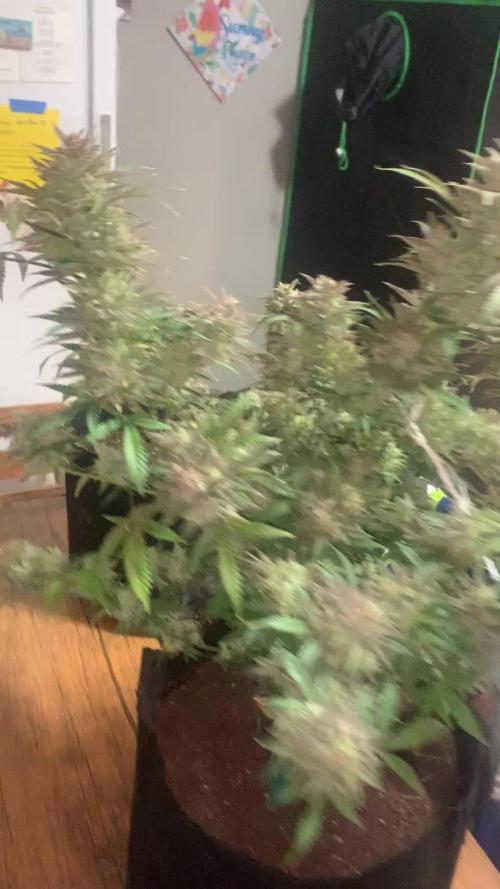
Taken fans off the lower portion of the plant 1-5 every few days or so, currently doing no defoliation and havnt passed 4/5 days.
Terpes- pretty amazed by the fact i smell fresh oranges even now in early flower!
(Seaweed drench once a week)

Likes
2
Share


@High_Grade_Dadli
Follow
Girls are doing well....seed looking like she earning her name..have some cutting off her n am please with the first week of flower....one got super stress n she dont even look like it jus watchin to see how things look later

Processing
Likes
10
Share


@Dunk_Junk
Follow
Day 56 - She grew 9cm this week. She is a large plant, very bushy. Lots of flower sites forming.
Day 56 - Tent configuration changed: 4x more CREE CXB3590's have been added and 4x blurple LED things removed. Lights now consist of 8x CXB3590's & 1x 1000W HID with flower bulb.

Processing
Likes
33
Share


@Eyeduno
Follow
Flush mode of after this week I think this weathers killing it and fucking up my environment


Likes
4
Share


@Naujas
Follow
42 days for my project - "Girl on the balcony on the north side" :) it looks really good, knowing what conditions she has to endure, this week there was not much sun, there was a lot of wind and rain, I used a little LST for the girl, the girl drinks = every other day 1.5 liters of water 6.3 ph, every 3rd watering I give biobizz nutrients :) good luck to everyone :).

Likes
Comments
Share

@NastyNatiBuds513
Follow
Forbidden Runtz Is A Great Addition To The Fast Buds Line Up. Very Colorful And A Treat To Watch Grow 👀
Likes
19
Share


@Comfrey
Follow
Beginning of week 9: Tropicana is 27 cm high and the stem is 38 cm long. Sun is back, rain stopped, happy growing.
Day 57
🌤️⛅️🌤️🌤️ 10-23 degrees, humidity is between 70 and 80%. Today I checked the PH of my collected rainwater, of the drainage, of my field horsetail tee / manure. With the soil everything is ok I think. PH of the drainage is 5,9. I was very surprised about the high PH of my homemade fertilizer.
Today I took some macro fotos with my new magnifying glasses. I saw the first purple leafs and trichomes everywhere. They are all clear I think. It‘s my first time growing a cannabis plant and I love it!😻
Day 58
🌤️🌥️☁️☁️ 13-23 degrees, humidity between 60 and 95%.
Tropicana feels better now with more light. It‘s much brighter during the days but today again cloudy. In my eyes Tropicana looks happy and she is so beautiful. I want to bite in one of those buds, but I will not do yet. Maybe I will take some of the less lighted buds, harvest for tee with cream. I like to vape my cannabis and cook or bake with resin and butter. So I plan to let Tropicana take all the time she needs to produce enough amber medicine.
Day 59
🌤️☀️🌤️⛅️ 12-24 degrees, humidity 65-80%
The smell is incredible. I really like it.
Day 60
🌤️⛅️🌤️🌥️ 11-25 degrees, humidity 62-78%. This morning Tropicana got a bio banana shake which I prepared yesterday evening. I chopped three banana peels and boiled them in one liter of water for short. After I blended them together wit the water and let it stand overnight. Then I sifted the fertilizer in the early morning and gave Tropicana her breakfast: 700ml rainwater and 70ml of my banana fertilizer. The drainage had a PH of 6
On nearly all flowers it‘s possible to find purple colors. The pistils started to change the colors. Our balcony is in the first floor and today it was possible to smell Tropicana down on the street next to the house. 🤭
Day 61
🌤️☀️☀️☀️ 11-26 degrees, humidity 55-75%. Today it was very obvious that Tropicana started fatten up the buds to mature: Different colors, very strong smell, pistils are getting orange. I spotted the first amber trichomes. I could have a nice and potent June harvest but I think it will finish in the first week of July.
Day 62
🌤️⛅️🌤️⛅️ 13-21 degrees, humidity is 50-60%.
Tropicana enjoys the morning sun while I drink a fresh hemp leaf tee and reflect the last two month of my legal balcony grow.
I watered with 700ml pure rainwater. The run off PH ist around 6,3. So I‘m quit sure that the reason for the increase in PH was the watering with the field horsetail manure, which has got a high PH something like more then 7.
Day 63
☀️☀️☀️☀️ 13-20 degrees and the humidity is between 66 and 85 %
Beautiful monday morning. Tropicana asked for a banana smoothie, today 1:20 mixed with 700 ml. pure rainwater. She likes to drink it slowly, so I don‘t water all in one anymore. First maybe 20%, 10 minutes later 30% and after half an hour 50%. If I watered all in one, 100 ml of 700 ml run off. If I water step by step, all of the water stays in the pot. After 24 h the pot is much lighter and I need to water again. She is very thirsty in these days.
Likes
30
Share


@Gruenerfinger85
Follow
Hallo meine Garten Freunde.
Ich heiße euch herzlich willkommen zum Ende von diesem Grow, ich bin mit der Qualität der Blüten äußerst zufrieden.
Dieser Strain hat mich vollstes überzeugt, ich bin sehr begeistert von der Resistenz gegenüber den Schädlingsbefall oder im allgemeinen.
Man kann ruhig ein zwei Tage mit dem Gießen im Verzug sein ohne das dieser Strain dir das gleich Übel nimmt.
Diese Sorte ist auch nicht so anfällig für über Gießen oder über und unter Düngung.
Ich habe in der Mitte der Blüte ein kleines Problem mit Frassflügler ( Triepse ) gehabt, da für kurze Zeit mein Lüfter ausgefallen ist, den Befall hat sie ohne weiteres weggesteckt, ohne jegliche Anzeichen für Probleme.
Die Buds haben sich sehr vielversprechend entwickelt und haben einen süßlich tropischen Geruch im Raum verströmt.
Wo drüber ich am meisten gestaunt habe war dass man diesen Strain Trainieren kann egal ob topping oder HST das haben die Damen gut weggesteckt.
Das einzige was man beachten sollte wenn man die Pflanzen toppt ist, dass man mit einer längeren Anbau Zeit rechnen muss.
Von insgesamt 5 sind 5 Seeds gekeimt, leider habe ich ein Sämling verloren.
Ansonsten haben sich alle Pflanzen so entwickelt wie ich es mir gedacht habe.
Der Ertrag hätte größer ausfallen können, dann hätte ich aber auch größere Töpfe nehmen müssen, und das konnte ich zu dieser Zeit leider nicht. Die Medusa #1 braucht noch einwenig länger.
Also meine Freunde wär eine schnelle Sorte sucht, dem kann ich diesen Strain ans Herz legen.
Vielen Dank das du mich und meine Schönheiten bis hierhin gefolgt bist ich weiß das sehr zu schätzen und wenn du willst kannst du bei meinen anderen Tagebüchern vorbeischauen oder mein Instergram Profil besuchen. https://instagram.com/gruenerfinger85?igshid=OGQ5ZDc2ODk2ZA==
Ich wünsch euch eine erfolgreiche Woche und fette Ernten ✌️🏼bleibt alle gesund.
Hier gibt es noch 20% Rabatt wenn ihr Diesen oder andere Strains sucht.
Bei Royal Queen Seeds gibt es auch viele andere tolle Produkte die dir beim Thema Grow oder dir bei der Fermentation helfen können.
Gib diesen Code ein.GROWERS20
https://www.royalqueenseeds.de

Likes
13
Share


@HeavyHead
Follow
So this is a combination of weeks 11-12 as they all went into 48 hours of darkness and cut down on different days. My got cut down on different days. Will post dry harvest pics next ;p
Processing
Likes
88
Share


@No_Clout
Follow
01/08/18 - I fed them all 1 litre each, one of them seems to be praying up but the other two Seem a little bit droopy still.
02/08/18 - #3 is praying like usual and the other two are getting better Day by day I’m going to be giving them another feeding tomorrow, I have seen roots stretching out to the sides of the pots so I might saturate the whole pot.
04/08/18 - horrible sight today looks like rusty cracks in some leaves , not got a clue what this.
05/08/18 - browning has continued since last night and it’s all on the new leafs not the older ones. i fed them without any calmag , so I think it could be a deficiency of some sort (cal/mag).the mad thing is, it’s only two of the girls, one of them is completely fine nice green leaves not yellow marks that turn orange/brown. It definitely has nothing to do with my ph or all three girls would be showing some symptoms seeing as they all get fed with the same soloution.✌️🏻
07/08/18 - everything’s cleared up their was slight nute burn in the process but everything seems a lot better so I decided to start LST. all the new leaves are the colour they should be with no nute burns or calcium deficiency 🙏🏻
Likes
2
Share


@Xabii
Follow
35 days!
The plant finally started to stretch, relief!
Was really worried I got a small plant again but am now at the end of week 5 thinking that it will go mid to big :)
Tied the plant down multiple times this week and defoliated quite often, the plant did not seem to mind.
A slight smell is coming.
Marked this week as bloom because it is in early bloom.
Increased light intensity and light cycle mid week, 18/6 - 20/4.
Overall a very good week.
Values are average of the day.
DATE - EC(us/cm)
20250621 1456
20250622 1450
20250623 1499
20250624 1558
20250625 1518
20250626 1444
20250627 1488
DATE - PH
20250621 5.72
20250622 5.73
20250623 5.68
20250624 5.65
20250625 5.72
20250626 5.83
20250627 5.72
DATE - ORP (mV)
20250621 45
20250622 36
20250623 26
20250624 19
20250625 19
20250626 21
20250627 11
DATE - °C - RH% (Tent Temp/RH)
20250621 25.7 44
20250622 27.1 44
20250623 25.4 44
20250624 22.9 49
20250625 25.4 56
20250626 26.1 57
20250627 25.0 50
DATE - °C (Reservoir)
20250621 22.1
20250622 23.2
20250623 21.9
20250624 19.8
20250625 21.0
20250626 22.5
20250627 21.5
DATE - CF
20250621 14.56
20250622 14.49
20250623 14.99
20250624 15.58
20250625 15.18
20250626 14.44
20250627 14.88


Likes
31
Share


@Reaper
Follow
next time i wont Veg under fluorescent lights, needs more power from the start for bigger stem and root system, i cant complain by the end result lol

Likes
16
Share

@eldruida_lamota
Follow
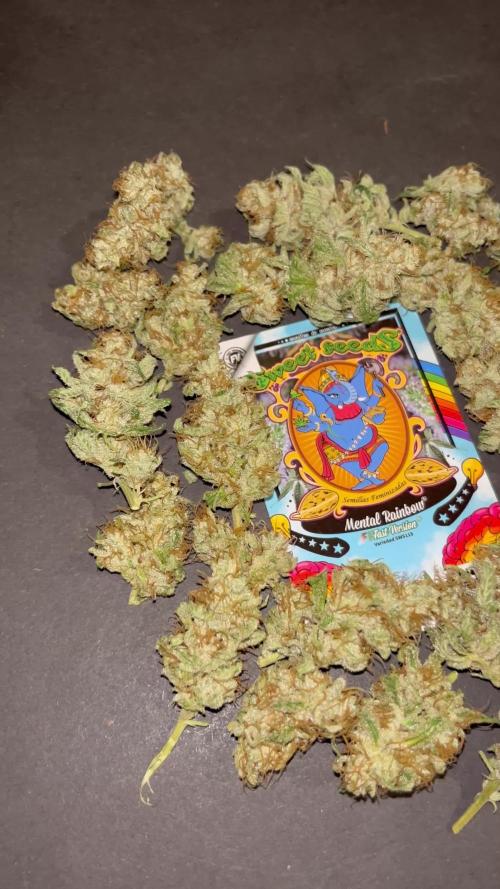
Venga familia ya viene la cosecha de estas Mental Rainbow de Sweetseeds, que ganas que tenía ya de darles machetazo.
Para empezar es buena variedad un poco tardía de lo que dicen pero me encantó cultivarla , aún con la plaga de trips que sufrí las 2 últimas semanas aguantaron y sacaron buenas flores.
Las flores aparte se ven resinosas.
La planta pues si creció vigorosa , no tiene mucho satélite es más porra central.
a sido una genética con la que disfruté bastante, no fue muy complicada cultivarla.
Agrobeta:
https://www.agrobeta.com/agrobetatiendaonline/36-abonos-canamo
Mars hydro:
Code discount: Eldruida
https://www.mars-hydro.com/
Hasta aquí es todo , espero que lo disfrutéis, buenos humos


Likes
7
Share


@Baboon_Grows
Follow
SST 7g of alfalfa per 5l , foliar and soil drench , followed by a kelp foliar next day eyeing the dosage as it’s like 0.03 for my foliar spray bottle 🙄🙈 probably curling up because of that . Also tied down some fan leaves and did few chop and drops through out the last week also was topped at some point 😂 forgotten when
This week i will foliar with SST alfalfa & corn & kelp
Rest for the soil drench I will mix with super8 tea
Likes
32
Share


@WATP55
Follow
Day 83
Currently drying, will update before Robert Smith turns up....
Day 87 5 days in, all trimmed and back in to dry.
Temp 18c RH 50%
Will raise humidity to 62% for last 5 days and add fan.
Day 92 Girls pruned to similar size buds and in jars to cure.
Will wait a few days until the residual moisture dissipates then weigh for the final time.
Lemony tones coming off her already.
Pleased as was getting worried during drying. Think I'll try a dry trim on the two Lemon Kix I have in atm (see my other diary)
Sampled some this afternoom and eveb before a cure its smooth enough to smoke, citrusy in profile and burns a nice clean white ash.
Looking forward to seeing the flavour/texture evolve over next few weeks before smoke report.
I'm not the most patient person, this part is extremely difficult.
Day 97 Final weight dried and a week cured is 87.8g (3.1oz)
Extremely pleased with the yield.
Smoke report
I've got to be honest, it's not the stinky monster I was expecting but its made up for it in other areas.
Really smooth on the inhale, lemony forest taste, no horrible aftertaste.
No coughing, which is a novelty!
For my first run, I'm v happy.
I feel the excessive heat may have microwaved some of the terps but we live and we learn.
Not long until my Auto Lemon Kix are ready, hopefully got the temp under control in time for them.....
Likes
14
Share

@greenkeepers
Follow
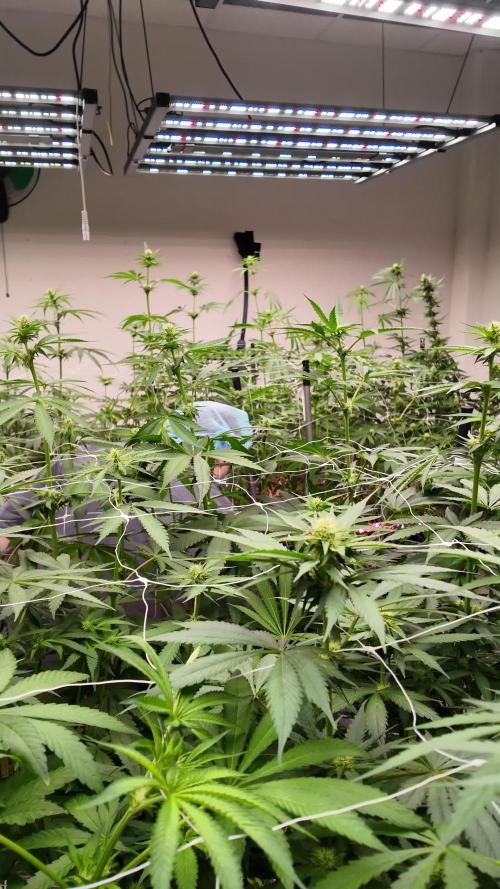
Week 4 – Flowering (Day 22–28) 🌸🌱
At the end of Week 3 (Day 21) we carried out a deeper round of defoliation and some lollipopping. By now the stretch is coming to an end, with the plants settling close to their final height.
We’ve also stopped foliar feeding, since every single plant is now covered in developing buds. To keep everything protected, we refreshed the beneficial insects, better be safe than sorry, how we say in German, sicher ist sicher.
Already in this early stage of flowering, we can clearly spot differences in structure, bud formation and even the first aromas. Some phenos are showing exceptional promise — those will be the ones we’ll highlight more in the coming updates.
🔎 Pheno notes so far:
AF Biostimulant 2 – strong side branching, open structure, already pushing citric aromas.
AF 38 – well-built top colas, vigorous growth.
AF 64, 92, 93 – impressive vigor, strong stacking, healthy canopy.
Apple Fritter is already filling the room with fresh citrus tones and showing early winners.


