
Likes
Comments
Share


@Michijardinero
Follow
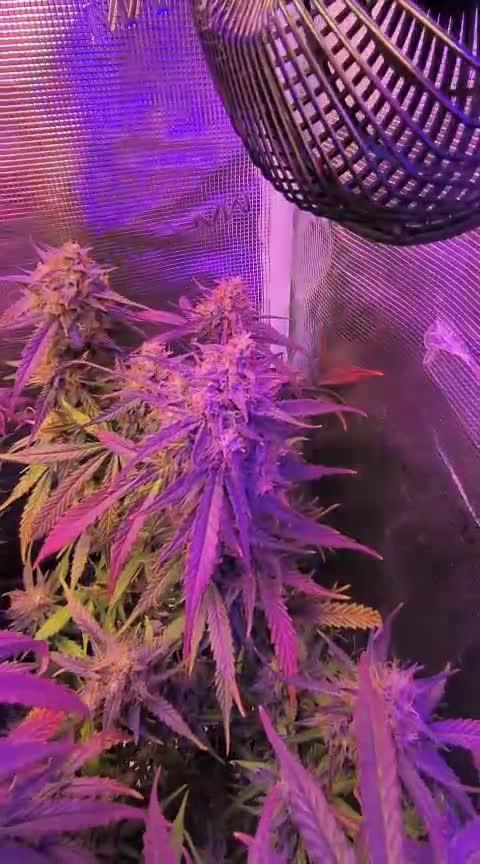
Bueno familia terminamos la 4° semana y damos comiendo a la 5° lo que pensaba que era los nutrientes eran quemaduras del viento y la luz ahora lo e acomodado y creo que van mejor están engordando bien y ya sueltan un olorsito rico 😁😁como siempre familia cualquier ayuda cualquier Consejo bienvenidos sean un abrazo familia y buenos humos paz

Likes
56
Share


@Prilyfe13
Follow
May 10, 2024 Day 85
A new week and I'm not sure these 2 are ready for flushing. They have way too many white pistils. Plenty of orange, though. Banana Purple Punch A has more orange pistils.
Both got a gallon of nutrient water today. So they are definitely still drinking somewhat heavily. And they haven't slowed down yet. I'll keep an eye on them though. Flushing will have to happen sometime. I'd say in the next 3 waterings. That's just a guess based on their current progress. It just seems that they aren't done swelling and there's absolutely no purple coming through yet.
Banana Purple Punch A still looks great. Her buds are starting to weight down the taller tops and they are slightly leaning toward the outside of the plant. It's actually quite good. It's opening up even more space for the lowers to get as much light as possible.
Air flow is great as well. This is especially important because she is in the back directly under a clip fan. So it's more prone to mold. At least that's what happened in my last grow. This time I have another clip fan across from this one, so the air circulates throughout the whole tent, top to bottom.
Banana Purple Punch B looks great! She's not bending any tops, but I don't expect her to with how strong her branches are. Practically immovable. However, she's definitely getting more jiggly. And she has huge buds top to bottom. I wonder if that's the reason she doesn't budge. No room. Lol. Honestly, she may be really compact, but I have her branches spread out enough for good airflow. There's just a couple of clusters that are a bit too dense with foliage, but it doesn't seem to be a problem. Lots of airflow and light.
She's a bit behind her sister plant. Way more white pistils and orange on this one. No signs of purple whatsoever. Just a healthy growing plant.
I'll be checking trichomes later today if I'm up to it. I hurt my back earlier. Regardless of that, I'll be getting trichome pics today or tomorrow. Probably tomorrow with videos at the end of the week. It's been quite some time since I last took trichome pics. Bad planning on my part. However, I'm excited to see how much further along they are from last time.
I won't be changing the light for another few days I think. Then I'll drop the power down. As I said before, I don't think they are ready for flushing, so not ready for light changes.
The environment is still a bit off. Today the temp is 76° but the humidity is still high at 56%. This is sure to ruin something. I'm still trying to get the humidity down. I have a feeling I just don't have enough air exchange in my bed room. I'm going to continue messing with it until it's right though.
Grow System Environment:
Temp: 74.1°
RH: 54.2%
VPD: 1.29 kPa
May 11, 2024
Not a lot going on today. Just some pictures.
Banana Purple Punch A is looking really good. She looks to have another week or so. I'm really confused as to why my plants take so long to grow and finish up.
Banana Purple Punch B has completely caught up with her sister plant. She has the same amount of orange pistils. That tells me there isn't much left to go. If she caught up, that means Banana Purple Punch A is even closer to being done than I think. Maybe.
I'll check the trichomes again tomorrow. No pics unless they are done. I doubt they will be. Especially Banana Purple Punch B. On the other hand Banana Purple Punch A could have only a couple days left and just isn't going to turn purple or fade at all.
I'm going to start flushing in a couple days I think. They both look about ready for it. Plus, they are about as big as they are going to get. I think the flush will bring out the colors. So next watering will be the beginning of the flush cycle. It should be in a couple days.
Also, both ladies have slowed down on their water intake. So the reservoirs should be empty in 2 to 3 days. Probably 2 days. Then I can clean them out and get to it.
The lights are going to be turned down when flushing begins. I'm going to aim for a DLI of 36 mol/m²/d for the rest of the grow. It shouldn't be anymore than a week of flushing before they are done.
The environment is still messed up. It got down to 49% yesterday for a couple hours, but then this morning it was right back up to 54%. The temp is fine at 76° Still not cold enough at night, but I have time. A few days to work it out. I'd like to be down to 65° by then for the last week of their lives.
Grow System Environment:
Temp: 73.1°
RH: 53.7%
VPD: 1.27 kPa
Update: I decided to check the trichomes anyway.
Banana Purple Punch A has quite a few cloudy trichomes. Very few amber and a bit too many clear. I'd say she has about 5 days left.
Banana Purple Punch B also has quite a few cloudy trichomes. However, she has about 15% to 20% clear trichomes. Amber trichomes are basically nonexistent. There's a few here and there, but mostly on the sugar leaves and not on the buds themselves. I'd say she has another 7 days left.
Honestly I don't want to harvest them separately. I'd rather harvest them at the same time, so I might harvest them in 6 days. Right in between. Maybe 7 days if Banana Purple Punch A isn't quite there yet.
To be honest, I have no real idea with this strain. They seem to be getting there, but there's no purple, still a lot of clear trichomes and it's been 12 weeks. So it could be another 2 weeks for all I know. I'd like to push them as far as they need, but I have 4 other plants that need to come in the tent ASAP. So I may have to chop a bit earlier than I really want to.
I'll post some trichome pics tomorrow and see what you all think. Comments are welcome. Lol
May 12, 2024
Some pics today. I'll try to keep this one short.
Banana Purple Punch A looks good. I checked the trichomes. Not done yet. I'm sticking by my 5 days estimate. So 4 days left.
She doesn't seem to be drinking at all. She is, but it's a trickle. Definitely not like it was. I'll have to empty the reservoir out tomorrow and start the flushing cycle.
Banana Purple Punch B also looks great. I also checked her trichomes. She is about the same as her sister plant. Not enough cloudy trichomes, but the amber ones are starting to show up. A good sign. She might be ready in 4 days. I'm still guessing 5 to 6 days.
She also isn't drinking nearly as much as she was before. A great sign that she should be starting the flush.
For trichome pics, I'll be posting some tomorrow. Nothing to post today.
I'll be dropping the light power when I start flushing. Which should be tomorrow or the next day. As I've said before, the DLI will be around 36 mol/m²/d.
The environment is a lost cause. I cannot for the life of me get the damned humidity to a reasonable level, so I'll continue to open the tent every couple of hours throughout the rest of the grow. Happily, it's only a few days to a week. The temp is a bit high today as well. 77°. I'm already working to drop it a bit without going over 60% humidity. I should be able to get it down to 74° without a problem. It's just the humidity that's killing me.
Grow System Environment:
Temp: 73.9°
RH: 55.6%
VPD: 1.25 kPa
May 13, 2024
Flushing day! I decided to rinse out the basins and begin the flush. I was going to wait another day, but I think it's time. They have about a week left I think. Honestly it should be done by now, but they aren't. Lol. No matter. They should be done in about a week. Maybe slightly less. So they have been given 4 ml of Flawless Finish. It should be the only dose I have to give. Maybe one more, but I doubt it. I still need to dry the containers out. That will take a day or two. So maybe a half gallon in a few days, just to get that last push in.
Banana Purple Punch A looks great! Some more lean happening with the tops. Nothing bad or anything, just a slight lean. Perfect for heavy buds. I didn't bother checking her trichomes today. No point. You can tell she's not ready just by looking at her.
Banana Purple Punch B may need even more time. I'm going to have to decided what to do. Wait for this one to be done then harvest both? Or harvest one at a time as they finish up? Decisions decisions. I'll figure it out in a week.
Her branches are really jiggly now. No lean exactly, more like a sway. When she gets moved her top heavy branches sway a bit. Great sign for a heavy yield from a 17" plant. Or is it 19"? Either way, it's going to have a fantastic yield compared to her size.
One advantage I am seeing with the longer finish is it will give me time to dry some Tropicana Cookies I am harvesting in a couple of days. I'll be wet trimming this time around and the dry time should only take about 5 to 7 days. Maybe 10, but I'd rather not try to stuff 4 plants in a 2x2 to dry. It's a recipe for disaster. 2 at a time stacked on top of each other.
I'll be dropping the light intensity tomorrow or later this afternoon. Maybe even tonight during lights out so in the morning it will be ready for the new day of less light. As I've said before... Over and over... I'll be dropping the light power to 70% which should drop the DLI down to 36 mol/m²/d. Oh, btw, I use the Photone for my light measurements. It has a PAR meter, Lux, DLI and I Believe color spectrum? Kelvin? No clue what that does. I focus on DLI. It's a better reading than just PPFD.
The environment is still messy... as always... I'm keeping the temp down to 74°. The humidity at 58%. So it's still too high, but I've done all I can to drop it down and it won't even go below 50% with the tent door wide open. It just won't. So unless I can get the humidity in my room down to like 30%, the humidity in the tent remains over 50%. Hopefully pulling the plants out daily is enough to prevent mold and other issues. There's also the two circular fans. They aren't at full power, but they don't need to be as there's two. Plenty of airflow. I'll really need to keep an eye on these plants. Maybe I'll take them out multiple times a day. Like 2 or 3.
Grow System Environment:
Temp: 74.5°
RH: 56.2%
VPD: 1.25 kPa
Update: I ordered a new dehumidifier for grow tents today. It should be here tomorrow. I'm guessing a lot of my problem with the humidity is my current dehumidifier. It barely pushes air. Cheap and well used. The new one is from Vivosun. A much more reputable company.
May 14, 2024
Trichome day! Alright, so I took some video today. Not the best quality, but I hurt my back so I'm all shaky. The pics were a lost cause. Lol
Banana Purple Punch A looks great! More leaning branches. This late in the grow, I don't care. They aren't leaning that bad and it's only showing how heavy these buds are.
Trichomes are mostly cloudy with a bit left of clear and nowhere near enough amber. 5 to 6 more days I think.
Banana Purple Punch B is so pretty. She has the faintest purple coming from the flowers, but not much. It is a sign that we may end up with a purple plant during flush.
Trichomes are partly cloudy with 30% clear and next to no amber. She still has time to go. I'd say another 7 to 10 days. Now I'm overshooting it just incase.
I don't think the plants noticed a difference in the light drop, or they did and it's not doing anything. However, I'm not sure what it should be doing. I'm guessing preserving trichomes? Makes sense. Anyway, it's staying at 36 mol/m²/d DLI.
The environment is still an absolute mess. The humidity is at like 59% and as always, I can control the temp, but nothing changes the humidity. And it's like 55% humidity out today. Fail. Lol.
Grow System Environment:
Temp: 74.3°
RH: 59.0%
VPD: 1.16 kPa
May 15, 2024
Nothing to do today. They are still watered and whatnot. No changes in color yet either. I'm starting to think these both will be green phenomes. Or maybe they really aren't ready yet. It's just weird. What am I doing wrong to get all my plants to grow for so long? Oh well.
This round is just different because of the other 4 plants that need this space. I really need them to finish up ASAP. No trichome check today. I can still t ell they aren't ready. The bottoms still have a majority of white pistils and the tops are just not there yet. I think they can get denser. They aren't quite rock hard yet, so I know they still have time.
Banana Purple Punch A looks amazing. More leaning branches that are swaying in the breeze. No fade yet, but the leaves are starting to look ready for the fade. Maybe.
Banana Purple Punch B is strong as ever. Definitely still packing on weight. Definitely not ready for harvest. Still another week I think. I'll check trichomes tomorrow on this one. I think I'll wait for her to be done then I can harvest both plants at once.
The light seems to be just being a light now. I can't really see what it's doing, but I know the frost is there. Lol. So it must be doing something.
The environment is killing me. Still over 60% and my room has climbed up to 60% as well. I have a heater running and the dehumidifier that I think is done working. My new one should be here today. And not a moment too soon. I should have replaced this one months ago. Unfortunately, I don't have much control over the heat anymore. The humidity is just over powering it and I can't get anything to change. I'm going to crank the heat and see if that helps. Like set it to 80° and see what happens. It's currently set to 74°. And 8 don't think that temp is high enough to combat the humidity. Crank it up!
Grow System Environment:
Temp: 72.9°
RH: 63.0%
VPD: .00 kPa
May 16, 2024
Today is looking pretty good. I checked the trichomes on Banana Purple Punch B as she has the longest to go. I figure when she is done, Banana Purple Punch A will be as well.
I've also watered them with plain water. PHed to 6.2. just a half gallon in the reservoirs. I'm not ready to let them dry out yet.
Banana Purple Punch A looks great! Her branches are starting to lean a bit harder and her buds look amazing. No purple yet. Or at all. I'm not sure. But I'm certainly sure that the fade hasn't begun yet.
I'm not bothering with trichomes for now. I'll just wait to see what her sister does. I'll check trichomes in a couple of days.
Banana Purple Punch B looks amazing. Her buds are fat and dense. She smells great and stays strong. A bit more swaying. But it's the whole plant now. Wonderful!
I checked the trichomes on this one. She is developing quite nicely. I'd say another 5 to 7 days? Maybe a little less if we're lucky. There's more cloudy trichomes than before and finally some amber. Much less clear as well.
She definitely is nowhere near fading, so that's a concern for time.
The light stays the same.
It seems to be perfect for these two. So no changes.
The environment is still a nightmare, but it's 86% humid outside and 63% in my room. Happily, not really, the humidity is down to 60%. Not good at all, but better than 63% or even 65%. I'm really hoping these ladies are super resilient. They should be. It's FastBuds and they have great genetics. The temp is fine. I haven't a bit higher to help some with the DLI. So it's hanging out around 76° to 77° for now.
The new dehumidifier works way better than the other one. But a cool thing is that they are both small, so I fit them both in and it seems to be kinda working. It's keeping the humidity below what it is in my room, but not low enough. I know it will drop when I figure out how to drop it in my room. I really need a big dehumidifier for my room. That would solve quite a bit.
Grow System Environment:
Temp: 75.8°
RH: 62.8%
VPD: 1.07 kPa


Likes
1
Share


@Growandroots
Follow
Wochenbericht – Pflanzprojekt (12. Woche – 4. Blütewoche)
In der zwölften Woche setzen die Pflanzen ihre Blütenentwicklung fort, doch die niedrigen Temperaturen bleiben eine große Herausforderung. Trotz aller Bemühungen ist es schwierig, ein konstantes Klima in der Box aufrechtzuerhalten.
Um die Auswirkungen der Kälte zu minimieren, habe ich beschlossen, provisorisch einen Unterboden zu bauen, damit die Töpfe nicht direkt auf dem kalten Boden stehen. Dies sollte helfen, die Wurzeln besser zu schützen und die Temperatur in der Nähe der Pflanzen zu stabilisieren.
Leider zeigen einige Blätter Anzeichen davon, dass sie von der Kälte betroffen sind. Dies äußert sich in leichten Verfärbungen und einer geschwächten Blattstruktur. Dennoch entwickeln sich die Pflanzen weiterhin vital, und die Buds zeigen langsames, aber kontinuierliches Wachstum.
In den nächsten Tagen liegt der Fokus darauf, die provisorischen Maßnahmen umzusetzen und die Pflanzen so gut wie möglich vor der Kälte zu schützen, um die Blütenentwicklung zu fördern.

Likes
73
Share


@Rwein93
Follow
Ciao ragazzi e bentoranti per i nuovi aggiornamenti!!!😉
Purtroppo ragazzi questa settimana non è stata delle migliori per i parametri. In Italia il caldo inizia a farsi sentire e nel box si sono raggiunte temperature di 30°C e l umidità è salita al 70% anche bagnando al minimo loro.😱
Le MimOrange crescono bene, forse il troppo caldo ha reso i rami più esili un po molli, ma tutto sommato crescono molto bene.👍
La numero 2 adesso misura 30cm. La numero 1 se non l avessi piegata sarebbe stata almeno 40 cm. Ottimo!
La numero 3 è più bassa e folta, penso che dovrò aprirla e pulirla un po.👌
Avendo cambiato zona di crescita non avevo calcolato il cambio di ph dell acqua del rubinetto e il fatto che non usi prodotti con un regolatore di ph incorporato mi ha tratto in inganno.🤦♂️
Ho misurato il Ph dell acqua dopo averla fertilizzata ed era di 7.7 così ho introdotto 0.25 ml di Ph Down e l ho portato a 6.27. Ora dovrebbe assorbire i Super nutrienti che gli stando alla grandissima!!!💪
Eh niente ragazzi! Speriamo che le temperature si abbassino di un paio di gradi, anche per noi perché si muore, e sembra solo l inizio.
Grazie a tutti per aver guardato e restate collegati per nuovi aggiornamenti.🙏
Buona settima e felice crescita🌱🌱🌱
P.S.
il video riprende le 3 talee varie all inizio, le Lemon tree, le MimOrange e 1 altra talea

Likes
7
Share


@Isle_of_dank
Follow
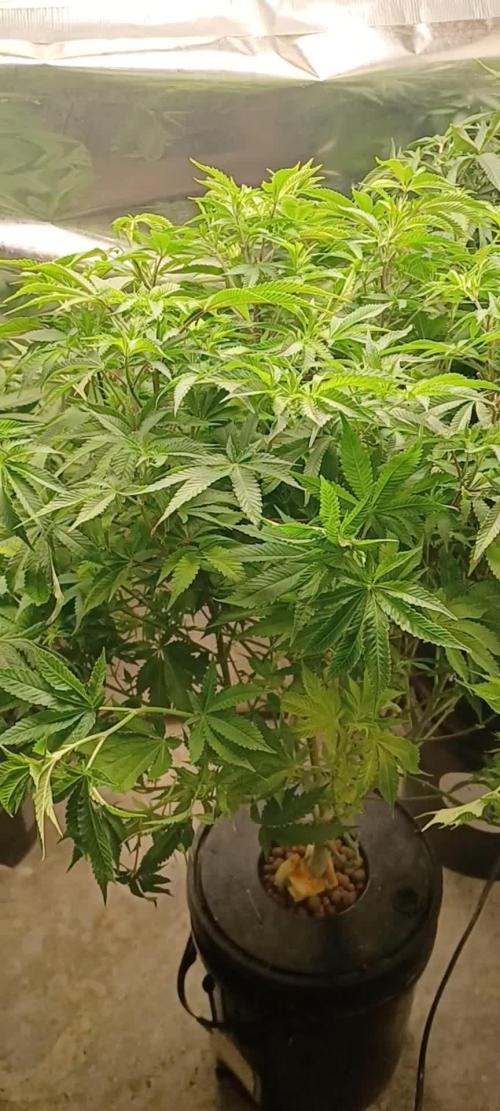
All have started flower just under 2foot tall light adjusted and pH corrected at start of week hopefully bounch BKK 19june
Likes
7
Share


@420DeepGrow
Follow
📆 Semana 9
Las plantas avanzan en la fase de maduración avanzada, con los cogollos ya muy desarrollados, compactos y pesados, centrando toda su energía en el endurecimiento y afinado final.
Los cálices terminan de hincharse y la resina alcanza niveles muy altos, cubriendo bien todas las flores. Los pistilos aparecen mayoritariamente oxidados, aunque aún se mantienen algunos blancos, indicando que la planta está cerca de su punto óptimo pero todavía en proceso de cierre.
Se aprecia un leve foxtailing en algunas puntas, algo sutil propio de esta fase final, sin afectar a la calidad ni a la densidad general.
La absorción continúa ralentizándose, mostrando claramente que la planta entra en su última etapa, enfocada en estabilizar su maduración y perfil aromático.
Seguimos creciendo fuerte 💪!


Likes
220
Share


@CRiSPrGrow
Follow
Week 2 Mr.B's Six shooter
so this one is doing fine, still no water needed since last week, literally no maintenance required, just spraying the soil with 0.25 ml / 250ml organic amino acid concentrate. You know how canna boost smells like soy sauce, well this one smells like that kinda except when i open it my whole basement smells like a chineese wok restaurant lol . Six shooter looks like i got three phenos , this one is an indica pheno looks like , let's see how she grows ! added cal mag to the foliar spray, once only this week, on day 5. amino spray on the soil is daily, until the 10 day mark. still only going to be plain water and secondary nutrients like CO2 and micronutrients . that's the plan anyway. VPD tappering off towards 1.1 as humidity is creeping down from a high of 42 to the high thirties now. going to plant my in soil ppm reader before i water for the first time since transplant lol... maybe not even this week ! low maintenance? will update 🚀


Likes
14
Share


@suchydog5
Follow
waiting for them to grow more to be able to survive these temps at night to repot :)
Likes
8
Share


@Skinnytalls420
Follow
Very happy with the outcome just as good as the first time I grown this strain!!!!
Likes
21
Share


@crystal_garden_0
Follow
Great week 100% success. Feels nice to be at this point, everything will definitely get going fast now, soft transplant soon as they are ready. Thanks everyone
Likes
3
Share


@drewnagy0510
Follow
Really light hairs. Smells really sweet with a little kick and a great way of double toping


Likes
89
Share


@Lukush
Follow
Hope you all enjoy,
We are in week 4...
She is beautifol and the buds are starting to fatten up nice and good.
Im really happy of this strain, in the beggin she was taking i wail to grow onces she hit that 3 week of veg bam she started exsploding with tricomes end the rest came along ✌️✌️❤️❤️
Hope you all enjoy mi diaries peace along growbros✌️😎🌲
Cupple new pics for yall😎🌲
Likes
170
Share


@Green_Man_420
Follow
Week 3 is here and again thank you to all you fellow grower’s that have stopped by to show the love 👊🏻✌️ a massive thank you to James @RQS for trusting me with this grow. A link to their website below go check them out 🙌
.
Well we are at the start of week 3. Moving along nice and steady. Starting to really struggle with RH yesterday was down to 40% for most of the day. Managed to get it back to 50%. I think I will top them all towards the end of the week but I need to see more growth before I do this.
Day 17, watered last night. Started to train the first plant. I’m going onto the back one either tonight or tomorrow. Turned the heat Matt off as I think the roots were getting too warm 🤷 we carry on. ✌️👊🏻
Day 18, adjusted the ties on this lady gone in fairly hard so we shall see how she handles it. Topped the other weeding cake today too. Let’s see how they look in a couple days. ✌️🙌
Day 20, watered last night. Slow and steady happy with how they have progressed after training and topping. ✌️
⭐️⭐️⭐️⭐️⭐️⭐️⭐️⭐️⭐️⭐️⭐️⭐️
https://www.royalqueenseeds.com/uk/
Likes
4
Share


@Xipsiomega1
Follow
End of week 2 in flowering (day 57 from sprout) and things go well. Made some defoliation and tied up some last stems to keep the plants in the center of the tent lower in hight than the the plants in the edges. I didn't add any fertilizer this week and generally i don't feed often even if my grow is organic. Addititives in the soil before transpalant do the trick. Most of these strains need light to moderate feeding especially in Nitrogen.

Likes
8
Share

@Roberts
Follow
White widow has been doing better, but has not fully pulled out of her issues. She is doing a lot better in the overall. Thank you Seedsman, Medic Grow, and Athena nutrition. 🤜🏻🤛🏻🌱🌱🌱
Thank you grow diaries community for the 👇likes👇, follows, comments, and subscriptions on my YouTube channel👇.
❄️🌱🍻 Happy Growing 🌱🌱🌱
https://youtube.com/channel/UCAhN7yRzWLpcaRHhMIQ7X4g.

Likes
16
Share


@m1ndgames
Follow
Week 1 of Flower - at least i was able to sex them. One was male so i did the needful.
The ladies are starting to flower now...

Likes
29
Share


@Canabitch_Grow
Follow
This time, the cold wind has arrived. Keep the temperature at 20 degrees at night and 28 degrees Celsius during the day, which is good when your plants start to flower.


