
Likes
Comments
Share

@Finally_free
Follow
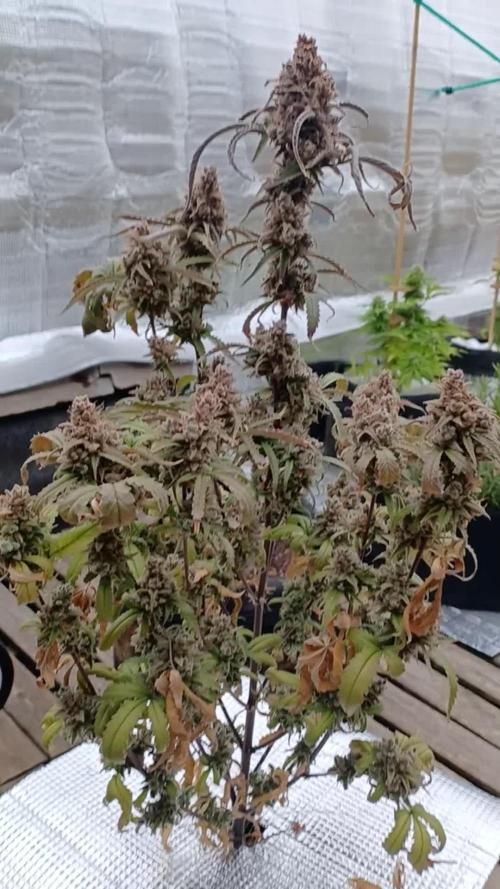
17/07 First 45gr of tops are off. Keepin an eye on the rest. Ma lenz came in tha mail today, awesome! Will be easy to follow up harvest times.
2nd layer still good... an extra day...
20/07 second part comin off, +80gr. The top layer + biggest buds. The rest may stay another few days
Keepin an eye on trichomes
22/07 bottom is 80gr wet, 14gr dry, that´s ok! The last part taste like eucalyptus and minty


Likes
5
Share

@BasedBuds_89
Follow
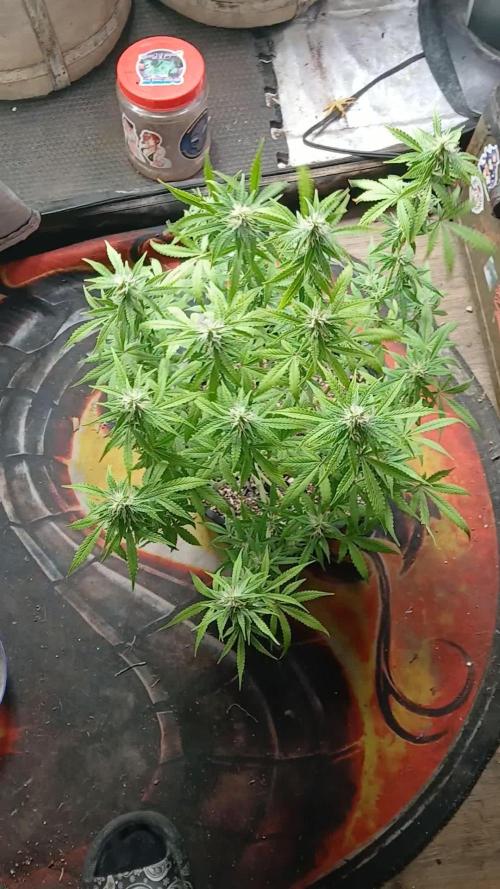
So I added a bit of calmag and nitrogen with little to no results. I let the roots soak overnight as well. Im convinced that it's the grow medium, I plant to transplant into a bigger pot with fresh soil to see if it helps the lockout. Im running out of room in my tent lil.


Likes
12
Share


@Daviz_42
Follow
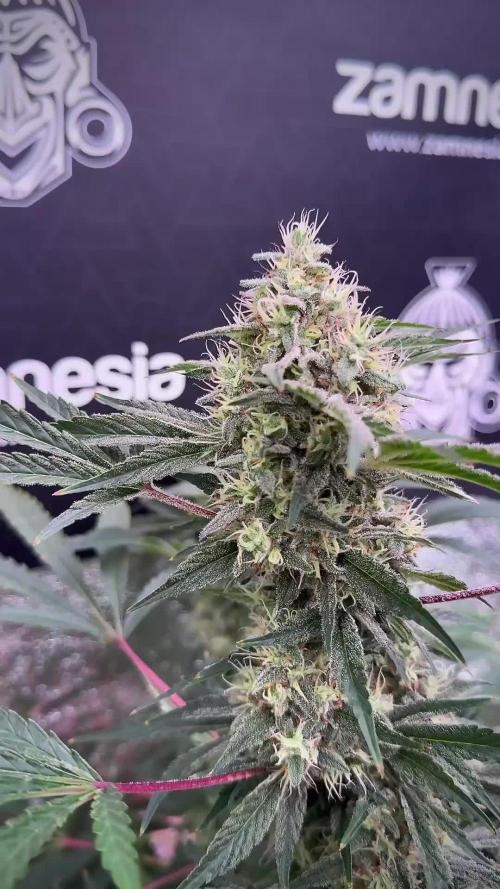
Los dos fenos tienes cosas en común, pero el dos es sin duda más especial, me gusta más por los terpenos y la cantidad de resina y la calidad de esta. Otra para mi coleccion de madres.


Likes
29
Share


@SolitudeCorners
Follow
Best root of the season awards
Can't wait to blazeeee
Feeding💪
10/17 Water30L+Cleanse80ml+calmag@190ppm
Ph6.3
Ebb 10.42/11.32/12.26/13
Clone 11.35/12.21/13.05/14
Average runoff ec1.5
Keeper 300ml per pot
10/18 Water26L+Flawless90ml+calmag@300ppm
Ph6.3
Ebb 11.38/12.24/13.17
Average runoff ec1.2 ph6.5
Clone 12.38/13.56/15.20/16.10
Average runoff ec1.5 ppm750
10/19 Water26L+Cleanse80ml+calmag@200ppm
Ph6.3
Ebb 11.12/11.48/12.24
Average runoff ec1.4
Clone 11.50/12.12/12.37/13.37/14.40
Average runoff ec1.3 ph6.6
10/20 Water30L+Cleanse30ml+Calmag@190ppm
Ph6.4
Ebb11.42/12.22/13.20/14
Clone 12.40/13.20/14.20/14.45/15.15
Average runoff 1.2ec ph6.4-6.7
10/22 last light day
10/23 2 Pm Cut and hang
Plan 21day at 23temp 55rh


Likes
7
Share


@Kushizlez
Follow
Day 52-64
(Day 54) I’m going to thoroughly inspect each plant and remove bananas if found. So far it’s only been the one on #7 but I don’t want to take a chance.
I’m also going to give a watering with some runoff.
(Day 55) Can’t find anymore bananas but that one. I will probably find a few bag seeds but who knows. It’s way too late for pollen to really have effect anyway.
These 5 plants finish nice and early compared to my other tent flipped on the same day. I would never take this strain 65+ days like last time. I would do 56-60 days next time I flower this strain
(Day 58) Holy shit this tent is fading like crazy now. They are starting to show some beautiful autumn colors. #1 #5 and #7 are definitely done. #3 and #6 could use a little more time so I’ve decided to take them down on the 24th.
I haven’t seen anymore bananas and the one that popped out on #7 has shriveled up and receded.
(Day 63) I’m seeing what look like seed pods starting to form in some of the main colas on my picture perfect pheno. #7 is showing 3 or 4 little bananas too. All of the top buds are definitely done so I’m going to harvest as soon as the lights come on tomorrow. I’m going to give one last watering right now and then harvest. I’ve noticed that harvesting a watered plant will extend the dry time by a few days and that’s exactly what I’m looking for. A nice slow dry. Plants are being full plant hung + dry trimmed and tent is being kept at 60-65 degrees and 60-65% RH.
Cutting everything down was a pain in the ass. I had to individually cut each square the scrog net so it wouldn’t contract and squish all the buds. I chopped down my other tent as well so I have no other plants in flower right now.
Likes
128
Share


@Tropicannibis_Todd
Follow
💩Holy Crap We Are Back At It And Loving It💩
Growmies we are at DAY 42 and she's just killing💀it👌
👉Added straws within the Tiny pot to help watering in week 4 👈
So I'm starting to see she needs watering every single day and now need nutrients 🙃
Lights being readjusted and chart updated .........👍rain water to be used entire growth👈
👉I used NutriNPK for nutrients for my grows and welcome anyone to give them a try .👈
👉 www.nutrinpk.com 👈
NutriNPK Cal MAG 14-0-14
NutriNPK Grow 28-14-14
NutriNPK Bloom 8-20-30
NutriNPK Bloom Booster 0-52-34
I GOT MULTIPLE DIARIES ON THE GO 😱 please check them out 😎
👉THANKS FOR TAKING THE TIME TO GO OVER MY DIARIES 👈


Likes
3
Share


@Bigbombbudz
Follow
Another week already...
Well the girls are dialed in perfect, the room is really getting a wonderful smell, and buds are filling in everywhere. Its been 16 days since I switched the time and put the girls into Bloom, and they are filling in like crazy.
Not much else to say but that everytime I grow any seeds from Original sensible seeds they grow big and wonderful. Cant wait to try these girls, Banana Sherbert.
Until next week, smoke a fatty, help out your fellow grower.

Likes
17
Share

@DogDoctorOfficial
Follow
Week 12 | Animal Mints — Legends of the Frozen North
Week 12 and the room is doing exactly what we hoped it would do.
This is the part of the run where patience matters more than intervention.
The structure is built. The weight is there. The resin is there. The metabolism is still active.
Now the job is simple: maintain stability, reduce noise, and let the plants finish with calm.
And that is exactly where this room is right now.
A quick recap: 12/12 from seed
For anyone new joining the diary, this run was flowered under 12/12 from seed — meaning these plants were grown under a flowering light schedule from day one, instead of being vegged under 18/6 and flipped later.
That changes the entire architecture of the plant.
Instead of building wide, heavily branched bushes during a long vegetative phase, the plants stay more columnar, more direct, and more apically focused.
Less wasted lateral growth. Less unnecessary vegetation. More efficient top-to-bottom flower development.
That’s why this run looks like this.
Lean frames.
Stacked tops.
Excellent vertical flower distribution.
And dense, productive bud sites from upper canopy all the way into the lowers.
This style is not about brute force.
It is about efficiency, timing, and letting the plant express itself with less interruption.
Week 12: the room is finishing beautifully
This week the room feels exactly like a late flower room should feel.
Not loud.
Not explosive.
Just mature.
The flowers are dense and fully formed now, with visible weight from top to bottom and clear structural consistency across the canopy. The upper tops have finished stacking and are now settling into their final shape, while the lower and mid sites continue proving exactly why the undercanopy support mattered so much in this run.
That lower development is one of the biggest wins here.
The undercanopy lighting did exactly what it was supposed to do:
it kept the lower flower sites active, productive, and worth carrying to the finish.
Instead of soft lowers and wasted interior material, the plant continued producing meaningful flower mass deeper into the canopy. Combined with the top lighting, this created a much more even distribution of usable flower across the full plant.
And that shows clearly now.
The room is not just top-heavy.
It is productive throughout.
Resin, color, and late-flower expression
This week the visual changes are subtle, but important.
The pistils are darkening and receding.
The calyxes are swelling.
The resin heads are fully formed and standing dense across bracts, sugar leaves, and surrounding surfaces.
This is the part of flower where the plant stops trying to build and starts trying to finish.
You can see it in the way the flowers are tightening.
You can see it in the way the bracts are swelling.
You can see it in the color shift — greener tissue fading into softer lime tones, deeper pistil oxidation, and the first real signs of end-of-cycle maturity beginning to settle in.
Nothing dramatic.
Just the plant slowly shifting its priorities.
And that is exactly what we want.
Feeding strategy: now just enzymes
At this stage, we have stopped feeding base nutrients and are now running only Pure Zym with water.
That is intentional.
At week 12, the plant does not need more pushing.
It does not need more nitrogen.
It does not need more unnecessary input.
It needs space to finish.
By this point, the soil still holds more than enough residual nutrition to carry the plant through the last stretch. The goal now is not to keep forcing uptake — it is to let the plant naturally use what is already available, finish metabolically, and begin consuming what remains in the medium and in its own tissues.
That is why we simplify here.
No force.
No excess.
No chasing numbers.
Just enough enzymatic support to help keep the rhizosphere active, assist in breaking down residual organic matter, and keep the medium biologically functional while the plant finishes the job.
That is the role of the enzymes now.
Not feeding the plant harder.
Helping the system stay clean and available while the plant completes itself.
Water, EC, and why less is more now
Water remains simple.
We are running rainwater mixed with recovered humidifier water, plus enzymes only.
No pH correction.
No heavy EC.
No over-management.
Input EC is staying extremely soft, around 0.1–0.2, just enough to carry the enzymes without unnecessarily loading the medium this late in flower.
pH continues to land naturally around 6.8, and we are leaving it there.
At this point, we are not interested in forcing perfect numbers on paper.
We are interested in maintaining a stable root environment the plant is already happy in.
And the plant is clearly happy in it.
This is one of those moments where overcorrection usually creates more problems than it solves.
The room is stable.
The plants are functioning.
So we let stable stay stable.
Still drinking = still working
One of the clearest signs that the room is still metabolically active is water consumption.
Even this late, the plants are still drinking 1.7–1.8L per day, down slightly from the peak (~2L/day), but still very strong for this stage.
That matters.
Because even though the room looks like it is approaching the end, the plant is still moving water, still transpiring, still exchanging, still functioning.
That means metabolism is still active.
And active metabolism means the plant is still finishing properly.
They are not stalled.
They are not fading out prematurely.
They are simply slowing down the way mature plants should.
That is a very different thing.
Climate: stable beats perfect
Environment remains essentially unchanged because it does not need to change.
Day temps around 26°C
Night temps around 18°C
RH around 60%
Root zone around 21°C
CO₂ around 1000 ppm
Stable, predictable, and easy for the plants to work in.
Could we push harder? Probably.
Could we chase tighter numbers? Also yes.
But at this stage, the return is rarely worth the extra energy, extra complexity, or extra stress introduced into an already stable room.
Leaf VPD remains within a comfortable working range, the plants are responding well, and the room is balanced.
That is enough.
Not every decimal needs to be optimized into exhaustion.
Lowering PPFD for the finish
We are also beginning to reduce PPFD now as we move into the final stretch.
Again, this is intentional.
Late flower is not the time to keep pushing peak intensity into tissue that is already trying to mature.
The bulk is built.
The structure is set.
Now we shift from production pressure into finishing pressure.
Lowering PPFD slightly helps reduce unnecessary stress, lowers metabolic demand, and lets the plant focus more naturally on ripening rather than continued forced output.
At this point, we are no longer asking for more mass.
We are asking for completion.
That is an important difference.
Final thoughts
This week is one of my favorite moments in a run.
Not because it is flashy.
Because it is honest.
This is what the end should feel like:
less intervention, more observation.
less forcing, more trust.
less noise, more patience.
The work was already done.
Now we let the plant finish saying what it was trying to say all along.
Big love to everyone still following this one — the growers, the quiet readers, the long-timers, the curious ones, the skeptics, the supporters, the OGs, and even the haters.
Energy moves either way.
Might as well keep it good.
Big love as always to Zamnesia for the genetics, to GrowDiaries for the platform, and to everyone spending time here watching this run unfold.
We are close now.
One more calm week.
Maybe two.
Now we watch.
📡 DELETED @ 1K Please stay tuned.we never quit https://www.youtube.com/@TheDogDoctorOfficial NEW 🙏 Thank you for your patience and continued support.
FOR DISCOUNT CODES AND MORE JUST FOLLOW THE LINK https://website.beacons.ai/dogdoctorofficial
📲 Don’t forget to Subscribe and follow me on Instagram and YouTube @DogDoctorOfficial for exclusive content, real-time updates, and behind-the-scenes magic. We’ve got so much more coming, including transplanting and all the amazing techniques that go along with it. You won’t want to miss it.
GrowDiaries Journal: https://growdiaries.com/grower/dogdoctorofficial
Instagram: https://www.instagram.com/dogdoctorofficial/
YouTube: https://www.youtube.com/@dogdoctorofficial Deleted by Youtube - https://www.youtube.com/@TheDogDoctorOfficial NEW
Vimeo : https://vimeo.com/dogdoctorofficial Under construction stay tuned ⸻
Explore the Gear that Powers My Grow
If you’re curious about the tech I’m using, check out these links:
🔆 Lighting & Environmental Control
• Future of Grow — Advanced LED lighting technology
https://www.futureofgrow.com/
DISCOUNT CODE: DOG20
• Lumiflora — Under-canopy LED lighting
https://lumiflorade.com/
• TrollMaster — Environmental controllers and automation gear (past collaboration)
⸻
Genetics
• Zamnesia Seeds — Genetics used in this project
https://www.zamnesia.com/
⸻
🌱 Soil, Substrates, Boosters & Root Support
• Plagron — Substrates, bio mixes, and supportive products
https://plagron.com/en/
⸻
🎒 Storage, Curing & Preservation
• Grove Bags — Curing and storage solutions
https://grovebags.com/
⸻
📸 Photography Equipment & Tools
(Not sponsors, but part of my creative toolkit)
• Sony A6700
• Sony full-frame macro lens + few more
• Stacking photography workflow - learning
• iPhone (for behind-the-scenes shots)
We’ve got much more coming as we move through the grow cycles. Trust me, you won’t want to miss the next steps, let’s push the boundaries of indoor horticulture together!
As always, this is shared for educational purposes, aiming to spread understanding and appreciation for this plant. Let’s celebrate it responsibly and continue to learn and grow together.
With true love comes happiness. Always believe in yourself, and always do things expecting nothing and with an open heart. Be a giver, and the universe will give back in ways you could never imagine.
💚 Growers love to all 💚
📸 P.S. – The Eye Behind the Lens
All photos in this diary (for now — except for the ones showing the camera, which I took with an iPhone) are taken with a Sony A6700 paired with a Sony full-frame macro lens and a few more.
Photography is part of the story — it’s how we share the fine textures, the glow, and the quiet details that words can’t always capture.
I’ve also started experimenting with photo stacking — a technique where multiple images, each taken at a slightly different focus point, are layered together to create one perfectly sharp image from front to back.
It’s not digital enhancement or AI; it’s pure photography — a way to reveal the plant’s beauty in microscopic depth, from trichome to petal.
You’ll even see a few shots of "ghost me" capturing the shots — camera, lens, setup — because every grow deserves not just to be cultivated, but documented like art.
FOR DISCOUNT CODES AND MORE JUST FOLLOW THE LINK https://website.beacons.ai/dogdoctorofficial
NEW DISCORD - Official Server Invite Link : https://discord.gg/ksjAkA5T74

Likes
38
Share


@Wicked_Stix
Follow
We are at day 21 on this gorilla cookies. I think she would be quite a bit bigger if I didn't break one of the mains on week 2 but she is still chugging along and growing well. I upped the maxigro to .5 tsp per gallon and started them on a little armor si so they can build some strong branches. Still running them on 24 hour light and 24 hour irrigation. They are going to stay under the blurple lights for a few more weeks until I can get them in the big room under the quantum boards. I'm hoping they will flower around 4 weeks but my autos seem to enjoy staying in veg so we will see what happens.
Likes
18
Share


@DeadJoke
Follow
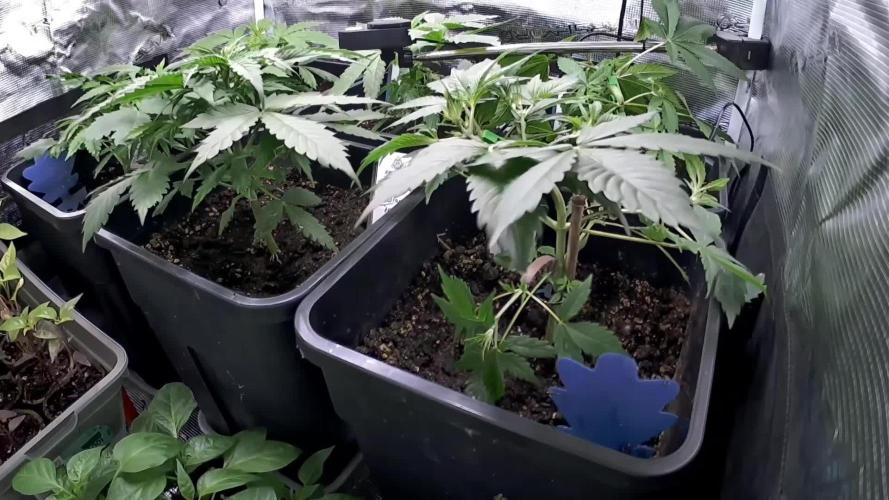
i have to give space to veg photo plants ..
so, mac1 have to shrink alittle bit
Likes
35
Share


@GreenHouseLab
Follow
Absolutely stunning girl, final days before the chop and hang dry in my tent at 70deg and 60RH for ideally 10 days.
Likes
11
Share


@TherealNICOGREEN
Follow
Nu prøver jeg lige at lave topping. Så hvor let det er på cannacrips på yt. Håber virkelig hun vil være med til dette hun er en MEGET GOD STABIL DAME allerede, tyk stamme smukke blade med rødlig stængler:) . Jeg er meget STOLT OVER kannabia vil lade mig prøve kræfter med deres nye strains min hydro er også blevet en Amnisia lemon auto fra kannabia!;-) . Udover det hele er blevet flyttet pga varmen fra politiet! Så går det rigtig fint!! Det bliver spændende og følge med så der kommer styr på tingene igen! Kom nu bare med en legalisering i danmark vi burde være ens i eu lande ! Hvorfor skal jeg flytte til tyskland for ikke være kriminel pga en UKRUDT PLANTE! Jeg skal i retten for et telt 3 lamper , blæsere i ogsv, ca150gram skunk , og 5gram hash! Det så latterligt! Forsættes i næste uge:

Likes
109
Share


@Prototype0181
Follow
This run has come to a end. I'll be chopping these lady's down in the next 48 hours.
I'll will do a Harvest update in a couple of weeks👍
Rock on Growmies 💚


Likes
8
Share

@Webacca
Follow
Langsam sieht das aus, wie ein Canna Anbau. Sehr fein
Alle Damen wachsen gut, die ersten Anzeichen einer Blütenphase zeigen sich. Recht schöne Farben in den Blättern... Alles gut.
Uuuund es beginnt zu duften.
Darf mMn gern so bleiben
Zeitraffer der letzten Woche, heute mit Rucklern, am Ende der Bildreihe. Liegt am Arbeiten im Zelt, wo ich an die Kamera gestoßen bin und das Bild sich verstellt hat.

Likes
72
Share


@Roberts
Follow
Auto Maxi Gom is growing good. She got her first lst today. She is under the Medic Grow Mini Sun-2, in Xpert Nutrients. The feed chart might be a bit strong for autoflowers. I think I got it better figured out now. Everything is looking really good. Thank you Xpert Nutrients, Medic Grow, and Seeds Mafia. 🤜🏻🤛🏻🌱🌱🌱
Thank you grow diaries community for the 👇likes👇, follows, comments, and subscriptions on my YouTube channel👇. ❄️🌱🍻
Happy Growing 🌱🌱🌱
https://youtube.com/channel/UCAhN7yRzWLpcaRHhMIQ7X4g