The Grow Awards 2026 🏆 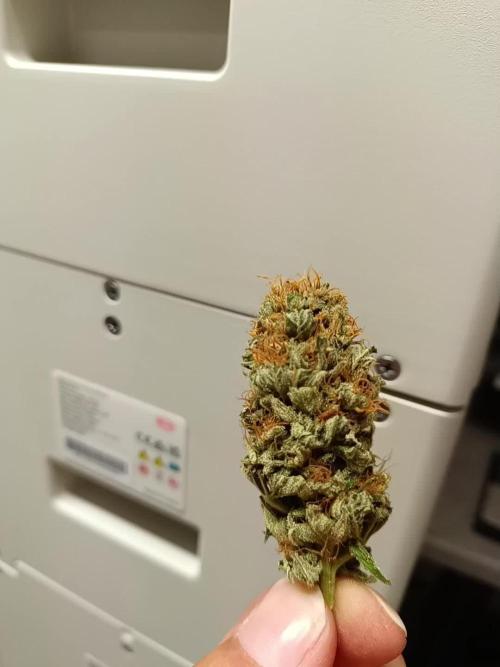


Likes
Comments
Share
@letmegrow85
Follow
Die gezwitterte pflanze habe ich nicht gewogen und zu früh geerntet, die anderen beiden bin ich mit zufrieden, die eine hat kurz vor 70 abgeworfen und die andere 66 bei 61% rlf Rest feuchte.
Wirkt ganz gut.

Likes
7
Share
@OwlGang_Uk
Follow
Week 4 - Sometimes You Got To Lose To Gain Phase 2 - I took off the fan leaves so that the plant would redirect its energy into the stem and branches rather than the leaves. I also cut of the top heads so that the energy would go into the development of the 2 heads below.

Processing
Likes
17
Share
@Ashbash
Follow
60x60x120cm tent. Basic cheap one not sure what brand, if any. 200w CFL for veg, and a 250w HPS for bloom. Gonna continue with biobizz and maybe a couple of other supplements later down the road. Soil is biobizz allmix. Says pH ready so no need to adjust. Hopefully that's right!

Likes
5
Share
@DogDoctorOfficial
Follow
🌱 Sour Diesel — Week 8
(Flower Week 3) — Strategic Reset Week
⸻
🔁 Quick Recap — Where We Are
• Genetics: Sour Diesel
• Timeline: Week 8 from seed
• Flowering: Week 3
• Height: ~60–70 cm (compact structure)
• Room Temp: 28°C
• RH: 65%
• Feed EC: 2.9
• pH: 6.5 (kept above 6.0 intentionally)
• Lighting: LED
• Action this week: Strategic defoliation
This plant is not tall — she’s compact, dense, and structurally tight.
Which means airflow and internal light penetration become critical early.
And that’s exactly why this week mattered.
⸻
🍃 The Defoliation — Not Aesthetic. Architectural.
This was not cosmetic trimming.
It was:
• Removing large fan leaves blocking interior bud sites
• Cleaning inner congestion
• Opening airflow channels
• Resetting light distribution across the canopy
• Helping the entire room environment (not just this plant)
The room needed air — this plant was advanced enough to handle stress.
That’s key.
Week 3 of flower is the transition window:
• Stretch is slowing
• Bud sites are set
• Energy shifts toward stacking
At this stage, a strategic defoliation:
• Improves transpiration efficiency
• Reduces microclimate humidity pockets
• Prevents internal leaf-to-leaf condensation
• Encourages bud site activation below the top canopy
This was structural architecture. Not haircut vanity.
⸻
🌡️ 28°C in Flower — “Too Hot?”
Let’s Go Deep.
People panic when they hear 28°C in flower.
But here’s where most growers confuse:
🔥 HPS vs LED Heat Behavior
Under HPS:
• Radiant heat warms leaf surfaces directly
• Leaf temperature often equals or exceeds room temp
• 28°C air under HPS can mean 30–32°C leaf temp
• That pushes VPD dangerously high
Under LED:
• Less infrared radiation
• Leaf surface temp is typically 1–3°C LOWER than room temp
• So at 28°C room temp, leaf temp might be 25–26°C
And VPD calculations depend on leaf temperature, not air temperature.
⸻
🌿 What Is Leaf VPD?
VPD (Vapor Pressure Deficit) measures the difference between:
• Moisture inside the leaf
• Moisture in the surrounding air
But if you calculate VPD using only room temp, you’re missing the real transpiration dynamics.
With:
• 28°C air
• ~25–26°C leaf surface (LED)
• 65% RH
Leaf VPD sits in a very workable mid-flower zone.
Not extreme.
Not stress-inducing.
Not shutdown territory.
We’re driving metabolism, not cooking terpenes.
⸻
💧 Why 65% RH Isn’t Dangerous Here
Context matters:
• Good airflow
• Opened canopy
• Compact but cleaned structure
• Early-mid flower (Week 3, not Week 7)
At this stage:
• Pistils are forming
• Bud density is still moderate
• Transpiration is active
High humidity becomes dangerous when:
• Bud mass is dense
• Internal airflow is poor
• Late flower resin traps moisture
We’re not there yet.
And we just improved airflow with defoliation.
⸻
⚡ EC 2.9 — Aggressive but Intentional
That EC is strong.
But:
• Plant is compact, not oversized
• Sour Diesel can eat
• pH 6.5 keeps availability wide (Ca, Mg, P balance)
The key will be:
• Watching leaf tips
• Monitoring runoff behavior
• Watching for clawing or salt stress
Right now, if she’s praying and stacking, she’s handling it.
⸻
🔍 What To Expect Next Week (Flower Week 4)
After defoliation:
You may see:
• Slight pause (24–72 hours)
• Increased vertical bud push
• Better lower-site activation
• More defined pistil clustering
• Stronger apical dominance response
If recovery is clean:
• Buds begin early stacking phase
• Internodes tighten
• Resin production initiates at bract level
If stress appears:
• Slight leaf droop
• Tip burn acceleration
• Reduced upward leaf angle
But based on structure and timing — this looks calculated, not reactive.
⸻
🧠 Why This Week Matters Long-Term
This week determines:
• Airflow pattern for late flower
• Mold resistance later
• Bud density uniformity
• Final trim efficiency
• Light-to-bud conversion efficiency
This wasn’t about now.
This was about Week 7 and 8 survival.
⸻
🙏 Appreciation Section
To:
• The OGs here since seed
• The new followers discovering the journey
• The silent readers
• The critics
• The skeptics
• The lovers
• The haters
• The platform
• The sponsors
• The community
• Grow Diaries itself
Everyone has a place here.
Growth happens in public.
And that takes courage.
Respect to all of you.
📡 Please stay tuned they can try and take us down but we never quit https://www.youtube.com/@DOGDOGTHEDOCTOR NEW
🙏 Thank you for your patience and continued support.
FOR DISCOUNT CODES AND MORE JUST FOLLOW THE LINK https://website.beacons.ai/dogdoctorofficial
📲 Don’t forget to Subscribe and follow me on Instagram and YouTube @DogDoctorOfficial for exclusive content, real-time updates, and behind-the-scenes magic. We’ve got so much more coming, including transplanting and all the amazing techniques that go along with it. You won’t want to miss it.
GrowDiaries Journal: https://growdiaries.com/grower/dogdoctorofficial
Instagram: https://www.instagram.com/dogdoctorofficial/
YouTube: https://www.youtube.com/@dogdoctorofficial Deleted by Youtube
Vimeo : https://vimeo.com/dogdoctorofficial Under construction stay tuned ⸻
Explore the Gear that Powers My Grow
If you’re curious about the tech I’m using, check out these links:
🔆 Lighting & Environmental Control
• Future of Grow — Advanced LED lighting technology
https://www.futureofgrow.com/
DISCOUNT CODE: DOG20
• Lumiflora — Under-canopy LED lighting
https://lumiflorade.com/
• TrollMaster — Environmental controllers and automation gear (past collaboration)
⸻
Genetics
• Zamnesia Seeds — Genetics used in this project
https://www.zamnesia.com/
⸻
🌱 Soil, Substrates, Boosters & Root Support
• Plagron — Substrates, bio mixes, and supportive products
https://plagron.com/en/
⸻
🎒 Storage, Curing & Preservation
• Grove Bags — Curing and storage solutions
https://grovebags.com/
⸻
📸 Photography Equipment & Tools
(Not sponsors, but part of my creative toolkit)
• Sony A6700
• Sony full-frame macro lens + few more
• Stacking photography workflow - learning
• iPhone (for behind-the-scenes shots)
We’ve got much more coming as we move through the grow cycles. Trust me, you won’t want to miss the next steps, let’s push the boundaries of indoor horticulture together!
As always, this is shared for educational purposes, aiming to spread understanding and appreciation for this plant. Let’s celebrate it responsibly and continue to learn and grow together.
With true love comes happiness. Always believe in yourself, and always do things expecting nothing and with an open heart. Be a giver, and the universe will give back in ways you could never imagine.
💚 Growers love to all 💚
📸 P.S. – The Eye Behind the Lens
All photos in this diary (for now — except for the ones showing the camera, which I took with an iPhone) are taken with a Sony A6700 paired with a Sony full-frame macro lens and a few more.
Photography is part of the story — it’s how we share the fine textures, the glow, and the quiet details that words can’t always capture.
I’ve also started experimenting with photo stacking — a technique where multiple images, each taken at a slightly different focus point, are layered together to create one perfectly sharp image from front to back.
It’s not digital enhancement or AI; it’s pure photography — a way to reveal the plant’s beauty in microscopic depth, from trichome to petal.
You’ll even see a few shots of "ghost me" capturing the shots — camera, lens, setup — because every grow deserves not just to be cultivated, but documented like art.
FOR DISCOUNT CODES AND MORE JUST FOLLOW THE LINK https://website.beacons.ai/dogdoctorofficial
NEW DISCORD - Official Server Invite Link : https://discord.gg/ksjAkA5T74

Likes
25
Share
@Trippie
Follow
Thick flowers 8p gettin a big top 😛
These plants are not bigger than 30cm, crazy!! 🤩🤩
Likes
19
Share


Likes
63
Share
@Canna96
Follow
Strain grew very easy, I mixed nutrients and dumped em in the hopper every few days and they did the rest. Very encouraging to be able to pull some very sticky and much thicker flowers than my first try. Very nice job Sweet Seeds with the Jack 47 Autos. The quality and smell is amazing, I am going to continue to cure, but after 8 days of drying and 9 days of curing I am very impressed.


Likes
7
Share
@Staffedition
Follow
Всем привет друзья!
Что то я заробался, всё никак не находил время показать свою девочку.
Куст мне очень нравится, с прекрасной генетикой.
Всем добра и мира!

Processing
Likes
23
Share
@GrowGuy97
Follow
Wish the buds would have got a little bigger but feel like that’s particularly my fault for a short Veg but overall I am blow away by the outcome for all the seeds to just be random bag seeds! 2 of the plants are drying now 3rd one will be cut tomorrow & the other 2 got probably 2 more weeks! Will do a taste & smoke report and also give a weight as soon as they dry & cure a little bit but honestly couldn’t be happier with my first grow! Thanks for all the support & help along the way & happy growing friends!🤙🏼✌️🏼🌱
Update on 1st plant - dry weight 42g, still smelled pretty Earthy when I put it in the jar but the smell is definitely coming out now, extremely sticky & frosty buds❄️: 1:🏼🙏🏼
Update - plant 2 Dry weight was 40 grams! Extremely happy with the out come this is honestly some of the best bud I have ever smoked! Amazing to me this came from a random bag seed, it has a very citrusy flavor, smells & smokes amazing! Honestly a 10/10 in my book, wish I could knew what strain this was so I could grow it again!😫❄️✌️🏼🌱
Update - plant 3 Dry weight 34g, smells & look phenomenal, the buds are much smaller & had the smallest yield so far but this is by far the best smelling so far! Will have a smoke update on this one soon, stay tuned friends & happy growing!✌️🏼🌱
Update - plant 5 dry weight was 52g it dried a little faster than plant 4 which I will probably jar tomorrow! Will update again with a smoke report soon, this plant brought my total so far up to 168 off 4 plants👍🏼 Thanks for following friends & happy growing! Also the butter I made from the trim was 🔥🔥


Likes
1
Share
@Bwright_315
Follow
A tale of two plant that are the same strain
Plant A is growing like a champ just waiting for tricone to be turn red10% but other then that not issues
Plant b I gave a hair cut and trim hoping the buds will fatten up also I love one of my light closer to see if that will help


Likes
11
Share
@punktkomma
Follow
Finally everything harvested. We had terribly high humidity combined with warm temperatures, which is why I harvested the top of the plant about 5 days earlier and let the flowers at the bottom ripen a little more. I will update as soon as it is completely dried with a smoke report and dry yield
Processing
Likes
3
Share
@cmstacker01
Follow
Week 3 flowering.
Buds are
slowly forming, plants still going good, cold weather is hitting my area now, hope it won't last long, might extend flowering period by a couple days if it stays this cold.

Processing
Likes
4
Share
@mr_smooke
Follow
7 week is behind us. On day 45 i setting up net for holding buds and a bit more fullit up tent. There is past 3 day since she started flower. In this update i can not move out of grow room and some picture is not so perfect
Peace and love ✌️😁💜💚

Likes
37
Share
@The_Bearded_Grower
Follow
Welcome to Day 43 29/1/2021 she is coming along great but I wish she would stop stretching lol not much else to say really . Happy growing and keep your stick on the ice


Processing
Likes
5
Share
@AgroCultiveta
Follow
Séptima semana de los esquejes, va todo bien y nada fuera de lo común.
Empecé a mezclar agua purificada con el agua de la llave para tener una EC mas equilibrada ya que aun no me llega el producto que había comprado, pero de alguna manera tenia que solucionarlo y por el momento va bastante bien.
Les realice una defoliación a los dos esquejes para que se definan bien sus brotes "principales" y estos tomen más fuerza. Los dos respondieron bastante bien a esté estrés.
Hoy agregue la malla para scrog pero aún ninguna llega a la altura pero pronto lo harán.
También estoy esperando que la Negra 44 que los acompaña crezca lo suficiente para comenzar la floración por esto deben quedar alrededor de 2-3 semanas de vegeta.
La temperatura con el led apagado esta entre 16-17ºC y ya no puedo hacer más. Hice todo lo que estaba a mi alcance así que lo mas probable es que se mantenga en esos rangos durante el cultivo. Espero que esto no genere mayores dificultades en el cultivo.
Cualquier recomendación sera bien recibida!!
*Al final una foto del guardián del cultivo. Muchas veces se colara en el contenido que subiré. 😅 😂
Likes
Comments
Share
@TiRobotProds
Follow
Les têtes sont epaisse et gras bonne génétique. La banque c'est hight-supplie.com pour les growers qui sont intéressés merci a vous.
Likes
27
Share
@Ganjagrandaddy
Follow
Flip day 4: I have not diaries as flowering yet as they are not yet showing heads. I consider this transition period to be full veg and get a more accurate timing for flowering. once they show
I will be flowering.
All three have been responding well to their switch.
Wedding Cake is a chunky and good sized girl now and after stretch should be my perfect grow size to room size. She will be a heavy budding girls by the look of her stems at this point. nodes are stacked closely so will stay sticky too.
Black ghost. o.g has thankfully woke up a little more now she realises winter is coming and she needs some cock !!!. lol She has thickened intensely below the canopy and does have some very strong looking side branching fighting through too. Her leaves are very indica thick and dwarf her GG#4 neighbours. I can see her as a finished girl and i think she will surprise me with yield too.
Gorilla Glue #4 is growing in expected and classic "skinny minney" style with her ebony looking branching and svelte appearance. She ain't fooling me as she is creeping up in size and height. The leaf colour is a little bit "veiny" but let's see how she stretches. I expect big things from this sneaky lady too.
They are a credit to Original sensible seeds and so far a very responsive group.
Be Safe and healthy
