
Likes
Comments
Share


@Natrona
Follow
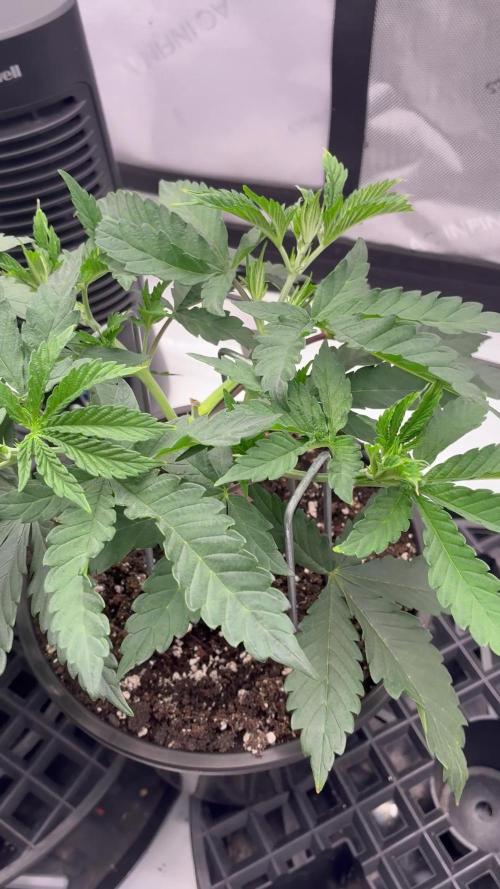
Tropicanna Poison XL Auto
W4F2
7/20-26
The hot weather returned with humidity and days of scattered thunderstorms. I fertilized once this week with I49 and top dressed with worm castings since I saw some yellow leaves near the bottom. Thankfully with all the rain we’ve had this month she doesn’t show any deficiencies or bud or root rot. I fertilized with I49 grow 1 tbsp/gal & 2 tbsp I49 Flower.
With the extreme heat and rain, my auto Tropicanna Poison XL Auto had a huge stretch a full 7 inches this week and now at 22 inches tall. There are no nutrient deficiencies and demonstrates resistance to fungal diseases.
Thank you all for your continued support and encouragement. Your likes and comments motivate me to keep sharing my journey. Let’s continue to learn to grow together!
Stay green, growers love 💚🌿
💫Natrona💫

Likes
3
Share

@NyBushDr
Follow
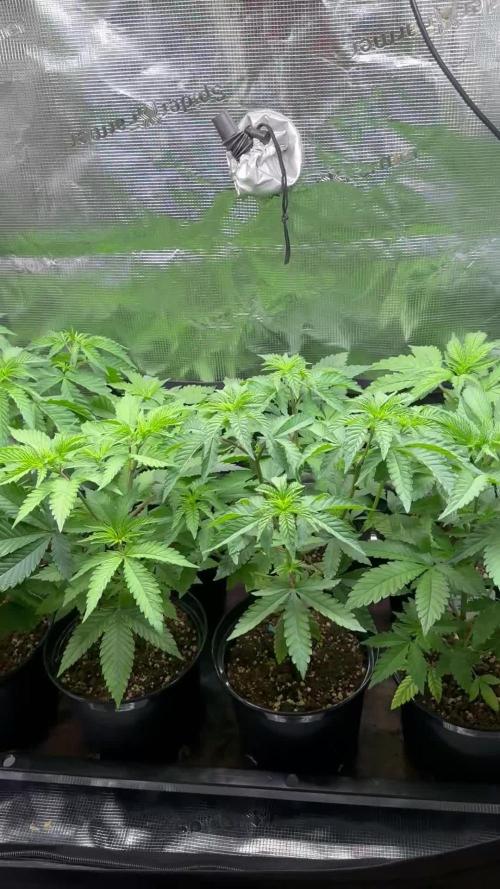
Good morning, weekly update time! We just finished up week 3 of veg as we land on day22 now. I noticed these ladies like it a little cooler as anything over 80 gives me some tacoing 🌮! I dropped lights on temp to 79 and have humidity at 70, I slowly changed vpd from .9 to 1 over the week ! The girls recovered from mainlining quickly and needed their first training, because of that I started using silica to harden up those trained mains! From here on out I’ll give fish shit and silica every other watering. The ladies got their bi weekly top dress of 1/4 cup worm castings to keep all that natural goodness working into the soil and down to the roots. I’m very happy with the way the run has progressed !
Likes
11
Share


@NoLimitQ
Follow
27/03/21 убрал растение на сутки в темноту перед харвестом.
28/03/21 харвест

Likes
62
Share


@Reyden
Follow
La tenda (4x4) è in fioritura da circa 2 settimane e la SF2000 lavora a pieno regime riuscendo a coprire bene e in maniera efficace praticamente ovunque, ho trasferito la Purple OG Punch di SSSC che è l’unica autofiorente e mi stava crescendo troppo in altezza per stare nell altro box e quindi aggiungerò lei in questo diario!😄💥🎬💚
Tutte le Gorilla 🦍 sia di Zamnesia che di RQS sono state defogliate nelle foglie più gialle e con carenze, le 3 piante di Seeds Mafia invece continuano così cercando di recuperare le altre in altezza…ora le Gorilla 🦍 sono tutte a 1.800 EC mentre le 3 di SM sono a 1.600 EC, la PPOG è a 1500 EC.
Ci vediamo presto con altri aggiornamenti e grazie di essere passato!
Grazie Spider Farmer ancora per questo LED SF2000, questo nuovo modello fa veramente la differenza e le piante crescono in maniera ottimale!!! 💯🙌🌱


Likes
7
Share


@YehGreen420
Follow
Uma planta que ainda está para ser testada em questão de uso, no planteio foi meia fraquinha mas devido ás circunstancias.
Semente na terra no dia 17-04-2024 e cortada no dia 07-07-2024,
81 dias de vida!!!!!


Likes
28
Share


@blazin_skywalker
Follow
2/4/19- Blue is right at the 5th node. I'm letting a little more growth happen so I have proper room to top without harming the nodes. Her leaves are nice, fat, and healthy!
2/5/19 - Decided to experiment with a FIM last night at midnight 😎 Let's see what happens! ✌️
2/6/19 - Reservoir Δ Day!
Likes
2
Share


@C_More_Budz
Follow
Things are goin by smoothly started to give them some calimagic in low doses so they can get use to it. The upper 4 more so towards the left I believe are white Runtz because they all have similarities, and the bottom three in a triangle are all mac and jacks because again they all have similarities, the last two smaller ones I believe may be gelato but I still don’t know. Goin to start giving them low dose feeds and gradually increase it. I’m gone try my best to upload every Thursday and make a YouTube video as well I will provide all links once things are set in stone. Any input is appreciated happy growings growmies

Likes
35
Share


@nonick123
Follow
Día 71 (24/03) La planta lo ha pasado mal tras 2 días sin riego (casi 3 ciclos completos de 12 horas de luz sin riego...)
A lo que se suma altas temperaturas en mi zona, han tenido 28 ºC durante las horas de luz...
Las hojas inferiores se encuentran caidas y alguna quebradiza...
Le hago un riego con 750 ml H2O EC 0,45 a ver si se recuperan....
Día 72 (25/03) Riego con 250 ml H2O EC 0,45
Elimino las hojas quebradizas que no se van a recuperar después de la "sequia" que han pasado
Se encuentra en buen estado general y formando nuevos pistilos! 😍💥
Día 73 (26/03) Riego con 250 ml H2O EC 0,45
Día 74 (27/03) Riego con 500 ml H2O EC 0,45 con BIO PK 5-8 a 10 ml / L (solo Limon Blanco)
Riego con 100 ml H2O EC 0,45 (el resto)
Reviso los tricomas, y GG4 Sherbet FF y Blueberry Pie F1 solo les faltan unos días! 😍💥
Día 75 (28/03) Riego con 400 ml H2O EC 0,45
Día 76 (29/03) Riego con 500 ml H2O EC 0,45
Día 77 (30/03) Fiesta de la Cosecha!
Reviso los tricomas y están un 10% ambar, 85% nublados y 5% transparentes
🚀 FastBuds 15% DISCOUNT code "NONICK" 2fast4buds.com @fastbuds.official
🚀 Khalifa Genetics - https://khalifagenetics.com/product/lemon-blanco-v3/ @khalifa.genetics
💦 BioTabs 15% DISCOUNT code "GDBT420" biotabs.nl/en/shop/ @biotabs_official
🌱Substrate PRO-MIX HP BACILLUS + MYCORRHIZAE @promixmitch @promixgrowers_unfiltered
💡2 x Mars Hydro FC1500 EVO Led Grow Light (2024 NEW FC 1500-EVO Samsung LM301H 150W LED) - https://marshydro.eu/products/fc1500-evo-led-grow-lights/ - https://www.amazon.de/dp/B0CSSGN5D8?ref=myi_title_dp


Likes
6
Share

@CalGonJim
Follow
1/19 1am MONDAY...TOO STONED TO TYPE..WHAT THE HELL IS THIS THEN..HEY SHUT UP....WAIT...IS THAT ME?😂
1/19 5 AM.🚨 I GOT THE HOLY TRIANGLE OF WEED THE WHOLE FUUCK'N TRAILER PARK IS HERE!!!!! Finally got black tea Tangie in the ground so Julian bubbles and Ricky are all growing with Montel and ice t.
1/20 1:20PM VEGING PERFECT AT 30 WATTS!!!
1/21 10:11 AM. The whole fucking park is here. Julian sprouted!!! Bubbles and Ricky are doing great. I’m gonna top them and then I’m gonna start them over from clones so they grow roughly the same time as Julian and I’ll keep the Ricky and the bubbles others as mother plants and I’ll just keep them going.
1/21 10:15 AM vegging 12 inches 30 W Samsung LED Mars Hydro light perfect
121 1:10 PM I moved black tea Tangie into the germination station. The 2 gallon fits in here just fine. This will be fine for germination.. She’s sprouted only after about 40 hours so she’s really strong.


Likes
6
Share


Likes
19
Share


@AsNoriu
Follow
Day 8. Girls are happy, nothing to add, let's see flowers !!! ;))
Pain to wait ...
Found some bugs on those plants aswel, will apply neem oil therapy in a minute.
Day 10. Yesterday soaked in soap and neem oil main tent, today was dry room day ...
I hate applying any soap for living soil, its a big disaster if loads of spray will get into pot, plus changes of ph.
I can only hope for best, but first valuation after 4 hours shows no visible bugs, sticky traps installed, they should and have to make it !!!! ;)))))
No flowers yet, just pre starts to form, so neem should not get into bud and destroy taste ...
Fingers crossed ...
Girls got theirs name by size, so Tallest, Smallest and Standard ;)))
Think to raise Smallest pot in a week, she is a bit too far, hard to find good lamp distance for all three ...
Happy Growing !
Likes
3
Share


@Joaka
Follow
Si bien se ve un crecimiento explosivo, no veo un buena generación de tricomas, debe ser porque aún no saco el nitrógeno
Likes
4
Share


@BioGrowBayer
Follow
Keine Komplikationen, alle Pflanzen sehen gesund aus und entwickeln sich gut.
Der Lichtzyklus wurde über 6 Tage hinweg schrittweise reduziert, jeden Tag eine Stunde weniger Licht.
Heute ist der erste Tag mit 12/12 Licht-Dunkel-Zyklus und damit der offizielle Start der Blütephase.
Erste Anzeichen der Blüte sind sichtbar, Internodienabstand nimmt zu, das Wachstum verlagert sich in die Höhe.
Keine Mangelerscheinungen oder Stressanzeichen.
In den kommenden Tagen wird das Stretching genau beobachtet.
Ab nächster Woche beginnt das Monitoring der Vorblüten.
Likes
4
Share

@C_More_Budz
Follow
FOLLOW THE GROW———>https://youtu.be/SjZ-eizIP7o
Growth has been steady and lush considering the fact that there has been a 2 week heat wave.
For the plants in the bucket the 2 smaller ones are phenos of my previous Fanta Sea RBX grow, and the bigger one is a Sherb clone from my previous grow as well
Likes
16
Share


Likes
35
Share


@DudeGrowsWeed
Follow
Update February 4, 2019 (Video and Pics actually taken Feb 1).
I’m figuring I’m about mid-way into flower now with the 6 girls I have flowering. Overall, I’m very happy with how things are going. The buds are coming in strong on all plants, they are stinky and sticky and I’m not complaining about anything really. But, I still see more yellow than I like. Last week I fed Recharge, Mammoth P, MegaCrop, and CalMag+. I don’t feed all of those at once, Recharge & Mammoth P one time, MegaCrop & CalMag+ the next, then the 3rd is usually straight water. I also seem to be able to go at least a day between waterings/feedings. Anyway, yellowing leaves during flower seems to be most common with a Nitrogen deficiency as far as I can tell. I’m tempted to feed in a round or two of veg nutes to see how that goes.
One more thing… I transplanted my clones and seedlings into larger nursery pots today. They were transplanted into pots with soil that has been composting/recharging for almost a month now based on some of the tips from the books I have been reading. I’m excited to see how they react to their new environment.
Likes
34
Share


@The_Bearded_Grower
Follow
Welcome to week 6 I started to see signs of nutrient deficiency during the course of week 5 and decided to correct this deficiency by trying to lower the nutrient level by all signs it appears to have worked. I was using the recommended level of nutrients on the bottle but after having conversations with fellow Growers I come to the conclusion that it was still too strong for my plants so I'm using half the dosage. Doing that has resulted in the plants growing very healthy no signs of deficiency in any of the leaves above the lower leaves so it appears that I've corrected the problem. That's my update for the week keep your stick on the ice
PPM's are at 1125 but 376 PPM of that is just the water and in installing a water cleaning system to see if i can bring that down

Likes
11
Share


@Lazuli
Follow
Preflowers 😁 shes going to have a good size im lucky
From here i dont touch her just the LST