
Likes
Comments
Share

@Northern_Ent
Follow
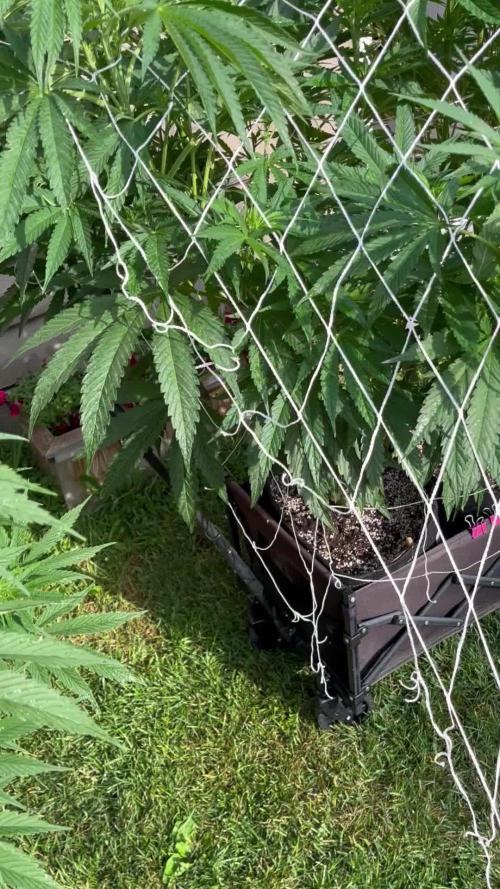
Aug 1: strong start to the week- it’s been hot and sunny lately and this will be our third and final day at 30 C.
Lemon Cream Kush looks great and is flowering now after two full weeks of force flowering (12h of darkness).
Aug 4: added another loose Scrog net layer to hold it together but to also allow separation of the colas to expose them to sunlight.
Aug 5: plants in this wagon are getting too big to move easily into garage. Will stop forcing and switch back to 15.5 h of daylight in yard. Still using far red light at dusk as a bloom booster.

Likes
54
Share


@MrJones
Follow
MrJones Cream Mandeiran Auto XL - ViparSpectra XS2000 240W Infrared Full Spectrum LED Grow Light
´🍪⊱╮🍪╰⊰🍪 WEEKLY GOALS 🍪╰⊰´🍪⊱╮🍪
🏡Indoor - 3"x4"x8" Custom Built Grow Closet
🌞Environment - 80F and 50%Humidity - using Humidfyer as needed.
🌾LST and Defoliation - this strain likes to stretch!
🗓️Week 2 Seedlings
⚱️5-Gallon 📊6.2 PH
💧 Feeding / Using Dr. Earth Dry Organic Amendments - Home Grown & Bud / Bloom Booster
🌞ViparSpectra XS2000 240W x2 Infrared Full Spectrum LED Grow Light
🕷️ IPM - Will be using Green Cleaner" 1 OZ per Gallon, and CannControl from Mammoth alternating between products each month for Integrated Pest Management.
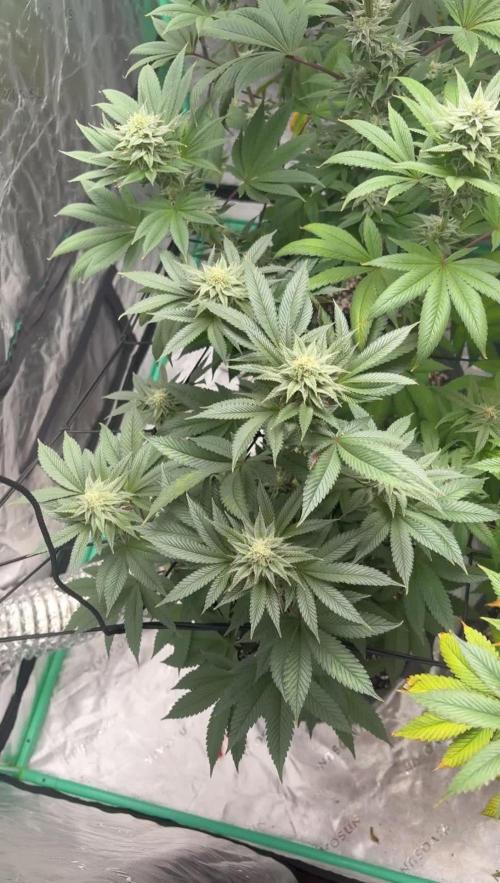
´🍪⊱╮🍪╰⊰🍪 PLANT UPDATES 🍪╰⊰´🍪⊱╮🍪
📝 Notes - Girls are just blowing up, they have doubled in size and started producing their second and third nodes, the leaves look perfectly healthy! The ViparSpectra XS2000's are just killing it!
╰⊰🍪╰⊰´🍪⊱╮🍪╰⊰🍪╰⊰🍪╰⊰´🍪⊱╮🍪╰⊰🍪╰⊰🍪╰⊰🍪⊱╮
🔶Sunday 06.20.21/ Continuing feeding just H20 PHed to around 6.0/6.5
🔶Monday 06.21.21/ Continuing feeding just H20 PHed to around 6.0/6.5
🔶Tuesday 06.22.21/ Continuing feeding just H20 PHed to around 6.0/6.5
🔶Wednesday 06.23.21/ Continuing feeding just H20 PHed to around 6.0/6.5
🔶Thursday 06.24.21/ Continuing feeding just H20 PHed to around 6.0/6.5
🔶Friday 06.25.21/ Continuing feeding just H20 PHed to around 6.0/6.5
🔶Saturday 06.26.21/ Continuing feeding just H20 PHed to around 6.0/6.5
╰⊰🍪╰⊰´🍪⊱╮🍪╰⊰🍪╰⊰🍪╰⊰´🍪⊱╮🍪╰⊰🍪╰⊰🍪╰⊰🍪⊱╮
Cream Mandarine XL Auto®️ Information
Tall-stemmed auto-flowering strain. This high-yielding 4th generation auto-flowering strain is the resulting hybrid from the cross between selected specimens of our Cream Mandarine Auto®️ (SWS29)) and a Super Tai’98 elite clone.
The genetic coming from the Super Tai’98 elite clone contributes with interesting Sativa characteristics to this hybrid, such as bigger size, but also subtle aromatic and spicy tones with hints of wood and nuts. The so much appreciated Cream Mandarine Auto®️ genetic contributes with traits from the Indica side, such as high flower and resin production, but also sweet and fresh aromas with tones of citric fruits of the mandarin orange type.
DATA SHEET
Variety SWS55
Indica: 35% / Sativa: 63,4% / Ruderalis: 1,6%
THC: 18-23% · CBD: 0,6%
Indoor Yield: 450-650 g/m2
Outdoor Yield: 50-300 g/plant
Indoor/Outdoor Harvest: 9 weeks from germination
Height: 110-150 cm

Likes
26
Share


@C_More_Budz
Follow
Smell is getting intense which is a good problem I always like having lol got the carbon filter running 24/7. The GroBucket system really keeps the soil at the perfect moisture level. Made a aeroponics system that’s got me intrigued lol but all and all things are coasting by it’s just on me to keep environment stable and the reservoirs filled. Check out the channel I got one video I need to upload then I’ll be uploading daily on YouTube check me out
https://youtube.com/@C_More_Budz


Likes
77
Share


@Ukfarmer420
Follow
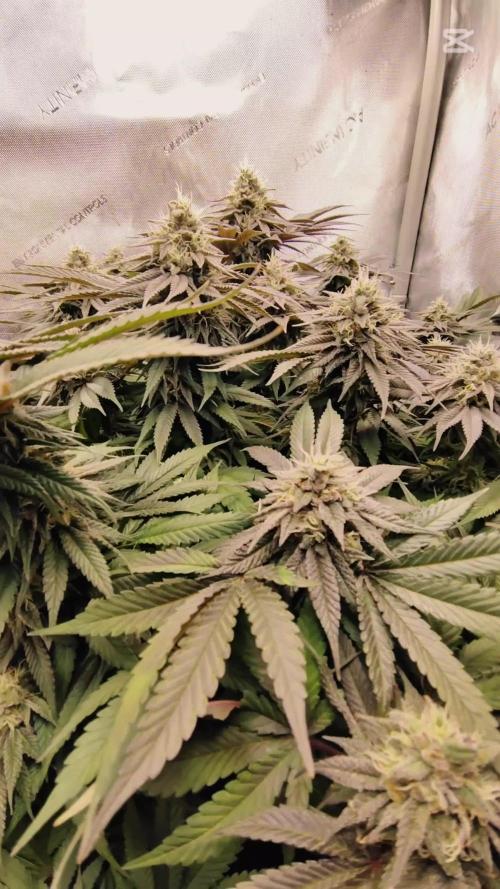
So I thought the plants was going to be a flop but they turned it around, really long time tho for a auto flower, I could of ran photos with a better yield, but never the less these look like 10/10 nugs and smell amazing i can't wait to see how these look dried off.


Likes
34
Share


@Grey_Wolf
Follow
Organic Cookies
Original sensible Seeds Girl scout cookies
8 weeks of flowering completed
29th March 2020
Hi Everyone I hope you are all well and staying safe during these strange times we are all facing at the moment.
This Girl scout cookies plant is getting closer everyday but so is the risk of mold .
Ive already needed to chop out a few pieces of flower that were starting to turn moldy so it's been a very stressful and watchful week for me.
Ideally I'd like to let this plant go atleast another week or even two but with the weather the way it is and the forecast for is yet to come suggests i will need to harvest well before then
if I'm to get uneffected buds that can be safely smoked.
I havent been game to even water her for the last 3 days due to the very high humidity but luckily she is showing no sighns of being thirsty or needing any food.
That is all for this weeks update Thankyou for stopping by 👍

Likes
2
Share

@TTerpz
Follow
Fed with nutrients 8/29
Start of week 5 flower : 8/30/25
Fed with water 9/3
Fed with nutrients: 9/5/25


Likes
63
Share


@CrazyHorse
Follow
Good afternoon gromies 😄 😇 😊
Week 9 was absolutely crazy. All my girls start to achieve an about high.
NYC diesel is a smallest as she was but developing beautiful small hairy flowers 💐 😍 😇
Have a good night, You Lovely Girls Growers 😇 🙏 😉
Likes
24
Share

@Doofy
Follow
She looks ok 👍
Looks like beginning fase of amber, not yet, but still, very close! Lil bit.... Got a few days more
Likes
7
Share


@Cannabeast40
Follow
Week 3 and a repot is done and now in day 3. Finally it’s settling down after the repot, which was not pretty at all😂
Hope to get some massive plants this run 🌱
________________________________________________________________________________________
Light from @MedicGrowLED 😎
NEO 780 LED🔥
780 Watt⚡️💥
PPF of 2184 μmol/s & 2.8 μmol/J🔥
Full Spectrum V1/F1 🌈
WiFi smart connection & Smart Aura Control 😱


Likes
26
Share


@BlackDragon22
Follow
La più piccolina di tutte la Cherry ma anche lei super cime compatte ed odore fuori dal normale, in attesa di essere secca e pesata anche lei, resina ovunque anche per lei, non vedo l'ora di fumaria, nonostante attaccata dalle mosche bianche per prima ha resistito molto bene alle avversità esterne. Grazie fast buds, grazie amici che mi supportate e a presto per migliori aggiornamenti!
Likes
3
Share


@spacetimeman
Follow
Flowering continues. I regularly do some defoliation to improve airflow and light penetration, but she actively raises new leaves.

Likes
150
Share


@RussianGrower
Follow
Hello to you from Russia, my friends from around the world. I thank all those who follow my progress and support me. Good luck! It's time to update my 13-week diary. I plan to make a harvest in a week, the plants are already fully talking about their ripeness. In General, things are going well for me, but due to weather conditions, the trip to the guerrilla cannabis plantations is postponed indefinitely. But I don't have to water them. Soon I plan on growing a new diary when the postal service delivers me new seeds and fertilizers for clones.


Likes
2
Share


@regionallystoned420
Follow
8 weeks into flower , white pistels still forming but thricombes are ready .

Likes
14
Share


@LokalGrenz
Follow
Did defoliation on all three never done it before not sure did k over do it but they needed the trim I had a lot of fan leaves blocking bud sights
Jan23 started to use the self watering pots from acinfinity gallon in each pot with fish shit


Likes
7
Share


@Ieiogrow94
Follow
Eccoci qui...
Tutto va per il meglio, questa settimana si inizia a vedere la resina e ora si inizieranno a formare le cime, per questo aggiungo Sugar Shot di @xpertnutrients vedremo l'evoluzione settimana prossima.
Tutto alla grande settimana molto interessante sul profilo della resina e dell'odore ora vediamo come gonfiano le cime.
Grazie a tutti per il supporto🔥🌲❤️

Likes
7
Share


@TerpToad
Follow
Welcome to the Dutch Passion Growing Competition 2025!
I choose Banana Blaze Auto for competing in this contest. The seeds were given to me by Dutch Passion for free. Thanks!
These are my first indoor-grown autoflowers. I am looking forward to fast growth and big headbuds, lets see how the Banana Blaze likes the AutoPots!
You will see that the seeds werent put directly in the center of the pots. I am planning on applying LST during the grow and gave myself some space to work with before hand. Stay tuned :)
Update day 4: a small miracle happened - all seeds popped up on the same day! And by all I truly mean all, not only the three Banana Blaze Auto, but my two additional plants aswell! With all my autos perfectly synchronized, I can now start on a good note into these grows. Soon all plants exept the Banana Blaze sisters will move outdoors.
Processing
Likes
6
Share


@Lazuli
Follow
The plants stretched a lot this week also started flowering
so i started with 4 of these seeds.
3 of them got the exact same hight and width so i took out the smallest plant to make seeds with it in another room.
the cannopy is filled nice with just the three of them i hope stretching stops and flowers start to fatten up.
they will continue to flower under this 104watt Led untill harvest
Likes
7
Share


@420lor
Follow
Bueno bueno, pues empezamos la recta final de esta maravilla de planta. A tan solo 2 semanas como máximo para el corte, tienen un aspecto espectacular, han engordado perfectamente y están duros como piedras!! Una genética que volveré a prepetir
