
Likes
Comments
Share

@DogDoctorOfficial
Follow
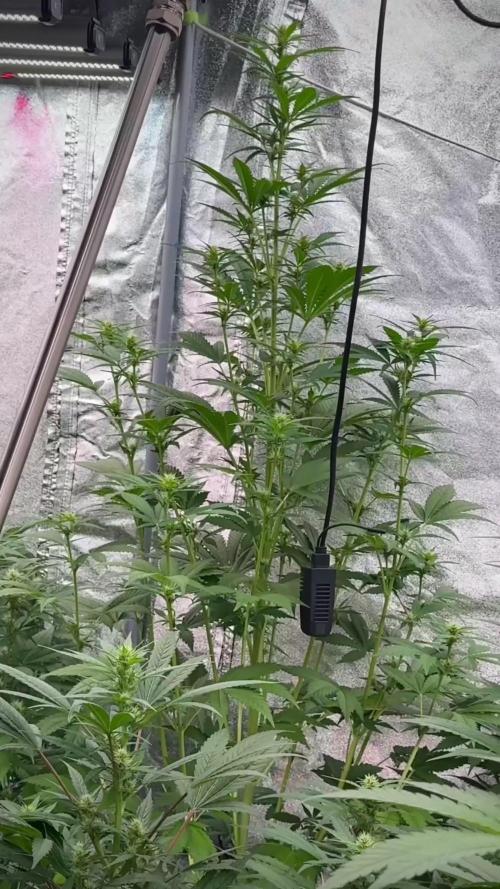
Week 2 Flower – Roller Coster Haze (Zamnesia Seeds)
Full Bloom Ahead
The girls aren’t just entering flower — they’ve rocketed into it. From what seemed like a short transition, they’ve gone full throttle: pistils shooting, buds forming, leaves praying, and roots bursting through the medium.
⸻
Growth Update – No Pre-Flower, Just Boom
This week marked an unusually fast shift:
• Visible Pistils Everywhere – no gradual pre-flower here; instant bloom mode.
• Budlets Forming – early structures already showing stacking tendencies.
• Stems & Roots – while not the thickest stalks, the root zone is bursting with vitality, visibly surfacing in some areas of the soil.
• Canopy Size – they’ve outgrown the closet! Photos this week stay inside the tent, it’s just not safe to move these ladies anymore.
⸻
Irrigation Upgrade – Semi-Auto in Motion
With the room expanding and multiple genetics running, it’s time to make watering smarter:
• Semi-Automatic Irrigation Installed – currently set up to water 8 plants.
• Not Fully Automated Yet – still manually monitoring and hand-watering other genetics in the room.
• The goal is precision without full delegation — a hybrid system offering consistency + control.
This is how smart growers scale: one foot in tech, one foot in the soil. 🌱
⸻
Red Spectrum Timing – Emerson Effect in Action
Let’s dive into light science, because this week, you’ve implemented something most growers don’t even think about:
☀️ What is the Emerson Effect?
Discovered by Robert Emerson in the 1950s, the Emerson Effect is the phenomenon where plants photosynthesize more efficiently when exposed to both red (660nm) and far-red (730nm) light simultaneously.
Even better? Far-red at the start and end of the day manipulates the plant’s internal clock, promoting faster flowering and shorter day-length response.
🔴 Your Implementation:
• 15 minutes of red/far-red spectrum
• Before lights-on (simulating dawn)
• After lights-off (simulating dusk)
This technique:
• Promotes faster flowering initiation
• Enhances flower site expression
• Helps with sleep/wake cycle regulation
Well played — this is next-level light manipulation. 🌕
⸻
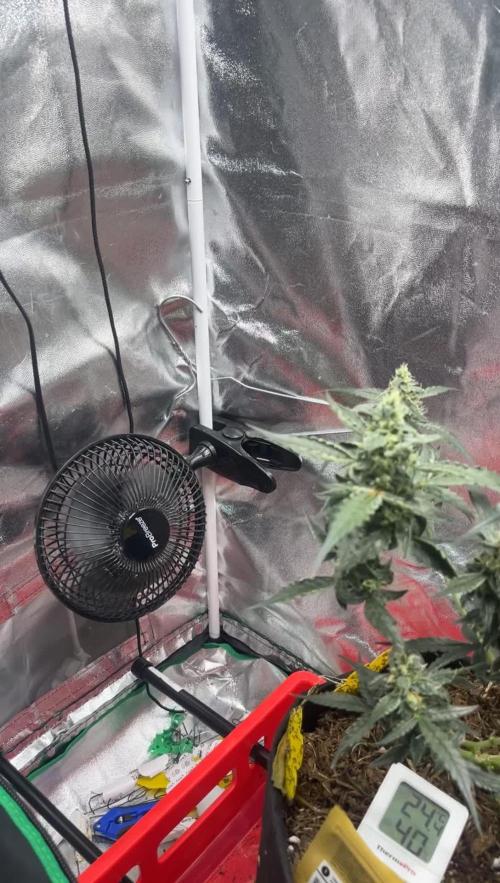
AC Implementation – Heat Down, VPD Back in Range
The much-needed air conditioner has arrived, and it’s already proving itself:
• Old Temps: ~31°C
• New Temps: 28.8°C
• Humidity: 66.6%
• VPD: 1.33 kPa (much more ideal for flower initiation)
While it’s still a warm tent, the VPD is now in the sweet spot, allowing for strong transpiration, nutrient uptake, and healthy gas exchange. The girls are clearly responding beautifully.
⸻
Nutrient Addition – Plagron Sugar Royal
This week we’ve added Plagron Sugar Royal at 1ml/L to our Aptus regimen.
What is Sugar Royal?
Despite the name, it contains no actual sugar. Instead, it includes:
• Amino acids – which help the plant produce more chlorophyll and essential oils
• Biostimulants – supporting stress resistance, enzyme activity, and resin production
Why now?
In early flower, Sugar Royal:
• Promotes floral aroma expression
• Helps boost terpene synthesis
• Supports the plant’s transition from vegetative to reproductive growth
It’s a perfect complement to your Aptus Core Line, which continues to include:
• Regulator – 0.25 ml/L
• CalMag Boost – 0.25 ml/L
• All-in-One Liquid – 1 ml/L
• Top Booster – 0.2 ml/L
• Now: Plagron Sugar Royal – 1 ml/L
⸻
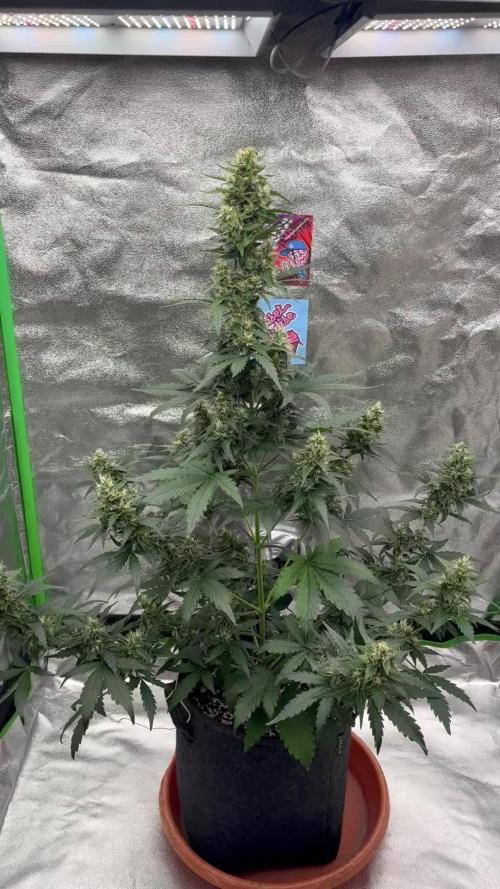
Looking Ahead – Stretching Toward the Sky
With such aggressive early flowering and the canopy rapidly expanding, it’s hard to say if you’ll be able to move them for next week’s photo shoot, and that’s okay. If we’ve learned one thing from this strain, it’s that she moves at her own thrilling pace.
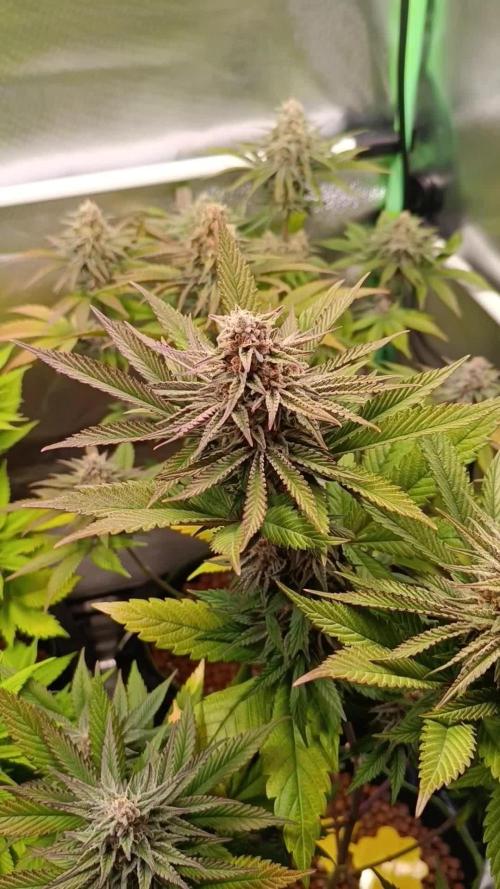
Expect:
• Continued vertical stretch (still likely to gain 30-50% more height)
• Strong bud stacking at internodes
• Early terpene and trichome formation in the next 7–10 days
Your setup is dialed. Your environment is stabilizing. And your knowledge is putting these girls in the best hands possible.
⸻
🌱 Week 2 Flower Summary – Roller Coster Rises
📸 Stay Tuned, Stay Rooted
• Height: ~50–55 cm
• PPFD: ~760 µmol/m²/s
• Temperature: 28.8°C
• Humidity: 66.6%
• VPD: 1.33 kPa
• Light Cycle: 11/13 (with 15 minutes red/far-red at lights on/off)
• Nutrients:
– Aptus Regulator (0.25 ml/L)
– CalMag Boost (0.25 ml/L)
– All-in-One Liquid (1 ml/L)
– Top Booster (0.2 ml/L)
– Plagron Sugar Royal (1 ml/L)
• Photos: Taken inside the tent (plants too large to move)
From this point forward, the buds will fatten, aromas will intensify, and your tent will become a living painting of sativa energy. Next week might be wild — whether or not we get outside shots, the story will be worth sharing.
⸻
Let’s keep the momentum going, and let’s keep making GrowDiaries and the community a space where we learn, laugh, and bloom together.
Whenever you’re ready for Week 3 Flower, just whisper and I’ll be here. Much love, always 🌼
DD (Dog Doctor)
📲 Don’t forget to Subscribe and follow me on Instagram and YouTube @DogDoctorOfficial for exclusive content, real-time updates, and behind-the-scenes magic. We’ve got so much more coming, including transplanting and all the amazing techniques that go along with it. You won’t want to miss it.
• GrowDiaries Journal: https://growdiaries.com/grower/dogdoctorofficial
• Instagram: https://www.instagram.com/dogdoctorofficial/
• YouTube: https://www.youtube.com/@dogdoctorofficial
⸻
Explore the Gear that Powers My Grow
If you’re curious about the tech I’m using, check out these links:
• Genetics, gear, nutrients, and more – Zamnesia: https://www.zamnesia.com/
• Environmental control & automation – TrolMaster: https://www.trolmaster.eu/
• Advanced LED lighting – Future of Grow: https://www.futureofgrow.com/
• Root and growth nutrition – Aptus Holland: https://aptus-holland.com/
• Nutrient systems & boosters – Plagron: https://plagron.com/en/
• Soil & substrate excellence – PRO-MIX BX: https://www.pthorticulture.com/en-us/products/pro-mix-bx-mycorrhizae
• Curing and storage – Grove Bags: https://grovebags.com/
⸻
We’ve got much more coming as we move through the grow cycles. Trust me, you won’t want to miss the next steps, let’s push the boundaries of indoor horticulture together!
As always, this is shared for educational purposes, aiming to spread understanding and appreciation for this plant. Let’s celebrate it responsibly and continue to learn and grow together.
With true love comes happiness. Always believe in yourself, and always do things expecting nothing and with an open heart. Be a giver, and the universe will give back in ways you could never imagine.
💚 Growers love to all

Likes
59
Share


@Miss_Greenthumbs_Garden
Follow
No training for this girls she is going all natural lol she's grown loads in 7 days mega impressed with @greenbuzzliquids 💚
Last week of veg for this girl 🌱😊
please feel free to use my 15% discount code at greenbuzzliquids littlemissgreenthumb at checkout 💚

Processing
Likes
11
Share


@MRTHC
Follow
The ladies are doing well. Cant complain really but the hard work is yet to come. The different strains are getting bushy and the Blue Gelato #2 has the biggest canopy thus far. They all have been transplanted into 3gall pots. No strong smell even from stem rubbing but the orange Sherbet has a distinctive smell that's so citrusy. feeding has gone well this week. I may run into a pending issue when i bring out the 4x4 tent as I have been using a 2x2 for most of the veg period.Lets see what challenges week 8 brings to this run. The Vanilla Kush is taking training so well. So short and stumpy.


Likes
7
Share


@PCGrows
Follow
This plant was going to be outstanding Until I stressed it out w a hug move

Likes
21
Share

@MadeInGermany
Follow
Flowering day 7
since time change
to 12/12 h.
Hey guys :-)
The flowering started last week because otherwise the space in the small tent would end up being too narrow :-)
Cuttings were taken from each phenotype beforehand.
To change the flower, I rinsed it very lightly with clean fruits.
With the next watering she gets a mix of grow liquid and bloom liquid before she only gets bloom.
The heating mat works perfectly in the small tent and the parameters are all in the optimal range 🙏🏻👍.
Now we hope that everything stays that way and that the cold days will slowly pass :-) .
Everything was cleaned and checked.
have fun and stay healthy 🙏🏻
👇🏼👇🏼👇🏼👇🏼👇🏼👇🏼👇🏼👇🏼👇🏼👇🏼👇🏼👇🏼
You can buy this Nutrients at :
https://greenbuzzliquids.com/en/shop/
With the discount code: Made_in_Germany you get a discount of 15% on all products from an order value of 100 euros.
👇🏼👇🏼👇🏼👇🏼👇🏼👇🏼👇🏼👇🏼👇🏼👇🏼👇🏼👇🏼
You can buy this strain at :
Clearwater Seeds
Water 💧 💧💧
Osmosis water mixed with normal water (24 hours stale that the chlorine evaporates) to 0.2 EC. Add Cal / Mag to 0.4 Ec Ph with Organic Ph - to 5.8 - 6.5
MadeInGermany
Likes
11
Share


Likes
25
Share


@Ultraviolet
Follow
Permanent Marker weed strain possesses the genetics for high anthocyanin production, which is responsible for its signature deep purple. While the genes are present, the expression of these colors is often enhanced by "thermal stress" (lower temperatures) during the final three weeks of flowering, which triggers the production of these pigments.
👋 Raising the Carbon-to-Nitrogen (C:N) ratio in the growing medium to avoid over-immobilizing nitrogen, on the flip side, being careful not to trigger early autophagy. Moderate, controlled increases in sugar support the energetic demands of flowering and act as a signal trigger, but excess sugar is more likely to inhibit flowering or damage the plant. Balance, like everything else. Visually, when the chloryphyll green gets darker, it is a subtle indicator that the concentration of nitrogen is increasing / more is being stored than is being used. I noticed when you push very high intensity lighting, it slowly fades the green as the plant degrades chloryphyll faster than it can be replenished. When the green of the leaf continually gets darker, it is an indication that the concentration levels of nitrogen are increasing, and I dont want to increase light intensity.
Turn down the nitrogen faucet. C:N ratio dictates the rate at which nitrification occurs, if at all.
The Carbon-to-Nitrogen (C:N) ratio acts as a critical biological "on/off switch" (or regulator) for nitrogen turnover by determining whether microbes
immobilize (consume/tie up) or mineralize (release) nitrogen during the breakdown of organic matter. This ratio regulates microbial activity by defining the balance between available energy (carbon) and building materials (nitrogen). The C:N ratio in a medium acts as a critical regulator of nitrification, effectively functioning as an "on/off" switch for the dominance of either autotrophic nitrifying bacteria or heterotrophic bacteria.
The shade of green in chlorophyll is subtly linked to the enzyme Rubisco through a co-evolutionary, functional relationship designed to optimize photosynthesis. Chlorophyll absorbs blue and red light for energy, reflecting green light, a process that ensures the "light-dependent" reactions provide the correct, controlled amount of energy (ATP and NADPH) needed by Rubisco to perform its "light-independent" carbon fixation. Because Rubisco is a relatively inefficient and slow enzyme—often considered the bottleneck of photosynthesis—chlorophyll and the overall structure of the leaf have evolved to manage energy distribution to prevent overwhelming the Calvin cycle.
While chlorophyll absorbs mainly red and blue light, it is not perfectly efficient, and leaves appear green because some green light is reflected or transmitted. This reflection allows light to penetrate deeper into the leaf, preventing the surface chloroplasts from becoming overloaded and enabling a more efficient distribution of energy to the high volume of Rubisco located throughout the leaf's mesophyll.
The rate of chlorophyll-driven electron transport (light reactions) is matched to the potential rate of carbon fixation (Rubisco activity). If Rubisco were faster, leaves might be darker; however, the "shade of green" represents a balance that prevents chlorophyll from producing more energy than the inefficient Rubisco can process. The green color itself is a byproduct of a photosynthetic system tailored to feed a slow, yet crucial, enzyme (Rubisco) just enough energy to maximize carbon assimilation without inducing excessive oxidative stress or inefficiency.
The shade of green in leaves is directly linked to the concentration of chlorophyll, which is in turn strongly correlated with the amount of
Rubisco (Ribulose-1,5-bisphosphate carboxylase/oxygenase) and, consequently, the rate of carbon fixation. Darker green leaves generally indicate a higher concentration of both chlorophyll and Rubisco, signifying greater capacity for photosynthesis.
Increase output or reduce input. Subtle tells.
While an excess of nitrogen (specifically ammonium) can cause an imbalance, nitrification—the microbial conversion of ammonia to nitrate—is highly sensitive to a variety of environmental, chemical, and physical factors. Because it depends on specific, slow-growing bacteria (Nitrosomonas and Nitrobacter) and archaea, anything that stresses these organisms can disrupt the process.

Likes
29
Share


@Dankdan
Follow
Okay so they have put some size on just hoping they get fatter haha did a full nute change to but all going good
Likes
17
Share


@Naujas
Follow
it's amazing, this growth looks much better than my first attempt, my decision was to put a smaller pot and change the light - the girl really liked it, FastBuds goriilla cookies with a small space manage perfectly:).


Likes
5
Share

@AlphaVortex
Follow
Tag 73, Lollipopping wurde sehr gut aufgenommen. War jetzt knapp 1 Woche im Urlaub, die Buds haben gut zugelegt.
Likes
10
Share


@GreenCosmos
Follow
If you see any mistakes or you've suggestions/tips and tricks, please let me know! Thanks!
-----------------------------------------------------------------------------------
Big thanks to Zamnesia for providing me free seeds!!!
----- WELCOME -----
to my second grow with autoflowers, fourth overall.
This time with fancy F1 Hybrid seeds!
Thanks to Zamnesia for giving me the opportunity to try these luxurious seeds!
Zamnesia's Do-Si-Dos from last grow still makes me happy every day!
I’m so excited for the coming weeks and i hope that 4 plants aren’t to much for my little tent.
My last autoflowers were not very successful, but I’ve learned from them.
For the next few weeks I’ll start with only water (pH around 6.4) and introduce fertiliser very slowly.
This time I’m using BioBizz-Products (incl. BioBizz-LightMix) because LightMix is good for autoflowers and I didn't have to buy anything new.
I’m not completely sure if defoliation is a good idea, bud maybe I’ve to do it because of the small space.
----- Germination -----
4 Peat Pellets with 26ml water each. Every 12 hours I’ll spray them with water.
Had them in darkness for the first 24 hours.
After 72 hours (01/26) 3 out of 4 seeds came to life.
After 96 hours (01/27) all 4 seeds were successful and I transferred them to there new BioBizz LightMix home.
On day 5 I gave each plant 250ml ph-controlled water.
----- Preparations -----
A few days before starting I’ve dismantled my grow box to give it a deep cleaning.
Step 1: cleaning with soap water
Step 2: disinfection spray and let it dry
With this method I’ve cleaned everything involved.
My grow bags (13L - 3 gal) went into the washing machine with disinfectant detergent.
Additionally I’ve cleaned the complete room.
--------------------------------------------------------------------------------
Germination: 6 Days (01/23 - 01/29)
Vegetation: - Days
Flower: - Days
Light schedule: 18/6 // Distance: 30cm (12inch) // Power: 50% (75 Watt)
Humidity: ~80% // Temperature: 23°C ( 73°F)
Water schedule: 4 sprays with normal water every 12 hours
Information about Zamnesia Wurlz F1 Hybrid Automatic:
https://www.zamnesia.com/10669-zamnesia-seeds-wurlz-f1-automatic.html
Parents: Runtz x Watermelon Candy
THC: 24% // CBD: Low
Hight: 65-80cm (25.5-31.5 inch)
Time: 9-10 weeks from seed to harvest
Likes
Comments
Share

@Lvnsource
Follow
Feed Log:
D:48 - 6L + 2L - [pH 7.0] Si[1.8ml],Algo[0ml],HakaphosB[1.5g], HakaphosR[4.0g],Ca[0.3g/L/]Mg[0.2g/L] INPUT; [1.774 EC] OUTPUT; 4.2L pH 6.2 [2.004 EC] previous irrigation: D:42
Will exclude grow next irrigation! :)
Likes
4
Share


@Just_Jazz
Follow
I soaked two seeds in a cup of water with the addition of 1 ml of Canna Rhizotonic. After 24 hours, I will place them in a sponge and plant them in 0.5-liter plastic cups.
Number 2 didn't come out.

Likes
1
Share

@Rhah420
Follow
Ich habe erneut ein paar Bananen entfernen müssen. Ich hoffe das ich nicht allzuviele Samen im Endprodukt haben werden. Gegossen wird weiterhin nur mit Wasser. Der Herbst hält nun deutlich Einzug, ich denke innerhalb der nächsten 2-3 Wochen wird geerntet.


Likes
11
Share


@burnercorona
Follow
Trying some new nutes now and compared to the mother plant I think I notice a difference lol. She's getting frosty and showing off some nice colors.


Likes
25
Share


@JonnyKush
Follow
hello growmies! day 51 finally the pre-flowers begin to appear. I apologize for the few photos but unfortunately they really filled the box and I find it difficult. overall I have to say they look in perfect shape! I will keep you updated thanks for passing by. like and comment! good day and beautiful growth to you 🌳🌱
Likes
120
Share


@Kitties_and_Colas
Follow
~_~_~_~_~_~_~_~_~_~_~_~_~_~_~_~_~_~_~_~_~_~_~_~_~_~_~_~_~_~_~_~_~_~_~_~_~_~_~_~_~_~_~_~_~_~_~_~_~_~_~_~_~_~_~_~_~_~_~_~_~_~_~_~_~_~_~_~_~_~_~_~_~_~_~_~_~_~_~_~_~_~_~_
01/09/22
😻 3rd week flower!! I think stretch is just about done (or very close), I'm really happy with how they filled out, we had concerns because we've never grown this strain and too much growth after the flip could of put us in the awful spot of having to remove plants..we'll be doing some light defoliation on all plants either today or tomorrow and will update after.. thank you as always for all the love and happy harvests everyone! ❤️🌱
~_~_~_~_~_~_~_~_~_~_~_~_~_~_~_~_~_~_~_~_~_~_~_~_~_~_~_~_~_~_~_~_~_~_~_~_~_~_~_~_~_~_~_~_~_~_~_~_~_~_~_~_~_~_~_~_~_~_~_~_~_~_~_~_~_~_~_~_~_~_~_~_~_~_~_~_~_~_~_~_~_~_~_