
Likes
Comments
Share


@Patillac31
Follow
Waited 5 days for soil dry and cannazym to arrive. Watered ¾qt today. Will monitor soil moisture levels a little closer. Also going to recalibrate both of my ph meters. More pictures to come, waiting on the lights to kick on. Suggestions appreciated! Happy growing!


Processing
Likes
8
Share


@eldruida_lamota
Follow
Como estamos familia, de nuevo actualizamos semana, y es que esta variedad no le a sentado bien el trasplante, que acompaño una pequeña carencia de nitrógeno y un exceso de humedad, conseguimos apañarlo regando la misma cantidad en periodos más extensos entre riego y riego y full de nitrógeno, salió todo correctamente, pronto pasaremos a 12/12 para la floración.
Se sigue controlando los parámetros en el agua y la temperatura en nuestra malla, 26 de maximas y 18 de mínimas.

Likes
3
Share


@Cannabis_Sativa
Follow
[Same like widow]
Transplanted in new home pot smart 420 super soil and humboldts root powder white widow

Likes
10
Share


@Bread_n_Buds
Follow
Our Blue Dream by Zamnesia is a main-lined beauty, not very tall but very effective in my opinion. It has just started flowering but judging by its little sister that has been flowering for two weeks before... we will see some beautiful things.
** Remember that we are growing a plant worked with the techniques indicated and another left to grow without pruning to preserve its speed; in the previous/next diary you will find the other plant of the same variety.
Here the straight plant has let itself go free and beautiful and is thanking us very well by giving us some very very beautiful flowers.
We are in a 100% organic configuration, the soil is recycled Promix + 1/3 fresh soil + 10% Perlite + RQS Mycorrhizae Mix (4 g in the mix, 1 g under the small fiber pot).
We switched to the advanced flowering program a couple of days ago but last week we still did not give green sensation. We fertilize with: // 1 ml/l Sugar Royal - 3 ml/l Alga Bloom - 1 ml/l Power Buds - 1ml/l Green Sensation
We are fertilizing with // 1 ml/l Power Roots - 1 ml/l Pure Zym - 1 ml/l Sugar Royal - 3 ml/l Alga Bloom - 1ml/l Power Buds
We sprayed 5 ml/l Vita Race Foliare once a week.
For all the info https://plagron.com/
All nutrients are available from Zamnesia: https://www.zamnesia.io/it/531-growshop/476-fertilizers
We always have the excellent mycorrhizae from RQS that run through the soil. https://www.zamnesia.io/5778-mix-micorrhiza-easy-roots.html
Try this strain it promises more than good ---- // https://www.zamnesia.io/en/3271-zamnesia-seeds-blue-dream-feminized.html
Short Description Zamnesia // Exceptionally tasty and potent, Blue Dream by Zamnesia Seeds is a hybrid with a distinctive and sophisticated character. A blend of Haze and Blueberry strains that manages to bring out the best of both worlds. Its short flowering time of just 9 weeks far surpasses other Haze strains!
The whole world of growing and much more is at Zamnesia: just take a look at the site and you will find "all the best that nature has to offer" in various shapes and colors.
The new strains are fantastic and the old ones are no exception...
-- // www.zamnesia.com

Likes
5
Share


@Albanymedicinalgarden
Follow
PKBR #2 is showing a couple leaves of what appears to be cal mag issues + senescence fading. I expect I’ll be able to ride it out til finish. It also happens to be the best smelling pheno in the tent at the moment. Drinking has slowed down as stretching ends. Stopped defoliating in any significance after day 21 of flower to minimize herm risks. So far everyone looks happy and healthy
Week 11end = 8/10

Likes
9
Share


@420DeepGrow
Follow
📆 Semana 9:
La Auto Pablo Escobar mantiene un ritmo estable en floración. Los cogollos siguen engordando y aumentando en densidad, con una producción de resina que no deja de sorprender. Los tricomas son mayoritariamente lechosos, aunque aún se observan muchos pistilos blancos, señal de que la planta todavía tiene margen para seguir desarrollándose. El aroma se vuelve más complejo y envolvente, con notas dulces y cítricas que se intensifican día a día.
¡Seguimos creciendo fuerte! 💪

Processing
Likes
14
Share


@Bakeryguy420
Follow
All smiles probably the best plant by fast buds I've ran , smells dank going be a nice haul easily over 4 zips best nutrients and lights:) should be done within a month :) drinking water everyday at this point:)

Processing
Likes
26
Share


@GrowGuy97
Follow
Starting to see a lot of white hairs think they are getting ready for flower, extremely excited to see how these ladies do! Thanks for checking in & happy growing friends!✌️🏼🌱
Day 23 - Everything seems to be going ok can’t see any issues other than the one plant with spots on the leaves but that is from spilling nutrient water on them!
Day 24 - started LST on 1 Orange Sherbet & 1 White Widow to compare the differences at harvest!
Day 25 - they are looking great! Can’t wait to see how the buds look😍✌️🏼
Day 26 - stretching out a lot!
Day 27 - Last day of week 4 everything is going great!✌️🏼🌱


Likes
10
Share


@PEAKYPLANTERS
Follow
Hi guys, what's up
I had set up this very small tent to test my gardening skills but I have to admit that even on this occasion I outdid myself .. the rest I leave to you to judge

Likes
11
Share


@THe_Cannadaddy
Follow
Still maintaining, no defoliation up to this point. There are still some deformed fingers on leaves from the stress but they are doing well!
Likes
141
Share


@Le_Duc_Du_Bud
Follow
Fin de la 1ere semaine , mes petits bébés ce développe correctement.
Je suis actuellement à 500ml d'eau par pots
Accompagner de la gamme vaalserberg
Garden , pachamama grow et mamaquilla roots, Arrosage tous les 3 jours .
Taille 6 cm environ .
Satisfait de ma première expérience.

Likes
101
Share


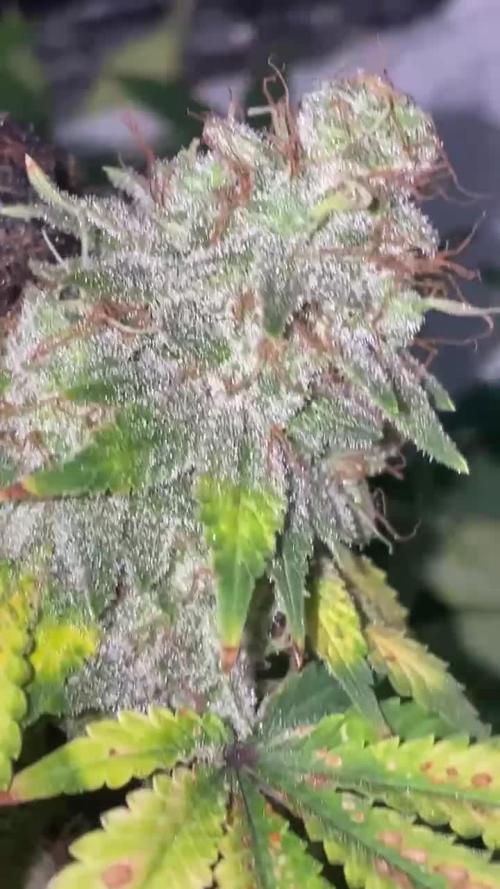
@SlowpokeFuegobud
Follow
💜 🌧️ 👊💜 🌧️ 👊💜 🌧️ 👊💜 🌧️ 👊💜 🌧️ 👊💜 🌧️ 👊💜 🌧️ 👊
The grow was a pleasure, the smell of the buds is mouthwatering!! 💜 👊
In the middle of the grow perhaps the soil got a bit salty.. the Punch still grew well without getting flushed. She showed signs of calcium deficiency on the leaves which are most addressed by the LED. She recovered easily and delivered delicious flowers. 🙏
The smell during the grow was so good, I couldn't wait for her to finish! 😍 Surely going to grow that one again!! 🍒 😋
I also love sleeping!
Effects are very relaxed. Just sloth. Muscle release, mindfuck release, all included! 😇
Thanks everybody for visiting!! 😘 Grower love!!! 💚 💚 💚
Thanks @Fast_Buds for the great genetics!! ❤️
_________________________________________________________________________________
Strain Description:
This is a giant autoflower that reaches 150cm and produces massive yields of up to 600gr/m2, a modern Cali strain that offers what a top-quality Indica-dominant hybrid should; nugs capped in resin with the density you would expect from Indica-dominant strains and that bag appeal that will surprise even the most experienced growers. Expect beautiful purple and magenta hues that come along with a sweet almost pastry-like taste and, thanks to the 24% THC, a very pleasant and potent effect that surprisingly starts as a motivating high and in no time relaxes you completely, taking a bit of the energetic edge off.
Bud description
Purple Punch Auto develops rounded compact buds with fat calyxes and bright orange or sometimes bright yellow hairs, with copious amounts of trichomes that give the buds that beautiful frosty look that all growers seek for. The light-green buds can exhibit subtle purple or lime-green tones that give them a charming and attractive look and complement them magnificently, while the mouth-watering mix of earthy cherries and blueberry muffins with a spicy touch will win you over even before you can see the buds.
Smoke report
Due to the high THC levels, you’ll experience a powerful effect that will completely relax your whole body and gradually start feeling like all your muscles are melting before you can count to three. Despite the strong Indica effect, you won’t be couch-locked thanks to the slight Sativa genes that incorporate a pleasant creative head-buzz and leaves you mellow and clear-headed in a peaceful state of mind. The perfect effect to go through a busy day stress-free, alleviating sore muscles after a long workout routine or just chill and have fun on a night out with friends.
Plant appearance
Due to the Indica dominancy, this strain remains relatively compact despite its height and grows wide and thick fan leaves typical of Indica-dominant varieties. You can expect a thick tall main cola and a few shorter side branches with spaced-out internodes where the incredibly frostbitten flowers develop and end up looking like buds on steroids by the end of the flowering stage.
Grow tips
This strain offers unique flavors and charming colors so we recommend flushing thoroughly to allow it to show its full potential and end up with the beautiful reddish-purple and/or lime-green hues on the buds and surrounding foliage. Due to the Indica genes, the buds grow denser than usual so it’s essential you tie the branches slightly so there is enough airflow in between the buds to prevent mold and bugs. This variety doesn’t require a lot of maintenance or anything extra but remember to feed her properly and with good-quality nutrients, this way you guarantee the buds fatten up properly and that your plant doesn’t suffer any kind of nutrient deficiencies.
Flavor
Thanks to the high-quality genetics, this strain offers a distinguishable taste of fresh blueberries and earthy cherries with spicy undertones and a pinch of sugary tart. The sweet smoke overpowers your throat with a sweet blueberry muffin-like taste as you inhale and, as you exhale, leaves a delicious coat of sweetness in your mouth that leaves you feeling like you’ve just eaten a dessert.
______________________________________________________________________
SETUP:
80x80x180 cm Zelsius
240W Full Spectrum LED IR UV dimmable
DW240H-A6-HS
Heatsink color red
LED Chips:
512pcs SAMSUNG LM301H + 24pcs Osram 660nm + 8pcs Osram IR 730nm + 8pcs UV 385nm
Color mix: 2700K + 4000K
2,8umol/J
Driver HLG-240H-C2100B
Coverage: veg 5x3ft / flower 4x2ft
Product size: 628x205x68mm
° 2x 5W Fans
° custom 320/270 cm³/h exhaust fan & Carbon Active Granulate 240cm³/h
° Mills Nutrients, Green Buzz Nutrients
Shouts go out to my sponsors @GreenBuzzNutrients, thanks so much for your support! ❤️
If anyone would like to try their amazing organic products, use code GD42025 for generous 25% discount (for orders of minimum 75€) ✨
https://greenbuzznutrients.com/
° tap water EC 0,26uS upgraded to EC 0,5 with PlantMagic MagneCal - pH 8, nutrient solution downgraded to pH 6,5 with Advanced Hydroponics Minus Bloom
° from week 4 in the same container Aptus Enzym+ once a week
° Biobizz Lightmix
💜 🌧️ 👊💜 🌧️ 👊💜 🌧️ 👊💜 🌧️ 👊💜 🌧️ 👊💜 🌧️ 👊💜 🌧️


Likes
3
Share

@MerekKutil
Follow
Ahojte všetci tak sme sa dočkali a máme tu krásne jarné počasie, ktoré už čoskoro bude veľmi ovplyvňovať môj kútok šťastia a vlhkosť bude nepriateľ číslo jedna. Samozrejme kitky sú ako Bratstvo Neohrozených a použijem Aero 360 kapsly na vlhkosť. Na začiatku 4. týždňa flower À la carte hnojív sa zatiaľ nemení, držím sa rovnakého tempa a čakám kedy začne obľúbený proces hrnček var a kitkám bude chutiť viac. Cal-mag Xtra je dosť silný a veľmi rýchlo vie dvíhať EC preto sa ho snažím dávať len každú druhú zálievku, pokiaľ nevidím nedostatky.Keby je taká možnosť chcel by som vidieť ten proces čo sa deje v koreňovej zóne vnútri v pote. Niečo ako tá rozprávka bol raz jeden život. 👉👉👉👉👉Bol raz jeden kutil ktorý sa v problémoch stravovacích pre kitky topil 😀. Ec čistej vody 0.5 tu sa začali moje problémy v kvete. Poďme pekne od začiatku. Celú vegetáciu som nepoužíval xmag calmag a všetko fungovalo hnojil som každú zálievku všetko podľa plánu. Výrobca udáva xmag Hnojit iba 1x týždenne ale ak som tam dával Magnézium 1ml začalo mi to strašne dvíhať EC k 2 a potom som začal dávať vodu hnojka fungovalo to do určitej chvíle keď tie kitky začali vykazovať hlad od hnojív. Ťažke tvrdá voda a calmag spôsobuje v mojom prípade,že sa mi tam usádzajú mineráli Ec prudko stúpa. Do tejto ruskej rulety som pridal enzimy canazim nech sa to tam trocha čo tam nemá byť rozloží. Samozrejme ten cal-mag hodím ale bude ho len mierne lebo nechcem sa potopiť ako Titanic. Preto aj predchádzajúce grow,keď som nemal EC meter a stále som tam dával Hnojky pálilo kitky lebo problém bol hlavne vo vode a keď som tam všetko namiešal tak to EC bolo vysoko a potom aj výsledky boli aké boli. Ťažke tento trn s päty som dal preč a kitka hneď po vstupe ďalšia zalievka ukázala s hnojkami hneď iné hodnoty a to som hnojku dal 2x za sebou. Teraz čakám ako sa to bude ďalej už správať a verím, že toto bol hlavný problém, ktorý ma brzdil a môžem dávať Hnojky už stále a nebáť sa, že to budem kaziť. Držte palce zdravý Kutil.
Likes
39
Share


@Randyb4
Follow
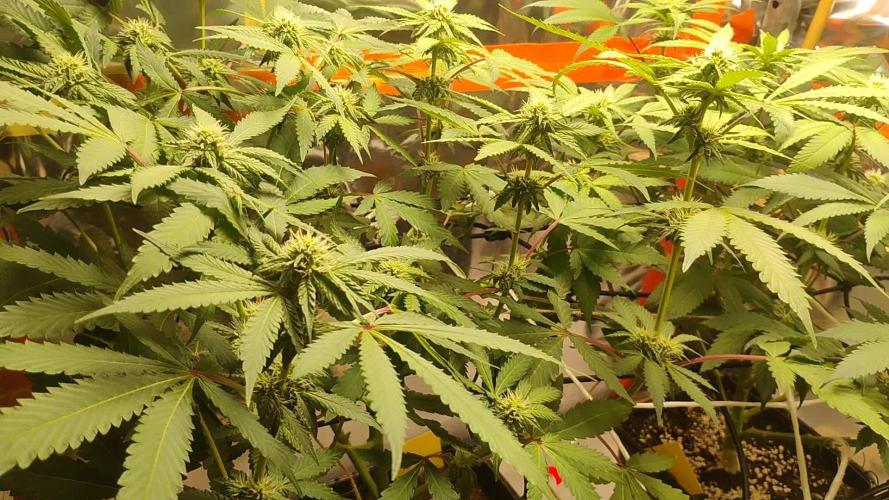
Day 113 39 Days of flower, First day of Week 16
Day 115 41 Days of flower
Watered with 4 gallons of spring water with 3 ml/gal of fish shit pH-6.6@68°F, buds are all looking good, all plants have alittle purple in them.
Day 117 43 Days of flower (First day of Week 7)
Day 119 45 Days of flower
Watered with 4 gallons of spring water pH-6.5@70°F. Buds looks better everyday, with less and less white hairs as the days go by. Buds are forming beautifully.

Likes
48
Share


@Mz876
Follow
13 weeks from seed and still no sign of flower . At this point I believe this is not an autoflower at all. She was planted the same time as my lambs breath and they are on their 6th week of flower today . If anyone has some knowledge they’d like to share that would appreciated

Likes
32
Share


@LSnake
Follow
In this second week of veg I started adding some nutrients to the plant water. (below the recommended doses) 🔥
Since they are growing well next week I will try to apply the manifold , hoping to be able to increase the final yield of this genetics that I love. ✂️🌱
Likes
13
Share


@Weird_Jimmy
Follow
👉I used the seedling solution 3-4 days too long and the plant looked like it was starting to have issues. I mixed some early growth solution and amost immediatly the plant looked happier and started to take off. It got no stretch so I anticipate the plant will be another short bush.
Likes
7
Share


@Ice_R
Follow
Early this week found 2 fungus gnats on the soil of one of the plants so was afraid of an infestation but after getting rid of the 2 havent seen any other one. Yesterday (day 14) had to give some support to 1 of the plants cause it was bending over. Overal not perfect but think these problems are all minor. So lets see.