The Grow Awards 2026 🏆 


Likes
22
Share
@LSDMan
Follow
(CAN) Une météo parfaite cette semaine. Je dispose des grillages plus gros autour des plants, je dégage également les alentours afin de laisser passer plus facilement les rayons du soleil et de faire baisser l’humidité ambiante. Les plants ont maintenant beaucoup plus d’espace et peuvent se développer pleinement pour prochainement, passer en floraison. Je renouvelle le marc de café autour des plants pour éloigner les potentiels nuisibles. Je pulvérise les plants au purin d’orties le jour 59. Arrosage à l’engrais de croissance le jour 60.


Likes
2
Share
@Dico29
Follow
Finally coming to a close. I started this thing almost 5 months ago in the middle of the woods... the nugs are the densest I have grown so I’m excited to see how it finishes.
I also have this northern light auto next to it with a nice layer of trichomes

Likes
3
Share
@Dargaville_Dukes
Follow
Everything is going well. It has been on a 18-6 light cycle for one week. I may have slowed it down by a couple of days by over watering one week ago. I haven't watered since. I gave it some time outside today as I don't have a fan yet for by veg set-up.

Likes
81
Share
@NugLife420
Follow
Well, this is the last week of flushing, then comes the chop. Timber! 🌲. Lol. I am super excited and happy with the results so far. I will update again when I harvest. 😃😎

Likes
43
Share
@brownbae420
Follow
Day 29/19
— Began LST on CDLC B; Optimizing light penetration
— Environment stable
— All plants looking great
— Vibe: 😇
Day 30/20
— Topped CDLC B
— Plants still praying
— Vibe: 🙏
Day 31/21
— SSxDG A/B Topped
— Vibe: 😎
Day 32/22
— CDLC A LST on the stems
— Environment stable
— Cleansed the space with the sound bowl
— Vibe: 😇
Day 33/23
— LST on all ladies started today
— Added crystals to the soil for each girlie.
— Vibe: 👽
Weekly Avg Readings
— Lights 18/6 - Level 7
— Temp: 70 (ideal) | 68.9 (avg)
— Humidity: 60% | 59.0%
— VPD: 1.00 | 0.97 kPa
"Perserverance is not a long race; it is many short races one after another." —Walter Elliot

Likes
Comments
Share
@GrowDiaries
Follow
Thanks to each stand for letting us be part of this incredible cannabis experience.
It’s rewarding to share this space with you. See you tomorrow again for more of this Spannabis in Barcelona!


Likes
16
Share
@Foggedaboudit
Follow
These are faster than expected. The smell is wonderful too. Pineapple and candy, the second pheno although it has less trichomes is bigger and has an added creaminess to its aroma. Truly great stuff even if they really don’t match the NTF description. Added some PK supplement too. Should be another week or two for these.
Likes
4
Share
@rickgrimes
Follow
ya se ven las flores, riego cada tres días , y corto las hojas que están caídas solo .último día de la semana 9 ya se aprecian las flores


Likes
7
Share
@UgoGrower
Follow
I'm really glad to get back to growing after a period of time. Many errors were made, such as :
- Too short flushing period
- Precipitation during defoliation
- Start of cultivation 1 week too early, disturbing my seedling.
- Flowers dried too intensely
- Humidifier missing
Overall, everything worked well, and I obtained about twenty grams. My WW was too small compared to what I was hoping to get. The restricted space resulted in strong temperature variations that stressed my plant. A lack of humidification in the tent didn't provide ideal conditions either.
that was so great, see ya!!!!
U.G.

Likes
2
Share
@EyeMKing
Follow
Started the first top dressing of Gaia Green All Purpose and Power Bloom at a 50/50 ratio of 1tbsp/gal each.

Likes
19
Share
@Mo_Powers
Follow
we are entering the 8th week and the 3rd week of flowering. she is no longer going up. the buds are getting thicker. i have cut off a few large leaves. she is doing really well. no parasites or diseases to be seen. so far i am very happy with her. very robust
Likes
24
Share
@AUTOBUDDHA
Follow
Fantastic week. Lots has changed. Plants are stacking something fierce!
I cut out the nitrogen completely this week, qnd that's how it will stay for the duration of the rest of the grow. I have found with autos, i have had the best luck when I push them hard with nitrogen up until this stage in growth. I then cut out the nitrogen completely and up the bloom nutes quite dramatically.
For the rest of the grow I will feed every watering. Water at a 6.4 ph.
Gro- 0ml per gal
Micro- 10ml per gal
Bloom- 15ml per gal
Bug bud- 5ml per gal
Very much looking forward to watching this batch swell!!
Wow... thats all I can say.. deep dark purple. Super strong smell of diesel fuel and citrus! Stacking hard!

Likes
8
Share
@FarmerT
Follow
Super excited to see the weight after dry 😬 didn’t weigh any plant when cut !!!!

Likes
26
Share
@MG2009
Follow
03/13/2021
Side branches are developing nice, I may do a little more lst to help lower tops to catch up before flowering starts
Ps.
Couple videos uploaded
Day #6 doing some bending, and broke a branch off so I dipped in rooting powder,threw it in some vermiculite soaked with Bonide Garden Rich Root & Grow 4-10-3 with (IBA) Lets see if she will root! Fingers crossed🙏
Likes
48
Share
@Aleks555
Follow
Hello, folks. The week went well. We are feeding at 1200 ppm and have activated CO2 supplementation 1500 ppm

Processing
Likes
15
Share
@eldruida_lamota
Follow
Que hay familia, ya estamos de nuevo, y es que estas crazy cookies estan engordando todavía, las seguimos manteniendo unas semanas más solo con agua , y a ver cómo avanzan estas semanas.
Ph controlado 6,5 humedad por debajo del 40% , lo único que no estoy puedo eso controlar es la temperatura que nos subió a 28,5 grados, por lo demás, sobre ruedas.
Para los próximos cultivos, cambiaremos la gama de nutrientes , más que nada por probar otras marcas.
Un saludo y buenos humos fumetillas.

Likes
12
Share
@cannasaxx
Follow
PH 6.5
Light 80% - 40cm Abstand zur Pflanze
Es wird Herbst. Sie sehen super aus und es riecht mega fruchtig und süß 😍
Es geht dem Ende zu 💚🍋🍒🍪
Likes
6
Share
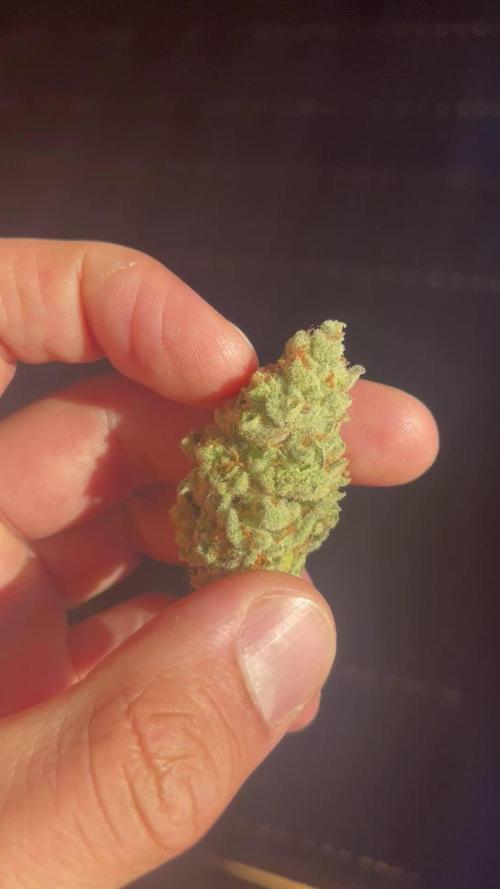
@Hazecat_420
Follow
Se viene próximamente la cosecha, cultivo limpio, estructura buena, buen olor y aroma intenso. Se aplica Flawless Finish para utilizar los últimos nutrientes de estas plantas, se espera el secado del sustrato y se comienza la cosecha


