
Likes
Comments
Share


@cRypto666
Follow
Die letze Woche war ein einziger Alptraum mit zu hoher Luftfeuchtigkeit meine Blüten hatten teilweise Blütenfeule

Processing
Likes
10
Share


@The_Chef_420
Follow
Well I made the decision to remove the plastic cover of the greenhouse because these babies are HUGE. Never had a plant this tall, ever, especially an auto. I removed all the lighting and left them and the other hydro girls exposed to the natural elements. Most were barely showing any signs of flowering so I figured the natural lighting would be sufficient and promote flowering. All my lighting is IP65 rated waterproof so I'm still looking for another way to mount them to run during the day when light is scarce or on cloudy days etc. But not for any extra time compared to sunrise and sunset. Have been removing large fans from the bottom up, exposing lower nodes. Also have been adding support their extremely long branches or tieing them back to the main stalk loosely at a node with hemp rope. At this point I'm not at all dissapointed that these Devils haven't flowered sooner, I expected delayed flowering because of the high doses of Superthrive throughout most of vegetative life. I just hope theres enough time left in the season for them to finish! Had to add an extension on our fencing lol, but the neigbors seem cool 😎, its legal anyways. Will add official height and current pictures in a few hours.

Likes
2
Share

@DE_BW
Follow
She is an absolute monster. I love her colors. Should be easily my most productive plant yet.

Likes
3
Share


@DrBud420
Follow
23.05.
today is the end of the fourth week for the plants, they haven't progressed much since last week, they grew a few cm and gained a little weight, but they are healthy, which is the most important thing... in a few days I will transplant them and top them because some of them have already developed the sixth pair of leaves, so I simply have to top them. turned out...
I thought of transplanting them into 10-liter pots and after two to three weeks into 50-liter holes, however, the weather didn't cooperate, and I was already late anyway because of the bad weather, and because of the same, my plants in the fourth week were the same as they should have been in the second, and because of the same, I couldn't even transplant earlier... now that nothing went according to the "plan", of course, I don't know how smart it is to transplant them into 10 L and then into 50 with the fact that it is with me the longest day of the year is June 22, so that actually a week after that it can start flowering (it usually starts at the end of July or at the end of August, but it can be late and start even in September, and it also knows how to plow and start already at the end of June)...now I think that it is better to buy smart pots of 50-60 liters and immediately transplant into them and then just bury them...another problem with that is that the soil that I took for vegetation has food in it for a month days, if I transplant twice, it may happen that it enters flowering, and the food for the vegetation has not yet been used up, and that would be a problem...advices are welcome
Stay high!!!

Likes
18
Share


@berlinbeginner
Follow
F29 beginning of 4th week of flowering
SD3 - initially sweet orange then engine grease
SD2 - initially sharp vaseline then engine grease mixed with kerosine.I personally like SD2 more. Even with the stunted growth.
SD3 is getting yellow from the bottom and i dont know what to do.
I had thrips so i sprinkled diatomaceus earth on top of the soil and rubbed some on the fan leaves and stems.
Sorry for the reddish pics

Likes
54
Share


@Hou_Stone
Follow
I'm happy for a first time, I obviously made a lot of mistakes but above all I learned a lot 👌😎

Processing
Likes
2
Share


@ajglover217
Follow
my friend said the plants needed some stones for decoration

Likes
4
Share


@DatGuyGrows
Follow
All I can say is WOW! This buds are coming in fast and strong! They are not disappointing! The smell is wonderful. Kinda smells like I opened a box of fruit loops cereal. They’ve grown a bit finally and the early flower growth spurt is finally starting. I’m hoping it picks up a bit cause I have a feeling these are gonna be some large heavy buds 😁

Likes
2
Share


@JVKdopegrow
Follow
Very nice stretch! This girl actually looks like the plants I have been trying to grow (for this stage). Still dialing in the nutes for consistent growth. Light defoilation only, skipping LST for this baby. Probably just good genetics on this one rather than any skill on my part.


Likes
3
Share


@CaliJ
Follow
6 out of 8 plants in pre-flowering, i replaced my humidifier with the dehumidifier, very present smell when I open the tent, a little early like my last crop. ⚠️ Day 26: Green gelato is hermaphrodite, destruction of the Green gelato, burial of a northern light.
Likes
10
Share


@Unnamed
Follow
Did not add any nutrients to the reservoir, only topped up the reservoir with water and adjusted PH/ORP, PH- adds P and ORP adjustment adds K.
Turned on the Mars Hydro VG80 mid week.
Internodal spacing is kinda big with some branches but overall OK, stretch seemed to have slowed down.
Nothing else to report.
Values are average of the day.
DATE - °C - RH% (Tent Temp/RH)
20241111 23.1 61.5
20241112 22.6 60.9
20241113 22.7 62.6
20241114 24.0 64.3
20241115 23.5 61.6
20241116 23.4 61.3
20241117 22.9 63.7
DATE - PH
20241111 6.07
20241112 6.08
20241113 6.11
20241114 5.98
20241115 5.95
20241116 5.95
20241117 5.94
DATE - ORP (mV)
20241111 62
20241112 94
20241113 125
20241114 104
20241115 84
20241116 70
20241117 54
DATE - EC(us/cm)
20241111 2168
20241112 2167
20241113 2025
20241114 2051
20241115 1990
20241116 2020
20241117 2027
DATE - CF
20241111 21.68
20241112 21.67
20241113 20.25
20241114 20.51
20241115 19.90
20241116 20.20
20241117 20.27
DATE - °C (Reservoir)
20241111 21.7
20241112 21.9
20241113 21.7
20241114 22.3
20241115 22.0
20241116 22.0
20241117 21.5
Likes
152
Share


@FrenchxFarmer63
Follow
Bonjour à tous !
Une triste nouvelle est arrivé cette semaine , mon premier pied "Black Domina 1" manquais d'azote la semaine dernière , ajout cette semaine , Sur arrosage de ma part.... + attaque d'araignée rouge que je n'avais pas vus.... J'ai donc décider de supprimer ce pied pour ne pas perturbé le reste des autres plantes.......
Après avoir enlever ce pied j'ai donc commencé à traiter les autres ! Avec un vaporisateur contenant de l'eau , du jus de citron et du concentré de savon noir de Marseille , ceux sont des répulsif naturel , à ça je vais arroser ma serre tous les jours pour y garder un taux d'humidité plus élevé car ces bestioles n'aime pas du tout l'humidité , elles prolifères quand il y a des fortes chaleurs sèches !!!
Attention ,
En plus d'avoir augmenter l'humidité dans ma serre , j'ai utiliser un conseil de ma grand mère , oui oui , ma grand mère pour asphyxier les araignée rouge , il serait conseiller de faire brûler du café , l'odeur dégager serait très désagréable pour ces sales bestioles !!! Attention les yeux , ça fume !!!!!!! (désolé pour la mauvaise qualité vidéo)
Mis à part ça le reste de la troupe continue d'avancer , les têtes grossissent et ce dessine de plus en plus , l'odeur et juste incroyable... ET je continue de palisser les branches !!! 😂 (LST🙌)
Je vous montre mes engrais maisons dans les dernières photos ( Cendre de bois + Marc de café )
Bonne soirée à tous

Likes
26
Share


@Bread_n_Buds
Follow
It was a wonderful journey, I really had the honor of doing this girl many times, this time even close to the Monster Zkittlez with which they generated the Runtz who was also in the grow. Super modern family situation, I wanted to try to figure out which one I liked best, and I still haven't been able to. at least I'm still tasting Runtz's first flowers and it's heavenly but the freshly picked Gelato and the upcoming Zkittlez are scary just to see them. Super resin, it really looks fake, I also have some macro photos that will make you cry. The resin is everywhere the trichomes are even in the largest leaves the scent is of the garden of eden. wow. Show. Really nice. It was freshly cleaned I want to try to do the resin the first time and then I have freshly cleaned and hung the whole girl upside down under the crop data next week when I clean and can give the detail. Gorgeous. Before being collected, she did two music therapy days, one of which in the dark with frequencies for plants and together we listened:
1 - Paolo Conte - "Gelato" al Limon
2 - Raekwon - Ice Cream to stay on the "Geato" theme and then all the M83 discography to be collected with the very famous Outro of Interstellar really seems to pass to a better life listening to that stuff. Top of the top

Likes
92
Share


@DogDoctorOfficial
Follow
Week 7 Flower Report – The Masterpiece Garden Unfolds
🌱 Introduction
Welcome back to the most thrilling chapter of our journey yet! Week 7 of flower is here, and the garden has transformed into a paradise of unique beauty and diversity. Every plant has its own personality, showcasing the results of all the hard work, dedication, and love poured into this run. Let’s dive into the details and celebrate these girls like never before—because they deserve it!
🌸 Plant-by-Plant Breakdown
Papaya Zoap
The rebel queen of the garden, aiming for the stars with her towering structure. Her dense, frosty white nugs sparkle like diamonds, and her leaves are fading to a stunning yellow hue—a clear sign she’s ready to shine. Her aroma is captivating, leaving no doubt she’s going to be a showstopper.
Gorilla Melon
Standing tall as the second in command, this beauty is all strength and vigor. Her vibrant green foliage cradles thick, frosty buds that exude a fragrance worthy of her name. A true contender for the title of MVP.
RS11
This one’s a frost factory! Long, elegant buds dripping in trichomes, with leaves gracefully fading to yellow as she transitions toward the finish line. Her balanced stature and impeccable structure make her a dream to cultivate.
Green Papaya
The frostiest of them all, her sugar leaves are curling under the weight of so much resin. Every glance reveals a shimmering coat of trichomes that’s hard to believe. If frost were a competition, she’d already have the gold medal!
Mandarin Squeeze
Dark and mysterious, this beauty stands out with her rich, deep green tones and impressively dense buds. Her flowers feel like rocks, and her aroma hints at a citrusy explosion waiting to happen.
Punch Pie
What can we say about this heavyweight? Her large, dense buds are jaw-dropping, and her presence in the tent is commanding. She’s proving to be a genetic masterpiece, delivering beyond expectations.
🌞 Environmental Mastery
This week, we’ve begun the slow decline of PPFD to 750, keeping reds and UVs strong while easing back on whites—a calculated move to guide these girls into the final stages. The room’s stats speak volumes:
• Temps: 27.8°C with RH at 64.8%.
• CO2: 800 ppm for consistent growth energy.
• Reservoir: PH 6.16, TDS 791, temp 21°C.
• Soil Stats: TDS 669, temp 22°C.
Even the fun facts are worth noting: leaf temps are ranging between 26.6°C and 24.2°C, while the LED bars are holding steady at 38°C, and the ICL-300 at 35.6°C. Aero Fan at 23°C and the filter output at 24.7°C highlight the precision and control in this room, all thanks to the incredible TrolMaster ecosystem.
💧 Feeding and Nutrient Update
Our transition from organic minerals to a solo mineral approach has been a game-changer. These girls are thriving! Here’s the recipe this week:
• System Clean: 0.25 ml/L.
• RO Water Conditioner: 0.8 ml/L.
• All-in-One Liquid: 1.75 ml/L.
• K-Boost: 0.5 ml/L.
• Regulator: 0.15 ml/L.
This blend is bringing out the best in each plant, delivering unparalleled frost, density, and aroma. The stability of the pH, thanks to minerals, has made life simpler while pushing the plants toward peak performance.
🌟 Reflecting on Progress
It’s a joy to walk into this room and witness the results of months of effort. Each plant is delivering on its promise, and the smells, colors, and trichome production are truly next-level. The journey has been demanding, but the rewards are sweeter than ever. The curiosity to see how they finish is at an all-time high!
💬 Shoutouts and Community Love
As always, massive gratitude to the sponsors that make this possible:
• TrolMaster for precise environmental control.
• Aptus Holland for top-tier nutrients.
• Cannakan for their unwavering support.
• Pro-Mix Soil for a robust foundation.
• Seed Banks for the incredible genetics.
To the Grow Diaries community, our followers, lovers, haters, and everyone in between—thank you for being part of this journey. Your engagement fuels the passion to keep growing, learning, and sharing.
📣 Call to Action
If you haven’t already, check out our YouTube and Instagram for exclusive content and updates. Don’t forget to hit that like button, subscribe, and ring the bell so you never miss a beat. Join us for the next episode, where we’ll dive into super-cropping and give the room another round of defoliation as these girls keep reaching for the finish line.
Let’s keep growing, learning, and celebrating this beautiful process. 🌱✨
Growers Love,
Your Grateful Gardener
Discount Codes so you can save big on your next check out 💚💚💚
Kannabia - DOGDOCTOR 30% off
SeedsmanSeeds - DOGDOCTOR 10% off
CannaKan- DOGDOCTOR 15% off
terpyz.eu - DOCTOR 15% off
The Neutralizer - PORKIT5-DOG 15% off
Fast Buds - DOGDOCT 15% off
As always thank you all for stopping by, for the love and for it all , this journey of mine wold just not be the same without you guys, the love and support is very much appreciated and i fell honored and so joyful with you all in my life 🙏
With true love comes happiness 💚🙏 Always believe in your self and always do things expecting nothing and with an open heart , be a giver and the universe will give back to you in ways you could not even imagine so 💚
Friendly reminder all you see here is pure research and for educational purposes only
Growers Love to you all 💚💚💚


Likes
7
Share


@Bingbings_garden
Follow
Hello growers
Been battling winter temperatures this week so moved this girl into the warmer tent. Got as cold as 16° inside the tent during the day (outside was 6-7°) for the past week. Growth might have been stunted a little bit but did my best to keep temps up without having to install heaters inside the tent. She now has a purple light to finish off her flowering run.
Edit: added two of the 200w lego panels to help fight the cold weather.
See you next year 😉
Likes
20
Share


@Hashy
Follow
Week 2
Light cycle=18/6
Light Power=120w 50%
Extractor controller settings
High temp= 24c
Low temp= c
Temp step=0c
High Rh= 65%
Low Rh= %
Rh step=0%
Speed max=5
Speed min=1
Smart controller settings (during lights on).
Lights on=06.00am
Radiator on= below 19c
Radiator off= above 20c
Humidifier on= brlow 60% above 23c
Humidifier off= above 63%
Dehumidifier on= not in use
Dehumidifier off= not in use
Smart controller settings (during lights off).
Lights off=00.00am
Radiator on= below 17c
Radiator off= above 18c
Humidifier on= not in use
Humidifier off= not in use
Dehumidifier on= not in use
Dehumidifier off= not in use
VPD aim=0.6-1.0
DLI aim=18-22
EC aim=0.8
PH aim=6.2
Thur 4/1/24
#2 (Day 8)
📋
Was H=9cm D=69cm DLI=16.9
Now H=9cm D=69cm DLI=19.7
Fri 5/1/24
#2 (Day 9)
📋 was in need of watering. Starting it's 3rd set of true leaves.
💧💧💧💧💧💧💧💧💧💧💧💧💧💧💧💧
Method= manual
Neutralise=0.1ml/L
Roots=5ml/L
Feed=nutes
Volume=200ml
Easy Ph down=0 drops/L
Ec=0.27 PH=5.9/6.2
Time=2.30pm
Runoff.
Total runoff=55ml
Ec=2.08 PH=5.7/6.0
💧💧💧💧💧💧💧💧💧💧💧💧💧💧💧💧
Sat 6/1/24
#2 (Day 10)
📋 Looks good.
Sun 7/1/24
#2 (Day 11)
📋 Potted up to 8L pot with biobizz light-mix.
💧💧💧💧💧💧💧💧💧💧💧💧💧💧💧💧
Method= manual
Neutralise=0.1ml/L
Roots=5ml/L
Feed=nutes
Volume=3L
Easy Ph down=0 drops/L
Ec=0.27 PH=6.0/6.3
Time=1.30pm
Runoff.
Total runoff=400ml
Ec=5.1 PH=5.2
💧💧💧💧💧💧💧💧💧💧💧💧💧💧💧💧
Removed humidifier.
Adjusted light height.
Light Power=100w 42%
H=10cm D=62cm DLI=18.9
Mon 8/1/24
#2 (Day 12)
📋 Looks ok, foliar sprayed (cal-mag 5ml/L)
Tue 9/1/24
#2 (Day 13)
📋 Having a cold spell at the moment so I'm adjusting the smart settings to compensate.
Smart controller settings (during lights on).
Lights on=06.00am
Radiator on= below 20c
Radiator off= above 21c
Humidifier on= not in use
Humidifier off= not in use
Dehumidifier on= not in use
Dehumidifier off= not in use
Smart controller settings (during lights off).
Lights off=00.00am
Radiator on= below 18c
Radiator off= above 19c
Humidifier on= not in use
Humidifier off= not in use
Dehumidifier on= not in use
Dehumidifier off= not in use
Wed 10/1/24
#2 (Day 14)
📋 H=12cm D=60cm DLI=20.1
✂️ Topped after the 3rd set of true leaves and left the lowers for now.
Considering this one was started nearly a week behind the others she soon caught them up.
Back soon.
Take it easy.
Likes
14
Share


@AntiWar
Follow
70 день, следим за трихомами... всё на фото
72 день, последний раз кормлю Ripen
77день, несколько янтарных трихом, скоро срежу их)))
Likes
3
Share


@TAXFR33
Follow
Plant has a beautiful fade since i started the flush 2 weeks ago. Nice dense n sticky nugs. We are at week ten and i’ll be chopping her tonight

Likes
Comments
Share


@eldruida_lamota
Follow
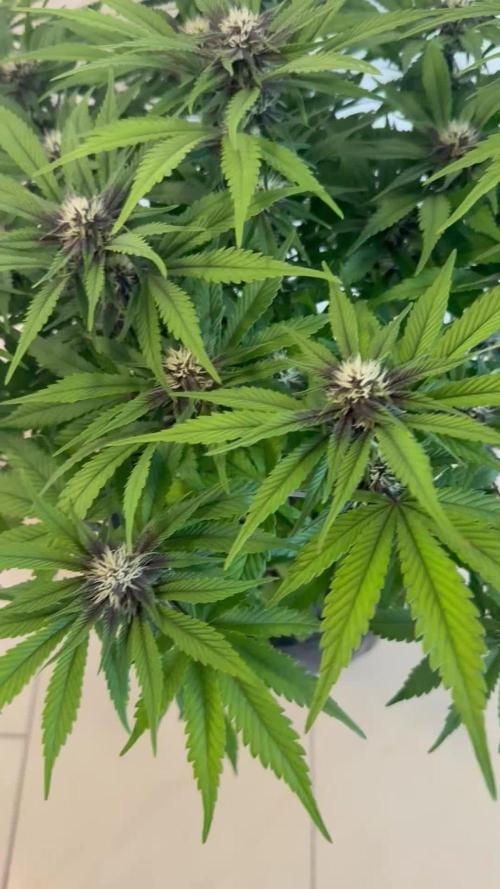
Vamos familia, actualizamos la cuarta semana de floración de estas Forbidden Mochi fast de Seedstockers, Aplicamos varios productos de Agrobeta, que son increíbles para aportar una buena alimentación a las plantas.
Temperatura y humedad dentro de los rangos correctos dentro de la etapa de floración.
La tierra utilizada es al mix top crop, por cambiar.
De 5 ejemplares seleccioné 4 para completar el indoor y trasplanté directamente a macetas de 7 litros, cambie el fotoperiodo a 12/12 y aplique una buena poda de bajos, se ven bien sanas las plantas tienen un buen color y progresan a muy buen ritmo, ya empezaron a progresar las flores a tricomar y a coger tonos púrpuras rosáceos, están increíbles.
Agrobeta:
https://www.agrobeta.com/agrobetatiendaonline/36-abonos-canamo
Hasta aquí todo, Buenos humos 💨💨💨