Likes
Comments
Share


@Natrona
Follow
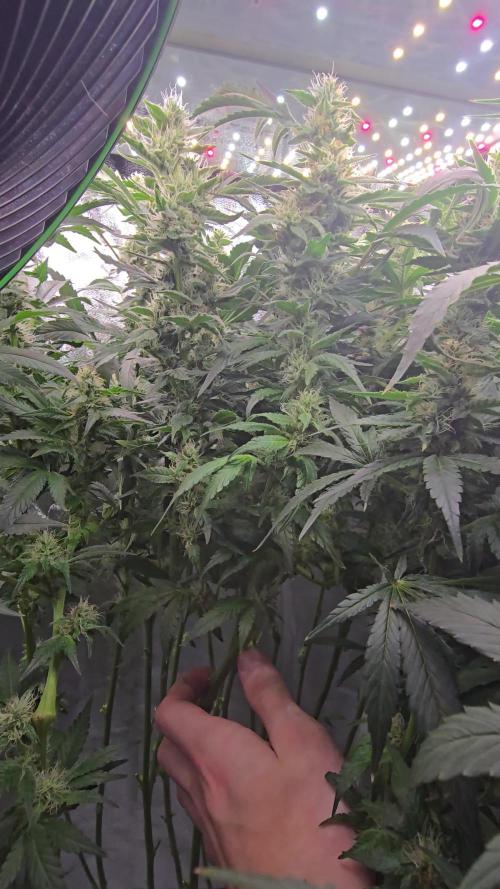
Tropicanna Poison XL Auto- Outside
W10F6 8/17-23
This past week has been rainy and overcast from a tropical storm with temperatures mostly in the upper 80s. We have Hurricane Erin approaching the Bahamas heading northeast with wind gusts of 30-40 MPH. While we won’t be directly hit by the storm, we will get the outer bands of heavy winds and rain. To protect my plants, I brought all the girls inside on Tuesday 19th in preps for the storm. I inspected each one for bugs, rot or anything unusual. She is free and clear of any rot or bugs
8/19 Tropicanna Poison XL auto is 53 days from germination. Sweet Seeds says 60-75 days to harvest so she needs about a week more. Next week with the hurricane approaching, we are expecting rain for most of the week. Given the pending weather conditions for the next couple of weeks, the remainder of the grow will be in the tent where I can control the environment. I also will be using the air conditioner to drop nighttime temperature and maybe bring out pink and red colors. The stems show pink so I’m hopeful.
Thank you all for your continued support and encouragement. Your likes and comments motivate me to keep sharing my journey.
Stay green, growers love 💚🌿
💫Natrona💫

Likes
9
Share


@TricoGhost
Follow
Para ser la primera vez que cultivo no puedo quejarme, pero si alguien me pudiese ayudar


Likes
61
Share


@DreamIT
Follow
What else to add to that already mentioned above? we have reached the end of the cycle, I will smoke it shortly, it is drying in a WEDRYER bag that I recommend to everyone (photos and review in the coming days). I followed the nutrition program provided by Royal Queen Seeds and did not notice any signs of excess or deficiency until the plant's nature discoloration after the final flush. I will evaluate the fertilizer difference when the other honey creams have bloomed as well. I didn't really like the capsules as I had to keep them still for days between irrigations and the color of the water was not the best to see if you don't have a continuous oxygen pump. For the rest, a very simple and resistant variety, a nice yield overall, considering my cultivation size. 9 out of 10 for this variety, but I reserve the right to change the vote after the smoke report: p 😜

Likes
5
Share


@Ninjabuds
Follow
Obama runtz x gas tax sad to say both seedlings are super crappy so far. If it was not for the gas tax parent being the best flower ever then I wld just toss these but sometimes the crappy slow growing plants end up being super dank
It's looking like a good start to a week the plants are strong they are getting to the point I can let the dried dry out completely. I'm thinking by the end of this week the plants will be starting to be sold.
Last week I put all the plants into my bigger 2x4 tent with my medicgrow mini sun 2 the 500w version. Only a few of the plants were ready for that light. Seems like the only plants that really have good resistance and have a strong start are the weedseedsexpress.com seeds. Shout out to weedseedsexpress.com for the strong plants.
I ended up putting all the plants back into my 2x2 tent with the 55w amazon light it has alot more blue light in its spectrum. It's kinda weird b4 I switched the plants to the 2x4 tent they were getting 220umol under my amazon 55w led then when I put them under the 500w light 25% strength about 50in from plants and they were getting only about 195umol in that tent but it was stressing most the plants. I assume a larger light has more side lighting hitting the plants. I think when useing larger lights it's good to measure umols from the top but also coming from the sides. I think durring seedling stage they only need about 50% the umols coming from the side the plants as the top is receiving.
When I put the plants back in the small tent about the same umols as they were getting b4 the switch and they were still a little stressed. So for a few days I put the small light at the top the tent giving them 100umols for a few hrs then 130umols the rest the day.
Likes
36
Share


@KnightRider
Follow
Hey Cannafam,
Well its been a fairly good week for my gal, weve had a few days of light rain but nothing to harsh,not enough to bring the snails out and this is probably the first week that shes not been attacked by a pest of some kind.
Most days have been hot and sunny and its still been fairly warm at night as well, thankfully the temp drop has been enough to start bringing out the purple colours further. They start in the middle of the plant and are slowly spreading out 😊💜
Shes also been thirsty and has two feeds this week with a watering every other day. Smell is ramping up now and the lovely forest fruits can be smelt when you brush a sugar leaf.
Bud development is slow and steady and shes starting to frost up now as well 😊
Overall shes doing well and the good weather is set to continue which im pleased about!
Thats all from me for now, take care my friends 💜💜💜
Likes
19
Share


Likes
1
Share

@psychonaut420
Follow
first 2 plants are lemon cherry cookies auto and last one is frozen face auto the white stigmas and streaching side branches are streaching outwards I’ve done more lst and defoleation for light penetration to each bud site

Likes
14
Share

@Shivashamboom1
Follow
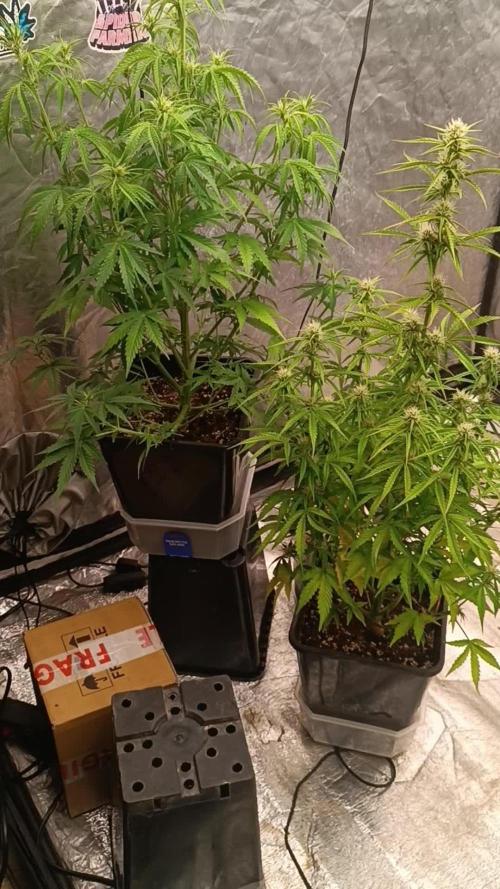
Inizio settimana 2 di fiori tutto procede bene.....la più piccola ha più o meno due settimane in meno della pianta po' ou grande.. stanno crescendo non troppo alte.. piuttosto sono ben compatte. Sicuramente anche le cime(fiori) saranno belli massicci compatte e soprattutto che sia una buona terapia 😉💪


Likes
39
Share


@Bluemels
Follow
Tag 112: Zeit zum Spülen bzw. Ich gebe keinen Dünger mehr. Weil die Shogun doch schon recht hell/gelb ist, aber gebe ich noch Alg a mic dazu um noch etwas grün zu erhalten.
Das Wetter hier spielt mir mal mehr mal weniger in Karten, der Sommer dieses Jahr ist sehr durchwachsen 😬
Likes
105
Share


@WhiteWidow
Follow
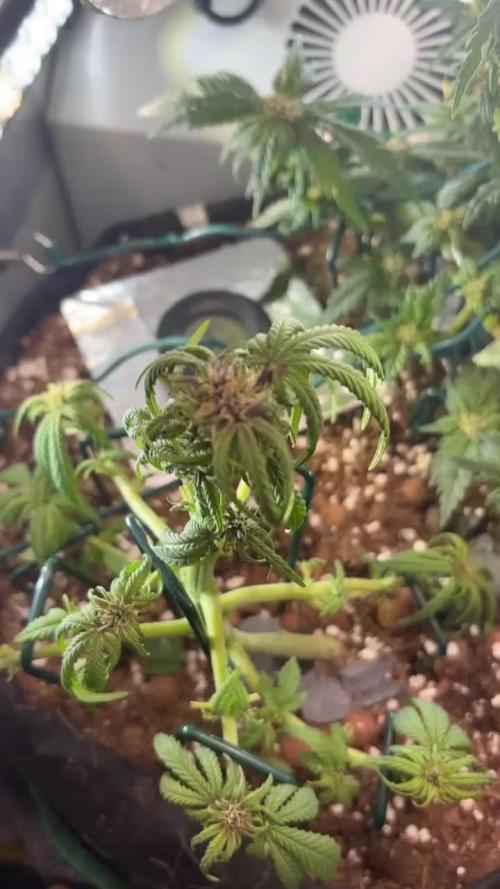
Bending, tucking, wireing.
Jackie seems to love it all, my fastest plant so far from seed. She is enjoying sun and few hours a day of CFL-s.
Light nutes dosages seem to suit her needs, bacillus and myco doing their job very well, more than happy I am what can i say :)
__________________
Update 13.10.
I Decided i want to try supercropping on an auto strain, my jack is groeing ultra fast on a daily and i blv today is kinda good day considering the growth of an auto and her life cycle..
you can see the training i am doing as well, every 2 days i must move green wires and gently stick them to soil not to hurt roots, and spread them side branches that have 2 pair of nodes already.
Lets see how will she respond in the next days :)
Likes
40
Share


@Ga4rd2en0er
Follow
Day 43 purpling petioles is back. Root zone ph tests are perfect 5.9 6.0. She is fed at only 650 ppm on constant drip feed. Anything higher and was seeing some tip burn. May try low low low dose pk boost. I've read up on adding at 1/8 strength and feed middle 3 weeks can help. Think I'm going to give it a shot next reservoir change.
Day 44 res change. Implemented Canna PK boost at 10% strength. Filled res with 2 gal. Will monitor plants signals. A couple bottom leaves yellowed and died. Not concerned as the leaves where well below canopy and low light conditions.
Day 45 .75 gal consumed. All is well
Day 46 she drank another 3/4 gal last night. Maintenance flush completed. Adjusted fan to above canopy and while doing so my hand inadvertently brushed against a bud and she smells of pure lemon candy at the moment. Stunning.
Day 47 another 3/4 gal gone and the top of the coco had a few dry splotches. She's out drinking my feeder. I may have to add a second carrot to the pot.
Day 48 she drank a gal last night. I think I finally got her flowering nutes dialed back in. Initial runoff ppm coming out same as going in. Overall appearance strong and healthy. Added 3 gal to res.
Day 49 checked her at lights on and she was bone dry. Somehow got an air bubble in the drip line. Immediately drenched her. she looks fine. Fingers crossed.
Added some pics/vids of some propagators that I'm playing around with. No MJ yet, but its spring and planting my herbs and veggies.

Likes
6
Share


@w00tGrow
Follow
fattening those buds with big budd but not really glad, seems like they are not proogressing much from week to week any advice?
or maybe just little paranoic ))
Likes
30
Share


@TragicTerps
Follow
This week we haven't really experience anything too crazy, plant C had a little underwatering issue she got thirsty started to look pretty weak the 1st day of week 6 (for her only) she had recovered by the end of day 1 before going into the dark cycle. As the week progresses we should see some more tricome production and some more development of the bud sites. I'm hoping the underwatering that happened won't stunt or hurt the end yield too bad, that was a bad moment of laziness... whoops.
Overall I haven't had any problems yet with pests there's been a lot of gnats and spiders on the outside of the tent but nothing on the inside. For a cheap tent it's working awesome. It does have some light leakaround the zippers but this isn't a problem for me as I'm growing in a darker area already. But if this were in a bright room all the time this tent would be a bad choice.
Now as week 7 progresses we'll start seeing more rapid Bud development and see some increased tricome production. To think this girl (plant A) is just barely over halfway done is crazy. I have ended up removing the entire bottom 1/3 of the plant in the form of defoliation of the yellowed and dying leaves. People say don't defoliate Autos for shock reasons I hope it doesn't really matter.

Processing
Likes
2
Share


@Palermo91
Follow
They look good to me ... keep give all the nutrient .. I gonna wait maybe 3 more days and I gonna topping 👍👍😊😊👌👌


Likes
15
Share


@PopsFarm
Follow
Day 52 - Toffee Pudding Auto from @anesiaseeds
Nutrients: @atami_deutschland / @atami.international / @stefan_atami / @daniel_atami
Soil: @promixgrowers_eur / @promixgrowers_global / @promixgrowers_unfiltered / @promixmitch
LED: @powerlux_spain
Tent: @secretjardin_
Thank you to everyone who follows and supports my work 🙏🏻💚
This means a lot to me and you should know you are a part of it and only with you all this is possible, you are the best community 😎
Growers love, love for everyone