
Likes
Comments
Share

@Jardin33ro
Follow
Entramos en los ultimos detalles para aterrizar en la ultimas 2 semanas. Una locura el tamaño de ese coco, ta quedando compacto y con tonalidades violetas. Un olor fuerte a limon podrido jaja

Likes
9
Share


@Rambogrow
Follow
Flower has begun and things are starting to take shape. Small amount of stretch has begun and nutes have been switched to flower. 3 ladies are very happy and are starting to shoot pistils.

Likes
4
Share


@AlpAge_Cino
Follow
Burned tips on clones too... Lot of plain rain water for everyone! Anyway, buds look great : they're long and get fatter.
I tried a wet sample in vaporizer yesterday : it tasted bad but it was potent enough to put a smile on my face... 😋 So I removed a few popcorn buds and put them to dry : it's covered with trichromes and it smells good. I'll vaporize this dry sample later, no doubt it'll taste better.
Likes
19
Share


@Dutch_Grower
Follow
Few lower leaves turned yellow, i gave them some more nutes with water. Everything is okay now.
Every friday around 7 pm new upload.
Don't forget to like (helps with the algorithm)
Thank you, have a nice one!

Likes
10
Share


@Farmer_Joe13
Follow
*Grow Diaries* ,you guys are doing a great job this is an awesome sight. Keep up the good work. I love looking at all these different grows and Diaries From great growers.
Booco Of different strains with so many Individual techniques.Such beautiful pictures makes it hard to leave the computer. No doubt an Experience every grower should know. Informative & Educational truly a learning experience . I have been growing for a while but never tried to measure document and record a grow Start to finish with pictures. I know this will be helpful for future grows I appreciate the opportunity To participate.
THANKS
Happy growing!
Farmer Joe


Likes
12
Share

@ohcibi
Follow
Approaching the finish line. Fertilizer is now at its final dose. Both plants stopped growing now and started to build thick buds. Ken in fact is way ahead in terms of buds but it might be because he Hase a little bit less in number. It’s possible that I trained Ryu too much for his pot size 😆😆. But let’s see. Both looking very good and a lot more powerful than in my first grow.
Water intake is still massive. The top soil is rock solid while draining water super fast which must mean the pots are filled with massive roots. The erected teeth came down a bit but they were never that severe in the first place so I’m still not worried about that. I skipped one day of watering to account for possible slight overfeeding but I mean, today’s watering then was with the increased dose of fert 😆😆. I know I’m pushing it a little bit but that’s deliberate. I have high demands both in mass and quality so my approach is riding the edge as good as possible from the beginning 😆
Likes
4
Share


Likes
3
Share


@Weedy_Shepherd
Follow
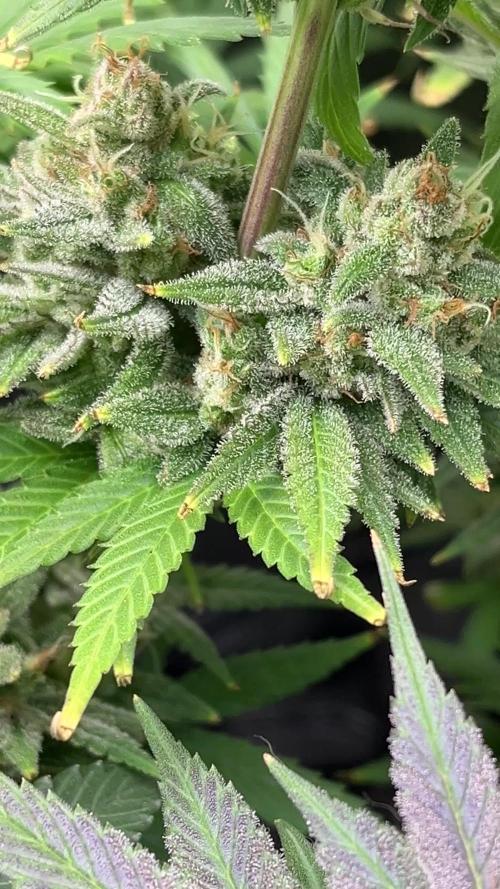
4 weeks left before the great chop, tricomes still very clear, but some are milking up quite nicely

Likes
37
Share


@RFarm21
Follow
Boas growmies! Esta semana apareceram mais folhas amarelas mas penso que seja normal, penso eu, visto que já estão caminho da 10ª semana.
O cheiro delas é fantástico!
17 Agosto - O gráfico representa a nutrição misturada em 2,5L de água da Royal Gorilla 1. EC = 1,55; pH 6,4
17 Agosto - Alimentaçao da Royal Cheese (2L): CE = 1,5mS; pH 6,3
-BioGrow - 3ml; BioBloom - 4ml; TopMax - 2ml; BioHeaven - 5ml; Activera - 5ml; Calmag - 1ml
17 Agosto - Alimentação Royal Gorilla2 e royal cheese 2 = Só água . ph 6.3)
-----------------------------------------------------------------------------------------------------------------------------------------------------------
21/08 - Alimentação Royal Gorilla #1 (2,5L): CE = 1,64; pH = 6,3
-BioGrow - 4ml; BioBloom - 6ml; TopMax - 2,5ml; BioHeaven - 7ml; Activera - 6ml; Calmag - 1,5ml
21/08 - Alimentação Royal Gorilla #2 (2,5L): CE = 1,33; pH = 6,1
-BioGrow - 3ml; BioBloom - 5,5ml; TopMax - 2ml; BioHeaven - 5ml; Activera - 5ml; Calmag - 1,5ml
21/08 - Alimentação Royal Cheese #1 (2L): CE = 1,36; pH = 6,1
-BioGrow - 3ml; BioBloom - 5ml; TopMax - 2ml; BioHeaven - 6ml; Activera - 5ml; Calmag - 1ml
21/08 - Alimentação Royal Cheese #2 (2L) - EC = 1,38; pH = 6,3
-BioGrow - 3ml; BioBloom - 4ml; TopMax - 2ml; BioHeaven - 5ml; Activera - 5ml; Calmag - 1ml


Likes
42
Share


@Master_weeda
Follow
Bonjour à tous les padawans et les maîtres jedis
Cette plante est vraiment exceptionnelle! Elle représente la force et j'en suis fier 😍
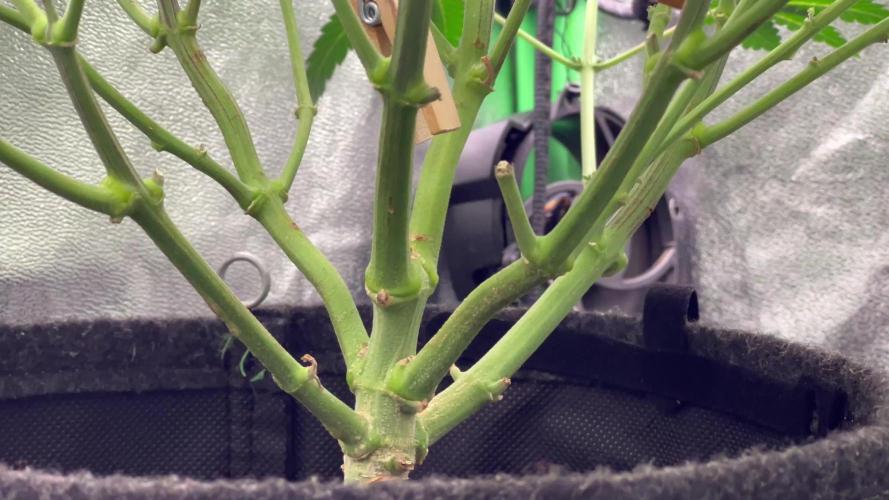
La semaine 4 est déjà la ! Ma plante est saine le LST ce passe relativement bien je l'ajuste tout les jour je le combine avec la technique du pincage d'Apex cela me permettra d'avoir une canopé plus homogène donc une meilleure pénétration lumineuse et par conséquent un meilleur rendement.
Le pinçage est une pratique courante en horticulture.
Beaucoup de cultivateurs l'utilisent pour améliorer le rendement de leurs plantations cannabiques ou autres.
Il est souvent question de 'taille' des bourgeons apicaux.
Cette taille se pratique également mais il n'est plus alors, à proprement parler, question de pinçage.
A l'instar d'une taille, le pinçage va permettre de stimuler le développement des ramifications tout en préservant les sommités en vue de la floraison.
Il est très utile pour uniformiser une canopée.
Pour réaliser le pinçage, il vous suffit de presser 'fermement' la tige [entre le pouce et l'index] aux environs de l'apex jusqu'à sentir un léger 'crAck'.
Cela aura pour résultat d'endommager les vaisseaux impliqués dans la circulation de la sève [situés dans le pourtour de la tige], la tige conserve toutefois une certaine rigidité.
Pour obtenir le même résultat, il est également possible de vriller légèrement la tige sur elle-même.
L'interruption du circuit d'alimentation entre le ou les apex et le reste du plant va provoquer un déséquilibre hormonal qui aura pour conséquence le développement des ramifications antérieures au point de pinçage.
Jour 25 j'arrose mon pot normalement avec un quart de son volume en eau toujours avec un PH de 6.3 à cette eau j'ajoute 0.7 gramme de greenhouse feeding enhancer pour favoriser son développement racinaire.
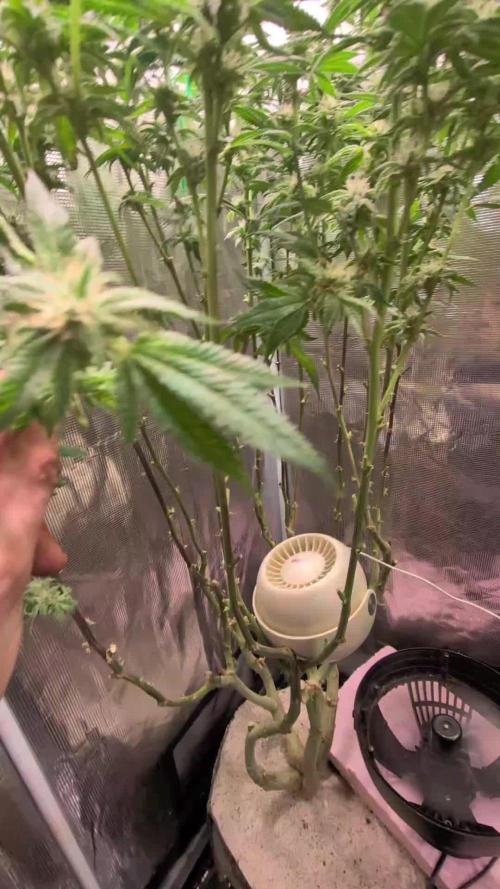
Par la suite je n'aurai plus qu'à ajuster mon LST jusqu'au stretch et surveiller mon arrosage, Je pincerai mes apex suivant la pousse de la plante pour uniformiser la canopé.
Petit rappel de ce que est le LST et comment le pratiquer le plus efficacement possible:
Quand commencer à appliquer la technique LST
De nombreux cultivateurs commencent la manipulation dés que les plantes possèdent entre 3 et 6 nœuds ou une paire de feuilles. Durant cette première étape de la croissance, le tronc encore flexible est pliable sans risque qu’il ne se casse, même si au fur et à mesure du développement de la plante il sera de plus en plus difficile de le plier. Nous pouvons continuer à guider la croissance des branches durant toute la culture, même durant la floraison, ce qui pour cette étape représente un grand avantage face à la taille, qui n’est pas du tout recommandé une fois que la formation des têtes commence, cela stressera en effet la plante, ce qui aura pour effet de retarder la récolte.
Comment appliquer la technique de guidage LST
Si nous sommes prudents, la flexibilité naturelle des fibres du cannabis permet de plier leur tronc et branches avec une relative facilitée, même durant la floraison des plantes.
En utilisant une corde fine, nous pouvons accrocher la pointe de la plante à la base du pot par exemple ou à un tuteur que nous aurons planté dans le substrat. Nous plierons le tronc avec précaution et nous le fixerons avec la corde, à partir de là, nous pouvons augmenter progressivement la tension de la corde, chaque jour un peu plus, jusqu’à obtenir la position souhaitée. Soyez attentif à la réaction de la plante, essayez de ne pas appliquer trop de pression sur la corde et rappelez-vous que la flexibilité des branches peut varier d’une plante à l’autre.
Pour obtenir de meilleurs résultats, il suffit de suivre quelques règles simples. Pour commencer, nous devons choisir une corde fine mais pas trop pour ne pas blesser les troncs au fur et à mesure qu’ils grandissent et qu’ils deviennent plus gros.
Nous pouvons utiliser des crochets en plastique souple ou de n’importe quelle autre matière flexible pour éviter d’endommager les plantes. Spécialement en intérieur, utiliser des cordons en plastique de couleur (voir les diaries de @Silky) est très pratique pour voir facilement les accroches et faciliter le travail au milieu du réseau formés par les cordes, les tuteurs, les mailles ou les supports que nous aurons dans la culture. Bien entendu, en culture extérieure et surtout en guerilla nous ferons juste le contraire et nous utiliserons des matériaux de couleur qui n’attirent pas l’attention pour que notre jardin reste discret.
Pour stresser les plantes au minimum, la mieux est de réaliser ces manipulations le soir ou juste après que les lampes en intérieur s’éteignent, ce qui leur permettra de se remettre durant la nuit. Normalement, le jour suivant nous pourrons observer comme les pointes des branches que nous avons pliées se dressent de nouveau vers le haut à la recherche d’une source de lumière.
Je combine un pincage d'Apex (explications plus haut) au LST cela me permettra d'avoir une canopé plus homogène donc une meilleure pénétration lumineuse et par conséquent un meilleur rendement.
Que la force soit avec vous 💪


Likes
15
Share


@Kurow
Follow
Had a bad humidity (spots on leave are wet spots that got handled ASAP) scare last week so got a dehumidifier up in there comfortably. Still smooth sailing.

Likes
236
Share

@yan420
Follow
This two were part of another diary and got moved out due to space reasons at VW8 and moved back indoors at VW20
https://growdiaries.com/diaries/218151-auto-god-s-glue-grow-journal-by-yan402
13.09.25 VW21 Both are looking good and are developing tighter nodes than when they were outside, I'm going to have to keep cutting them back every once and a while I also applied nematodes against thrips and fungus gnats.
20.09.25 VW22 some spots and some yellow leafs, I think it's a root problem, probably root bound, but both seem healthy and are getting thicker so maybe just top up with Coco coir and give a slight different nutrient schedule less Tri Part Bloom could do the trick MAYBE lol.
27.09.25 VW23 Topped up the pots with extra coco coir and trimmed the side roots a bit, both plants were root bound 📹
03.10.25 VW23 did a HST/LST session 📹
12.10.25 VW25 Done a major HST session to try and keep them in line with the Sunset Sherbet GF I have going in the same tent, rest in the video 📹
17.10.25 VW25 ffj/fpj/fish 30 → 60 ml
19.10.25 VW26 it just became a one plant diary, keeping #5, #6 gets it's own diary for testing nutrients.
20.10.25 VW26(?) Feed tweak: added 3 g Calcium Nitrate/ 30 L (≈ 15 ppm N + 10 ppm Ca)
24.10.25 VW26 did a defoliation and trimming session 📹
25.10.25 VW26 I'll be repoting tomorrow, 26.10.25 VW27 rest in the video📹
27.10.25 VW27 Epsom Salt 0 → 2.5, Calcium Nitrate 3 → 9 g
01.11.25 VW28 CalMag 60 → 30ml, TriPartBloom 20 → 30ml, Magnesium 2.5 → 3.5g
04.11.25 VW28 no more yellowing between the veins and no new spots, the changes to the schedule worked, rest in the video 📸
09.11.25 VW29 Did what I'm hoping is a last cleanup 🎥
12.11.25 VW13 Did another cleanup in the tent 🎥, also switched to the FERMAKOR PK Micro schedule, (10.11.25) added Phosphoric acid as a pH down in preparation for flowering
14.11.25 FW1 FERMAKOR PK Micros 40 → 50 ml
22.11.25 FW2 Calcium Nitrate 40 g → 35 g
05.12.25 FW3 about 2 weeks ago Calcium Nitrate 35 g → 25 g, FERMAKOR PK Micros 50 ml → 60 ml
08.12.25 FW4 powdery mildew, rest in video 📸
🌱💦🌱💦🌱💦🌱💦🌱💦🌱
Day to day tasks & actions 🌿
🌱💦🌱💦🌱💦🌱💦🌱💦🌱
06.12.25 FW3 – Fed 5l of #1 → 2l runoff
(*RUNOFF reused for indoor house plants)
💧💦💧💦💧💦💧💦
🌱 Nutrients in 30 L #1 Veg – FERMAKOR
💧💦💧💦💧💦💧💦
Calcium Nitrate (Calcinit / Nitcal): 45 → 40 g → 35 g → 25 g
= 1.50 g/L → 1.33 g/L → 1.17 g/L → 0.83 g/L
= 207 ppm N / 253 ppm Ca → 184 / 225 → 161 / 197 → 115 / 141
PK Concentrate (FERMAKOR Base): 30 → 40 ml → 50 ml → 60 ml
= 1.00 → 1.33 ml/L → 1.67 ml/L → 2.00 ml/L
→ balanced 1:1 P:K + light micros (from extract)
Home-made FFJ/FPJ (Fish + Veg): 30 ml
= 1.00 ml/L
Epsom Salt (MgSO₄·7H₂O): 8 g
= 0.27 g/L → ~26 ppm Mg + ~35 ppm S
Fetrilon Combi 1 (Micros): 0.5 g
= 0.017 g/L
→ Fe 0.7 ppm · Mn 0.7 ppm · Zn 0.3 ppm · Cu 0.3 ppm · B 0.1 ppm · Mo 0.02 ppm
Phosphoric Acid (pH down) + Citric Acid (chelation): as needed
→ First set pH with phosphoric acid, then add a little citric only if you want extra chelation
Target pH: 5.8 – 6.0 (drop test yellow-green)
📦 TOTAL:
Liquids: 60 → 70 → 80 → 90 ml per 30 L
= 2.00 → 2.33 → 2.67 → 3.00 ml/L
Solids (CaNO₃ + Epsom + Fetrilon):
53.5 → 48.5 → 43.5 → 33.5 g per 30 L
= 1.78 → 1.62 → 1.45 → 1.12 g/L
💧💦💧💦💧💦💧💦
⚙️✂️⚙️✂️⚙️✂️⚙️✂️⚙️
✂️ Tools & equipment ✂️
⚙️✂️⚙️✂️⚙️✂️⚙️✂️⚙️
✂️ 2× MarsHydro SP3000
⚙️ MarsHydro 150mm ACF Ventilator
✂️ Trotec dehumidifier (big unit)
⚙️ Mini no-name dehumidifier
✂️ Kebab skewers (LST – stainless)
⚙️ Wire + roast skewers (LST assist)
✂️ Scissors (HST)
⚙️ Vacuum (for spills & cleanup)
✂️⚙️✂️⚙️✂️⚙️⚙️✂️⚙️✂️⚙️✂️⚙️
🍒🍭🍬🌈🍒🍭🍬🌈🍒🍭🍬🌈🍒
🦄Fantasy Feast ( Seeds)🦄
🌈🍒🍭🍬🌈🍒🍭🍬🌈🍒🍭🍬🌈🍒
Species: Hybrid (Regular)
Genetics: The mother is Unicorn Whip by Dirty Bird Genetics. The father is Charcuterie by Cannarado Genetics.
Effect: Unknown Mixed effect body and head high
Flavor: Some phenos are Skunky gassy fruity, some are fruity sour citrus with a chemical touch and a touch of skunk
Flowering: Estimated 8–10 weeks
Resistance: Strong — Testing phase done
YouTube Link: https://youtube.com/-m8h?si=A7x4Zlr2kj-_ga31
Likes
13
Share


@CannaIGrow
Follow
Can definitely tell that the main Tops(oldest) have stopped growing taller, lower branches are still trying to catch up. Tricomes on the top buds are still clear

Likes
19
Share


@Alice_in_Wonderland
Follow
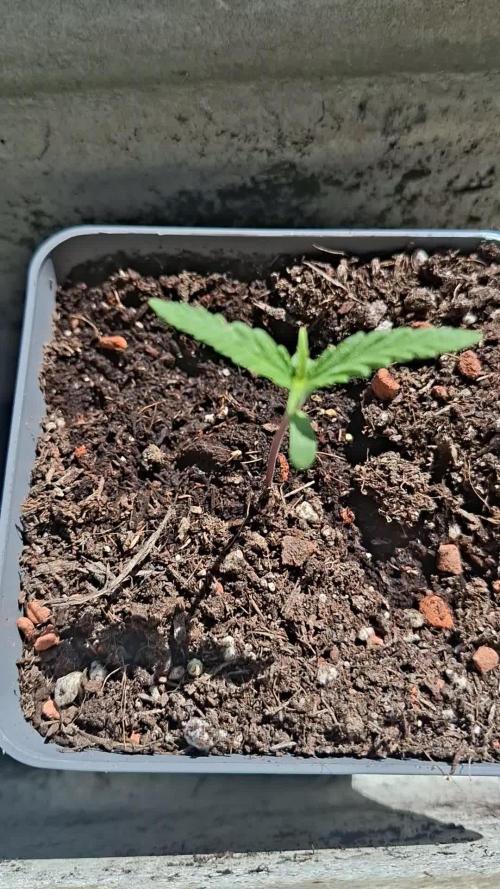
Day 8 - First official day of veg and both ladies are right on time for a small adjustment in lighting, PH and nutrients. 10ml of Hydro A & Hydro B were added to both buckets (10L of water in each bucket) and the Milwaukee PH controller was set to work. Starting at a PH of around 7.8, it slowly worked down to a perfect 6.0 over about 50minutes. The lights were readjusted to be 60cm from the seedlings who are all between 8-10cm tall and the intensity of the lights increased to about 70% brightness.
Day 9 - Cheech is taking nicely to the adjustment in light and nutrients, but CG 1 is looking a little bit too perky. Going to give her 24 hours to adjust.
Day 10 - We have finally renamed CG 1. Fellow enthusiasts, meet Venezia.
Day 12 - The root systems are clearly visible in the ladies today
Day 13 - The ladies are looking well today. Venezia seems to be showing some light signs of heat stress with slight curling of the leaves. The lights are due to be adjusted tomorrow to account for the seedlings growth over the last week.
Likes
15
Share


@GroLife
Follow
First week of flowering was interesting, started scrOG training looks like I’m exposing the plant to grow more cola’s crossing my fingers on this. The aroma of the plant is starting to get stronger.
Likes
7
Share

@vivibeats
Follow
day 18 wheter is finaly good enoug so she coul stay outside except for the night
Likes
102
Share


@Zurban_Poison
Follow
Hello everyone!
well friends !, so she took her final forms! from today it switches to flowering mode 12/12 .. in the diary I will add a week of flowering when it starts blooming and not when the light mode has changed .. I don’t like it when they do it .. it gets confused .. 2 weeks is needed for flowering to begin active after switching to 12 hour mode .. and those growers who add weeks of flowering when switching to 12 hour mode, damn you!)))
