The Grow Awards 2026 🏆 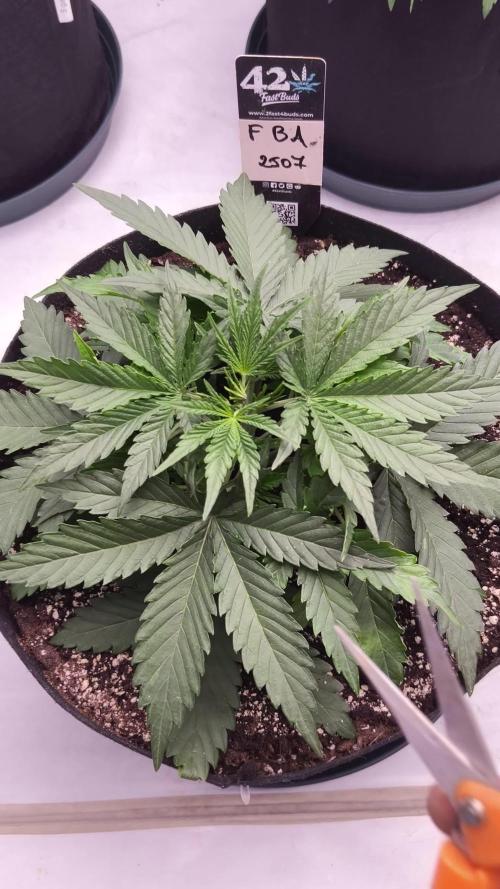


Likes
Comments
Share
@Dictator
Follow
did this beautiful girl a topping, depilation, and LST, she feels good 💚
Likes
280
Share
@love_2_grow
Follow
D1
Both girls germinated, but the first has stretched more than the other, although they both look healthy and vibrant.
I moved them from the heat mat into the tent and a temporary SANSI light since the other light is still in my photo tent for another couple of days.
I will not bother with up-potting and instead transplant them into their final pots tomorrow.
------------------------------
D2.
Transplanted and watered each with 0.5 liters of water @ pH 6.4, with a half teaspoon of myco/kelp mixed in.
I switched the lights and set DLI to 12
------------------------------
D4.
The girls are happy little campers in their new homes.
The first is the taller one but only by a centimeter.
I bumped DLI to 14.
------------------------------
D7.
End of the first week, and the girls are loving life. Unfortunately, it seems that fungus gnats do as well. I knew this could happen by using fresh worm castings as a top dressing. It's not a huge deal, as I already have nematodes ready to go, but I want the soil to dry out before watering again. It's silly to risk over-watering just to get rid of a few gnats. It can wait a few days.
I increased DLI to 16.
------------------------------

Likes
16
Share
@osmrducks
Follow
Day 57: Girls looking good and healthy. Got the HLG turned up 100% pumping 500 watt to em! We shall see. Still only given around 500ppm nutes.
Day 58: Got mostly cloudy with just a couple amber it looks like. I'm thinking I need to start flushing. Albeit, only on one plant. I will wait a few days more until I make a decision.
Day 59: Still looking beautiful! Buds are getting thicker! Decided I will give MOAB till week 10 and check the tric's at that time. Prob start flushing at that time. Only time will tell.
Day 60: Girls looking good. 👊 Not gonna lie, getting nervous as I do not want to cut em too soon or too late. This is a tough spot. The one has a ton of red hairs. It looked as if there was just a couple of amber that I found the other day. I was looking on the outside of the buds, also. So I know the inside is where I need to look. Just not wanting to jack with them too much. I will check again at end of week.
Day 61: Busy. No updates.
Day 62: These girls are starting to smell amazing!! I don't see any noticeable growth here lately. I'm hoping they start to bulk even more though as I think I am still seeing some clear trichomes.
Day 63: Welp, all is well and no new updates. I been feeding pretty heavy so I will back off and just water tomorrow.

Likes
269
Share
@JohnnyBlaz3
Follow
Day 92
Day 30 Bloom
42ish days remaining.
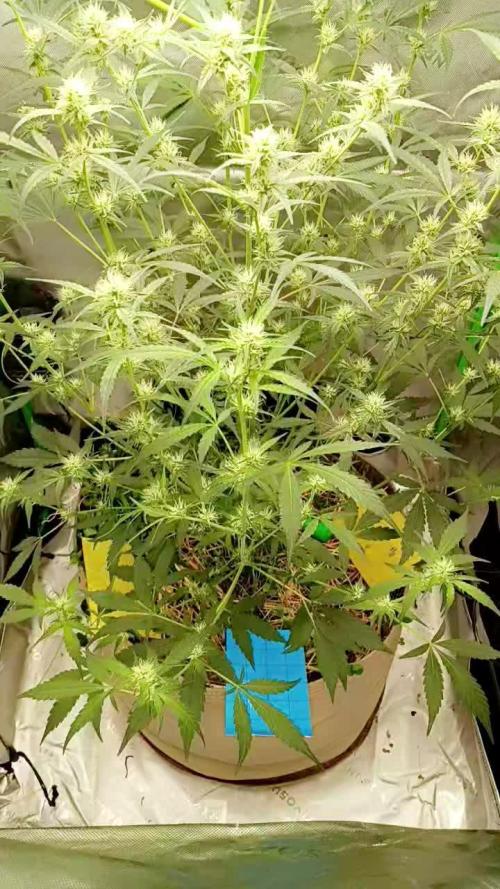
Pour some SUGAR on meeeee.........wowzers the sugar is really starting to cake the sugar leaves now. Got tons of healthy bud sites forming and the smell is just delightful. Did another decent defoliation to keep all the buds site in the light. Keeps it nice and clean with great air flow. Speaking of air flow I added an oscillating fan to keep the air moving under the canopy better.
There is a problem forming that I'll need to take care of this week. Another purchase?? 😡 lol
De-humidifier......the humidity is very slow starting to raise. I started with 2 humidifiers on full, then 1 on full, then 1 on min for a bit then no humidifier and now its starting to raise with no humidifier so I'm gonna need to deal with this asap as it will become a very big issue in the future if I let my girls get moldy, but no chance I would let that happen! so i'll be on the search for a decent used one this week or purchase a new one unless I learn something new here, which I probably will.
A question this week too. about Harvest. mayb 2 questions. So I hear alot of tricks regarding harvest. 24-48-72 hours of darkness before harvest then cut them in the "dark" meaning dont let the bloom lights come on again before harvest. different flush times and so on. what works best for you guys?! I'm thinking 7 day flush since thats why my nute sched says and it hasnt led me astray yet. I'm considering doing a tiny mid bloom flush reccomended by a friend, i like the idea to give just pure water for 1-2 days and kind of give the plants a break from the massive ppms i'm putting them through although I might skip this step if not needed either.
2nd part of the question, if the flower time for this strain is 70-75 days, I realize I should harvest when most of the tricones are milky and some clear with very little to no amber ones. but if I flush for a week before harvest, how do I know when to start the flush, how long is my harvest time frame for maximized potency. I'm guessing with experience I'll be able to know my girls and say yup harvest is x days out but for this one not too sure.
40ish days til harvest is bittersweet, feels so long but part of me loves it, how big can/will these buds get with another 42 days!
Thanks again friends for following, this week the sugar came now I wanna see the weight really start being packed on.

Likes
4
Share


Processing
Likes
Comments
Share
@Greenbean15
Follow
This plant is going to be the heaviest yielding other of my purple trainwreck plants. Super excited to see what this plant will do. I was able to get the second PT clone to turn semi-purple on the bud, trich’s were better and smoke seemed to be about 2x as potent as the first grow.
I’m not sure what kind of potency this third plant will have but I’m hooping for good things. She flowered early on me instead of during 12/12(started throwing pistils) so I may have her flowering date off by a week or two. I think I stressed her into flowering by drying her out too much in veg.
Regardless, I’m excited to see what she does. So far seems to be the healthiest PT I’ve been able to grow.
Thanks for reading and happy growing! 👩🌾🏼🌱
Processing
Likes
15
Share
@Wicked_Stix
Follow
The girls are starting to fill out pretty nice. We are at 14 days since switching the lights to 12/12. The grandaddy black seems to be one of the slower ones to transition to flower but she is showing preflowers and starting to stretch. Gave them the weekly flush and fresh nutrients. This will be the last week of maxigro. I will cut it out and start liquid Koolbloom next week.

Likes
4
Share
@Bear_Grows_Green
Follow
11/19 start of a new week.ngot watered/fed yesterday.
11/22 watered with saps and inoculatednwith BB


Likes
6
Share
@KivzBudz
Follow
Die letzte Blütewoche hat heute begonnen. Bin jetzt bei Tag 58 (25.08) die Glookies hat angegebene 60-70 Tage Blütezeit und die Blue Cheese 60-65 also werde ich beide 65 Tage machen, ich denke damit fahr ich ganz gut. Am Donnerstag 29.08 werd ich Ihr das letzte mal Licht geben, dann Freitag und Samstag ohne Licht und Sonntag morgen wird geharvestet :D
Dunkelphase wurde gestern (28.08) eingeleitet.
Bilder werden geupdatet.


Likes
14
Share
@MrGrowDiarie
Follow
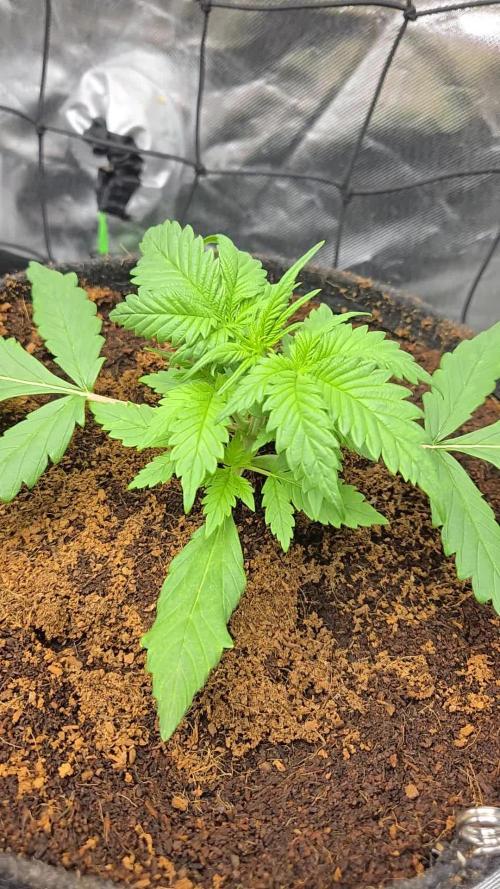
Welcome to week 3! It's the biggest so far in terms of growth – partly because she's in a 15L pot. She's already showing signs of being an autoflower at day 15, which is pretty early for an auto. But the stretch will show how big she’ll really get in the end. I watered her 2 days before with drain


Likes
13
Share
@BrigadeDesTerps
Follow
Les couleurs arrivent sur les demoiselles
Frosty devient une petite boule de neige
Les odeurs sont hyper fruité du côté gotti et Frosty
Aladdin kush buissonne fort et son odeur bien kushy/citron acid
Quelques brûlures sûrement à un surplus
Bouture d’ananas dans de l’eau

Likes
77
Share
@ctm_dzagi
Follow
Didn't get all what i can, because it's stop stretching sooner then most strains before.


Likes
10
Share
@StickyFingah420
Follow
Ganadora del primer lugar en la categoría autofloreciente de la copa Litoral de Los Poetas en Chile.🏆🥇
Definitivamente en mi top 5 de preferencias ⭐️⭐️⭐️⭐️⭐️
Una genética muy estable, ya que es segunda vez que germino de estas semillas y se expresa exactamente el mismo fenotipo; tonalidades hermosas y caractericas, frutos muy apretados y macizos cubiertos de una capa de tricomas lo que le da una visual espectacular.
El aroma en frasco es una mezcla de frutilla ácida y tierra con un fondo dulce 🤤 es realmente exquisito. En la fumada se repiten gran parte de los aromas pero menos dulce y más cremoso y especioso, detodas formas es un humo genial que querrás fumar todo el día..
Likes
12
Share
@StonedandSteady
Follow
AutoBlueberry 11th w/ 6th W/ Flower breed by #DivineSeeds #DivineSeedsSquad #DivineSeedsBreedingCompany
4th feed of #NukeHeads Nutrients #PlutoniumBloom Check out these Lush Ladies and those Awesomely Purple Budz with Trippy Trichomes Growing on! I'm also trying to make and/or convert one of my Budz into a Polyploid (Bigger and More Bulbous Bud) This AB is Flowering out and her Smells are Super Strong of Gasy and Candied Blueberries! I recently Trained down her branches to expose more Bud sites and Removed the Biggest fan leaves to expose the Bud site's to this Glorious #OsreeQB1000w Full Spectrum Grow Light! I've also Super Cropped, Topped um, Defoliated, Leaf tucked, and Implement the 3D's method like my Broski #TigerfishOrganics to remove the Dead, Dying and Diseased leaves!
Origin:Afghani/Thai
Type:50% Indica/ 40% Sativa/ 10% Ruderalis
Flowering:56 days
THC:22%
Harvest:400-550 g/m2
Height:110-150 cm
They were Growing under the #Growatt600w and in my #TopoLite 24×24×48 Grow Tent but I've Upgraded and Updated it to my #OsreeQB100W I'm also using #TNBNaturals #TheEnhancer Co2 Despersal Canister and using thier Ph⬆️⬇️ for my Decolinated Tap Water!
Green and Growing Up Great! She's Growing into her 6th week of Flower! She's Growing in my special blend of ProMix potting mix, a 1/2 bag of Earthworm castings and 2 light handfuls of Diatomaceous Earth mixed Up well for before transplanted! Diatomaceous Earth: Diatomaceous earth is made from the fossilized remains of tiny, aquatic organisms called diatoms. Their skeletons are made of a natural substance called silica. WHAT IS DIATOMACEOUS EARTH?
In a nutshell, DE comes from the fossilised remains of small marine organisms called diatoms. Over a 30 million year period, these hard-shelled algae collected on the bottom of bodies of water, eventually forming into a type of sedimentary rock. Fast forwarding, it wasn’t until around 1836 that a German peasant Peter Kasten discovered the ivory-coloured, powdery substance while drilling a well in northern Germany. Ever since, the usefulness of DE for multiple purposes, including industrial and horticultural applications, has been well-reported. Just sprinkle some diatomaceous earth on top of your soil and watch mother nature's secret weapon work its magic.CONDITIONS THE SOIL
When it comes to growing cannabis, everyone strives to provide the best soil to grow the best plants—but there’s always a way to make it even better. Making the soil a better medium is called soil conditioning, which is exactly what diatomaceous earth does. It works by improving the retention of moisture in your potting soil, holding a large amount of fluid and drying at a rate that’s much slower. This natural soil additive also helps to retain nutrients and allows for better oxygenation of the substrate. NATURALLY CONTROLS PESTS
DE is an all-natural, safe-to-use substance that doesn’t harm the cannabis plant with toxic chemicals. The nature of diatomaceous earth makes it useful against most types of insect infestation you might be experiencing; and unlike chemical insecticides, insects can’t develop a resistance to the effects of DE. So once they’re gone, they’re gone for good. DE is an abrasive. and when used as an insecticide, it gradually scrapes away an insect’s exoskeleton, absorbs the fluids, and dehydrates insects and other critters to eventual death. IMPROVES PLANT STABILITY
When using DE in your soil, it can be especially beneficial as it frees up nutrients so that they are made available to the plants as needed. This works via the silica content of DE being absorbed into the plant tissue, which helps improve the plant’s ability to respond and receive more nutrients as DE activates. This in turn results in greater yields and better stability under small pH fluctuations!
https://divineseeds.net/
https://instagram.com/divine.seeds?igshid=osxe2v7en33v https://divineseeds.net/
Thanks Again to All my Friends, Family's, Teams, Sponsors, Followers and Subscribers!!! Your Genetics are Merry Magnificent, Mega Marvelous and Mighty Medical! Love um!!! I really Can't stress enough how Thankful and Grateful I am of All of you and what you've Shared with Us! Means the World!!! It's definitely a Pleasure being able to Grow with these Phenomenal Grow Lights! Please Enjoy! BudBrothers4-Life! Cheers Famz!!! Much Props and Much Topz!💯🔥 #Osree #GrowStarStore #Growatt #TNBNaturals #TNBTeam #GrowYourOwn #Bliss
https://instagram.com/osree.light?utm_medium=copy_link
https://instagram.com/as420.ca?igshid=1f116alw054wp
The Grow Bags: https://www.as420
https://instagram.com/tigerfish_organics?utm_medium=copy_link
https://www.facebook.com/Tigerfishorganic/
#TigerfishOrganics YouTube Channel Link: https://youtube.com/channel/UC6OSXTda1JYaVNoCxdcYqIg
Likes
1
Share
@KurtThePlantGuru
Follow
Very very happy with how this came out, I saved a branch and some smalls to smoke myself and filled an entire gallon bag to be put towards fresh frozen bubble and eventually into sum amazing rosin!
Likes
1
Share
@REPOOLSIV
Follow
5/10 - Can’t wait to see how she dries up!! I’m not the best when it comes the drying portion but I feel confident everything’s ok. (pls don't judge the fact I used a scrog for the dry, I had to leave to work but figured I could chop, hang, then run out the door. Got too excited and forgot to setup the coat hangers and the only thing in arms reach was the scrog hahaha)
5/12 - Looks like everything is going pretty solid! All leaves are still pretty soft and not crispy in the slightest. 60%rH and 51F
5/16 - Had a few warm days outside and that definitely sped some things up. She still isn't quite dried yet so we're still going strong.