


Processing
Likes
12
Share


@eldruida_lamota
Follow
Power plant xl, una variedad sativa, es de temprana floración.
3/3 unidades, algo tardías en cuanto al desprendimiento del caparazón de la semilla.
Lo demás todo correcto.

Likes
33
Share


@cheetah844
Follow
She is lagging behind. I've been trying to grow an OG Kush for 3 seasons now. The first shipment I received they were all duds, the company sent out more seeds to replace those but the second shipment never arrived & now from a different breeder this one is a little droopy and sad.
Likes
72
Share


@Stinkfox
Follow
This is the final week. I checked trichomes today. THey are about 75% cloudy. I’ll be harvesting by next week. I gave a teaspoon of Cha-Ching. The smell is heavenly! I Had to support a few branches.

Likes
92
Share


@Hou_Stone
Follow
it's been 2 weeks since it's 60% humidity and I can't go below :/
I noticed mold in 2-3 buds of my Ztrawberrys ;'(. I tried to remove the moldy areas with my pruner but it was moldy all the way to the center, I decided to just rip it off a bud. I don't know if it's a good solution, it's the first time it's happened to me

Likes
11
Share


@Pot_Portraits
Follow
Week 3 of veg and transition week, she is under 13 hours of light now. Don't want her to get to big in the jar, just a headache to manage, normally I just run autos in the #Hydrojars.
She gets a bit more fertilizer now, added some Mycco from Eden Green.

Likes
9
Share

@RBG
Follow
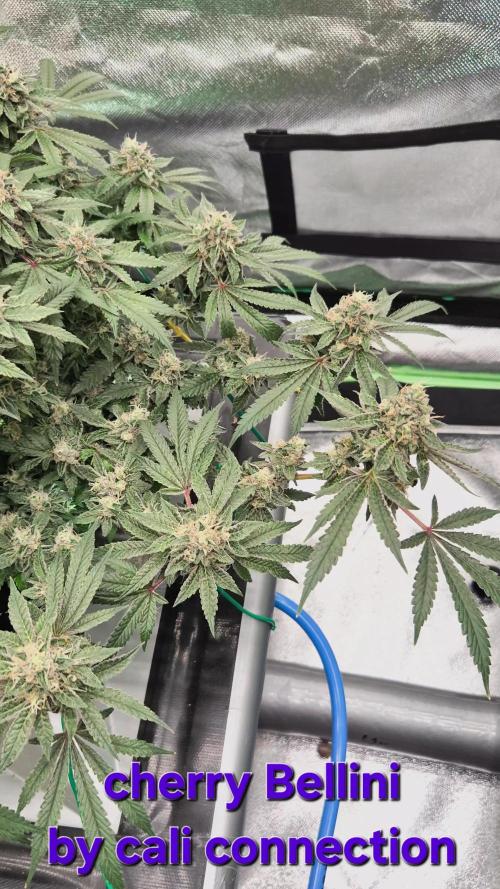
🌿 CherryBellini by The Cali Connection 🌿
Week 14
Flower week 8
Flower-day 1
3/12/25
( pisitils showed 25th of October) im timing from pisitils showed but diary runs from 12/12 light flip
No nutrients change today, I'm thinking about 2 weeks or so of feeding, maybe 2 more horti rawk doses before switching out to new millennium winter frost then onto flush with plain water/ph
Not sure, not sure. Maybe even give LA and Grape an extra week to get Bellini over the end instead of pulling a little early or pulling her as shes finishing up.
Next horti rawk dose probably saturday (48hr run ) then dump then new nutrients.
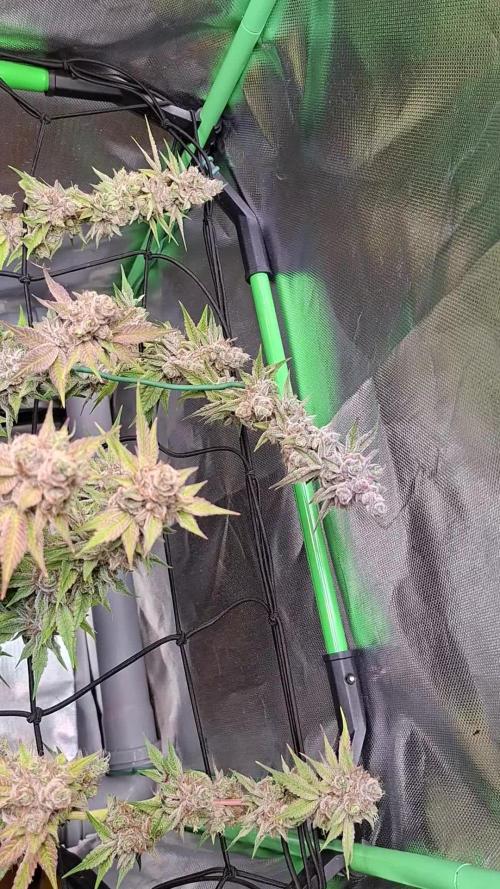
This is currently week7 day 1 flower from 6/12/25 ( pisitils first shown )
8/12/25
Will be dumping nutrients tomorrow, switching to winter frost by new millennium then onto flush
9/12/25
Dumped nutrients, winterfrost 500ml ( 10ml a gallon) will use for 7 days then flush for 10 or so
Likes
10
Share


@Gram_Solo
Follow
Tropicanna Banana is all done. 2 weeks in the jars to cure now.
got just over 2 ounce of this plant so not too bad. should be a good daytime smoke.

Likes
6
Share

@Psykixx
Follow
An Blütetag 75 fand sie ihr Ende. Am Vortag entlaube ich immer schon und sobald das Licht aus ist ziehe ich den Stecker. Am nächsten Tag ein paar Stunden nachdem das Licht normal angegangen wäre schneide ich sie dann ab und hänge das was ich mir raussortiere in den Trockenschranck. Der Rest muss leider auf den Kompost... Da blutet einem immer das Herz...

Likes
41
Share


@BOMbolenath
Follow
The girl is progressing well.
She is receiving around 25 DLI of light.
I did a topping.

Likes
3
Share


@High_Grade_Dadli
Follow
Moved dem girls into direct sunlight so they are getting more light coverage now....jus leave dem to do their
Likes
40
Share


@GermGrowFox
Follow
War nicht viel los. Die Crit stand im Dunkeln und der Topf war furztrocken.

Likes
6
Share
@eldruida_lamota
Follow
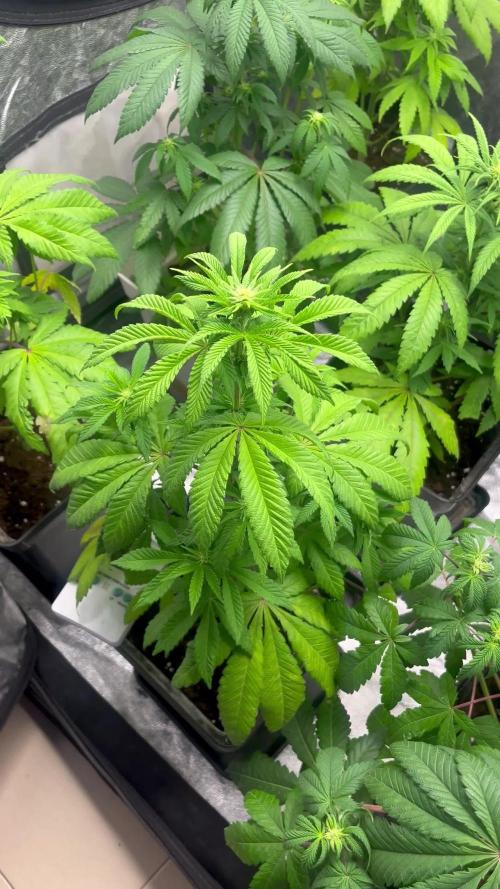
Que pasa familia, vamos con la segunda semana de floración de estas Fishy Zoap feminizadas de Seedstockers.
Vamos al lío ,se trasplantaron en macetas de 7 litros definitivamente.
El ph se controla en 6.0 , la temperatura la tenemos entre 24/20 grados y la humedad ronda el 50%.
El ciclo de floración puse 12h de luz, el foco está al 50% de potencia.
De momento van creciendo a buen ritmo y tienen un buen color, estaban muy bien enraizadas al realizarle el trasplante se notaba la abundancia radicular.
Comentar que llevan un pequeño estrés hídrico debido a la bajada de temperatura , par de grados por la noche, lo cual no absorbieron bien, pero estoy al tanto de solucionarlo.
Gracias Agrobeta por el envío de la Gold series para esta temporada, se vienen cositas 🙏
- os dejo por aquí un CÓDIGO: Eldruida
Descuento para la tienda de MARS HYDRO.
https://www.mars-hydro.com
Hasta aquí todo, Buenos humos 💨💨💨
Likes
29
Share


Likes
15
Share


@Dank_days101
Follow
To grow shes a pleasure , looked healthy all the way to crop ,, solid buds what absolute stink , its air dryin at roof hight and im still convinced everyone can smell it ,,,, honestly am drewlin knowin i got the summer time chedder
Processing
Likes
2
Share


@GaliforniaWeeds
Follow
Día 13/10/20 día 37 de floración
Nuestras nenas continúan estables, el único cambio es la bajada de temperaturas, sobretodo de noche aunque con la ayuda de un calefactor la mantenemos en 23 grados. Poco a poco los días pasan y se va a cercando el lavado de raíces, por lo que ya no subiremos demasiado la ec de las niñas, no te lo pierdas!!
Día 15/10/20 día 39 de floración
Continuamos vigilando las nenas, hoy ha tocado una inspección detenida y un aspirado de la sala para minimizar riesgos. Por otro lado la nutrición sin cambios, sigo con el riego por goteo programado para riegos de 1,5 min cada. 6 horas durante el día. Ahora solo falta seguir controlando a espera de cosechar los resultados, te lo vas a perder??
Día 17/10/20 día 41 de floración
Hoy rellenamos el tanque de nutrición, al final se queda con 1.85 ec y 6.1 de ph, esta será la ec más elevada que utilizaremos en nuestro cultivo. La mantendremos así durante unos días hasta que toque hacer el lavado de raíces para asegurarnos de cosechas unas flores con un aroma y sabor sin contaminantes (algo de lo que ya nos aseguramos desde un principio al utilizar zyco)


Likes
60
Share


@Professor_Chaos
Follow
Beginning of week..
Wow.. Just... Wow lol.. That's all I can say. Amazing scent.. Gorgeous colors.. Very happy and healthy girl. Besides very minor spotting on some lower leaves.. Which I am assuming was from Calcium def.. She is looking great! I'm not sure what this is all about, but damnnear all my plants have this clawing on leaves that are not exposed to the light.. Looks like wind burn.. Looks like nitrogen toxicity.. But I know for a fact that its neither.. Fans are not even really blowing on the plant itself.. And other leaves would also be clawing if it were nitrogen toxicity.. I'm assuming it's just from not enough light exposure.. But not an issue.. She is happy and loving life! At this point I am stopping silica.. Just too many conflicting articles about it not doing any good in flower.. And even causing the smoke to be harsh and the bud hard to break up.. Which does make alot of sense.. I only like to use silica in veg anyways.. And for the stretch.. It just makes more sense to me..
Mid week..
Adjustments need to be made.. The very top of each cola is getting a little bit of clawing.. I'm thinking it may be time to cut back on some Micro.. Maybe even the Floralicious Plus, since they both have so much Nitrogen in them.. She's getting plenty of CalMag, and the other trace elements in the Micro shouldn't be that much of an issue.. Still gonna use the Micro.. Just cut it down from 1mL/L to .5mL/L. Maybe the clawing is just how these plants tend to grow?? I'm not sure.. I see alot of the clawing on her small side branches.. Always have on other grows too.. But maybe I've always been giving them too much Nitrogen in bloom.. Just seems more like a 'not getting light' kinda thing.. But now that it's on the top of the colas.. I'm thinking its a Nitrogen thing.. Anyways.. Such a gorgeous plant! Gorgeous colors.. Amazing smell.. Just... WOW! Lol
Next day..
Ok I'm thinking the clawing is getting a little worse.. That's after I fed her using .75mL/L of Micro and about 10 drops of Floralicious Plus.. Both containing a bit of nitrogen.. I'm going to have to completely cut out the Floralicious Plus and just .5mL/L of the Micro.. I hope that doesn't cause any different issues.. It shouldn't.. And I'm going to bump up the Kushie Kush bloom booster a little.. Still not full strength but getting closer.. I hope this doesn't affect my final yeild and/or taste! I will literally cry if the taste is fucked up at all... 😢 lol.. Nah.. As strong as it is now.. I think that would be impossible! I got my new tent in yesterday.. Haven't set it up yet tho.. Gotta get everything ready to switch over soon.. It's still a 2×2.. But instead of 48" tall it's 55" tall.. Which would be a little better for taller plants (not by much.. But still better lol).. Anyways.. No more Floralicious Plus and only about half of the Micro doses (lol) that I intended to use in the first place.. She really doesn't like Nitrogen in flower.. Which is understandable.. But I've never had a plant this sensitive to it before.. Good learning experience for sure!
End of week..
So I bought a Brita filter because my tap water is pretty shitty.. 240 PPM - 260 PPM.. I've only ran about a gallon through it and its barely bring it down to 190 PPM - 200 PPM.. I mean.. I also didnt use the actual Brita filter yet.. Just the Wal-Mart brand.. It sucks obviously.. When I run the actual Brita filter in my drinking pitcher.. It can bring the tap water down to about 160 PPM!!! Compared to the Wal-Mart filter.. That is fucking incredible! I'm thinking when I run a couple more gallons thru, it will hopefully bring it down a bit more.. I don't need it to be 0 PPM.. just not 260 PPM.. That's fucking insane! Our water sucks out here.. The plants dont seem to mind very much, but after using the filtered water, instead of the nutrient water being 1150 PPM its barely 980 PPM - 1000 PPM.. NOTot a huge change.. But I think it will help. For harvest, I'll use the FloraKleen once along with distilled water.. Still got a few weeks before thinking about that.. But I always flush with my tap water and can't ever get the PPM below 400 PPM or so... Now about the plant lol... Yeah, it's gotta be nitrogen toxicity with the clawing leaves.. Again, I've went down on the Micro since it has so much nitrogen.. And also cut out the Floralicious Plus.. Sometimes I'll add a couple drops.. But it really makes me nervous lol.. I DO NOT want to hurt the yeild or taste of this girlie! But she is doing good.. Just as a test, I added a little bit of some feminized pollen to a very small nug on the bottom.. Its photoperiod pollen.. But this should create a "fast version" according to Sweet Seeds.. But she is doing good.. Smelling amazing.. Gorgeous colors!!.. Anyways... On to the next week!!!...
Likes
33
Share


@Seldom_Seen
Follow
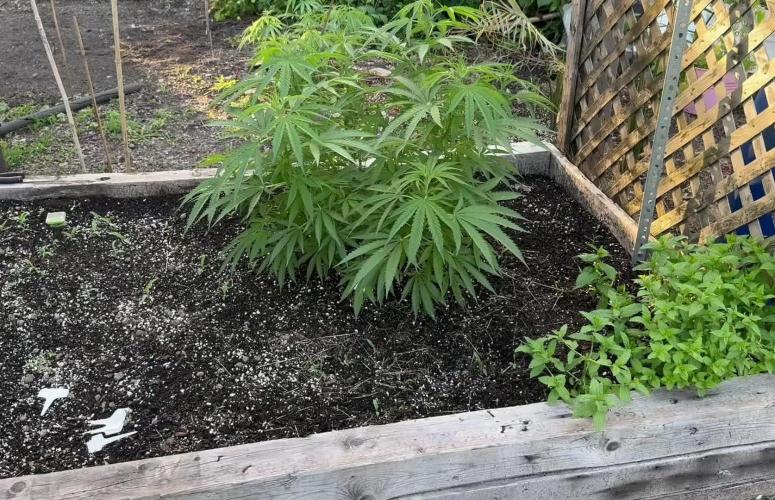
This plant was an experiment in the corner of my grow space in a 6ltr pot. I was thinking if I got an ounce off it I would be lucky. It took 15 weeks and here I am now with 3 ounces of super sweet smelling Rhino Ryder 🦏
Likes
30
Share


@coyote2thick
Follow
I’m lightly defoliating each and making sure my bud sites are exposed. Everything seems to be swelling up nicely.

Likes
22
Share


@SolitudeCorners
Follow
So impressed with all these amazing colors and terpenes cant wait to smoke!
Feeding💪
10/3 Water32L+Rootdrip10ml+Calmag@150ppm
Ph6.1
Ebb
Repel 9.30/10
Refresh 11.30/14
Average runoff ph6.4 ec2.8
Clone
Repel 10.05/10.25/10.50/11.05
Refresh 12.30
10/4 Water34L+Rootdrip10ml+Fultilt50g+
Ec0.8 ph6.2
Ebb
Repel 10.15/10.48(3min)
Refresh 12.30/14.30
Average runoff ec2.4 ph6.4
Clone
Repel 10.30/10.45/11.20/11.50
Refresh 14/14.30/15.30
Average runoff ec3.3 ph6.3
10/5 Water32L+Purpinator60ml+Calmag170- 240ppm ph6.1 ppm240
Ebb
Repel 10.2/10.32
Refresh 12/13.30
Average runoff ec2.4 ph6.4
Clone
Repel 10.2/10.30/10.50/11.05
Refresh 13/14/14.30
Runoff ec2.6 ph6.4
Keeper 400ml
10/6 Water32L+Rootdrip10ml+Fulltilt36g+calmag ec0.8 ph6.2
Ebb
Repel 10.10/11
Refresh 12.30/14
Average runoff ec2.2 ph6.4
Clone
Repel 10.10/10.30/11
Refresh 12.30/14.15/15
Average runoff ec2.6 ph6.4
Keeper
300ml
10/7 Water35L+calmag@150ppm+Purpinator80ml
0.3ec ph6.1
Ebb
Repel 11.05/11.48(3min)
Refresh 13.20/14.50
Average runoff ec2.2 ph6.4
Clone
Repel 11.15/11.35/11.53/12.33
Refresh 14.20/15.20
Average runoff ec2.5 ph6.4
10/8 Water35L+Rootdrip+Fulltilt40g ec0.8 ph6.2
Ebb
Repel 11.38(3min)/12.20
Refresh 13.30 /15
Average runoff 2.3ec ph6.4
Clone
Repel 11.35/11.55/12.10/12.40
Refresh 14/16
Average runoff ec2.4 ph6.3
10/9 Water35L+Rootdrip30ml ppm40 ph6.1
Ebb
Repel 9.05(3min)/9.55
Refresh 11.35/13.35
Average runoff2.1ec ph6.3
Clone
Repel 9.35/10.10/10.35/11
Refresh 12.35/14.30
Keeper 400ml per [email protected]