
Likes
Comments
Share

@RageTdavis
Follow
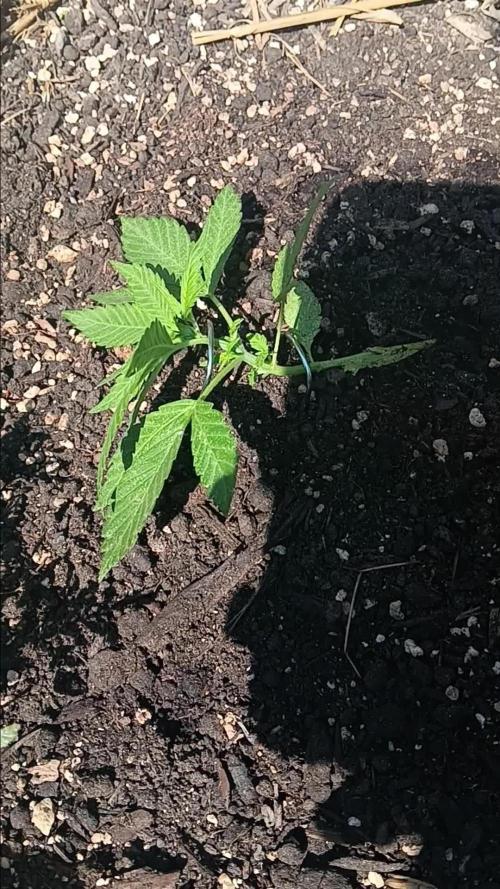
Im enjoying this autoflower run so far its showing me a little nutrients can go a long ways. Not just 10ml or plus every feed out of the bottle. I've been feeding 1ml or less. Ph is simple easy I barely have to go no more then .4 each feed to up my ph. I hope I she stretch well before flowering 💐
best of growing

Likes
4
Share


@DivinePineMan
Follow
I have my Electric Sky 180v2 now in instead of the cheap 40$ for 4 lights i bought on facebook. Which were growing but nothing like this thing has been doing the past week. Im still blown away by the light but back to the plants. Doimg great i took some clones. First time ever so hopefully they root. I been sprayin em 4 -6 times a day. My 3rd g6jetfuel i took out of my tent with es180v2 and put in closet by itself with the 40$ cheap leds. It hasnt grown a whole lot compared to the tent plants g61 and 2...i thought maybe it may of had a male or hermi part but honestly i dont think it did bc i cant find it now. But its still in there bc i decided to throw it on 12-12 in closet to find out sex forsure. Ive been foliar spraying in my tent 3 timez a day. And 2 times a week i get 2 little drops of fox farm grow bif in my 10oz spray bottle of water.
Likes
17
Share


@HIAZ_urbanbudfarmer
Follow
Week 7 of flowering. This girl has gone wild!!! She's got BIG stacked colas with huge buds. In the end I had to super crop her over & set up a scrog/ trellis net to hold her down & support the weight of the colas, which I probably should have done a while ago.
As it was more about getting the light down closer to the other plants.
Likes
45
Share


@masterofsmeagol
Follow
9/17 Didn't know this was a new week or I would've taken more pictures. I'm glad I took those two plants. As it dries and I start to trim I could see where it could've turned to rot real easy. It rained enough last night to soak all the girls. The two bottoms I harvest look like the have pm on them. If so I'll wash it or through it in the concentrate bag. Found a few colas a dropped which will go in the concentrate bag. Scoping the toasted toffy and the event horizon and the both look AMAZING! I've scoped the others and I'm extremely impressed. They may be difficult to grow strains but they have high cannabinoid content. The sherb cream pie has really come to life and turned totally purple with beautiful flowers. The girl in the 50 has several soda can sized buds. I hope this weather holds up. I don't like flowers this size getting wet. The sativa leaning hydrid us the only one I may have trouble with. It's only in a 10 gal but it's enormous! If needed I coyld bring it inside at night. The buds look like cat tails. I'm used to growing indica dominant strains. Plant us super healthy though. I'll be intrigued jail for a while and I've gotta make contact with whoever is going to do my extracts. I'll keep this updated. It's a lot of work bur it's worth it.
9/18 WATERED EVERYTHING I GALLON BUT THE BOTTOMS OF THE 2ND EV AND THE TT WHICH EACH GOT A HALF. Since harvest I've noticed some pm spring up on the toasted toffy. Looking at the other event horizon through a scope the trichs are all milky with some amber. I'm just waiting for A LITTLE more amber. And for me to have time and or room. I decided to harvest the tops and majority of one of my event horizon and toasted toffy. Today during an inspection I found a couple grey mold branches and some botrytis on my big GMO on the back. This plant is done. It's by far the furyhest ahead. Septoria effected the yield a little but pistols were retracted and amber was at like 10%. I thought about it and I watched the plant next to it with the pm have a branch I supported just "slough off". Right in my face. I figured if there was a sign tjis was it. I cut that rot off and put the buds from the branch in a bag and froze them then I went around and harvested the limbs on the other plant that were furyhest along. I took about half of it. I could've taken more and maybe I should've but I'm tired. I also noticed a couple spots of grey mold on the plant in the 50. All the leaves were falling off. I finally scoped it and it was right whetr I wanted it to be. Looking at the colors I'm glad I spent so much time the past few days. That one I hung whole. The sherb cream pie has something eating the fresy shoots (probably ear wigs. But the buds are fattening and the trichs aren't quite there. I'm going to let the rest of this stuff go ad long as possible. With the exception of the other event horizon. I finally tried it. It's fucking killer. I could take that plant now. The only reason I'm not is because I have to much work on my husband's as is. I'll do some videos amd pictures but I'm tired as fuck. Got to try event horizon. Very fucking impressed!
9/19 The past 3 days I've been working 5 a.m. to dark. I went back and harvested the bottoms of the toasted toffy and event horizon 1. After injury from harvest they contracted wpm. I used this as a learning experience and put some away in the freezer for concentrates and used a peroxide and water bucket. That's what kills the p.m. anyway. I hung them and they spun in the wind. I blew them lightly with a leaf blower before putting them ok strings I had previously setup with a fan in front of it. I kicked ass today. Toasted toffy got sampled and did NOT disappoint. I had it in a jar though and it was green so I'm not counting this. I do have some dry. I have indoor left too. Like in the video that one GMO looks like it's fucking dying or something. I'd rather cut it and use it for concentrates if it effects my healthy plants. I just checked on that plant in the 50 I hung. It looks amazing under the scope and smells better. Decisions, decisions. I do have a few calls I should make sooner rather than later. We are supposed to be getting rain.
9/20 The past 3 days have been hard. The wife's medical stuff is acting up and I had to tend to harvesting a few. My whole body hurts. I even did my first bud wash yesterday! The ev and tt I took and left some buds on ended up covered in pm. So I decided fuck it and tried bud washing. I also froze some for extracts. Speaking of which I need to male contact with whoever I'm going with this year because I think I've reached the point of diminishing returns on that dieing GMO. When it comes to grey mold and botrytis I don't fuck around. Winds are really high today. Putting the scope to the sherb pie is making me second guess myself too. Oh well. It's not going to rain today. And if needed I can move them in the barn. If I get ahold of Mt processor I'll chop that GMO and bring it right there. The other thing is that I've got tons of weed and a lot of its hanging so I've gotta find someone that will do a batch of live rosin then like a elbow of dry. This is the best part of the year. We'll It's supposed to be. Cutting down good plants us bittersweet. I don't mind chopping that one gmo a little early though because it's close to hitting the point of no return. That little sativa dominant hybrid in the ten is HUGE! The buds are swelling like crazy too. It's got a COUPLE septoria spots but this thing is resilient and easy to move around. This will finish perfectly. So far I'm happy with what I have. I'm GRATEFUL. The two September plants I tried were GREAT. A 90/10 and an 80/20 and they both suprised me and got me exactly whete I wanted to be. I'll keep things updated. I did a video I'll upload.
9/21 Weather is still great and the buds don't even seem wet in the morning. The thing is is that something (rot or ear wigs probably both) have stripped lower interior branches. In some cases stripping them ENTIRELY or chewing the stem right off. It wasnt happening to my favorite GMO or the one in the 30 and the like on in the ten. The Sherb pie I noticed grey mold on 3 different branches. Last time I checked trichs it wasn't ready but I've got to get a handle on this mold/pests or it's going to he taken a little early. We have incliment weather coming Wednesday I think. I'll bring the 10 inside and if I have to I'll bring that perfect GMO in as well. I'm going to scope everything again today. I called a bunch of extractors for prices. I was going to do fresh rosin and just yank and drive but that is looking to be harder. I can get badder made CHEAP from a reputable lab. I think I'll do that. They prefer dry and that way I could through what's left from last year in there. I have this other one GMO that I've had the same issues with. I'm sick of removing bud rot or having to cut interior branches off due to pm. Tried toasted toffy and it was fucking amazing. I'm planning on trimmingvthe ev and if I finish I can bring the other one in. It's done. It's not getting any bigger. Trichs aren't changing. That GMO I am going to scope when I get home and it will be coming down in the next couple days. Otherwise I'll end up with half of what's there. The GMO I took the tops from is finishing up too. If I scope that and it looks decent and I have the time I'll take the remainder. I'm leaning towards doing at least a lb dry for extracts. I've got some frozen. I've got some hanging and most is still in the ground. I sleep on all major decisions. However, I know getting my nice buds soaked when I'm already losing shit to budrot and grey mold isn't the smartest thing. I'll probably take what I can and bring the others inside to keep them safe. I didn't think I'd have this much quantity. I knew quality would be good but this isn't a bad year quantity wise either. I'll keep this updated.
9/22 Busy as hell! Rain coming Tuesday. After a final check of the scope and the flowers and I took the GMO that all the leaves had fallen off of. That plant is going straight to extracts with the one in the thirty. I also "finished" harvesting that GMO that was furthest along. Trichs were getting amber. Been in trim jail. Was going to take the Sherb Pie but I'm not seeing amber yet. I did have to cut off some branches that had rotted. I'll keep an eye on it. It will come down when it's ready. It just sucks losing little bits of it. My favorite GMO is sooooo close to perfect. I should just take it but I'll wait. If we get rain I'll bring that and the sativa looking one in the ten is the barn. Back to work now. Before I forget what strain is what lol.
9/23 Still busy as fuck. I chopped the other event horizon amd hung it whole. It's DONE and it doesn't need to go through the rain storm. I also took the majority of the GMO early pheno. What's left will get plucked off and used for extracts. The big one in the 50 is getting dry. I have finished the event horizon and I'm not "finished" with the toasted toffy but I have it in 5 gal buckets with a food grade lid so u can at least cure correctly. The gmo is still hanging. I'm wondering whether I should wait it out or chop. I'm gonna take care of what I have inside first and hope that shit doesn't eat my plants or that it doesn't rot off. That perfect GMO has one branch with some grey mold. I might cut it off. I'll keep this

Likes
Comments
Share


@Organic473
Follow
Down to two plants gave away one to a grower friend of mine...Hopefully I have a male and female here. I need more Skunk #1 seeds for a massive grow.

Likes
26
Share


@420DeepGrow
Follow
Gracias al equipo de Seedsman y XpertNutrients sin ellos esto no sería posible.
💐🍁 Bubba Cheescake:
Bubba Cheesecake es un cruce de Bubba Kush anterior al 98 con Cheese Cake (Wedding Cake x Exodus Cheese). Se trata de un híbrido 70% índica con muy buenos rendimientos, alto en THC y bajo en CBD. Bubba Cheesecake prospera en interiores y exteriores. En interior se aconseja un corto periodo de crecimiento vegetativo debido a la cantidad de estiramiento que presentan las plantas. Las plantas pueden crecer hasta una altura de 250 a 350 cm. cuando se deja crecer naturalmente al aire libre. En interior, la floración dura entre 60 y 65 días, con rendimientos entre buenos y altos, de 400 a 550 gr/m2. Las plantas de exterior son capaces de producir entre 700 - 800 gr. peso seco. En las latitudes norteñas, en exterior, los productores pueden esperar cosechar a principios de octubre. Los cogollos son grandes y duros como piedras. Las plantas maduras muestran atractivos colores púrpuras y azules y brillan con una resina pegajosa que cubrirá las manos del cultivador si no tiene cuidado. El componente Wedding Cake agrega dulzura al sabor del regaliz y el aroma es terroso y musgoso. La producción de THC es muy alta con un nivel bajo de CBD. El efecto es intensamente narcótico, fuerte y duradero.
🌻🚀 Consigue aqui tus semillas:
🍣🍦🌴 Xpert Nutrients es una empresa especializada en la producción y comercialización de fertilizantes líquidos y tierras, que garantizan excelentes cosechas y un crecimiento activo para sus plantas durante todas las fases de cultivo.
Consigue aqui tus Nutrientes:
https://xpertnutrients.com/es/shop/
📆 Semana 5:
Definitivamente se ha adaptado muy bien a su hábitat natural, voy con dosis muy suaves de nutrientes ya que ellas tienen prácticamente todo lo que necesitan. El canto de las aves la pone feliz.
Poco que agregar, buen sol y buen tiempo

Likes
25
Share


@Paul_on
Follow
Last feeding gave last wk ive just been given them rain water, and green tea 4 days ago just to give some antioxidants, i gave 1 and a half litres of plain cooled kettle water to each pot today, no more water now until harvest 4 days for Mimosa x Orange Punch to be harvested, and 8 to 10 days on the kush n cookies CBD, and on the Funky Skunk, i getting good results on every grow the last year and a half, im 💯grateful 🙏🍀 Biscotti mintz, and water mellon Zkittles from @Barney's Farm.com coming up in march 2023.


Processing
Likes
8
Share


@Max1973
Follow
Day 14 - Clay balls arrived, all looks good.... 😎
**the rust and damage on the first leaves is nothing to worry about,
the ice cream container water level dropped below the root level, fixed it,
but was cool to learn how fast hyrdo dmg can occur.... 👍
Day 17 - Lookin good... vid....
👍😎👊

Likes
68
Share


@themartian911
Follow
hello guys it's the 3 last week approximately and i go to put the maximal dosage of my flowering fertilizer today.
we can see that the buds have already swell well 😀👍


Likes
28
Share


@TheHighentist
Follow
Start of week 4 of flower!
Off to a troubling start, as the light switched on over 1 hour ealiere than scheduled.
I took a spare timer, and set it up to continue it's 12/12 schedule, but now moved one hour back.
I cross my fingers they forgive me for this error.🙏
👽👉31/10 The day after watering and the day my timer messed up my 12/12 schedule. But hope it brings no problems.
I defoliated lightly and only removed most under the SCROG line.
Even a couple of underdevoloped branches that stretched below SCROG-net got cut.
👽👉 1/11 Been having a battle with humidity after watering, but upped my air circulation to help.
👽👉 2/11 Waterday*
Upped my nutes on BioHeaven, BioGrow and BioBloom.
👽👉 3/11 They seem to be responding good to the upped nutrients.
👽👉 4/11 Humidity under control.
👽👉 5/11 The VPD on point, has really speed up the trichome production.
👽👉 6/11 Waterday*
Stayed on the same schedule, as last watering. They seem very satisfied and no signs of mistreatment.
Likes
6
Share


Likes
103
Share


@ShowsWorld
Follow
Overall i am satisfied with this strain and I do plan on buying more seeds from Barney’s farm. Very strong and stable genetics I highly recommend this strain to experienced growers as well as newbies. Very easy to grow and a great smoke.0

Likes
11
Share


@Professor_Daank
Follow
Holy moly. She's growing... like a weed.
She's loving the nutrient schedule and environment (finally). I was having an issue maintaining proper humidity levels and after exhausting EVERY possibility with venting, fans and otherwise, I have moved my dehumidifier inside the tent and it's working wonders. I drain the water with a shop-vac as I do the same for my run-off. Things are going great so far, I hope to continue this forward progress in the coming weeks. Going to LST sometime this week, just not sure when.
6/13: Started minor LST phase to open spots to light. Fan leaves are gonna be huge. I also overwatered her... I'm a noob.
6/14: No watering for 24 hours. I removed my LST. She wasn't yet strong enough for the arc I put into her. Another noob mistake and add the overwatering to this, I just wanted to destress her.
6/15: Back to regular 1 liter per 24 hours, also added Armor Si to the nute schedule.
6/16: She's showing signs of getting back to normal. Added Diamond Nectar on this day. I also LST'd her back to position.
6/18: Back to normal. I trimmed 1 fan leaf under the canopy that wasn't going to get any light.
6/19: She's better and growing well. I'm going to try and keep this vegetation stage a little longer. Added a little more water today, just a tiny bit. I have 2 other plants that are a week behind and I want them caught up for the flip as close as possible. Pray for me.

Likes
20
Share


@TPBzh
Follow
They are going fast ! I think they are healthy and in good shape. They started to flower this week. I have started to put 4h of night. Everything is going very well.

Likes
12
Share


@Nofeckingclue79
Follow
Hi growmes
I'm happy with our my good plant is coming along I thought my little Mars hydro sp150 light was not powerful enough for a 2x2 tent in flower but when reading the master growers diaries with the same plagron nutrients and Zamnesia biscotti seeds there girls was not joining up into huge Cola's so I'm guessing it was genetics but I'm still very happy with all that I have learnt for my first grow. Was reading this week's growweedeasy newsletter and there was a photo of a members first grow hanging up drying and growweedeasy were saying this could be you if you pay for our master class and I know your harvest will get smaller when they are drying but they were all little and airy not even one big main cola if anyone gets a chance take a look it's a joke considering this is the picture there using to advertise signing up and paying for their master class. Also my diaries are out by about two weeks but can't be bothered to change it not very computer savvy but I still think this app is hard to use but should get better the more I use it 😂

Likes
28
Share


@Gerard_1
Follow
Esperaba mayor producción por su parental monster, quizás este fenotipo es de esta estructura, la volveré a probar con las semillas que me quedan


Likes
15
Share


@Siriuz
Follow
Hey guys how is it going?
This time we are trying new things
Introducing techniques like
Defoliation, topping, HST, LST
This week we wanted to make sure
The energy of this girl goes directly to the buds and hopefully we get a bigger and better yield than before in our past experiences
Alright guys so here's the conclusion of this week #8
From day 1 til the end of the week
Check out the pictures and videos
Alright guys let me know your opinion
If you have any tips please let me know as well, I'm also planing on adding molasses later on floating stage also this fertilizer named beastie bloomz not sure if you know it but they say it helps you get weigh on your buds, please let me know if you have work with it before in the past and if is good as they say it is
Also about the molasses when and how is the best time to add them?
Thanks a lot and have a wonderful week
Happy growing peace and love friends

Likes
34
Share


@The_Bearded_Grower
Follow
looking very good and getting fat. the tricombs are nice and milky. 1 more week till flush baby

Likes
13
Share


@XperencdGmanXG
Follow
well looks like this plant has gone into flower, I would have liked it to have been bigger before this began but oh well. As the French say C'est la Vie!