The Grow Awards 2026 🏆 


Processing
Likes
11
Share
@SChomegrown
Follow
01/15/19 Day 15 week 3 Zkittlez # 1 seems to be the smallest but is quickly catching up. Did bump up to 2 Tsp/ Gal since they all took it very well.


Likes
4
Share
@SuperGluedGrow
Follow
Week is going good aside from me accidently cutting off a stem on pheno 2. If I can properly save the cutting though I might have a chance at another female. Pheno 3 I'm hoping can make some comeback as I really want to flower the plant, its not dead by any means but the way its growing I just cant see it allowing itself to flower the top leaves were barely growing so I topped. Hopefully positive changes within the next week.


Likes
3
Share
@CaptonianMoneymaker
Follow
Some plants are still flipping over to flower myb 2 weeks behind the dist Bloomer
Likes
Comments
Share


Likes
98
Share
@DogDoctorOfficial
Follow
I love growing its a big passion of mine , and the fact that GD exists makes everything so much better, one can interact with others and enjoy and learn from each others. Thank you all growers love and keep them green <3 <3 <3


Likes
43
Share
@TheCannaProphet
Follow
~ GG4 SHERBET FAST FLOWER by FastBuds ~
Well fam, here we go again with another epic strain from FastBuds Fast Flowering stable. After having such tremendous success growing their Gorilla Cookies Fast Flower outdoors last year, I've decided to run another of their fast flowering strains outdoors this year... GG4 Sherbet Fast Flower!
The best description of this awesome cultivar comes directly from my friends at FastBuds which is as follows:
"Bred from extremely potent and flavorful Gorilla Glue and Orange Sherbet genetics, GG4 Sherbet FF (Fast-Flowering) takes all the best traits to the next level, offering a high-yielding strain that can produce up to 600 g/m2 in a 7-week flowering time. This super resilient Indica-leaning hybrid thrives indoors and outdoors, and in all types of climates while producing mouth-watering sweet, fruity, spicy and earthy terps that translate into a delicious sugary hazelnut aroma. Expect an extremely relaxing and overall happy effect that’ll leave you with a huge smile from ear to ear. It’s the perfect strain for growers of all levels of experience seeking low-maintenance yet highly productive photoperiod varieties that deliver quality and quantity without extra effort.
GG4 Sherbet FF grows chunky buds with long dark orange hairs and spade-shaped calyxes that get encrusted with trichomes by harvest time, giving them a gorgeous silvery-white appearance. This medium-sized photoperiod can reach up to 200 cm in height and yields up to 650 g/m2 while developing that typical hybrid structure. GG4 Sherbet FF grows with a stocky, bushy appearance, developing one sturdy main cola and fat side branches that support huge yields without much effort. This super-fast variety produces distinctive light-green buds with a high bud-to-leaf ratio, making your trimming sessions a breeze. It’s a top-notch resin producer that doesn’t need much maintenance and will thrive in almost every climate, rewarding growers of all levels with extremely flavorful resin that makes for outstanding hash end extracts."
________________________________________________________________________________________________________________________________________________________________________________________________________________________________________________________________________________________________________________________
The Setup:
This is going to be an outdoor grow, but I have started the GG4 Sherbet Fast Flower indoors as our weather is still too cold to put her outside (nighttime temp's dipping regularly into the 30's℉).
The plan is simple... let her grow inside under a 19/5 light schedule until the nighttime temperatures stay above the mid 40's℉, at which point she'll be moved outside and transplanted into the soil which I have already setup and inoculated with beneficial microbes, and then let the fun begin!🤪💚
________________________________________________________________________________________________________________________________________________________________________________________________________________________________________________________________________________________________________________________
Weekly Updates:
6/7- Well, here we go into Week Ten from seed for the FastBuds GG4 Sherbet Fast Flower and I have to say she's really beginning to look like she will be a beautiful example of this strain!
6/9- Our weather is beautiful now with daytime high temp's in the 80's F without a lot of rain so I am watering her daily at sundown with approximately 3-5g of well water straight from the garden hose.
6/11- The FastBuds GG4 Sherbet FF continues to sprout new growth daily now, and I have been training her branches throughout the trellis net. I was going to install a second trellis net, but decided to just use the single net and do some HST on her to keep her canopy opened up.
6/13- I gave the GG4 Sherbet FF a good watering today at sundown via the garden hose with straight well water.
I am planning on top dressing her in roughly 7-10 days from now with a blend of 4-4-4 and 2-8-4 along with some worm castings in anticipation of the start of flowering in the near future.
There's another week chalked up and it won't be long until the real excitment begins when this lady begins to go into flower!
Thank you for checking out my diary, your positive comments and support make it all worthwhile! 💚Growers Love!💚😎🙏


Likes
8
Share
@ChitownCannaChica
Follow
Weather has been hot and humid! Going to have to look out for bud rot! We had super dry weeks and now a ton of rain and humidity—- with 90s. Doing great, but seems to have slowed a bit. Smells like a pine forest! ✌️🏻💚🌿💨
Likes
23
Share
@Kakui
Follow
F29, se comenzó con el riego de engorde, con una EC 2.6~2.8 y pH 6.4, se han quitado un par de hojas bloqueando sitios de cogollos, los cogollos están muy resinosos, súper frosty, el olor está súper fuerte también.

Likes
Comments
Share
@Broffel
Follow
She is doing amazing, already can see she will become a purple girl.


Likes
42
Share
@Dunk_Junk
Follow
She dried out a little too much during the week.
Lots of leaves turned brown too.
I think she is done anyway, trichomes are all milky and the pistils are mostly brown.
Based on that = harvest in 24h 💪

Likes
9
Share
@Martymar021208
Follow
These girls are looking very lively and I'm very pleases to this point. Introduction to calmag at the appropriate time I am hoping for better harvest this go around. Hope your grows are all doing good.


Likes
15
Share
@valiotoro
Follow
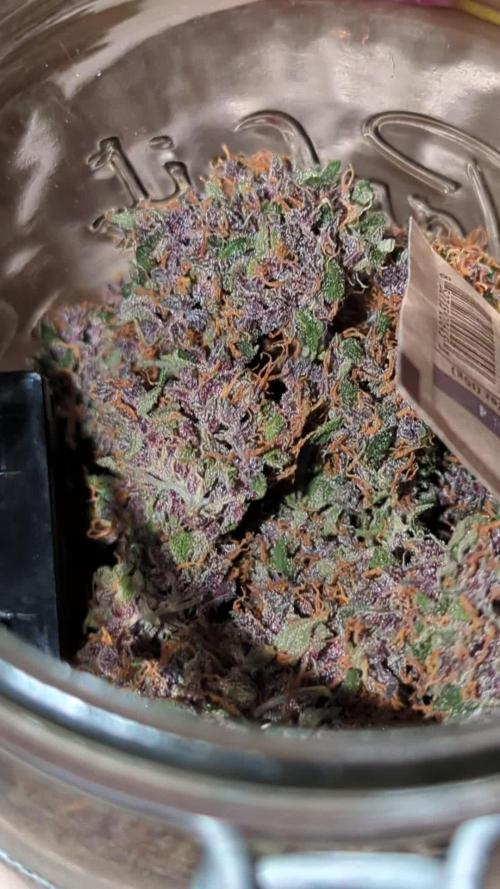
Hello everyone😎
Week 6 of flower for the LCC🍋🍒🍪
All the top buds harvested✂️
I had a lot of fun growing this strain🤩
The smell is absolutely out of this world…the colors…💜
I have 3 different pheno,all purple,some smells more citrus and the others more ripe cherries!
One more week for the lower buds and finito I already feel nostalgic😜
*what’s coming out of the yuzu is essentials oil,every year I make Yuzucello feel free to ask me the recipe🍸🍋
Likes
53
Share
@Mz876
Follow
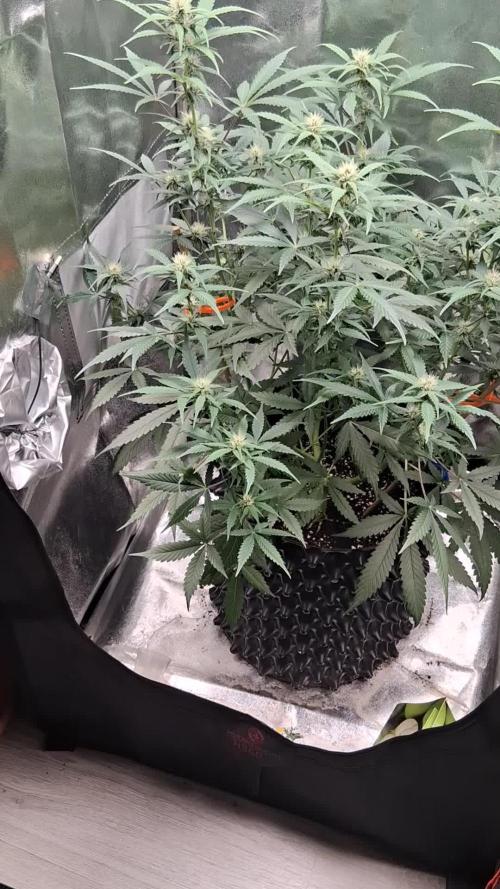
Made it to week 3 of flower . She’s definitely flourishing . Very happy with how she’s been growing from the start . Some seriously good genetics .

Likes
41
Share
@Dr_Boom
Follow
Yet another exciting week to share. I flipped her to 12/12, and she responded with some praying leaves and a lush green color. I'm starting to see a little stretch, and I'm hoping to get at least 3-4 inches of new growth. Time will tell.
