
Likes
Comments
Share

@Rhah420
Follow
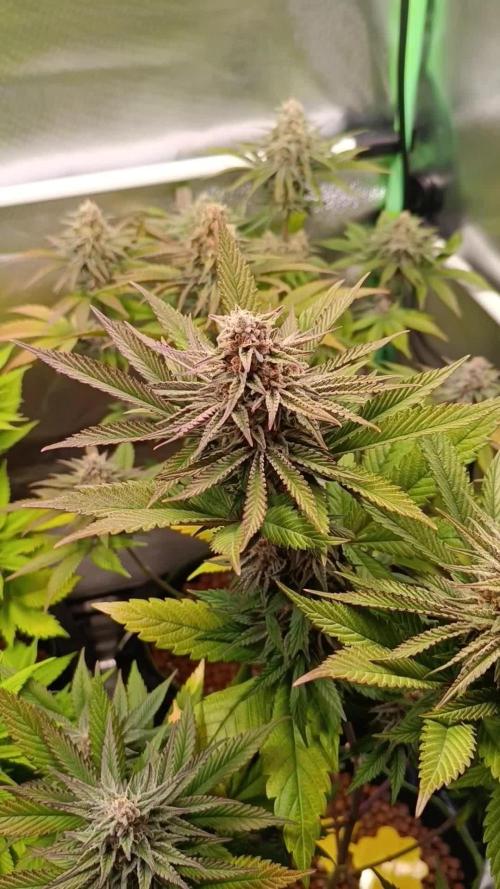
Ich habe erneut ein paar Bananen entfernen müssen. Ich hoffe das ich nicht allzuviele Samen im Endprodukt haben werden. Gegossen wird weiterhin nur mit Wasser. Der Herbst hält nun deutlich Einzug, ich denke innerhalb der nächsten 2-3 Wochen wird geerntet.


Likes
10
Share


Likes
6
Share

@Radagast_
Follow
17.08.
OG KUSH
Day 114# Flowering Day 6#
The plant was at the end of its 16th week 2 days ago.
The flowering has begun.
Video and photos are from yesterday.
Stay High and Keep Growing!!!

Likes
12
Share


@CanarianGrow92
Follow
The 21st of july we germinated this fantastic banana purple punch from fastbuds
The 22nd of july we placed the seed in a peat pellet
The 23rd of July the first 2 leaves appeared so we can say that its the first day of life!
We will now start the week 1 of this diary 😁

Likes
13
Share


@420DeepGrow
Follow
Gracias al equipo de AnesiaSeeds y XpertNutrients sin ellos esto no sería posible.
💐🍁 Frozen Face Auto
Nueva variedad autofloreciente, tan refrescante como una mañana helada con un toque de cereza y lavanda. Esta variedad es una auténtica obra maestra de la cría, con un linaje dominante 70% Sativa que aporta una vibración edificante y energizante a tu cultivo. Perfecta para los que aprecian la belleza veloz de las semillas autofeminizadas y la mezcla única de dicha aromática.
Con un contenido de THC del 30%, Frozen Face Auto promete una experiencia tan estimulante como una zambullida en un lago fresco, dejándote fresco y vigorizado.
Ofrece rendimientos impresionantes de 550 g/m² en interior y hasta 300 g por planta en exterior. Con un ciclo de 70-75 días.
🚀🌻 Consigue aqui tus semillas:
🍣🍦🌴 Xpert Nutrients es una empresa especializada en la producción y comercialización de fertilizantes líquidos y tierras, que garantizan excelentes cosechas y un crecimiento activo para sus plantas durante todas las fases de cultivo.
Consigue aqui tus Nutrientes:
https://xpertnutrients.com/es/shop/
📆 Semana 8:
Se aprecian unas lindas preflores hembra, comienza a estirar de forma acelerada.
Todo sigue su ritmo y ellas comen bien todos los nutrientes, comienzo a aplicar sugarshot, silica force y enzimas.

Processing
Likes
2
Share


@Valedor
Follow
Seguimos retirando las fan leaf's que ya no son tan necesarias en todas las nenorras, el sistema de las automáticas continua en el lavado de raíces, el sistema regular continua floreando y madurando, considero que la próxima semana estaremos cosechando la White widow y la mamá mía


Processing
Likes
1
Share


@nausicaahime
Follow
week 5
when the thrips first showed themselves.
I noticed them cuz some silver stains started appearing on some leaves. you can see them better under LED light. So, I sprayed Neem Oil all over the plant. I could notice that if you don't do it well, spraying and rubbing the leaves with a piece of cloth, the oil will also create some stains.
2nd topping.
killed some thrips this week, they're cute and didn't seem to harm the plant seriously. Neem oil worked fine to control them. No other pests that I could notice
+ Defoliation + LST
Flowermind (4ml + 0.5g)
Likes
5
Share


@Kirsten
Follow
Orion F1 Liquid Nutrients:
The seedling is looking fairly unhappy. I will keep an eye on it.
The plant has been given its first dose of Mega Crop Part B to introduce some more nitrogen, hopefully she will begin to grow some more and start greening up.
The plant was watered when the pot was dried, to avoid mould and root issues.
8.5.25:
The plant was watered with 1ltr of dechlorinated water PH'd to 6.0. I added per litre;
♡ 1/4 TSP Mega Crop Part B
♡ 1ml Trace
PPM: 656
PH: 6.0.
☆ Xpert Nutrients PH down, up to 1ml.
☆ Ecothrive Neutralise 1 drop per litre from the 1ml pipette, which is attached.
This is my dechlorinator.
Let's see how she goes.
Thanks for stopping by 😊🍃✌️💚🤞
Likes
3
Share

@803AutoGrower
Follow
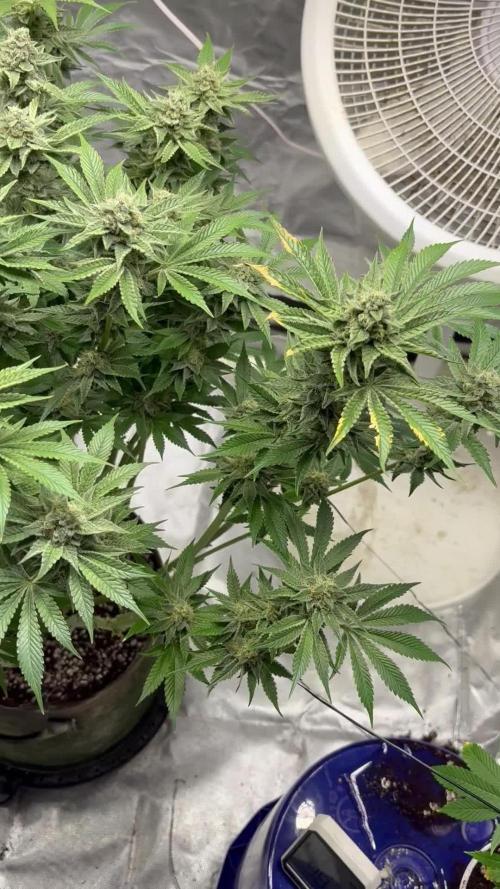
Week7 of flower and she is stacking nice and getting thick. Buds are rock hard and coated in resin. Greasy feel that is stickier than anything I’ve ever grown. At least two more weeks maybe more as all her heads are crystal clear.

Likes
46
Share


@GanjaReaper
Follow
Day 67:
Increase in flower size phrase has been finished now they about to go into the mature phrase.
I will eighter flower them for 1 or 2 weeks depending on how it goes.
Might only give them water with enzymen,regulator and humic for now on, that Is basicly flushing ( ec 0.7 ).
or Ill just slightly feed them( ec 1.4-1.6) for a few times before I start flushing them( ec 0.7).
Again I took the pictures before doing work on them ( watering and defoliation), so they look a little sad.
I did notice that many of them got burned tips, indicating that they get more nutrients then needed.
It does make sence since In this week and weeks to come, they need less nutrients and having a harder time taking it.
Yet they do drink everything in 1.5-2 days, so they still do like to get nutes.
Thats all for this week.

Likes
18
Share


@OttoManVePr3sident
Follow
Amnesia haze sativa genetikler içinde en sevdiğim olanı. Sert etkisiyle her dumanda daha yüksek kafalar 😁
Processing
Likes
55
Share


@Tazard
Follow
She looks very healthy but two of her 20 tops had to go. So she now has 18 tops. Her sister still has 6.

Likes
10
Share


@SiberianJazzMan
Follow
Hi gromies!
Been away for a while but back at it again with some improvements to my set up. First of all bought a new tent (Homebox ambient 120×120×220) which has had a HUGE impact on controlling the plants' grow environment. Also bought a new blower (Primaklima whisperblower 800m³). This is really an overkill but it is really easy to keep the temperatures in control with it. In addition I got myself a Lunatek 315 CMH lamp for veg. A great improvement for my vegging. Been thinking about using my CMH lamp alongside with my two LEDs, but haven't had the balls to start messing around, until I have some more info in this area.
I am just starting week 7 and now the ladies have started to gather some volume. It's looking really nice so far. My first time growing one single strain (gorilla zkittlez from Barney's farm)😄. It is really interesting to see different fenotypes in a single strain! Two of the plants are significantly lighter shade of green than the other three.
I am hoping to see purple colouring in, at least, one of these plants as the grow proceeds.
So far everything looks ok.

Processing
Likes
10
Share


@Calarok
Follow
hey guys! I decided to baptized my two ladys and add some visual markers to see wich is witch easily!
Batman = CBDurban / black bucket
Robin = Afghan / white bucket
After watching a tones of videos i finally decided to apply some prunning techniques. Batman received a topping to have for cola's, and Robin was FIM and i remove 2 big leaves that was doing lots of shadow!
You can see the hole process by picture and videos!
Thanks for following! And please subscribe!

Likes
20
Share


@Naujas
Follow
Well, I managed to do something that I really didn't expect :) the yield is small, just like the pot :) it was a wonderful trip ;) but from now on I will only grow it in big pots :) good luck to everyone :) I will add weight when it is ready :)


Likes
7
Share


@420lor
Follow
Bueno bueno, pues empezamos la recta final de esta maravilla de planta. A tan solo 2 semanas como máximo para el corte, tienen un aspecto espectacular, han engordado perfectamente y están duros como piedras!! Una genética que volveré a prepetir

Likes
32
Share


@AsNoriu
Follow
Day 37. Girls are flowering !!!!
Yesterday I gave them heavy feed . Checked ppm only at the end - 1550 ;))))) thought they will burn, leaves went curly during day and I had to spray them with BioHeaven really often ..
Night photo shows all good so , I will give bacterial feed next watering and will do one more feed bomb. Will target my favourite 1200, but you never know ... ;)))
Hopefully tomorrow I will dump last Northern Lights and will rearrange all tent. Second wave of FB needs bigger pots too ...
It's amazing what they did under that little light, but I think WeedSeedExpress grow proved - all Mars Hydro SP light line - pure joy for grower !!! SP150 will go to grow wonderful plants in Wooster very soon ... One more grower will be born ! ;)))
Busy busy busy ;)))
Day 40. Two girls got supercrop, they stretched too much. Both got bottom clearing too, other girls still left for a week, till any training will be done .
After 6 hours girls are looking up already and all is good , just overcrowded ;))))
Happy Growing !!!
Likes
13
Share


@KingSalomonsWeed
Follow
Blühe Zkittlez
Blühe Zkittlez
Blühehehe
Zkithehelez.
Forget it.
Aber gefällt mir.
Die Pflanze.
Und Growdiaries.
Und andere Growdiaries.
Und Ganja...
Und BARNEYS FARM.
Oh mann, wie kann man die Vergessen zu Erwähnen.
Die haben mir schon ein mal das Grinsen ins Gesucht gemeißelt.
Und ich weiß nicht warum, aber ich mag die Watermelon Zkittlez seid CorinnaFarm ein Growdiary gemacht hat.