


Processing
Likes
7
Share


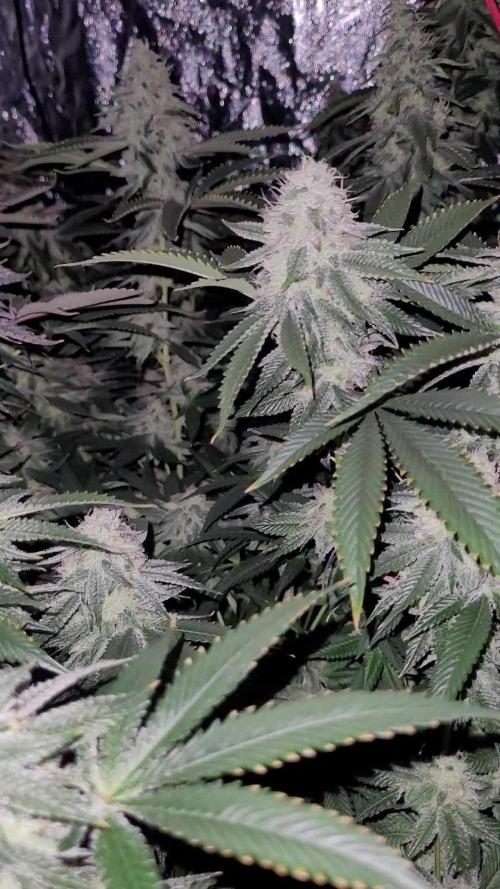
@Targona
Follow
The girl has been blooming for six years now, now I'm just waiting for the trichomes to turn white and finally there will be a harvest. So far they are transparent and the buds are not yet ripe, I will have to wait 😉
Processing
Likes
88
Share


@No_Clout
Follow
08/08/18 - Day 22 looking good especially after the minor bump in the road, the wire I bought for the LST is doing it’s job for the time being but I will be buying some proper stuff on the weekend. ✌️🏻
10/08/18 - did more LST last night and their responding well except one, I did some minor defoliation of some fan leaves hogging the 💡
11/08/18 - plant #3 is finally getting into feel of the LST and is looking a lot happier, but girl #1 & #2 are just going with the flow and killing it, my first time doing LST like this and I wish I started doing it two harvest ago 😂👌🏻
13/08/18 - watered each plant with 2 litres each 💧plant number #3 has a slight kink in it from the LST it has been a pain for it the main stem has hardly any flexibility but the other two are 👍🏻


Likes
Comments
Share


@kissrubb
Follow
Buenas me ha gustado cultivarla, pero no me ha gustado nada que una bolita que estaba muy escondida que no la he visto me ha liado un poco el cultivo y la cosecha final, (hermafroditismo) es algo que les lleva pasando bastantes años a este banco español a pesar de tener temperaturas y riegos y pH muy controlados, sabores como un toque incensado y agridulce al mismo tiempo cuando le das la calada y cuando exhalas el humo se te pegan un tono frutales en la punta de lengua que no sabría describir esos tonos dulces, pero te refrescan mucho la boca, caladas muy suaves y agradables y te da ganas de hacer cosas y creatividad al menos en mi punto.


Likes
26
Share


@pifflestikkz
Follow
Day 43
12/08/24 Monday
Feed today, it was warm again so they drank the whole 300ml each so I have topped up another 150ml to see run off to prevent salt build up.
All thriving 😍✌️💚
ACOP and Melonade Runtz structure is stunning 💪
Divines Overdose is getting chunky and showing nice stack potential 👌
Leaving these to just run there natural course, will allow me to best pick my next SOG run with micro autos indoor 😎
Video update
Day 45
14/08/24 Wednesday
De-chlorinated tap water pH 6 only today.
Day 48
17/08/24 Saturday
Another watering today using de-chlorinated tap water pH 6 only.
Orange bud is tall!! Top her next time.
Critical orange is lovely and compact.
Overdose is nice and compact,
Melonade Runtz nice compact structure also.
Picture and video update ✌️ 💚


Likes
5
Share


@dfgh95
Follow
Just recorded a video this week.
Nothing has changed. They are vibing with some bigger sisters.
Some plain water is sprayed every other day.
The first seeds that popped were transplanted to a bigger container and some others already popped
Processing
Likes
6
Share


Likes
19
Share


@Mr_Juice
Follow
-light intensity increased to 100%
-watered twice a week with 1.5 liters of water. 1x with nutrients, 1x pure water
-pre-flowering this week, flowering officially begins next week🌹

Likes
109
Share


@MadeInGermany
Follow
Hi all 🤗
She continued to do very well this week 😍.
On June 28th she was placed in the flowering tent, where she now has a light duration of 12/12 h.
I am very curious to see how it develops in bloom, and what a smell will end up blowing through the tent 😍.
She still has enough nutrients left, so I will probably only give Green House Powder Feeding again in 2-3 weeks :-). I wish you all a lot of fun with the diary, stay healthy 🙏🏻 and let it grow 🌱🍀
You can buy this Strain @
https://greenhouseseeds.nl/
☝️🏼☝️🏼☝️🏼☝️🏼☝️🏼☝️🏼☝️🏼☝️🏼☝️🏼☝️🏼☝️🏼☝️🏼
Green House Seeds Company Cup 🏆
Type:
Wonder Pie
☝️🏼
Genetics:
Wedding Cake x OG Kush
👍😍
Vega lamp: 2 x Todogrow Led
Quantum Board 100 W
💡
Flower Lamp : 2 x Todogrow Led
Cxb 3590 COB 3500 K 205 W
💡💡☝️🏼
Earth: Canna Bio
☝️🏼
Fertilizer: Bio Grow Feeding ( GHSC ) , Enhancer ( GHSC ) , Bio Bloom ( GHSC)
☝️🏼🌱
Water: Osmosis water mixed with normal water (24 hours stale that the chlorine evaporates) to 0.2 EC. Add Cal / Mag to 0.4 Ec Ph with Organic Ph - to 6.0
Likes
21
Share


@DogterB
Follow
Week 14
Day 92 (10/16)
Checked her trichomes and she's just starting to show some amber. She may need watered tonight, probably will add in some Mammoth P and molasses too.
Day 93 (10/17)
I've been slacking on updates and pics, but there's just not too much to say or document. She's still doing her thing, really looking more frosty than the first partial harvest. Thinking I should have waited a bit longer for the first cut, but oh well, it still gets the job done. I have held off on watering as her pot is still pretty heavy. It was lighter this morning so maybe this afternoon I will water her. I'm keeping an eye on her trichomes as I want there to be more amber for the final harvest.
Day 94 (10/18)
Everything from the partial harvest has been dried and I finally weighed it all. Came out to around 48.5g (including the 4-5g we've been smoking on). There's still plenty more on her. Everything has been jarred up for a few days and I've got Boveda packs in the jars too.
Day 98 (10/22)
Checked the trichomes this morning and I think I might put her in the dark for 48 hours starting tomorrow night. She's turning into a fuggin 100 day auto.
Day 99 (10/23)
Well, I made the executive decision to prep her for harvest. When her lights went off last night, I unplugged it from the timer so she'll have her 48 hours of dark. I also added some ice cubes around her base. I've read about the dark helping and the ice simulating a frost, but I've never done this so we'll see. Shouldn't hurt right? So I'll be harvesting her Saturday night or Sunday. And hopefully popping another over the weekend 😃
Day 100 (10/24)
Well she's been in the dark almost her 48 hours. I have family in town tonight, so she may have to wait until tomorrow to get cut. Or I might just stay up half the night and get her down tonight lol. We'll see.
Day 101 (10/25)
Technically week 15, but who's counting. Cut her down today. Got her cleaned up and into paper bags to dry. Will get a weight and post the harvest once she's dry. Getting another one ready to go 😉


Likes
13
Share


@Esiking
Follow
Hi guys i am wondering with this fastbuds strain.West coast og will yield much and its dense and potent.next week i will start to flush with advanced nutrition flawless finish.
Thank you all.

Likes
24
Share


@CannaCoPassion
Follow
Popped the Mighty Grape and the Dosidos Zkittlez in a cup of water on 5/3 and then in moist paper towels after 5 hours. Both germinated just fine after a day with the Mighty Grape growing alot faster than the Dos Z.

Likes
15
Share


@XperencdGmanXG
Follow
Well I was able to LST these girls quickly and they responded very well. So new SOP is to LST and then apply Raw aloe vera juice and the plants will explode. Will be flopping them to flower very soon.
Processing
Likes
5
Share


@Tried_and_Tested
Follow
This week was another great week, with not much work being needed in the tent. All I did this week was minor defoliation to remove yellowing leaves on the bottom of the plants not receiving good light.
Buds are continuing to swell up nicely, with a roughly even spread in size across the canopy. There is however a slight gap in my canopy which would be avoided for optimal results.
The strongest plants are still the same, with Topped and LST in 1st, Mainlined in 2nd, and LST only in last place.

Processing
Likes
3
Share


@Reaper
Follow
these are 6 clones from the critical HUGE PHENO in the rdwc, i want to keep 1 clone as an motherplant with my autoflowers.
april 11:
all rooted / transplanted and show color and healthy growth. feed em around 400ppm

Likes
12
Share


@Hawkbo
Follow
Purple Lemonade , Gelato 1&2, LAK 2&3 are all just about done theyll be coming down over the weekend or early next week. T26, Pineapple Express, Mexican Airlines, LAK 1, 6 Shooter Blue Dreamatic and Cream Cookies are all on the flush but will need a few more before chop. This tent reeks up the whole block it's pretty intense skunk in the driveway right now. There will be one more update I'm guessing for most of these before the harvest update. This was the most successful autoflower crop I've had in a long time I think theres some really good quality buds on some of these. I'll put the video up now and as I go thru the pics theyll be uploaded so if your interested come back tmm for the pics.


Likes
14
Share


@JerMeds
Follow
Good amounts of bud swelling going on. I'm going to switch them all from Big bud to Overdrive soon. Quality on these buds are very good. Very good genetics.
Looking to harvest sooner rather then later because humidity is 50-70%... I normally have good judgment and harvest right when they are ready and avoid mold/rot. I just have to be careful.
After this grow I'm shutting down this grow room for a short time for upgrades to fix my humidity/temperature issues once and for all. I did not expect winter to bring condensation in here room like this.
P1 Her buds are still pretty young. I adjusted my lights around so now she has more light. She should swell up nicely in the next week or 2. I did drop a LED light while moving lights and snapped 2 branches a few days ago. Shes fine tho.
P2 This girl is a fast finisher. She buds are ripening up very fast. I'm thinking she will come down on day 65-70. She smells so freaking incredible tho...mmm cant wait. I switched her from Big bud to Overdrive on day 56. She will be ready to go very soon.
P3 Beautiful buds but fluffy, very sticky and smelly tho.
P4 Alot of tight buds maybe they will swell up fat.
P5 She now has a true 360w flood light all too her self. Lots of big buds and shes a big drinker.