


Likes
Comments
Share

@mihixd
Follow
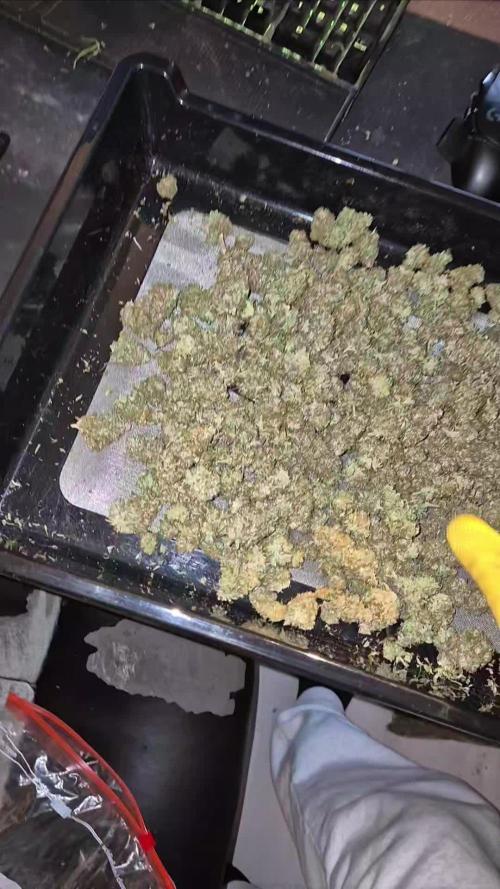
124.5 grams DRY WEIGHT on plant 1
When I removed the plant stakes, all the branches started hanging super low to the ground. Satisfying feeling.The buds foxtailed, which is such a pain in the ass to trim. Nice smoke tho tastes good etc.
This one was a big stretcher which caused large canopy heigh differences, bit annoying.
76.3 grams DRY WEIGHT on plant 2
More density than on plant 1, these didnt foxtail. Nothing too special
118.2 grams DRY WEIGHT on plant 3
This plant has the best nugs out of all 4. Super dense (see vids) and they smell so fruity. Super sticky, i had to switch trimming scissors after every bud.
Also have 100g of trim that I'll sift and mess around with.

Likes
63
Share

@Growbody
Follow
Meine lieben Freunde und Freundinnen, Brüder und Schwestern im Geistigen und Tatkräftigen, herzlich Willkommen zum Greenhouse Summer Outdoor Grow 2026.
Der erste Strain des Outdoor Grows den ich Euch vorstellen werde ist die Purple Lemonade FF von 2Fast4Buds, eine 60% Sativa die laut FastBuds etwas nebulös als eine Kreuzung aus purple und citrus Cali Genetik beschrieben wird. Egal, sie soll sehr fruchtig und zitronig schmecken und könnte schöne Farben bekommen. Außerdem soll Sie eine kurze Blütezeit haben. Hier ist die URL:
https://2fast4buds.com/de/seeds/purple-lemonade-fast-flowering#description
Der zweite Strain der im Set mit dabei ist, ist die Mimosa x Orange Punch fem. von Barney's Farm, die ihre Genetik und den Taste bereits im Namen trägt, eine 65% Indica, die laut Barney's "ein wirklich sensationelles, zitrusähnliches und mandarinenartig-süßes Aroma" haben soll. Auch sie könnte interessante Farben bekommen. Hier die URL:
https://www.barneysfarm.de/mimosa-x-orange-punch-552
Last but not least, der dritte Strain ist die Chocolate Sherbet fem. von Grower's Choice, eine 70% Sativa, deren Eltern Chocolope x Sunset Sherbet sind. Auf den Geschmack bin ich schon jetzt gespannt, cremiges Haschisch. Mit bis zu 240cm könnte sie die größte im Greenhouse werden und würde dann bis zur Decke wachsen. Hier ist die URL:
https://www.growerschoice.nl/de/chocolate-sherbet.html#description
EDIT:
Nachdem die oben aufgeführten Pflänzchen nicht so recht loslegen wollten, habe ich mich entschlossen, fertige Stecklinge von Hanfgarten aus Österreich dazuzubestellen. Die Stecklinge kommen in die Mörtelwannen, die selbst gezogenen kommen in die bereits bewährten 15 und 20 Liter ROOTiES. So kann ich die auch mal direkt in die Sonne stellen.
Der erste Steckling ist die Blueberry von Hanfgarten, eine 80% Indica, einer Kreuzung aus Afghan Indica x (Thai Sativa x Mexican Oaxacan Sativa), die nach 8 Wochen Blüte Mitte Oktober fertig sein soll. Außerdem soll sie fruchtig, beerig und süß schmecken. Auch hier gibt es eine URL:
https://www.hanfgartenshop.de/blueberry.html
Der zweite Steckling ist die Runtz, ebenfalls von Hanfgarten, ein Hybrid aus Zkittlez × Gelato, die auch nur 8-9 Wochen Blüte hat, mal sehen. Wenn sie ein ähnliches Aroma hat wie die Wurlz bin ich happy. Die URL:
https://www.hanfgartenshop.de/runtz.html
Der dritte Steckling ist die Super Lemon Haze, eine 80% Sativa von Greenhouse Seeds, deren Genetik von Lemon Skunk x Super Silver Haze stammt. Mit 9-10 Wochen Blüte steht sie wohl mit am längsten im Greenhouse. I💖Haze und hier sind die URL's:
https://www.hanfgartenshop.de/super-lemon-haze.html
https://shop.greenhouseseeds.nl/feminised-cannabis-seeds/1-seed-pack/super-lemon-haze/?variation_id=604
Auch dieses Jahr gibt es wieder etwas Neues:
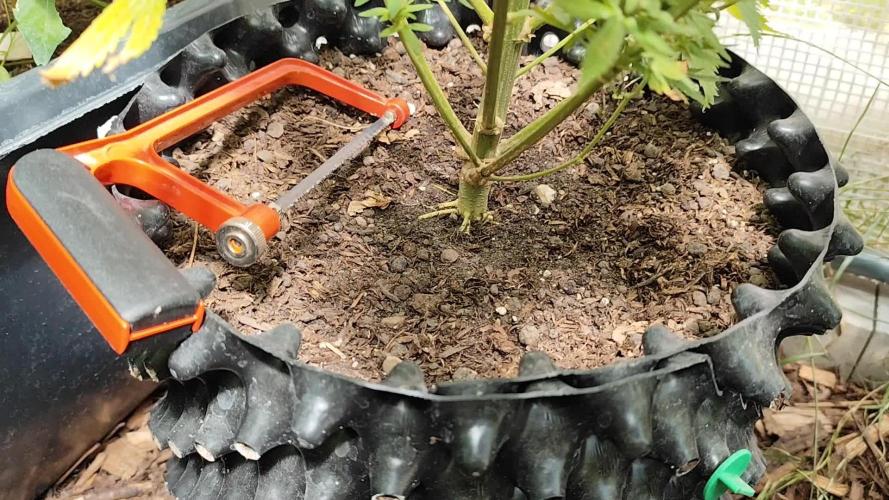
Mir ist vor einigen Wochen im Baumarkt ein Foliengewächshäuschen begegnet. Die Aussicht, meine Schätzchen immer im Trockenen zu Wissen, lies mich sofort (also sofort nach einem Recall mit meiner Liebsten) zuschlagen. Danach war nur noch ein teilweiser Umbau unseres Gartens nötig, einen kleinen Weg anders verlegen, ein Fundament ausheben, Bordsteine zersägen, 2 Zentner Beton verbuddeln, Löcher bohren, verdübeln und verschrauben ohne das der Beton ausplatzt, einen haufen Astwerk vom Wein opfern und viel Rasen neu anlegen, das war's schon fast.
Neu:
Sind auch die zwei 90 Liter Maurerbottiche, in denen sich meine Pflanzen wohlfühlen dürfen, 4x soviel Platz wie im letzten Summer Outdoor Grow. Zur Drainage habe ich Rheinkiesel 9-18 verwendet. Da drauf kam mein altes Erdmischungsrezept mit frischem Kompost von Piluweris, Lehm, den die Wühlmäuse ständig in unserem Rasen aufwerfen und Sand aus'm Kieswerk mit gaaanz viel Staub drinne, praktisch Gesteinsmehl. Auch hier gab's was Neues: Hornmehl zusätzlich, hatich früher schon verwendet und ganz vergessen. Der erste Sack Sonnenerde Hanferde wurde mit der oberen Schicht meiner Mischung vermischt. Der zweite Sack kam dann blank obendrauf.
Neu:
Für mich ist auch die angewendete Keimmethode noch neu, die Samen zuerst in einem Marmeladenglas mit temperiertem Wasser mit Zusatz von Wasserstoffperoxyd keimen zu lassen. Das ist jetzt das dritte Mal, dass ich diese Methode anwende. Der Vorteil daran ist die superschnelle Keimung, der Keim schaut tatsächlich bereits am nächsten Tag aus der Schale und nach ein oder zwei weiteren Tagen haben sich die Keimlinge von der Samenschale befreit. Das weitere Vorgehen bereitet mir noch Probleme. Ich verwende immer noch die SmartStart Plugs von Zamnesia die ich praktisch halbiere, also von oben nach unten einmal Mittendurch. Dahinein lege ich jetzt den Keimling und klappe die zwei Hälften dann zusammen und pflanze den Plug in den Topf.
Neu:
In die Wannen kommen zusätzlich Gäste als da wären erprobte und neue sowie überwinterte Chilisorten, verschiedene Basiliken oder -kums, Weiße Melisse, Roter Klee, paar Blumen und so.
Tag 78: Im Freien hatte es heute wieder 33°C bei wenig Wind und Wolkenlosem Himmel, im Greenhouse hat es tags bis 38°C bei 24% RLF. Die Mörtelwannen bekommen deshalb morgens und abends 10 Liter, die Töpfe ~2 Liter Brunnenwasser. Nachts hat es nur 16°C bei 69% RLF.
Tag 79: Tagestemperatur im Greenhouse heute 39,5°C bei 21% RLF. Nachts kühlt es auf 14°C ab, bei 86% RLF. Die Blueberry von Hanfgarten ist mittlerweile 123 cm, hat einige lange Seitentriebe und wächst vorne aus dem Greenhouse. Die Runtz von Hanfgarten schießt auf 107 cm hoch, nutzt jeden Raum, den sie auch bekommt. Die Super Lemon Haze Hanfgarten/Greenhousseeds ist mit 96 cm die kleinste im Greenhouse, bekommt aber demnächst mehr Platz und mehr Licht. Die Purple Lemonade FF von 2Fast4Buds hat mit ihren 108 cm einen ziemlich dicken Stamm entwickelt, auch sie schießt ans Licht. Die Chocolate Sherbet von Grower's Choice kommt auf 153 cm, hat die Minosa x Orange Punch mit 134 cm überholt und ist jetzt die größte.
Tag 80: 35°C, im Greenhouse 42°C bei 33% RLF, Nachts angenehme 13°C bei 91%.
Tag 81: Am Tag war es wieder heiß, 36°C bei 27%, Nachts 14°C bei 90% RLF.
Tag 82: Die Sonne brennt jetzt den 5. Tag in Folge ohne eine weißen Fleck am Himmel. 35°C bei 32%, heute heißt es für die Gelato F5 von 2Fast4Buds Abschied zu nehmen vom Greenhouse. Ende März wurde sie im Büro angebaut und war eigentlich gar nicht für Outdoor geplant. Jetzt bin ich froh, sie in der 8. Woche, ihrer 2. Blütewoche ins Greenhouse gebracht zu haben. Der Anfang ihrer Kariere ist auch dokumentiert, allerdings nicht hier in diesem Journal, das hole ich später mal nach. Etwas mehr als 2 Monate war sie geschützt im Greenhouse und konnte ihre Buds so richtig aufpumpen. Erst beim Trimmen ist mir so richtig aufgefallen, wie groß die Buds jedes einzelnen Stängels geworden sind und wie groß die Hauptblüte geworden ist. Ich habe jeden einzelnen abgelichtet, damit ihr das sehen könnt. Die komplette Pflanze wog ein knappes Pfund, nach dem Trimmen waren es noch 280 Gramm, mehr als ein halbes Pfund. Auf den letzten Fotos seht ihr das Kontrollwiegen der DryFerm Bags und wie sie im Keller an der Decke hängen.
Eins kann ich versprechen: It will take a very, very long time 😃 Schön das du es bist, der mich begleitet 👍😎



Likes
19
Share


@4Haut
Follow
Hi@all, it is the end of the fifth week, I started some low-stress training to bend the lower branches towards the light. It worked really well. Three days ago, I topped the "head". I hope she's recovering from it in the next days/week. So far, everything seems to be going well and it’s really enjoyable. 😎🌿
My only concern is the 40x40 cm tent – I think it might be a bit tight in there...
Greetings ✌️

Processing
Likes
13
Share


@RussianGrower
Follow
Hello to my friends from all over the world. Updating my diary again. My plants show steady growth and so it's time to make clones. I removed the large leaves and took eight shoots for cloning, adding hormonal gel I removed them in the greenhouse, create a microclimate. I left some branches so that they could grow slightly and afterwards I will also make clones. After I get enough plants, I will cut off the mother plants, forcing them to grow several central stems.
If you are interested in following the adventures of weed in Russia, subscribe to my diaries

Processing
Likes
Comments
Share


@Heathi
Follow
Flipped to flower to see what she can do because so many clones took! I'm so super new that it's still so exciting every time I figure something out.
Definite pistils at day 3 of flower

Likes
5
Share

@KannaGrowing
Follow
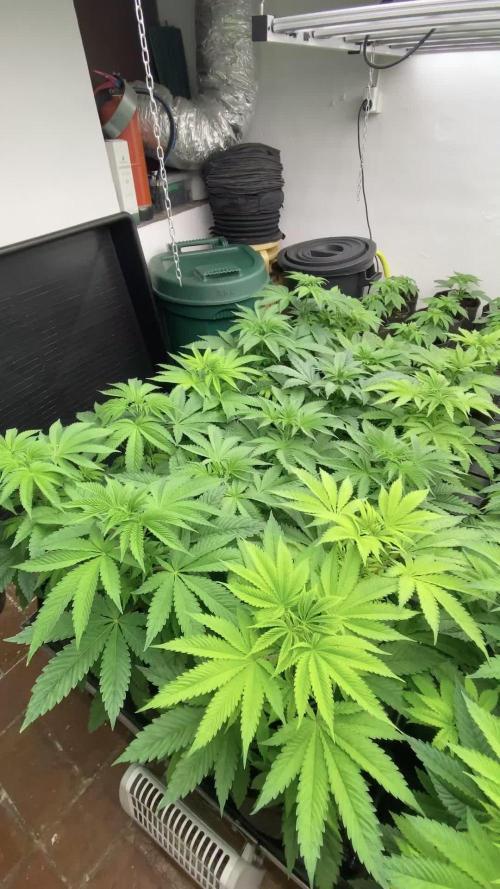
Ha llegado el momento de pasar a la fase floración.
Ajustamos nuestras luminarias LazerLite Pro 720w a 12 horas y subimos la potencia al 50%.
Seguimos con riegos alternos de fertilizante y agua.

Processing
Likes
5
Share


@Ensign420
Follow
Week 02 Introduction
This week has been a bit of a struggle. Had my first experience dealing with slime and brown algae. But I think adding enzymes and increasing the beneficial bacteria helped to fix the issue. Also experienced nutrient burn for the first time. My nutrient solution strength got as high as 671 PPMs. So backed it down to about 430 PPMs during the end-of-week reservoir change. Also cut Hydroguard (expired?), CaliMagic, and Superthrive from this grow. Now she's still stunted, but is starting to recover. Hopefully...
[START OF WEEK 02]
Day 01 - Monday - 08/10/20 - Total Days: 008
-----------------------------------
- [0830]: Still looks a bit yellow. But getting larger!
--- Solution strength was at 248 PPMs.
--- Just topped off with a bit of distilled water
--- PH went up to 6.1 so PH'd down to 5.8
--- Ran the top feed for a bit to wet the hydroton.
- [2130]: She's looking even more yellow now.
--- Even the new leaves are really yellow.
--- Decided to add more base nutes.
--- Added 4ml of Sensi A
--- Added 4ml of Sensi B
--- Now at about
--- Solution Strength went up to 304 PPM.
--- PH was at 6,
--- Also raised the water level a bit more.
--- I really hope it's a nutrient deficiency and not an over-watering issue.
--- Please live!
Day 02 - Tuesday - 08/11/20 - Total Days: 009
-----------------------------------
- [0830]: Looking less droopy. But still yellow.
--- Decided to do a reservoir change.
--- 4.5gal of distilled water
--- 8ml of Sensi Grow A
--- 8ml of Sensi Grow B
--- 8ml of Voodoo Juice
--- 4ml of B-52
--- 4ml of CaliMagic
--- 4ml of Hydroguard
--- 4 drops of Superthrive
--- PH'd down to 5.8
--- Solution strength: 302 PPM
--- Since I didn't want to risk over-watering the rockwool, I did not to do a top feed, may do one tonight after the sleep cycle (lights are still set to go off at 10am and back on at 4pm).
--- As I was doing a reservoir change, I noticed that the tubes and bucket were a bit slimy. Didn't really stink or anything. Is this normal? Maybe due to the Hydroguard and Voodoo Juice?
--- I hope she gets better soon!
- [2215]: Getting larger! But still yellow.
--- Also can see a root growing through the net pot! Tiny little thing but it's there! Will have to start dropping water once more appear.
--- After looking over a few DWC diaries using AN nutes, seems like my solution strength is still too low. Most around this stage average around 500 PPMs with about 4ml per gallon.
--- Top fed for a minute to wet the top of the hydroton.
--- Solution strength went down to 263 PPM.
--- Added 8ml more of Sensi A
--- Added 8ml more of Sensi B
--- Now base nutes are at 16ml for 4.5 gal of water.
--- PPMs went up to 411.
--- Still lower than 500 PPMs, but that's okay.
--- PH was at 6. Not sure if I should adjust PH using AN nutes. So going to not ajdust unless PH goes above 6.1.
Day 03 - Wednesday - 08/12/20 - Total Days: 010
-----------------------------------
- [0830]: Looks like more root growth!
--- She still looks yellow. But leaves are perky.
--- PH was at 6.2 so lowered down to 5.8.
--- Solution strength was at 394 PPMs
--- Since roots are still growing, I decide to lower the water level a bit. Now water level is a bit below the net pot.
- [2200]: Root is getting longer!
--- Slime is returning. Not sure why.
--- Solution strength: 357 PPMs
--- PH: 6.1
--- Decided to add an enzyme along with more beneficial bacteria to hopefully cure the slime.
--- Added 16ml of Sensizym
--- Added 5ml of Hydroguard
--- Added 8ml of Voodoo Juice
--- New solution strength: 430 PPMs
--- New PH: 6.1
--- Top fed for a minute.
--- This slimy residue is really freaking me out! I hope the added enzymes will help eliminate the slime.
--- Going to do a full reservoir sterilization/nutrient change over the weekend. Please survive until then girl!
Day 04 - Thursday - 08/13/20 - Total Days: 011
-----------------------------------
- [0930]: I think the enzymes worked! There is little to no slime now!
--- Although I think the root was also dissolved in the process. It's now just a little stub sticking just below the net pot. The enzyme is also suppose to dissolved dead roots too but guess that root was too weak? Not sure what happened there. But I think the slime is cured!
--- Solution strength went down to 395 PPMs. Decided to add more base nutrients.
--- Added 8ml of Sensi A
--- Added 8ml of Sensi B
--- Added 4ml of B-52
--- Solution strength went up to 598 PPMs.
--- PH was at 6.1
--- As long as the PH is between 5.5 and 6.3, I'm not going to use PH Up or Down. But still will monitor PH levels.
- [1715]: Checked up on her after her nap and shes looking alive but stunted. But no slime!
--- Decided to add some sugars to help maintain the enzymes and beneficial bacteria.
--- Solution strength was at 587 PPMs.
--- PH was at 6.2
--- Added 8ml of Bud Candy
--- Solution strength went up to 671 PPMs.
--- PH also went up to 6.3
--- Lowered water level a bit to hopefully promote more root growth.
--- Top fed for a minute.
--- She is getting bigger, but still looks yellow.
Day 05 - Friday - 08/14/20 - Total Days: 012
-----------------------------------
- [0915]: Leaves look a little burnt on the tips. Still no slime.
--- Going to back off on the PPMs to hopefully fix the nutrient toxicity.
--- Solution strength was at 632 PPMs
--- PH was at 6.3
--- Added/Removed water until PPMs were at 536.
--- PH was still at 6.3
--- Raised water up a bit, then top fed for a minute.
- [2200]: Looking better. Still yellow though.
--- Solution strength: 514 PPMs
--- PH: 6.5
--- Added PH down.
--- New solution strength: 518 PPMs
--- New PH: 5.2
--- PH was kind of high. So decided to PH down. Had to use quite a bit to bring it down. But eventually got it to drop down to 5.3. A little low, but so far, the PH has always gone up so wanted to start it really low.
--- Ran the top feed for a minute to re-saturate the top of the hydroton.
Day 06 - Saturday - 08/15/20 - Total Days: 013
-----------------------------------
- [0830]: She looks stunted. leaves are still yellow.
--- Solution strength: 514 PPMs
--- PH: 5.6
--- Top fed for a minute.
--- Not sure what to do at this point. Going to do another reservoir change soon. Hoping she lives until then.
- [2145]: Looking pretty much the same.
--- A bit of slime has returned. Since I've been diluting the nutrient solution, the enzyme ratio has dropped. So I guess this is expected.
--- Also noticed that slime build up was on the air-stones. Never really checked the stones so not sure how long that has been there. Looks brown too, which can't be good.
--- Going to do an H202 sterilization of the system (minus the net pot) tomorrow so did not add anything.
--- Lowered the water level to below the net pot.
--- Then top fed for a minute.
Day 07 - Sunday - 08/16/20 - Total Days: 014
-----------------------------------
- [0900]: STERILIZATION DAY!
--- Decided to skip today's night cycle for a deep clean.
--- I'm hoping that skipping a night cycle won't be too stressful.
--- Temporarily moved her to a new bucket.
--- Used about a half of gallon of straight distilled water to flush out the net pot.
--- Drained the system and wiped up all the brown sludge. Also removed the air stones and cleaned up all the goo.
--- Filled the system with 2 gallons of distilled water and at least 30ml of food grade hydrogen peroxide (35% strength).
--- Yea its a lot, but since I'm not going to sterilize the system overnight, I went with a really high doseage. Basically I kept adding until I started to see little bubbles start to form.
--- Then I ran the water pump.
- [0915]: Boiled the air stones in tap water for about 10 min. Then reconnected them to the airlines.
--- I let the air stones and hose soak in the sterilization solution for about 5 minutes so the peroxide can absorb into the stones. Then ran the air stone to help mix and agitate the solution.
--- Occasionally, I'd repeat the process of turning the air pump off for a few minutes to let the stones soak.
- [1000]: Covered the top two row of holes of the net pot with some aluminum tape. Hopefully this solves the light leaking in through the hydroton.
- [1200]: Used an old toothbrush and scrubbed the pump clean. Then drained the system.
--- Refilled with more distilled water and peroxide. Again added a lot.
--- Ran system again to sterilize even more.
- [1530]: Drained the system and refilled with distilled water to rinse.
--- Ran the system for a few minutes, then drained and rinsed again.
--- Did this a few more times over about an hour.
- [1630]: Added 4 gallons of fresh distilled water.
--- Added 15ml Sensi Grow A
--- Added 15ml Sensi Grow B
--- Added 12ml of B-52
--- Added 16ml of Voodoo Juice
--- Added 16ml Sensizym
--- Solution strength was at 430 PPMs
--- PH was at 5.6
--- I was going to add Hydroguard, but I think the bottle is expired. Since 2017 or 2018!? I think Hydroguard is good for up to 2 years from the date on the bottle or 6 months after opening. So not going to use from now on. I wonder if this could have contributed to the slime build up.
--- Also removed the CaliMagic and Superthrive too. Going to only use AN products to eliminate the chance of incompatible nutrients.
--- Placed her back in the bucket and top fed for a minute.
--- Here's hoping for the best. Going to let it ride until morning! Please feel better!
[END OF WEEK 02]

Likes
Comments
Share

@Gardens_of_Of
Follow
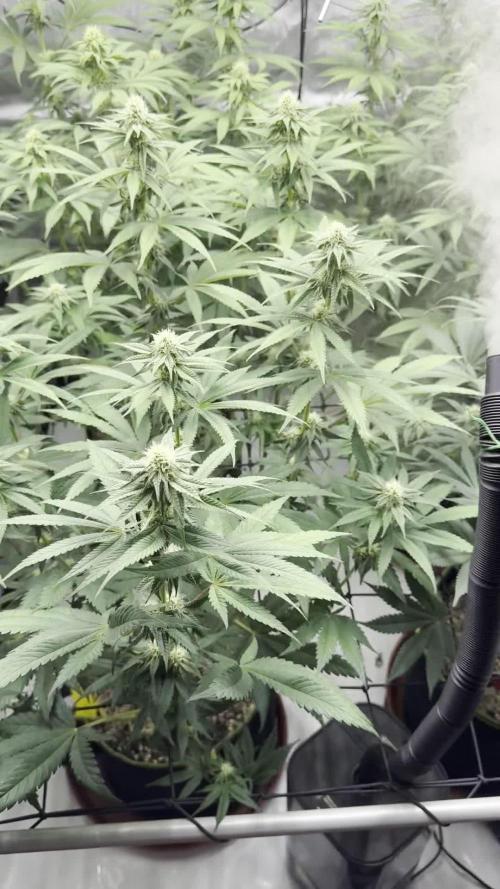
The fourth week of flowering has come to an end, and the plants are now fully focused on building flowers. The bud sites continue to develop steadily, and the first noticeable layer of trichomes is beginning to cover the buds. On some plants, the resin production has become so vigorous that even the fan leaves are starting to develop a visible coating of frost—a promising sign of what's to come in the weeks ahead.
The slight yellowing on the taller plants has not improved yet. As a precaution, I raised the light by another 5 cm to reduce the intensity at the top of the canopy. Over the next few days, I'll monitor their response closely and adjust further if necessary. Aside from the mild yellowing, the plants appear healthy and continue to produce dense, increasingly frosty flowers.
I also carried out a small amount of selective defoliation throughout the week, removing only the occasional large fan leaf that was shading developing bud sites. This time, I took a very conservative approach, avoiding unnecessary stress and allowing the plants to direct their energy toward flower production.
The biggest challenge this week was the ongoing heatwave. Fortunately, my air conditioning unit kept the tent temperature below 29°C. While that is a little warmer than I would ideally like during mid-flowering, it remains well within an acceptable range and doesn't appear to be affecting the plants negatively.
With the garden settling into its rhythm, patience becomes the most important tool. The flowers are becoming noticeably frostier each day, and the unique characteristics of each cultivar are beginning to emerge. Now I'm just hoping the heatwave passes soon so the weather returns to normal and the plants can finish this stage under more comfortable conditions.


Likes
12
Share


@Kirsten
Follow
Pink Mist is looking good, has stopped growing as much, and is starting to get into proper flower.
I have much else to say, however it seems I'm unable to, due to grow diaries cutting off all my comments, so I decided to save myself much time, and sadly just not say it!
Thanks for checking out my diary 🍃 ✌️


Likes
3
Share


@JuanPablo5280
Follow
Shes Starting to smell reallllly good! I shouldn't have too much larf if i had more room to spread her out in early flower she would be producing alot more.
Likes
15
Share


@YOZYY
Follow
One week at a time they are growing nicely just waiting for them to bulk up I hope they get super fat 😁.
Likes
17
Share


@YorkshireGardeneruk
Follow
Just gone in to pre flower normy run atoflower on 18 as think go better had these on 20 hours light,but now back on 18 hours as normally larger plants when run on 18 hours

Likes
6
Share


@Staffedition
Follow
Привет друзья.
Наше знакомства продолжается с новым сортом автоцветущих растений от Smail_Seeds сорт TROPICANNA POISONZKITTLEZ XL AUTO F1 reg.
Сегодня растению 58 дней.
Растение очень хорошо развивается, ни каких сбоев в генетике не наблюдается.
Шишки наливаются😀
Сорт выводим сами.
Смотри мой профиль, у нас всегда есть что то интересное.
Не забудь поставить лайк❤️, если понравилась как прошла неделя
И читайте наш TELEGRAM: https://t.me/smail_seeds
#Smail_Seeds 😀


Likes
7
Share

@GERGrowDesigns
Follow
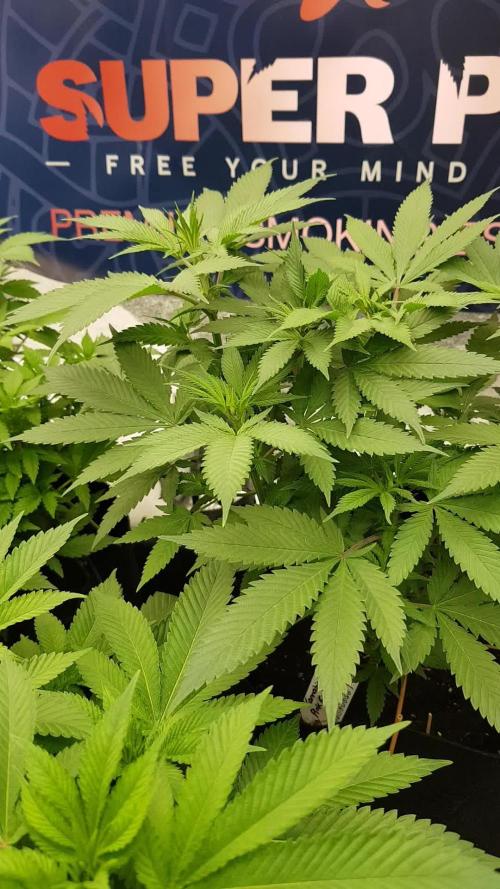
Welcome to Flower Week 1 of Kannabia Pink Gelato
I'm excited to share my grow journey with you from my
Kannabia Seeds Project . It's going to be an incredible ride, full of learning, growing, and connecting with fellow growers from all around the world!
Check out Kannabia Seeds with my link [https://www.kannabia.com/de?ref=61966] and grab the germination device or the strains I used . Trust me – it’s worth it for sure !
Get another 20% Discount at all products using the code [GGD] at the checkout.
For this Project , I’ve chosen the Feminized Photo Strain Pink Gelato:
Here’s what I’m working with:
• 🌱 Tent: 120x60x80
• 🧑🌾 Breeder Company: Kannabia Seeds
• 💧 Humidity Range: 60
• ⏳ Flowering Time: 56-63 Days
• Strain Info: 23%THC
• 🌡️ Temperature: 26
• 🍵 Pot Size: 20
• Nutrient Brand: Hy-Pro
• ⚡ Lights : 600W x 2
A huge thank you to Kannabia Seeds for allowing me to try my Best with this amazing collection from Photo Strains they managed to Sponsore . Big thanks for supporting the grower community worldwide! Your genetics and passion speak for themselves!
Let’s grow together – and don’t forget to stop by again to see the latest updates!
Happy growing!
Stay lifted and stay curious!
Peace & Buds!
Likes
27
Share


@adam_pawloski87
Follow
Let’s go Day 36 !!! This week went real great, girls built up a lot of structure, and stayed super healthy ! Today they got fed just water phd at 6.5 ! They been really loving that balance! I also removed a lot of under trim since we are going into preflower , so had to shave up those legs lol ! It’s really great for them , the love that airflow , but don’t take off too much or you could shock your plants so be careful ! Can’t wait to see what these girls do this week ! Hope you all enjoy an are ready for another amazing productive week ! Peace , Love , an positive vibes to y’all Cheers LetsGrowwww!!! 😶🌫️💨💨💨💨
Likes
6
Share


@Growin_it
Follow
Needed to defoliate to create airflow and start shaping the ladies.
Stretching out the lower colas across the base.
Fimmed the ends of the longer stems to get a split going for more colas.
Recharge added to feed after stripping 30%+ of the lower canopy.
Will turn to flower in a week or too.
Notes: slow growth due to the lower heat in the tent. Okay with that because the Lecky bills have been huge with all the price gouging going on.

Likes
1
Share

@therealgrowmie
Follow
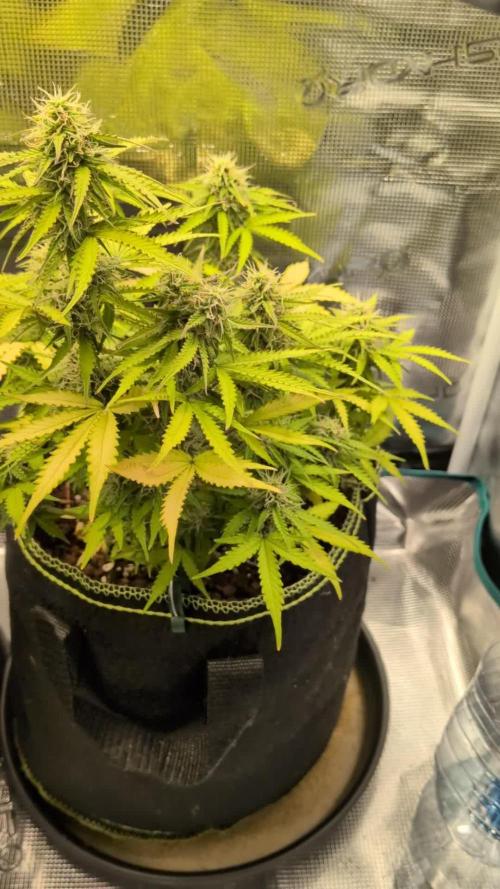
We’re in the midst of the bulking phase now, with a few buds stacking up nicely.
Unfortunately, the plant on the left has sparser bud distribution. Compared to other auto genetics, these three plants also show a broad variety in growth structure and phenological traits.
Also, overall plant health isn’t entirely satisfying, with high temperatures being the Main cause. The leaves are showing several stress-related issues like mild tip burn, nitrogen deficiency, and some cal-mag problems. But hey—we’re here to grow buds, not leaves! 😄
That said, the fade is to be expected as the plants start to cannibalize themselves for nutrients. The stretch is also in its final phase, so we’re likely 3 to 4 weeks away from harvest.
---
Quick rundown on everything else:
Watering: 1500ml every third day
Fertilizer: According to the BioBizz schedule
Light intensity: ~1000 PPFD
VPD: ~1.62 kPa
Temperature: ~28°C
Relative humidity: ~55%
Likes
92
Share


@DogDoctorOfficial
Follow
🌱 Week 1: The Journey Begins! 🌟
Hey Grow Fam! 🙌 We’re off to an epic start with our TrolMaster adventure, and I’m already feeling the love for the setup, the seeds, and the growth happening in the room! So, let’s dive right in and get into the details of this exciting week!
🌿 Germination Update:
Our first Gorilla Melon seed from Fast Buds didn’t sprout, but no worries—round two was a success! 🦍🍈 The second seed has germinated and is looking full of potential. I’m throwing in a Sweet Seeds Papaya Zoap into the germination station too, so we’re keeping this exciting lineup going strong! Germination is such a key part of the journey, and having a healthy start is what it’s all about.
🔧 Room Build & TrolMaster Setup:
The build is coming along beautifully, and I gotta say, the TrolMaster system is blowing my mind! Everything’s under control like magic 🎩✨, and the TM+ app? Wow, just wow. I mean, I can literally be in the bathroom and still keep an eye on the plants—check all the metrics, adjust settings, and fine-tune what I need, all from my phone! 😂💧 This level of control is next level. I’m loving how smooth and seamless it makes managing the room. The gear is just unreal, and seeing it all come together is truly something special.
🌱 Nutrition Talk:
As for feeding, we’re starting light but smart! I’ve begun with 0.15ml of Regulator and 0.25ml of Startbooster per liter for now. I always believe in starting easy and ramping up as the plants develop. These early stages are crucial—balance is everything. For the time being, I feel this is more than enough to keep the babies happy and healthy. 🌿💧 The Regulator is working wonders in maintaining plant structure and health, while the Startbooster is fueling the early root and vegetative growth, laying down a solid foundation for the weeks to come. It’s about getting it right from the start—too much too early can be a killer. Keeping it steady with precision, that’s the goal!
Big Shout-Outs:
To the amazing team at @TrolMaster, @Fast_Buds, @Sweet_Seeds, @AptusHolland, and all the incredible sponsors—I’m beyond grateful for the support! 💚 And to my GrowDiaries fam and followers, you guys make this journey what it is—thank you for the love, and I’m so honored to have you along for this ride. 🙏
We’re just getting started, and I can’t wait to show you what’s next. Stay tuned for more updates, epic builds, gear reviews, and plenty of insight. Don’t forget to follow me on GrowDiaries, YouTube, and IG for exclusive content, and let’s make this grow the best one yet! 🌿🔥
Growers Love to All 💚💚💚
P.S.- A deep dive into the Full Spectrum Quantum Sensor (MBS-PAR):
The Full Spectrum Quantum Sensor (MBS-PAR) is an essential tool for any serious grower looking to optimize their light environment. This sensor measures photosynthetically active radiation (PAR), which refers to the spectrum of light that plants actually use for photosynthesis—typically between 400 and 700 nanometers and more depending .
What makes the MBS-PAR sensor special is its full spectrum capability, meaning it accurately detects not just visible light but also far-red and UV light—which are crucial for maximizing plant growth, development, and flowering. With this tool, I can monitor the exact intensity of light my plants are receiving, making sure they’re getting the optimal levels for every stage of growth.
By using this sensor in my grow room, I’ll be able to ensure that the light distribution is uniform across the canopy. Plus, it allows me to fine-tune the light output from my ThinkGrow LED setup, ensuring my plants are thriving under the best conditions. Whether it’s increasing light during the vegetative phase or fine-tuning it for flowering, the MBS-PAR sensor helps me keep everything on point. And the best part? I can monitor it all through the TrolMaster app, ensuring I can make adjustments whenever needed—even if I’m not in the grow room!
This level of precision means healthier plants, better yields, and maximum efficiency. It’s a game-changer for taking the guesswork out of lighting and getting closer to growing perfection! 🌱💡
Growers Love to All 💚💚💚


