
Likes
Comments
Share

@Kardo
Follow
Diese Pflanze wird sehr schön sie bildet über all schöne Triebe zeigt eine schöne Farbe und wird nur noch größer schaut euch wie viele Triebe das sind
Processing
Likes
38
Share


@snowybudz
Follow
Just gotta get the cmh for the veg tent and some ducting, hang the 600 in between the 2 thouies and bloom is on... some transplanted some left to transplant

Processing
Likes
93
Share


@Ferenc
Follow
Let's see how it goes. I raised up the water so it is now 150ml 2x per plant so 300 per plant per day. The same with fertilization and the same days remain. I keep 14 hours darkness and 10 hours light schedule for Purple Punch obviously I take out from the tent and put separately. I can't wait to harvest the Gelato Cookie D'ohpe so I can use the tent for the Purple Punch. I give 18 hours light on so 12 hours on 4 hours off and 6 hours on 2 hours off. Basically, it was the only solution because I put the Purple Punch in at 23:00 o clock and take out at 9 am. So the light on from 23:00 to 11 am and then 15:00-21:00 and off from 21:00 to 23:00. It was the only good way based on my timeline working hours and school. I also see the first signs of flowering after 7 days of light schedule change of the Purple Punch. Hope it goes well. They have a totally different smell, both strong, but the Gelato Cookie D'ohpe is like sweet and aromatic, and also like a muck heap 🤐😅👻The Purple Punch has strong smell but not sweet more like citrus. Saturday: I always had some yellow fan leaves but now it is getting more on the Gelato Cookie D'ohpe. Hopefully, it causes the flowering stage because the plant wants to use the energy for buds making and takes out of the leaves, so it is a natural process. I read that it means the plant is on the halfway of the flower. Hope the best. Tuesday: Purple Punch does well flowering, and the Gelato Cookie D'ohpe I think one more week so I will start flushing from tomorrow. I have checked the trichomes, they are cloudy, milky and the pistils started getting brown also so soon it will be done. The fan leaves also getting yellow as it can be seen so I think the next is the final week, if not then no more than 2 weeks and it is done. I can't really wait... End of this week Gelato Cookie D'ohpe is 70cm and the Purple Punch is 40 cm.


Likes
5
Share


@Muthaofdragonflies
Follow
So the smallest 5gal white og flipped her leaves on me. Like WHAT!!! Some research showed me cal-mag was the solution. And I know why. As I mentioned in. My other diaries - ph is off on my well water. I know this and also plants need water. So to water the hot dry plants before running Around for Work or not. I had no time for adjustments and feeding.
As guilty as I feel.... well... is what it is.
Got the greenhouse back on track today with a good ph water and cal-mag plus feeding. Will watch for improvement. They are all pretty hardy im impressed by their largeness.
The large one has exceeded my height and is also filling out. I have topped twice and once on smaller ones. Started to defoliate some of the under leaves and other leaves that had some pest damage. No major pest issues since I battled the flea Beatles but I didn’t capture grasshopper and a caterpillar 🐛 and a white looking spider with egg sack (be gone evil beings) but these girls are outdoors and that’s where bugs live sooooo... whatcha gunna do. 🤷♀️🏻
Moving on. Another 6 weeks and these girls should be heading into the flowering zone. Excite to watch that phase. Hope I have enough room out there. Once temps drop around here a little more I will remove the shade screen And spread them out a bit. But I can’t yet as the greenhouse reaches temps over 100 without it.

Likes
1
Share


@Iamelteddy
Follow
This Blue Dream’Matic from 420 Fast Buds is on the same timeline as my Purple Lemonade Auto.
We’re entering week 10 from seed.
I haven’t topped this one unlike the Purple Lemonade .
Been a pleasure to grow.
The smells are amazing, trichome production has been great , and the buds have been getting pretty thick!
Definitely one of the stickiest plants I’ve handled.
No complaints with this strain.
I’ll post a harvest post next week or so once they get chopped down.
Thanks for the progress follow! 🤘🏼

Likes
11
Share

@MadeInGermany
Follow
Hey guys :-)
The lady has developed very nicely this week 👍.
They were planted in their 8 liter pot where they can now really take root again.
Depending on what time is left in the vegi phase, you might be trained :-) .
Otherwise everything was cleaned and checked.
Have fun and stay healthy 💚🙏🏻
👇🏼👇🏼👇🏼👇🏼👇🏼👇🏼👇🏼👇🏼👇🏼👇🏼👇🏼👇🏼
You can buy this Nutrients at :
https://greenbuzzliquids.com/en/shop/
With the discount code: Made_in_Germany you get a discount of 15% on all products from an order value of 100 euros.
👇🏼👇🏼👇🏼👇🏼👇🏼👇🏼👇🏼👇🏼👇🏼👇🏼👇🏼👇🏼
You can buy this strain at :
Clearwater Seeds
Water 💧 💧💧
Osmosis water mixed with normal water (24 hours stale that the chlorine evaporates) to 0.2 EC. Add Cal / Mag to 0.4 Ec Ph with Organic Ph - to 5.8 - 6.5
MadeInGermany
Likes
45
Share


@masterofsmeagol
Follow
8/14 Everything looked beautiful this morning. Seems like I've got the watering schedule down better. I do have one gmo that looks hungry so I need to increase nutes. At least on that plant. Toasted toffy has little spits that could be water marks, pests or septoria. I don't think it's septoria. In the pastvi lost far more leaves when I had septoria. I've been crazy busy. I'm surprised things are going this well. I need to put up the final supports so I can add to them once I've got big heavy buds. I was really stoked to see everything doing so well. The plant in the 50gallon is the furthest in flower. I'm so grateful to have the ability to grow high quality cannabis for myself amd my wife. There's nothing quite like it. That hash I made turned out great. I think I'll press it today. Supports will be done this week. Saw a few aphids on the plant I cut down. Earwigs aren't here this summer or there would be NO aphids. Plus when I cleaned out the insides this morning I found some dead leaves WAY in the middle by the stalk. They would've eaten that shit if they were here. Birds and other predators seem to be keeping pillars at bay. I'm not seeing the damage and when I do sfind one it's absolutely tiny like a newborn. I'll think about whether I need to spray BT.
8/15 That fucking cancel button always fucks everything out. I was done no I need to start over. Didn't water last night. Found pm on my gmo in the 30. Interior of the plant. Should've defoliated better and earlier. Oh well. I'll treat with k bicarb or plant doctor. I'll have to think about it. Other plants are looking good. Well they all are. I just hate pm. I can't isolate it due to local laws so it is what it is. Nothing I haven't dealt with before. Watered today. The middle gmo in the 30 got 1.5 gallons. The other plants each got a gallon. Including the one in the 10gal and 50 gal. Its supposed to rain but only like .1. I also chose to feed today. All plants got a gallon. I DID NOT WATER THE EVENT HORIZON IN THE MIDDLE AND THE SHERB PIE AS THEY WERE PRAYING AND HEAVY. I need to get these supports up. I'll update as I go.
Oh and one thing I remembered is that, I didn't properly sanitize the trellis nets I installed on the plant that has pm (non visible today but still). I harvested the plant that used that bet last year was harvested in two stages. The bottom I let go way later and ended up with a little pm on the stuff I left for hash material and it got some pm. I wonder if that's whete this came from.
8/16 Death in the family this morning. I couldn't decide if I should use organocide plant doctor or not. It's a systemic It's been discontinued and reformulated. It's a systemic fungicide. Instead I mixed two tsp potassium bicarbonate with a little dawn in a half gallon mister. I used gloves and defoliated everything that had pm on it. I checked the plants next to it and luckily it hasn't spread yet....but it will. I feel safer using the k bicarb. I'll do more research and try to find the best way to tackle this. I don't want to get rid of the plant and due to local ordinance I can't isolate it. If I can keep it to this one plantvthat would be fine. I'd just use it for extracts. So glad I didn't use all that netting and put up tjosr supports. I'll need to disinfect them if I decide to use them. We'll see. Plants are coming right along flowering.
WENT BACK OVER AND DEFOLIATED A BUNCH OF fan leaves and interior stuff to promote airflow. Still saw pm on that plant u had treated earlier with k bicarb. I can't isolate due to laws and I'm not willing to discard this massive monster cropped plant. So I'm going to treat it. I started by removing everything infected and improving airflow on that plant and all the others. I didn't make it to one event horizon. I plan to treat the infected plant with Organocide Plant Doctor since its what I have on hand and I've had good luck. It's a systemic. After I treat the one plant and see that it didn't hurt the plant I'll use a preventative dosage on the other plants. I've battled wpm several times. This is something I'm very familiar with. What sucks is it's totally my fault it happened due to grower error. This has set back me puttingvup my supports as well. Plants look good woth a haircut. Also the toasted toffy had some leaves removed with spots that looked like septoria. I think nutes havecreally kicked things in gear. Now there are little buds on plants.
8/17 BAGS still seemed heavy so I didn't water. It's been MUCH cooler. It's 63 at 9am. It would normally be 80 by now so maybe they aren't using as much water. I watered the the toasted toffy I missed last round but the Sherb Pie still had weight to it. I also watered the GMO on the far side and the one in the 30 as the seemed a little lighter. I looked in and I couldn't find a SPOT of powder mildew on the plant! I know it will come back but on this 100% rh day there isn't a spot I can find! I'm going to go check on them later today. Do some more defoliation and treat the plants with Plant Doctor to try to mitigate the spread of the P.M. Very suprised the k bicarb worked like that.
WENT BACK OVER AROUND 11. I WATERED THE TWO THAT DIDNT GET WATERED LAST TIME. THE EVENT HORIZON AND THE SHERB PIE. IT WAS COLD AND OVERCAST. TEMPS HAVE BEEN MUCH COOLER. SOON AS I WATERED THE SUN CAME OHT AND THE TEMP WENT UP. I WENT THROUGH THE PLANTS I MISSED AND SEFOLIATED LEAVES AND INTERIOR BRANCHES TO INCREASE AIRFLOW. SURPRISED TO STILL SEE NO PM WITH 100% HUMIDITY. I WENT THROUGH EVERY PLANT. ILL NEED TO GO TJROUGH AGAIN BUT TJIS IS MUCH BETTER. THE TOASTED TOFFY THAT MAY HAVE SEPTORIA I WILL TREAT TONOGHT WITH PLANT DOCTOR. I REMOVED ANYTHING LOOKING INFECTED. I LSTed THE BIGGEST BRANCHES WITH CLIPS TO THE BAG AMD TWINE. SO AIRFLOW IS MUCH BETTER. I THEN REMOVED A BU CH OF THE MIDDLE. I COULD TAKE MORE BUT ON OUTDOOR HARVESTS THAT LITTLE STUFF GOES IN EXTRACTS. I PUT A FEW HOURS IN TODAY. IM GOING BACK AND ILL TEST THE PLANT DOCTOR ON THE TOASTED TOFFY. BUT IF THE K BICARB WORKS THIS GOOD ILL JUST KEEP USING THAT.
8/18 It started sprinkling when I left this morning. I did more defoliation on a few different plants. Including the healthiest GMO. It seems like things should be further in flower but it is what it is. I'm not doing clones again. Only reason I did is because I lost my 72 seedlings and depleted my seed supply. I hate treating pm. Lost Coast Plant Therapy I'd really whete its at when it comes to treating pm. I might just order that. My commercial buddy told me that he wouldn't use the plant doctor and not to "spray shot all over my plants". He's probably right. I see something small and try to overcurrent. I dont see any more septoria looking leaves on the toasted toffy since I lsted it and removed damaged leaves. I was going to use the fungicide plant doctor on that and then use it ad a preventative. He's probably right. I've put a lot of work in defoliation and such. It WILL spread but it hasn't yet. I removed what I saw. I was going to hit it again with k bicarb but it said it should be weekly treatments.i hope I'm doing things right. I shouldn't be this worried about pm but I've got am anxiety disorder. I'll fully sterilize (AGAIN) my posts and trellis netting before I instal it. I'll probably go check on them later. It's hard to avoid pm with 100% humidity and 30° temp swings. I've got a few lights so maybe this winter I'll do indoor. I'll try to keep this updated. LOOKING BACK AT PRIOR DIARIES I GUESS IM RIGHT WHERE I SHOULD BE FLOWERING WISE. I JUST HAD A COUPLE REALLY EARLY PHENOS A COUPLE TIMES.
8/19 Defoliated some more stuff amd tried to improve airflow. Humidity is high and it was sprinkling earlier. I think we'll have showers. Not seeing much pm. MAYBE a little in the middle of that middle gmo but it could just be residue. I'll treat it again with potassium bicarbonate soon. If that doesn't work I'll switch up treatments. I've got citric acid amd some other stuff too. I almost ordered lost coast last night but decided I'd wait to try it out. The toasted toffy has SOME spots that look like septoria. It's the second furthest in flower and very indica leaning. It seems to be flowering vigorously so I don't want to fuck with it too much. I could use plant doctor on it and see what happens but I'm going to monitor for a few days after defoliating.
WENT BACK OVER AROUND 4 AND SHOOK OFFCTHE PLANTS. HADNT RAINED MUCH. BAGS ARE STILL HEAVY. THE TEN WAS LIGHT AND THE EVENT HORIZON BESIDE IT SEEMED A LITTLE LGHT AS WELL. I THINK IT MIGHT BE ME COMPARING THEM TO OTHER PLANTS THAT ARE SATURATED. SEEING HOW THEY BOTH LOOKED THE BEST IVE EVER SEEN THEM I HELD OFF WATERING. ITS ALSO SPRINKL9NG AMD GOING TO RAIN TONIGHT. ILL REASSESS IN THE MORNING. PLANNED ON USING PLANT DOCTOR ON TOASTED TOFFY BUT DECIDED AGAINST IT PARTIALLY DUE TO THE RAIN. PARTIALLY BECAUSE I PUSSED OUT. I WANTED TO FEED. IVE NOTICED SOME FADE AND PLANTS PUSHING AND TRYING TO GET OVER THE FENXE INTO FLOWER. THE TOASTED TOFFY AND THE UNKNOWN IN THE 50 ATE THE FURTHEST ALONG AND DEVELOPING ROCK HARD BUDS. GMO HAS A MASSIVE STRETCH. THINGS CHANGE DAILY. I WANTED TO GET A GOOD DOSE OF NUTES IN SO AFTER THIS LITTLE BIT OF RAIN WHEN WE GET THAT NICE SUNSHINE MY PLANTS WILL TAKE OFF!! THEY'VE BEEN PROGRESSING FAST DESPITE THE SHITTY WEATHER.
8/20 It's still sprinkling. It SAYS WE got zero rain yesterday but that's just not true. Today is supposed to be light showers with like .02 in 9f rain. I mixed up some water to check the plants. I figured a few would he light. The event horizon on the back SEEMED a little light. So did the one invthe ten. I realized it was just comparing it to the bags that were saturated. Still I ended up giving the event horizon in the back a half gallon and split the other half with the one in the 10 that dries out super fast. It's crazy. The weather just abruptly changed one day and I go from watering twice a day to hardly at all! Everything but the sherb pie and the seedling in the 10gal are vigorously flowering. Upping the nutes was a smart move. The seemed to like it. I'm gonna check later and as soon as I can I'll hit that toasted toffy with plant doctor. That's tied for furthest along in flower. I've done a bunch of research and I think this is the right move. I'll keep this updated. After this small patch of shitty weather we are goingvto get some sun amd these girls will EXPLODE!
WENT BACK OVER A FEW TIMES. LAST AT SIX. I DID SOME DEFOLIATION AND PRUNING OF PLANT INTERIORS. ITS ABOUT TIME TO TREAT THE TOASTED TOFFY AGAIN WITH PLANT DOCTOR. I CAN SEE SOME SEPTORIA SPOTS. I TREATED THE EVENT HORIZON THIS MORNING. IT GOT A FEW HOURS BEFORE A LITTPE RAIN WND THEN SUNNY AND 80. I USED BETWEEN A QUARTER AND HALF GALLON ON THE INE PLANT. I MAY NOT HAVE USED ENOUGH OF THE MIXED UP SOLUTION ONVTHE TOASTED TOFFY. IT HAD BEEN WORKING AWESOME AND NOW THAT ITS TIME TO REAPPLY I NOTICE A FEW LEAVES THAT LOOK INFECTED. OVER THE NEXT WEEK ILL BE MONITORING THE RESPONS FROM THE PLANT DOCTOR. I'M CONSIDERING APPLYING PLANT DOCTOR TO THE REST OF THE GARDEN. I THIBJ THE K BICARB HAS BEEN DOING GOOD KEEPING THE PM DOWN ON THE MIDDLE GMO. I HATE THAT I HAVE TO FIGHT DISEASES. IM NOT DOING CLONES AGAIN. AND IM GOING TO BE MUCH CLEANER. THE SHERB PIE LOOKS A LITTLE OVERWATERED AND HAS SOME YELLOW LEAVES BUT MANY HAVE TURNED PURPLE AND OTHER FALL COLORS. THE PLANTS ARE AGGRESSIVELY FLOWERING AND TEMPS ARE CHANGING. STILL IN EARLY FLOWER. IVE GOT A GOOD FEELING. IVE DEALT WITH MUCH WORSE AND CAME OUT GOOD.

Likes
17
Share


@SeshHouseCannabis
Follow
I choose to go with lollipops technique for the small plant. I did cut a lot of leaves on that small plant, but the bud size is getting huge. For the another one, I will just continue with defoliation until harvest. And I also just bought some terpinator to give the flower more nutrients and boost the smell.

Likes
10
Share


@GuniGugu
Follow
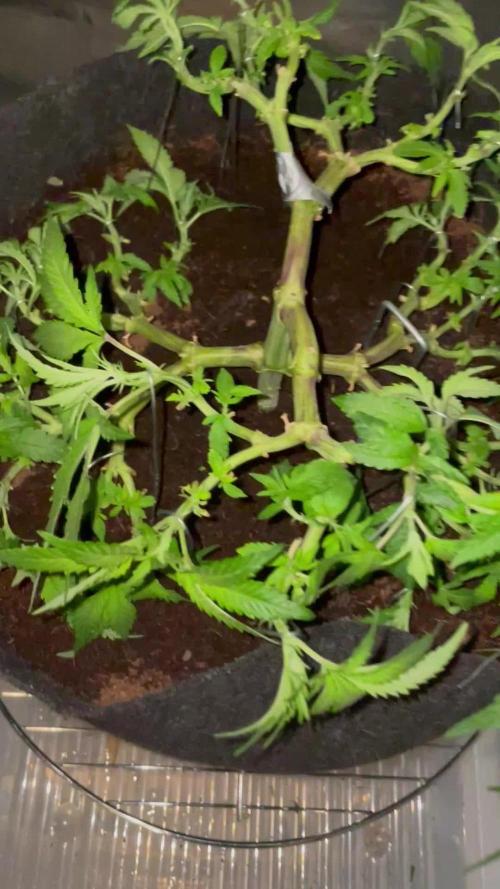
D67 removed ScrOG and repeated LST on left plant so lower buds will get more light. There is not enough space in tent to do the same with the right plant.
Likes
4
Share


@knnabisgrower
Follow
En la 4ta semana aumentamos la dosis del fertilizante para crecimiento, regulamos su p.h en 6.0 e hicimos una poda apical en el 4to nodo de cada una de las plantas.

Likes
2
Share


@Ganja_Zombie
Follow
5/31/25 Sprout popped out of Coco in 400ml Menards Mini Pail.
-10:00pm fed with 100-150ml~ 1050EC 5.6pH Mix.
-25-75ml~ runoff
-QB96x2 at 320 watts
-Light is like 46-54 inches away.
Using the Photon App with a printer paper diffuser it says the top of the sprout is 320 ppfd.
Trying to decide which system to use for watering. Printed a bunch of stuff including a AutoPot Tray that holds the Mini Pail and AquaValve5. Lightproof Lid. Pot Elevator if needed.
Made a Irrigation ring and a bunch of things to hold it to the Mini Pail nicely. Connected to a LetPot WiFi Auto Watering System that allows me to set how many times it waters a day. It also provides a feature that when its watering schedule starts it can be done in intervals instead of continuously watering.
I am leaning toward using the Auto Watering System over the AutoPot to avoid salt buildup.
If I use the AutoPot I wonder if I would be fine if I topfed like 1000ml~ every Saturday Afternoon?

Likes
16
Share


@GRow_M8s
Follow
* All plants had one feed last week with some PK soluble ( SODK one more feed this week). The rest of waterings are tap water with some microorganisms in.
* No new deficiencies spotted (except stomper#1 & 2 from last week), PK gives us the last boost.
* Buds progressing well with a lot of crystals, smells are medium and so glad about that, promising though after curing properly.
* Lights at 35k - 40k Lux.
* humidity 45% - 60%, temps 20C° - 25C°.
* D53 --> Fixing the canopy with a bit more aggressive LST to all the plants, except the main stem of stomper #3 (the stressed one).
* D56 -> Final day of week 8 and the most mature plant is the stomper#1 (the plant with the early LST and most affected by N toxicity in early stage.
- Trichomes are looking like 10 days before harvest, letting the other 5 plants enjoy more light.
Week 8 --> finished ✅

Likes
4
Share


@eldruida_lamota
Follow
Que pasa familia, vamos con la segunda semana de floración de estas Tropicana poison F1 de Sweetseeds.
Vamos al lío , las 3 plantas seleccionadas fueron trasplantadas a su maceta definitiva, ya superaron el shock por el trasplante, estas semanas las paremos todas a floración.
El ph se controla en 6.2 , la temperatura la tenemos entre 20/22 grados y la humedad ronda el 50%.
El ciclo de floración 12h de luz, el foco está al 100% de potencia.
Las jodidas estiraron demasiado, veremos como acaban, no me gustan tan altas.
Hasta aquí todo, Buenos humos 💨💨💨

Likes
8
Share


@Easty2022
Follow
Done a good bit of trimming this week ready just so she's ready for the next step. Anyone who has any tips pass them on all welcome 🙏
Likes
2
Share


@CogordoAcuatico
Follow
Cosecha finalizada, fue una de las mejores plantas que e tenido, su aroma fuerte a menta y pegamento invadió toda mi casa, ni hablar del tamaño mounstruoso
Likes
19
Share


@proud_to_grow_loud
Follow
The colors are showing on this lady! They are beautiful! I couldn't believe how much she came into her own. I started to flush her and she's been hungry anyway. I taper off the nutes like nature intended. So last week was probably less than I added on the site. I will go back and fix it.


Likes
12
Share


@BeHappyNtoke
Follow
This week has went by ok beach ball is growing well new growth has come in pretty well the other plant is not happy with the pot slow growing plant
Likes
35
Share


@IndicaVibeMe
Follow
I'm going to need to transplant this gal! Already roots poking out the bottom so I'm prepared to get her in a bigger pot soon! Probably this week.-- update, she's loving Life in a larger pot!
Smells incredible already 👍

Likes
6
Share


@GermanBoy69
Follow
Die Pflanze hat einen Wachstumsschub in die Höhe bekommen. Der PH-Wert ist jetzt konstant bei 5,5. Habe nochmal Dünger zugegeben. Der EC-Wert ist mit 2,3 glaube ich etwas zu hoch, aber dagegen mache ich nichts. Die anderen Pflanzen im Turm gedeihen prächtig.
---------------------------
The plant has had a growth spurt in height. The pH value is now constant at 5.5 and I have added more fertilizer. I think the EC value is a little too high at 2.3, but I'm not doing anything about that. The other plants in the tower are thriving.
