


Likes
Comments
Share

@Crazy_Luxembourg
Follow
🌱 Dognabis Cup 2025 – Jalousy Diesel Auto · Octo Genetica
After preparation comes life. 💚
Before the seeds sowed, I carefully prepared my 100% coco substrate with the Aptus Super Soil Organic program – the foundation for an active, vibrant medium that provides everything a young plant needs right from the start.
Since coco naturally contains no nutrients, I deliberately chose a slightly stronger mix to create a stable and biologically active base:
Processing
Likes
18
Share


@ShowsWorld
Follow
Even though the temperatures have gone extremely to high for my liking this plant seems to love it. She’s a very resilient plant I highly recommend tho she strain to everyone. After I clear out my flowering tent I will put this bad baby into flower.




Processing
Likes
21
Share


@Charly_grower
Follow
Que estirada de mi lemon-ak 😊 se ve hermosa y sana sin ninguna plaga! Hasta el momento todo muy bien y sin ningún problema..
Sigo regando día por medio con fertilizantes top crop una base de la. Floración(top bloom) y el Plato de mi auto (top-auto)...
Charly grower 👨🌾
Likes
13
Share


@GrandmasBoy2021
Follow
Week 9 (aka day 63)
According to the strain report, today would of been the day of harvest (if perfectly grown) Since I am not a master grower, it appears she needs more time. ha She is coming along great though! Super frosty and the flowers along the stems are starting to pack on weight. According to other grow diaries I've read, the harvest day will probably be in one month 3/3/21 (12 weeks total) If you notice my tent is a bit crammed, that's the only thing that's not ideal lol
I am watering every three days with 6.0 phd water with 1 tablespoon of molasses and 1 teaspoon of SuperNova mixed into a gallon or more of water.
Please let me know if you have any suggestions/ questions/ concerns. I am getting excited about harvest day! It's not to far away :) Wish me luck in the end stretch! lol Happy Growing everyone
Likes
11
Share


@Tmasm
Follow
Saudações
Iniciar diários fast buds
Encomenda chegou dentro do prazo, muito discreto.
Dia 16/11/2023
Selecção de 5 sepas, colocando em papel toalha
Dia 17/11/2023
Colocando em vaso final, com um cúpula para manter umidade alta.
Agora é esperar que corra tudo bem
Não se esqueça de ver novidades em https://2fast4buds.com
Likes
65
Share


@3lementa1
Follow
Things are looking good. I'm in a bit of a time crunch so I think I'm going to harvest early. Sometime this week probably, just shy of 8 weeks. Cool strain to grow. Very interesting calyx formations at the crowns. I dried a couple small buds and threw them in my vape a few days later and the terpenes seem great. Can't wait to see how it tastes fully cured.
I'm going to wash and decarb the buds before curing them, and I've never done that before, so I'll post that here too.
Thanks to everyone who read and commented! Happy growing!

Likes
17
Share


@Mastr
Follow
This week just flush her with 8 litre ph water and I will harvest her next week some point
Update today day 100 and she is thirsty as hell will flush her again tomorrow then will go for 48 hour darkness
Update today day 103 and I find my jewellery microscope but still can't see any Amber trichomes so I leave her and will check on her everyday
Update today day 105 and I decide to chop her down I let her 12 hour darkness then chop off will update later

Likes
2
Share

@Bear_Grows_Green
Follow
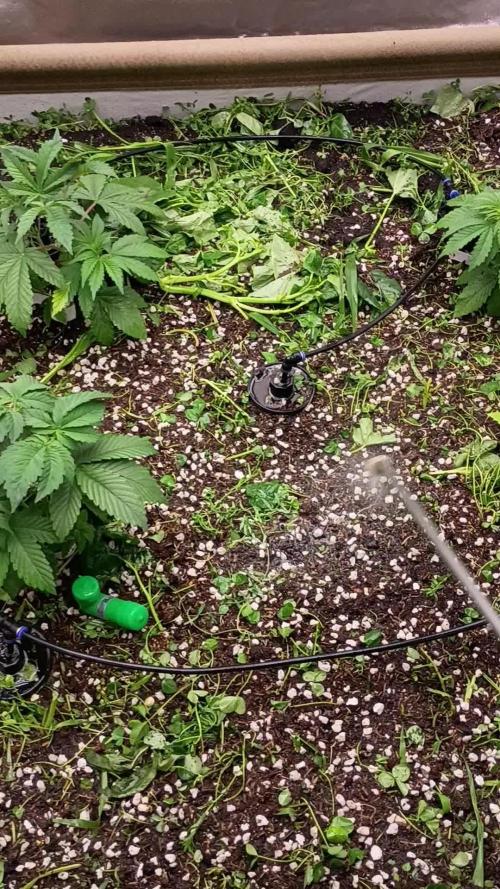
Might be a day early but I'm calling it the start of a new week. The ladies have been looking super unhappy last couple days determined they were root bound so got em put into their final home this morning. Chop and dropped cover crop put thin layer of mixture of BAD worm castings and Coast of Maine lobster compost and watered in with goodies. Set the ppfd to 300 and vpd closer to 1.0
Likes
14
Share


@goeser
Follow
Doing a bit of defoliation thats it
Giving all the plants more clear water because i overfeed them. Next time definitely with scrog . Good genetics love it

Likes
9
Share


@420DeepGrow
Follow
📆 Semana 10:
La Epsilon F1 Auto continúa su floración con gran estabilidad. Los cogollos ganan densidad y brillo, con tricomas cada vez más notorios, indicando una producción de resina prometedora. El perfil aromático se intensifica con notas cítricas y especiadas más marcadas. Se mantiene la alimentación con fósforo, potasio y azúcares para consolidar la formación de flores, sin signos de sobre-fertilización ni estrés en la planta.
🌱 Todo en marcha hacia una cosecha de calidad.
¡Seguimos creciendo fuerte! 💪


Likes
Comments
Share

@SubliminalSociety
Follow
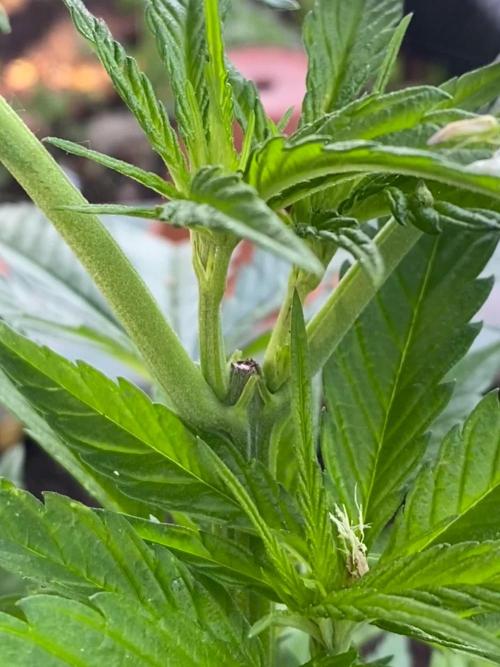
Good week. A little more sun, summer is definitely Here.
No big stretch but that’s expected and wanted with the topping. She’s growing very bushy, might have to remove some leaves soon.
Planted basil around her and it survived and is strong. Read that basil increases terps. I’m enjoying the leaves.

Likes
5
Share


@Jonatan
Follow
Esta semana a sido clave ya que vamos cortos de tiempo en este proceso, me hubiera gustado ponerlas antes
Les empeze a echar liquido bio-bloom
y an reaccionado bastante bien ☺️
Le emos añadido tambien al sustrato un poco de carbon para darle ese nutriente que tambien le aporta la energya a las raices 💪


Likes
11
Share


@sam_doze
Follow
There it is . My Red poison auto Original and My other seeds by bulk packs.
Totally three plants of weed.
oh yeah baby
My cellphone did that
Likes
52
Share


@CBD_Sweden
Follow
@MephistoGenetics,
Hi all the happy people here in GrowDiaries.
This is my second cultivation ever and it will be fun to try a bigger space than my closet grow.
First, I'm just going to say I'm done with the construction of my new growroom.
The room is 2.14 meters by 1.7 meters and has a ceiling height of 2 meters.
It provides a floor area of 3.6 square meters.
I use a 54 Watt Lightwawe T5 for germination and 2 Pcs 400 Watt HPS lamps.
I have a channel fan that replaces the room air about 40 times an hour to get a comfortable environment in the room, the air enters a fresh air intake from the outside.
The air is purified through a carbon filter to then leave the room to the rest of the basement.
Then I use that heat to heat the rest of the basement.
I will use 10 pcs 15 liter Autopots to grow with and a 100 liter water tank that supplies the pots of water and nutrition.
I will grow completely organically in soil and will watercure my buds to get the best possible medicine for me.
But there are no cultivation rooms to be displayed here, so I continue with what is most important.
I am very excited to see how the new growroom will work and how this Stilton Special will turn out.
Strain Name: Stilton Special F1
Genetic heritage - Sour Livers F3 x Northern Cheese Haze F3
Strain behaviour - Stilton grows well from the off, and develops into a stout but branchy specimine that leads to a fine yield of awesome flowers. She's not too stretchy but also is sizeable enough with good growth, to train and shape to your liking. Flowers develop pretty fast and grow to a good size, it may to advised to clear out some undergrowth and if needs be a very gentle defoliation mid-way through the grow, although leaf tucking may suffice well enough.The end product is of top shelf quality and she doesn't lack in yield either.Give your garden, nose, and body a treat and be sure to indulge in a slice of Stilton this year, You won't regret it.
Size - 50 - 70 cm
Structure - Medium height but bushy
Flower Density - 9/10
Indica/Sativa - 65/35
Cycle Time - 65 to 70 days from sprout
Yield - 90 to 140 grams as a single plant
Best Method for overall high yield - 9-12 per 1,2m x 1,2m sq in 10-15 Liter pots (Soil)
Aroma - Very strong, Cheesey/fruity/sour/spicey/ with a dash of coffee.
Taste - Dank berries
Effect - Good hybrid powerful but balanced effect
Medicinal Benefits - TBA
Best Grown - Indoor/Greenhouse
Cannabinoids - TBA
Extract information - Ideal extract candidate - High in resin, oil and terps.
--------------------------------------------------------------------------------------------------
2017-09-25. Week 5 starts. Added a video of the girls. Gave the girl water and nutrients. This girl is 24 cm high and have grown 7 cm in 7 days.
I flushed the girl yesterday with 40 liters of tap water. Im lowering the humidity in the room with a dehumidifier and try to have 50% air humidity.
----------------------------------------------------------------------------------------------------------------
2017-09-29. Installation of the New light rail in the grow room. Its Advanced star light V 5.0. Added a video of it.

Likes
57
Share


@SmokieMcPot
Follow
2 Girls 1 Cup week 7 is it? How time is flying by.
Day 42- still eating like pigs, so I'm bumping up the formula and doing 50/50 tap/RO for now on. Bubbled of course. Spots of calcium deficiency on GC here and there for the last week and I have seen a few spots on WG also. Still used 5mL calmag per gal as max dose to hopefully keep spotting from spreading. Raised my bucket to 374ppm prior to nutes. Decent defol tonight and I got a net back out to hold these down and spread em out as much as possible. One branch on WG has taken over as the main I guess and it's hard as f. Only place it's going is up lol.. 22in from the light as of RN, getting 37.2 DLI. Going to work up to 40 this week and see how they like it. GC really needs to hurry up. Can't let WG get too amber and can't leave dead rotting roots in the system right? Crossing my fingers GC hurries TF up in the end, or it may get cut early. RES change around 6pm tonight, modified week 2 bloom GHE medium. Breakdown as follows:
2gal water/calmag - 374ppm
Hydroguard - 5mL
Micro - 12.6mL
Grow - 12mL
Bloom - 15mL
RES totals after PH corrections - 1453 @ 5.71.
Plants 14in ^
Lights 22in ^
DLI 37.2
===========================================================================================
Day 43- McGuiver'd some external RES together tonight. Waterfarm site tube is now extended into a return line to the external RES. Small cat drinking fountain pump in the base of the external with a 1/4in fitting plastic welded on the 3/8 outlet of it. This thing trickles, just like I wanted. 1/4in line runs to my old fill port on the front of the waterfarm. Constant circulation from one res to the other. Waterfarm started life as a 2gal RES system. Roots fill it up and take up precious space. Roots were even coming out of the site tube lol. When I pump it out for a change lately, Im barely getting a gallon... side res and waterfarm combined now hold a little over 4gal now with the root mass filling a large portion of the farm. Ill actually measure one of these times. If I raise the farm up more, I can hold more in the side RES. 4 or so should cut it, they don't have much longer right? Filled with same formulation as last fill, just 4 or so gal instead of 2. Mixed 5, left with 1? in the bucket when I hit fill line. This may help conserve some water once I finally get their EC dialed in. Not only do I play my plants music throughout their day, I even sing to them from time to time.. Hopefully I don't lose any watchers with my horrible singing in the vid tonight 🤣🤣
===========================================================================================
Day 44- Why didn't I start this experiment off with an external RES? Damn the stability of more volume is a definite PLUS! Haven't had to adjust PH or top off 2 or more times a day since. Been letting the level drop and watching numbers while keeping PH in check. I think I've finally found a stable EC too. For now anyway. Water level drops, EC drops slightly, ph rises slightly. Taking almost 24hrs to swing from 5.61 up to 6.12 instead of 8-12hr. Been thinking about cutting back GC and just keeping it alive so dead roots don't disrupt WG but let WG finish as best it can. GC is THAT far behind from the looks of it. Trimmed em both up late in their day yesterday. Open it up a bit so the lowers on WG can bulk up too. Adding to the list of things I should have done differently and will share at the very end.
===========================================================================================
Day 45- ditched the net AGAIN tonight. No leak, shit was just annoying being in my way. Also been thinking ALLOT about my choices in life... latest is why did I plant two diff strains in the same pot and how can I make the best of it? They don't grow at the same rate or eat the same. WG is a PIG! Thought long and hard and have made the decision to cut back GC some to give WG her room to bloom. WG didn't stretch much and GC is still going. Keep supercropping it to keep it out of the fan and same distance from the light as WG. I have to keep both alive till the end, unless I throw in the towel on GC at WG harvest and chop em both. Really don't want to waste the experiment, so I may get creative at the end. Only have the one tent and was planning on drying in it since I've got the closet its in dialed in. Really don't want to make a cardboard dry box...
===========================================================================================
Day 46- Going to wean these girls off the N next RES change. GC is starting to stretch more, and still refusing to make the transition. maybe less N will do the trick?? kick up the bloom a bit as well. WG is ready for it for sure. GC may have an issue with it, but she'll survive. gave em both a defol before lights out today. heavier on GC than WG since WG isnt bushing up as fast as she used to. the light frosting is getting more populated also. side RES is working out beautifully!
===========================================================================================
Day 47- little prune on GC today to keep it out of WG's way. Plucked a few here and there off WG to keep it opened up. Colas everywhere! Going to be one short dense plant that's for sure. If GC gets to a finish, it's going to be a bunch of popcorn from the looks of it. Time will tell.
===========================================================================================
Day 48- light prune on GC to keep it out of the way, since its decided to be like 3wk behind WG. maybe tonights RES change will punt it in gear, and itll start exploding in flowers... yeah, i smoked before typing this so the pipe dreams are real on this one.. dialing back the calmag plus (since it has N in it) to 4mL a gallon. dialing back the N in the modified formulation from GHE week 3 "mid bloom" medium feed. formulation as follows:
Tap/Zero Water - 2.5gal/2.5gal
81ppm
calmag plus - 20mL
^ to 307ppm
Micro - 26.5mL
Grow - 26.5mL
Bloom - 41mL
RES totals after PH corrections - 1148ppm @ 5.63.
Measured the total volume needed to fill both the waterfarms RES and the external RES and it came to 18.4L. i scooped nearly every drop out of the side RES, but didnt even tilt the waterfarm. so there was prob a quarter to a half gal left in the farm. safe to say roughly 19L capacity. a HUGE increase from a measly 8L from factory. thats before roots fill the RES too, leaving you with NOTHING for water/nutes. so ill have to measure once again when the system is empty and see the true total volume without fillers. tis the end of week 7 i suppose. i will update the timelapse tomorrow afternoon to wrap up the week. i have a 3 week day 27-47 vid on YT if you're actually reading this and want to see the up to date clip.
https://www.youtube.com/watch?v=YKtqPxKeMNM
*edit* looks like GC is finally starting to hit the transition harder closer to end of the day today looking at vid..
===========================================================================================
As always, thanks for stopping by and checking out my current grow experiment. If it's your first time, check out previous weeks for their daily updates, pics, timelapse, blah blah blah.. you still reading this shit?? 🤣
Likes
6
Share


Processing
Likes
25
Share


@Kikiwindsurf
Follow
20/3/2020: Finally Im gonna try with LST because of im growing indoors in night and outdoors during day and the artificial light will be much more efficient with this technique. Probably I will let Lemon Haze grow naturally , at least at the starting.
Stay tunned !!