
Likes
Comments
Share


Likes
17
Share

@CCSAUTOVGROW
Follow
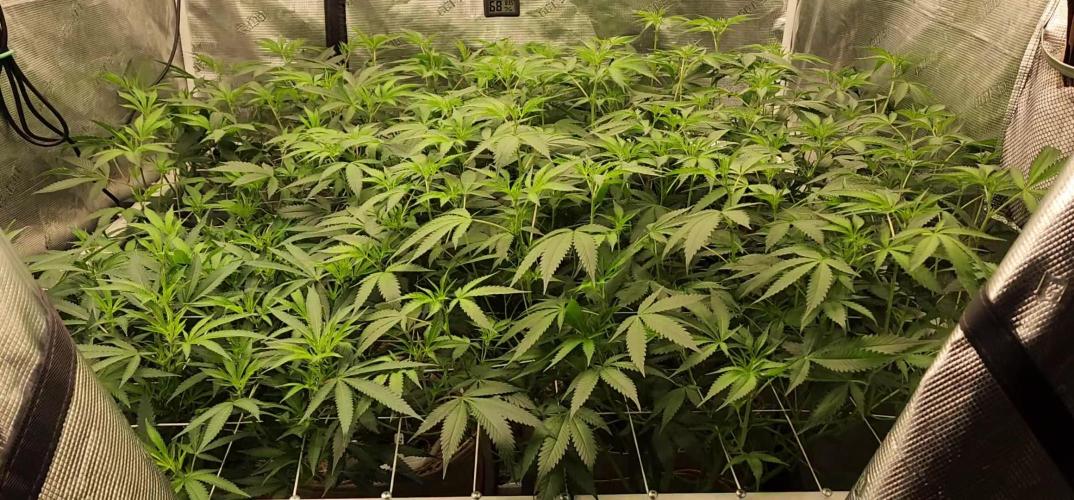
Purple Pheno!!!!!!!!!!!!!!!!!!!!!
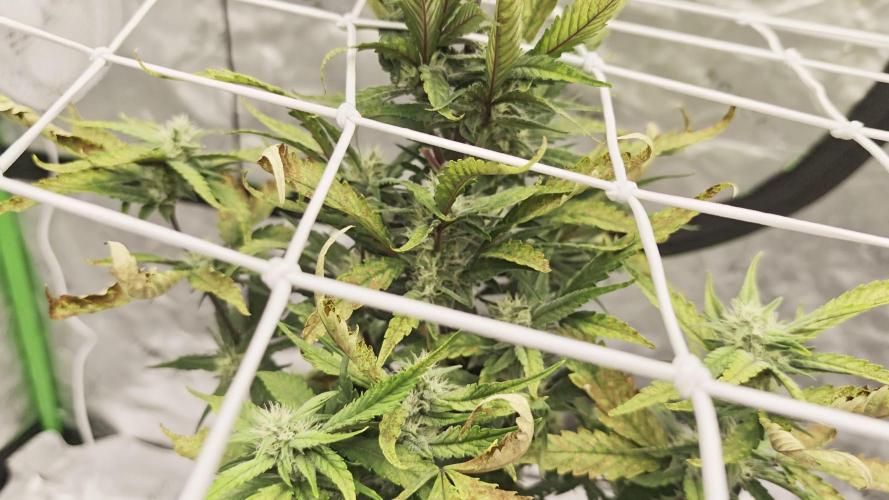
Ripening nicely. She is super smelly. Smells like fruity gape. Have 2 carbon filters going and it doesn't even touch the smell. Noticed a little burn on the tips of the leaves so backed off a little on the nutes. Coasting toward the finish line. Maybe three weeks?😁

Likes
9
Share


@Growlife23
Follow
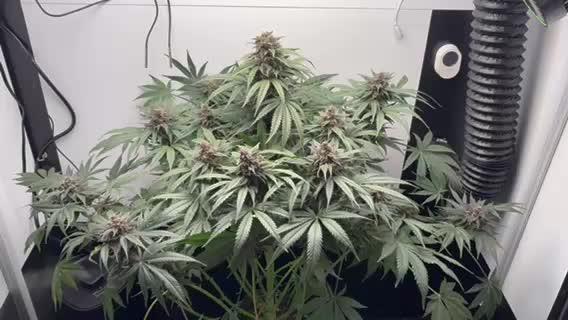
No purple yet kind of bummed out about that but we'll see what happens the buds are getting fatter so I'm happy about that nice and hard the smell is awesome can't wait to smoke this
Likes
16
Share


@valiotoro
Follow
Hello everyone 😎
Week 2 of flower for the strawberry banana auto from Fast Buds 💥
She grew fast with beautiful green color,for the nutrient 4ml/L terra bloom & 1ml/L power buds from Plagron
Mars hydro SP-6500 60%
Have a nice day 😋


Processing
Likes
25
Share


@Kikiwindsurf
Follow
30/04/2020 enjoy ! day 56 and 57of the gorillas. day49 Lemon Haze.
03/05/2020 I cant keep my HPS light working because of the heat... They will finish outdoors and, at my terrace, the maximum temperature registred was 39 fucking Celsius degrees so let´s see how she evolves ! I take a look at the crystals every single day because I know that because of the heat they can change of color very fast but its not the case, all the plants are very resistent. Top Candy and Bloom increasing, and i gave 3 doses of PK (52-34) and probably 1 or 2 more once a week.
Stay tunned !!


Likes
3
Share


@Dunk_Junk
Follow
She's still growing well this week. 8cm growth.
It's her first week on 12/12.
Changed to 6-12-36 powdered nutrients now.


Likes
Comments
Share

@Ensign420
Follow
|»» LOG DISCLAIMER: Not intended as a grow guide. Grow log entries are usually posted 3 weeks later and are for my learning reference. ««|
Introduction - Week 14 Summary -
Ensign's log, stardate 17705.1,
Another great week in the garden!
In preparation for flower in the main tent, been making slight environmental adjustments.
As for the veg tent, been mainly tending to solo cup waterings and basic canopy training.
Added worms to all pots in the garden and made a slight upgrade to both humidifiers. Also got more beans from James Loud Genetics!
Anyways, still have more to do! Onwards to next week Ensign!
[START OF WEEK 14]
==========================================================
---------- [ 3x3 VEG TENT - GR7 / GR3 ] ----------
TKO #2 - WEEK 06 - Full Veg
Gorilla Goat #1 - WEEK 06 - Full Veg
Chill Out OG #3 - WEEK 03 - Full Veg
Garlic Budder OG#1 - WEEK 06 - EMPTY
---------- [ 4x4 MAIN TENT - GR30 ] ----------
Chill Out OG #2 - WEEK 14 - Pre-Bloom [Stretch Wk2]
TKO #2-2 - WEEK 08 - Pre-Bloom [Stretch Wk2]
Heady OG BX1 #1 - WEEK 10 - Pre-Bloom [Stretch Wk2]
02/02/26 → 02/08/26 [WEEK 14]
This Week's Estimated Goals
----------------------------------------------------------------------------------------------
DLI: ~17 mol/m²/d
PPFD: ~400 μmol/m²/s
VPD: ~1.2 kPa
This Week's Meter Readings & Averages
----------------------------------------------------------------------------------------------
Light On/Off: 16:00 - 10:00 | Wattage: ~326.5W [LV04]
Distance From Canopy: ~[28”, 25”, 25”]
Plant Height: ~[24”, 27” , 27”]
Max Plant Height: ~52” [Lamp-to-Soil Distance]
DLI: ~16.80 mol/m²/d
PPFD: ~389 μmol/m²/s
VPD: ~1.01 kPa
Soil %: ~[48.4, 47.3, 48.1, 51.7, 50.3, 68.0, 49.3, 66.0, 45.4, 76.3]
==========================================================
Day 01 - Monday - 02/02/26 - Total Days: 089
-----------------------------------
Daily Averages ~[+01:00]
- Temps: 80.1°F [26.7°C]
- Humidity: 72.2%
- VPD: 0.97 kPa
- Soil %: [49, 47, 52, 52, 48, 65, 46, 63, 39, 77]
-----------------------------------
- [21:36]: Night check on the 4x4 tent.
--- Ca-Caw! Wow the garden is looking incredible and the canopy is completely stacked with tops!
--- Let’s grow my ladies!
- [21:40]: Checked the Ecowitt soil moisture sensor data:
------------------ [ 3x3 VEG TENT - GR7 / GR3 ] ----------------
------ 48% - [CH01 » M1 » VBL - TKO #2]
------ 48% - [CH02 » M2 » VBR - Gorilla Goat #1]
------ 51% - [CH03 » M3 » VFL - Heady OG BX1 #1]
------ 52% - [CH04 » M4 » VFR - Garlic Budder OG#1]
----------------- [ 4x4 MAIN TENT - GR30 ] ---------------
------ 48% - [CH05 » P1 » FLT - Chill Out OG #2]
------ 66% - [CH06 » P1 » FLB - Chill Out OG #2]
------ 47% - [CH07 » P2 » BLT - TKO #2-2]
------ 64% - [CH08 » P2 » BLB - TKO #2-2]
------ 38% - [CH09 » P3 » FRT - Heady OG BX1 #1]
------ 76% - [CH10 » P3 » FRB - Heady OG BX1 #1]
--------- Veg: ~38%-45% | Flower: ~45%-55%
--------- General: ~30% [Dry] «| ~45-60% [Moist] |» ~70% [Wet]
- [21:43]: Checked the 3x3 veg tent.
--- Veg garden is looking healthy and all mothers and clones are looking perky and green!
--- A Heady OG clone needs watering!
- [21:47]: Here is the starting initial watering range:
------ Heady OG BX1 #1-2 » 241.0g → 325.6g
--------- General Weight Range: [Dry] ~275g «| [Dryback] ~300g |» ~325g-400g [Wet]
--- Been 3 days since the last watering.
--- Took the starting weight before watering,
------ Heady OG BX1 #1-2 » 292.3g
--- While on a scale,
--- Evenly misted the top of the cup with RO water.
--- Did not spray the top growth.
--- Misted 10-20 sprays. Waited a moment, then misted again.
--- Repeated this process until the cup weighted at least 300g.
--- There was no runoff.
- [21:59]: Took the saturated weight after watering,
------ Heady OG BX1 #1-2 » 390.5g
--- Updated the wet weight and watering date.
--- Placed the cup back into the tent.
--- Checked the cuttings in the propagation tray and growth is looking pretty good! Still have a few stressed phenos, but plan to take new cuttings soon if health does not recover.
- [22:08]: Checked the humidifiers.
--- Tanks are still full and no leaks found.
Day 02 - Tuesday - 02/03/26 - Total Days: 090
-----------------------------------
Daily Averages ~[+01:00]
- Temps: 81.0°F [27.2°C]
- Humidity: 74.1%
- VPD: 0.93 kPa
- Soil %: [48, 48, 51, 52, 54, 70, 54, 67, 41, 76]
-----------------------------------
- [21:14]: Night check on the 4x4 tent.
--- The canopy is looking even and tops are getting taller!
--- Oops! Chill Out OG #2’s pot is flooding!
- [21:17]: Dialed the BluMat cap back a full rotation and made sure that the mark was set to the gold line (for gravity feed).
--- Shaka! When the walls fell!
--- Checked the rest of the sensors by disconnecting the drip tube and re-calibrating for the hanging drop (not drip).
--- Heady OG BX1 #1’s pot did not , but had to slightly re-adjust TKO #2’s cap.
--- Cleaned the water from the tent’s floor..
--- Unfortunately, the main tent’s flood tray leaks..
--- Damnit Ensign..
--- Anyways..
- [21:23]: Checked on the BluMat soil moisture sensors:
------ Chill Out OG #2 » 34mbars
------ Heady OG BX1 #1 » 35mbars
------ TKO #2 » 36mbars
--------- Watering Range: [Too Wet] ~25mbars «| [Ideal Target] ~40-80mbars |» ~125mbars [Too Dry]
--------- BluMat Max Values: [10mbars «||» 750mbars]
- [21:55]: Checked the Ecowitt soil moisture sensor data:
------------------ [ 3x3 VEG TENT - GR7 / GR3 ] ----------------
------ 49% - [CH01 » M1 » VBL - TKO #2]
------ 47% - [CH02 » M2 » VBR - Gorilla Goat #1]
------ 50% - [CH03 » M3 » VFL - Heady OG BX1 #1]
------ 52% - [CH04 » M4 » VFR - Garlic Budder OG#1]
----------------- [ 4x4 MAIN TENT - GR30 ] ---------------
------ 52% - [CH05 » P1 » FLT - Chill Out OG #2]
------ 69% - [CH06 » P1 » FLB - Chill Out OG #2]
------ 51% - [CH07 » P2 » BLT - TKO #2-2]
------ 68% - [CH08 » P2 » BLB - TKO #2-2]
------ 43% - [CH09 » P3 » FRT - Heady OG BX1 #1]
------ 76% - [CH10 » P3 » FRB - Heady OG BX1 #1]
--------- Veg: ~38%-45% | Flower: ~45%-55%
--------- General: ~30% [Dry] «| ~45-60% [Moist] |» ~70% [Wet]
- [22:00]: Checked the 3x3 veg tent.
--- The veg garden is looking incredible and growth is thriving and perky.
--- All mothers and solo clones are green and look great!
--- Two phenos need watering. Let’s go!
- [22:05]: Here are the starting initial watering ranges:
------ Chill Out OG #2 » 274.7g → 335.3g
------ Heady OG BX1 #1-3 » 233.5g → 325.8g
--------- General Weight Range: [Dry] ~275g «| [Dryback] ~300g |» ~325g-400g [Wet]
--- Both cups were last watered 2 days ago.
--- Took the starting weight of both clones before watering,
------ Chill Out OG #2 » 295.1g
------ Heady OG BX1 #1-3 » 270.4g
--- While on a scale,
--- Evenly misted the top of both cups with RO water.
--- Did not spray the top growth.
--- Misted 10-20 sprays. Waited a moment, then misted again.
--- Repeated this process until both cups weighted at least 300g.
--- There was no runoff.
- [22:26]: Took the saturated weight of both cups after watering,
------ Chill Out OG #2 » 375.6g
------ Heady OG BX1 #1-3 » 395.5g
--- Updated the wet weight and watering dates for both cups.
--- Placed both cups back into the tent.
- [22:34]: Checked on the clones in the propagation tray and all growth looks healthy!
--- Two clones need watering!
- [22:41]: Here are the starting initial watering ranges:
------ TKO #2-1 » 290.7g → 340.5g
------ Gorilla Goat #1-1 » 279.9g → 340.6g
--------- General Weight Range: [Dry] ~275g «| [Dryback] ~300g |» ~325g-400g [Wet]
--- Both cups were last watered 8 days ago.
--- Took the starting weight of both clones before watering,
------ TKO #2-1 » 297.4g
------ Gorilla Goat #1-1 » 297.8g
--- While on a scale,
--- Evenly misted the top of both cups with RO water.
--- Did not spray the top growth.
--- Misted 10-20 sprays. Waited a moment, then misted again.
--- Repeated this process until both cups weighted at least 300g.
--- There was no runoff.
- [22:53]: Took the saturated weight of both cups after watering,
------ TKO #2-1 » 345.4g
------ Gorilla Goat #1-1 » 345.5g
--- Updated the wet weight and watering dates for both cups.
--- Placed both cups back into the tent.
- [23:00]: Checked the humidifiers.
--- Tanks are still full and no leaks found.
Day 03 - Wednesday - 02/04/26 - Total Days: 091
-----------------------------------
Daily Averages ~[+01:00]
- Temps: 82.1°F [27.8°C]
- Humidity: 72.6%
- VPD: 1.03 kPa
- Soil %: [47, 47, 50, 52, 51, 69, 50, 67, 44, 76]
-----------------------------------
- [14:17]: Decided to increase the grow light’s intensity a bit more.
--- Within the AC Infinity App,
--- For the Main Tent [4x4] controller,
--- Adjusted the 'Flower [12/12]' Schedule for the grow light.
--- GROW LIGHT (MARS HYDRO FC-6500):
------ Increased the MAX intensity from 4 to 5
--- Will take PPFD readings later.
- [16:04]: Evening check on the 3x3 veg tent.
--- Veg garden is looking green and all mother phenos and clones are perky and healthy!
--- Two clones need watering!
- [16:13]: Here are the starting initial watering ranges:
------ Heady OG BX1 #1-2 » 241.0g → 325.6g
------ Heady OG BX1 #1-4 » 234.8g → 325.4g
--------- General Weight Range: [Dry] ~275g «| [Dryback] ~300g |» ~325g-400g [Wet]
--- Both cups were last watered 2-5 days ago.
--- Took the starting weight of both clones before watering,
------ Heady OG BX1 #1-2 » 297.2g
------ Heady OG BX1 #1-4 » 296.7g
--- While on a scale,
--- Evenly misted the top of both cups with RO water.
--- Did not spray the top growth.
--- Misted 10-20 sprays. Waited a moment, then misted again.
--- Repeated this process until both cups weighted at least 300g.
--- There was no runoff.
- [16:46]: Took the saturated weight of both cups after watering,
------ Heady OG BX1 #1-2 » 390.4g
------ Heady OG BX1 #1-4 » 390.4g
--- Updated the wet weight and watering dates for both cups.
--- Placed both cups back into the tent.
--- Propagation clones are all perky and all phenos are looking pretty healthy. Still concerned about both Gorilla Goat phenos, but they do look better. I think.
--- Anyways! A Gorilla Goat clone needs watering!
- [17:03]: Here is the starting initial watering range:
------ Gorilla Goat #1-2 » 275.7g → 340.3g
--------- General Weight Range: [Dry] ~275g «| [Dryback] ~300g |» ~325g-400g [Wet]
--- Been 7 days since the last watering.
--- Took the starting weight before watering,
------ Gorilla Goat #1-2 » 299.4g
--- While on a scale,
--- Evenly misted the top of the cup with RO water.
--- Did not spray the top growth.
--- Misted 10-20 sprays. Waited a moment, then misted again.
--- Repeated this process until the cup weighted at least 300g.
--- There was no runoff.
- [17:12]: Took the saturated weight after watering,
------ Gorilla Goat #1-2 » 345.5g
--- Updated the wet weight and watering date.
--- Placed the cup back into the tent.
- [17:20]: Checked the Ecowitt soil moisture sensor data:
------------------ [ 3x3 VEG TENT – GR7 / GR3 ] ----------------
------ 45% - [CH01 » M1 » VBL – TKO #2]
------ 47% - [CH02 » M2 » VBR – Gorilla Goat #1]
------ 49% - [CH03 » M3 » VFL – Chill Out OG #3]
------ 52% - [CH04 » M4 » VFR – Dry Soil]
----------------- [ 4x4 MAIN TENT – GR30 ] ---------------
------ 51% - [CH05 » P1 » FLT – Chill Out OG #2]
------ 69% - [CH06 » P1 » FLB – Chill Out OG #2]
------ 50% - [CH07 » P2 » BLT – TKO #2-2]
------ 68% - [CH08 » P2 » BLB – TKO #2-2]
------ 45% - [CH09 » P3 » FRT – Heady OG BX1 #1]
------ 76% - [CH10 » P3 » FRB – Heady OG BX1 #1]
--------- Veg: ~38%-45% | Flower: ~45%-55%
--------- General: ~30% [Dry] «| ~45-60% [Moist] |» ~70% [Wet]
--- Also made a slight update to the veg tent’s sensor IDs.
- [19:18]: Checked the 4x4 tent.
--- Ooo yea! The garden is healthy and wow the canopy is blowing up with growth!
--- The under canopy is looking great as well!
--- Also the flooding has been fixed and the BluMat system looks good!
- [19:21]: Checked on the BluMat soil moisture sensors:
------ Chill Out OG #2 » 36mbars
------ Heady OG BX1 #1 » 42mbars
------ TKO #2 » 39mbars
--------- Watering Range: [Too Wet] ~25mbars «| [Ideal Target] ~40-80mbars |» ~125mbars [Too Dry]
--------- BluMat Max Values: [10mbars «||» 750mbars]
- [19:55]: Defoliated some of the larger fan leaves.
--- Tried to open up the top canopy to help the lower growth to stretch up more.
--- Plan to defoliate daily a little at a time.
- [19:59]: Nice! Worms are here!!
--- Ordered another batch of fresh worms from Uncle Jim’s Worm Farm for the garden!
--- Stoked to transfer these to their new homes!
- [20:05]: Dumped the worms into plastic container.
--- Going to add a few to each pot in the garden!
--- In the main tent, placed a few worms into each pot.
--- Covered each pile of worms with the trimmings from earlier.
- [20:20]: In the veg tent,
--- Added a few worms into each of the mother pots.
--- The rest of the worms were placed into the mulch bin (in the main tent).
--- Planning on turning the mulch pot into a worm bin for composting and future top dressings.
--- Let’s go my wormies!
- [20:40]: Decided to adjust the main tent’s environment a bit more.
--- Within the AC Infinity App,
--- For the Main Tent [4x4] controller,
--- Adjusted the 'Flower [12/12]' Schedule for the exhaust fan.
--- EXHAUST FAN (AC INFINITY CLOUDLINE T6):
------ Increased the VPD LOW trigger value from 1.0kPa to 1.3kPa
--- Adjusted the 'Flower [12/12]' Schedule for the humidifier.
--- HUMIDIFIER (AC INFINITY CLOUDFORGE T7):
------ Increased the VPD target value from 1.0kPa to 1.3kPa
- [21:08]: Checked the humidifiers.
--- Tanks are still full and no leaks found.
Day 04 - Thursday - 02/05/26 - Total Days: 092
-----------------------------------
Daily Averages ~[+01:00]
- Temps: 83.6°F [28.7°C]
- Humidity: 70.1%
- VPD: 1.17 kPa
- Soil %: [49, 47, 48, 52, 50, 69, 49, 67, 48, 77]
-----------------------------------
- [15:36]: Made a slight modification to both humidifiers’ RO water line.
--- This was more of a cosmetic upgrade, but dig how clean each unit looks now!
--- Drilled a hole into each lid (just large enough for the RO line to fit through). Then re-routed the water line with a few corner fittings.
--- The auto shut-off float-valve is now positioned lower in the tank so the water level has dropped, but that’s okay (tank is still more than halfway full).
- [16:03]: Evening check on the 3x3 veg tent.
--- All vegging mothers and clones are looking healthy and green!
--- Two clones need watering. Let’s go Ensign!
- [16:08]: Here are the starting initial watering ranges:
------ Chill Out OG #2 » 274.7g → 335.3g
------ Heady OG BX1 #1-3 » 233.5g → 325.8g
--------- General Weight Range: [Dry] ~275g «| [Dryback] ~300g |» ~325g-400g [Wet]
--- Both cups were last watered 2 days ago.
--- Took the starting weight of both clones before watering,
------ Chill Out OG #2 » 296.6g
------ Heady OG BX1 #1-3 » 274.0g
--- While on a scale,
--- Evenly misted the top of both cups with RO water.
--- Did not spray the top growth.
--- Misted 10-20 sprays. Waited a moment, then misted again.
--- Repeated this process until both cups weighted at least 300g.
--- There was no runoff.
- [16:37]: Took the saturated weight of both cups after watering,
------ Chill Out OG #2 » 380.6g
------ Heady OG BX1 #1-3 » 395.3g
--- Updated the wet weight and watering dates for both cups.
--- Heady OG BX1 #1-3 is getting tall!
--- Using a pair of clean trimmers,
--- Topped and cut the main stalk down to the bottom 3-4 nodes.
--- Mulched the trimmings.
--- Placed both cups back into the tent.
- [16:54]: Checked on the clones in the propagation tray,
--- Mother clones look good for the most part! Still have a few stressed phenos, but that’s okay.
--- Wow 3 clones need watering!
- [16:58]: Here are the starting initial watering ranges:
------ TKO #2-2 » 293.9g → 340.3g
------ Garlic Budder OG#1-1 » 299.1g → 340.6g
------ Garlic Budder OG#1-2 » 279.2g → 340.3g
--------- General Weight Range: [Dry] ~275g «| [Dryback] ~300g |» ~325g-400g [Wet]
--- All cups were last watered 8 days ago.
--- Took the starting weight of all clones before watering,
------ TKO #2-2 » 296.2g
------ Garlic Budder OG#1-1 » 295.7g
------ Garlic Budder OG#1-2 » 291.7g
--- While on a scale,
--- Evenly misted the top all cups with RO water.
--- Did not spray the top growth.
--- Misted 10-20 sprays. Waited a moment, then misted again.
--- Repeated this process until all cups weighted at least 300g.
--- There was no runoff.
- [17:10]: Took the saturated weight of all cups after watering,
------ TKO #2-2 » 345.4g
------ Garlic Budder OG#1-1 » 345.6g
------ Garlic Budder OG#1-2 » 345.4g
--- Updated the wet weight and watering dates for each cup.
--- Placed all cups back into the tent.
- [17:16]: Checked the Ecowitt soil moisture sensor data:
------------------ [ 3x3 VEG TENT – GR7 / GR3 ] ----------------
------ 47% - [CH01 » M1 » VBL – TKO #2]
------ 45% - [CH02 » M2 » VBR – Gorilla Goat #1]
------ 48% - [CH03 » M3 » VFL – Chill Out OG #3]
------ 52% - [CH04 » M4 » VFR – Dry Soil]
----------------- [ 4x4 MAIN TENT – GR30 ] ---------------
------ 50% - [CH05 » P1 » FLT – Chill Out OG #2]
------ 69% - [CH06 » P1 » FLB – Chill Out OG #2]
------ 49% - [CH07 » P2 » BLT – TKO #2-2]
------ 67% - [CH08 » P2 » BLB – TKO #2-2]
------ 50% - [CH09 » P3 » FRT – Heady OG BX1 #1]
------ 76% - [CH10 » P3 » FRB – Heady OG BX1 #1]
--------- Veg: ~38%-45% | Flower: ~45%-55%
--------- General: ~30% [Dry] «| ~45-60% [Moist] |» ~70% [Wet]
- [19:35]: Checked the 4x4 tent.
--- Ooo yea! The garden is full of healthy tops!
--- No need to train and tuck anymore. Nice!
--- Time to let these ladies grow!
--- The under canopy is also looking clean and green!
- [19:39]: Checked on the BluMat soil moisture sensors:
------ Chill Out OG #2 » 38mbars
------ Heady OG BX1 #1 » 36mbars
------ TKO #2 » 40mbars
--------- Watering Range: [Too Wet] ~25mbars «| [Ideal Target] ~40-80mbars |» ~125mbars [Too Dry]
--------- BluMat Max Values: [10mbars «||» 750mbars]
- [19:43]: Checked the humidifiers.
--- Tanks are still full and no leaks found.
Day 05 - Friday - 02/06/26 - Total Days: 093
-----------------------------------
Daily Averages ~[+01:00]
- Temps: 83.5°F [28.6°C]
- Humidity: 73.0%
- VPD: 1.05 kPa
- Soil %: [50, 47, 47, 52, 50, 68, 49, 67, 49, 76]
-----------------------------------
- [21:43]: Night check on the 4x4 tent.
--- Wow the canopy has blown up with vertical growth!
--- Chill Out OG definitely has a shorter growth morphology whereas both Heady and TKO seem to be growing about the same height. Really impressed with TKO as she as managed to surpass Chill Out OG in both height and canopy space.
--- Let’s go! Grow strong my girls!
- [21:45]: Checked on the BluMat soil moisture sensors:
------ Chill Out OG #2 » 40mbars
------ Heady OG BX1 #1 » 44mbars
------ TKO #2 » 43mbars
--------- Watering Range: [Too Wet] ~25mbars «| [Ideal Target] ~40-80mbars |» ~125mbars [Too Dry]
--------- BluMat Max Values: [10mbars «||» 750mbars]
- [21:56]: Checked the Ecowitt soil moisture sensor data:
------------------ [ 3x3 VEG TENT – GR7 / GR3 ] ----------------
------ 49% - [CH01 » M1 » VBL – TKO #2]
------ 46% - [CH02 » M2 » VBR – Gorilla Goat #1]
------ 46% - [CH03 » M3 » VFL – Chill Out OG #3]
------ 52% - [CH04 » M4 » VFR – Dry Soil]
----------------- [ 4x4 MAIN TENT – GR30 ] ---------------
------ 50% - [CH05 » P1 » FLT – Chill Out OG #2]
------ 68% - [CH06 » P1 » FLB – Chill Out OG #2]
------ 49% - [CH07 » P2 » BLT – TKO #2-2]
------ 67% - [CH08 » P2 » BLB – TKO #2-2]
------ 49% - [CH09 » P3 » FRT – Heady OG BX1 #1]
------ 76% - [CH10 » P3 » FRB – Heady OG BX1 #1]
--------- Veg: ~38%-45% | Flower: ~45%-55%
--------- General: ~30% [Dry] «| ~45-60% [Moist] |» ~70% [Wet]
- [22:02]: Checked the 3x3 veg tent.
--- The veg garden is healthy and growth is green and perky!
--- A Heady OG clone needs watering!
- [22:06]: Here is the starting initial watering range:
------ Heady OG BX1 #1-2 » 241.0g → 325.6g
--------- General Weight Range: [Dry] ~275g «| [Dryback] ~300g |» ~325g-400g [Wet]
--- Been 2 days since the last watering.
--- Took the starting weight before watering,
------ Heady OG BX1 #1-2 » 241.0g » 249.6g
--- While on a scale,
--- Evenly misted the top of the cup with RO water.
--- Did not spray the top growth.
--- Misted 10-20 sprays. Waited a moment, then misted again.
--- Repeated this process until the cup weighted at least 300g.
--- There was no runoff.
- [22:47]: Took the saturated weight after watering,
------ Gorilla Goat #1-2 » 385.2g
--- Updated the wet weight and watering date.
--- Also decided to top her.
--- Cut the main stalk down to the bottom 4-5 nodes.
--- Placed the cup back into the tent.
--- Check on the propagation clones all phenos look great and no need to water.
- [23:03]: Decided to adjust environment of the 4x4 tent.
--- Within the AC Infinity App,
--- For the Main Tent [4x4] controller,
--- Adjusted the 'Flower [12/12]' Schedule for the exhaust fan.
--- EXHAUST FAN (AC INFINITY CLOUDLINE T6):
------ Decreased the VPD LOW trigger value from 1.3kPa to 1.2kPa
--- Adjusted the 'Flower [12/12]' Schedule for the humidifier.
--- HUMIDIFIER (AC INFINITY CLOUDFORGE T7):
------ Decreased the VPD target value from 1.3kPa to 1.2kPa
- [23:08]: Checked the humidifiers.
--- Tanks are still full and no leaks found.
Day 06 - Saturday - 02/07/26 - Total Days: 094
-----------------------------------
Daily Averages ~[+01:00]
- Temps: 81.9°F [27.7°C]
- Humidity: 74.3%
- VPD: 0.95 kPa
- Soil %: [48, 48, 45, 51, 50, 68, 49, 66, 48, 76]
-----------------------------------
- [20:01]: Night check on the 4x4 tent.
--- Wow the garden is stretching upwards and looking perky!
--- The under canopy is clean and all pots are looking great!
--- Nothing to do today but watch the grass grow!
- [20:15]: Checked the Ecowitt soil moisture sensor data:
------------------ [ 3x3 VEG TENT – GR7 / GR3 ] ----------------
------ 51% - [CH01 » M1 » VBL – TKO #2]
------ 52% - [CH02 » M2 » VBR – Gorilla Goat #1]
------ 45% - [CH03 » M3 » VFL – Chill Out OG #3]
------ 51% - [CH04 » M4 » VFR – Dry Soil]
----------------- [ 4x4 MAIN TENT – GR30 ] ---------------
------ 50% - [CH05 » P1 » FLT – Chill Out OG #2]
------ 67% - [CH06 » P1 » FLB – Chill Out OG #2]
------ 48% - [CH07 » P2 » BLT – TKO #2-2]
------ 66% - [CH08 » P2 » BLB – TKO #2-2]
------ 49% - [CH09 » P3 » FRT – Heady OG BX1 #1]
------ 76% - [CH10 » P3 » FRB – Heady OG BX1 #1]
--------- Veg: ~38%-45% | Flower: ~45%-55%
--------- General: ~30% [Dry] «| ~45-60% [Moist] |» ~70% [Wet]
- [20:20]: Checked the 3x3 veg tent.
--- The garden is thriving with mothers and clones.
--- A clone needs watering! Okay! Let’s go!
- [20:25]: Here is the starting initial watering range:
------ Chill Out OG #2 » 274.7g → 335.3g
--------- General Weight Range: [Dry] ~275g «| [Dryback] ~300g |» ~325g-400g [Wet]
--- Been 2 days since the last watering.
--- Took the starting weight before watering,
------ Chill Out OG #2 » 290.1g
--- While on a scale,
--- Evenly misted the top of the cup with RO water.
--- Did not spray the top growth.
--- Misted 10-20 sprays. Waited a moment, then misted again.
--- Repeated this process until the cup weighted at least 300g.
--- There was no runoff.
- [20:44]: Took the saturated weight after watering,
------ Chill Out OG #2 » 385.8g
--- Updated the wet weight and watering date.
--- Placed the cup back into the tent.
--- Mother clones in the propagation tray all look good and don’t need watering!
- [20:52]: Checked the humidifiers.
--- Tanks are still full and no leaks found.
Day 07 - Sunday - 02/08/26 - Total Days: 095
-----------------------------------
Daily Averages ~[+01:00]
- Temps: 81.3°F [27.4°C]
- Humidity: 74.2%
- VPD: 0.94 kPa
- Soil %: [48, 47, 44, 51, 49, 67, 48, 65, 49, 76]
-----------------------------------
- [19:09]: Night check on the 4x4 tent.
--- Ah yea! The garden is thriving and raging with top growth!
--- Heady OG and TKO are starting stretch away as Chill Out OG is remaining pretty squat.
--- Wow! All phenos are all looking great!
- [19:12]: Checked on the BluMat soil moisture sensors:
------ Chill Out OG #2 » 44mbars
------ Heady OG BX1 #1 » 40mbars
------ TKO #2 » 46mbars
--------- Watering Range: [Too Wet] ~25mbars «| [Ideal Target] ~40-80mbars |» ~125mbars [Too Dry]
--------- BluMat Max Values: [10mbars «||» 750mbars]
- [19:14]: Checked the Ecowitt soil moisture sensor data:
------------------ [ 3x3 VEG TENT – GR7 / GR3 ] ----------------
------ 55% - [CH01 » M1 » VBL – TKO #2]
------ 51% - [CH02 » M2 » VBR – Gorilla Goat #1]
------ 44% - [CH03 » M3 » VFL – Chill Out OG #3]
------ 51% - [CH04 » M4 » VFR – Dry Soil]
----------------- [ 4x4 MAIN TENT – GR30 ] ---------------
------ 49% - [CH05 » P1 » FLT – Chill Out OG #2]
------ 67% - [CH06 » P1 » FLB – Chill Out OG #2]
------ 48% - [CH07 » P2 » BLT – TKO #2-2]
------ 65% - [CH08 » P2 » BLB – TKO #2-2]
------ 51% - [CH09 » P3 » FRT – Heady OG BX1 #1]
------ 76% - [CH10 » P3 » FRB – Heady OG BX1 #1]
--------- Veg: ~38%-45% | Flower: ~45%-55%
--------- General: ~30% [Dry] «| ~45-60% [Moist] |» ~70% [Wet]
- [19:18]: Checked the 3x3 veg tent.
--- Veg garden is a healthy and all mothers and clones are looking perky!
--- A Heady OG clone needs watering!
- [19:20]: Here is the starting initial watering range:
------ Heady OG BX1 #1-4 » 234.8g → 325.4g
--------- General Weight Range: [Dry] ~275g «| [Dryback] ~300g |» ~325g-400g [Wet]
--- Been 4 days since the last watering.
--- Took the starting weight before watering,
------ Heady OG BX1 #1-4 » 284.7g
--- While on a scale,
--- Evenly misted the top of the cup with RO water.
--- Did not spray the top growth.
--- Misted 10-20 sprays. Waited a moment, then misted again.
--- Repeated this process until the cup weighted at least 300g.
--- There was no runoff.
- [20:04]: Took the saturated weight after watering,
------ Heady OG BX1 #1-4 » 395.2g
--- Updated the wet weight and watering date.
--- Placed the cup back into the tent.
--- Checked the veg clones in the propagation tray and everything looks good with no need to water. Great!
- [20:13]: Nice! My order from James Loud Genetics has arrived!
--- Been on a mission this year to gather genetics for the seed stash and JLG is an absolute must!
--- As for genetics, ordered and received:
------ Gluelato [Gorilla Glue x Gelato 41] → FEM | x10
------ 41 Kings [King Louis x Gelato 41] → FEM | x5
------ FREEBIE: Unreleased Seeds [Candy Fumes x Double Lemon Cherry] → FEM | x3
--- Will eventually hunt through these! But until then, continuing to expand the seed stash with more high quality beans!
--- Anyways!
- [20:24]: Checked the humidifiers.
--- Tanks are still full and no leaks found.
--- Another most excellent grow week in both tents!
--- As the pre-bloom phase ramps up, may need to build and install the second level of scrog netting.
--- But going to let these ladies stretch upwards for now!
--- Onwards to next week Ensign!
[END OF WEEK 14]


Likes
3
Share

@TRPHAUS089
Follow
Defoiled, added a second net. Enhancer and npk booster also added every 2 weeks

Likes
82
Share


@WhiteEdge
Follow
12.03.2024
Continue into week two. Target EC is the same for this week
Girls looking great. One Purple Lemonade fall into bucket! That lid is not cut with precision😏 Put some plastic to hold till now
Clean tanks and filters with h2o2+vinegar acid +bleach
Replace all filters
Mix new batch with 2ml AN connoisseur AB + Big Bud Powder + Silica - total 20l @
Donne one pass off long misting 2m
TrolMaster Tent-X arrived! Setup and registration done in seconds. Finding best placement ...
700 PPFD @ center, VPD 1.0, RH 53-56% day, RH 45-48% night, Temp Night-20c, Day-25/26c, Leaf temperature 23c, Light distance 60-65cm, CO2 750+ppm
540w@70cm distance
NT-Nutrient Tank - PH -5.9, EC -1.15, Temp-21c
14.03.2024
Top up tank with 10l off 1.2EC solution - 2ml AN Connoisseur A+B + 3g Big Bud @ 18l (1.16EC)
Replace all filters
Before top up, nutrient solution in tank is 0.86, after adding 1.2EC new mix is 1.03
PH is slightly rising, normal when EC is drooping
Girls grow nicely, no deficiencies, this week is start off stretchy faze.
Remove some big and bottom levees
PAR map 800max/600min PPFD, VPD 1.0-1.1, RH 50-54%, Temp Night-21-22c, Day-25/26c, Leaf temperature 23c, Light distance 60cm, CO2 750+ppm
580w@60cm distance
50s ON time 20min OFF time Day Time
50s Off time 30min OFF time Night Time
NT-Nutrient Tank - PH -5.92-5.99, EC -0.89-1.0, Temp-20-22c
15.03.2024
Position TrolMaster Tent-X Box on tent and connect to internet. Temperature ,Light and humidity sensor is great, I lake that all sensors and connector boxes are on RJ connectors
Great and fast install, registration and connections off all cables, censors and light! Like ability to expand system with Aqua-X and Hydro-X for irrigation ,PH/ EC/Temp monitoring off nutrient tank
Controlling solenoid valves and pump will be SUPERB!!! Recycling type off timer are great for Aero misting!
With Inkbird equipment i have issues that all connections are permanent and if you have longer cables....😡
HLG Scorpion Diablo LED light is connect via LMA-14 light adapter ! Wow i can control dimming and timing off my light via Wi-Fi😀😊😎👏🙏🙌
PAR map 800max/600min PPFD, VPD 1.0-1.1, RH 50-54%, Temp Night-21-22c, Day-25/26c, Leaf temperature 23c, Light distance 60cm, CO2 750+ppm
HLG Scorpion Diablo@83%
580w@60cm distance
50s ON time 20min OFF time Day Time
50s Off time 30min OFF time Night Time
NT-Nutrient Tank - PH -5.95-5.99, EC -0.89-1.1, Temp-20-22c
16.03.2024
Top up tank with 15l off 1.2EC solution - 2ml AN Connoisseur A+B + 3g Big Bud @ 18l (1.16EC)
Replace all filters, still everything in pristine condition after every changing, nutrient solution in tank looking and smell fresh and clean.
Reducing humidity in night time below 50% , humidifier rise temperature to 22-23c at night
Day RH is 53%, in first two hours keeping temps and humidity lower to reduce deferential form night time to 1-2c
Don't want to have more than 10-15cm off stretch in next week
Girls drink more water and nutrients every day, think around 10-12l per day
Managing EC strength with adding slightly higher nutrients solution when top up tank. Overall its around 0.9-1.0EC for most of the time
PH is stabile , slowly rise in small increments. Need to adjust @ 6.2 to 5.9 every two-three days. Probably i will leave it to swing even more.
Diablo is at 80% power @ 45-55cm from top canopy, 900+PPFD in center, lowest corners get 650+
PAR map 920max/650min PPFD, VPD -1.1, DRH 50-54%, NRH48-50%, Temp Night-21-22c, Temp Day-25/26c, Leaf temperature 23c, Light distance 45cm, CO2 750+ppm
HLG Scorpion Diablo@80%
580w@45cm distance
50s ON time 20min OFF time Day Time
50s Off time 30min OFF time Night Time
NT-Nutrient Tank - PH -5.95-5.99, EC -0.89-1.1, Temp-20-22c
17.03.2024
Top up tank with 10l - 1.2EC solution - 1.8ml AN Connoisseur A+B + 3g Big Bud @ 18l (1.16EC)
Replace all filters, install one new. Total 5 mash filters + 2 disc filters
Remove some large fan leaves from all girls. Nothing crazy. Next week is final BIG defoliation and pruning
Clean room benches a little bit after defoliation.
Whole week all girls are doing great , no sign off any kind off stress or deficiencies. Superb fast growth.
Stretching is more apparent in the end off this week. Next week is going to be madness!
18.03.2024
Raise light 10cm , adjusting to canopy level..
HLG Scorpion Diablo@83%, Set sunrise/sunset dimming @ 30min - TrolMaster Tent-X
PAR map 890max/650min PPFD, VPD -1.1, DRH 50-54%, NRH48-50%, NT-21-22c, DT-25/26c, Leaf temperature 23c, Light distance 45cm, CO2 750+ppm
Week 2 off Flowering in Summary
100l off RO water
190ml+190ml AN connoisseur A+B, 15g Big Bud Powder
70kW electricity in total for light, Pumps and AC Infinity Fans. 58kW for Light + 8kW Dehumidification + AC Infinity ventilation
Week start @ 1.14EC, nutrient strength. Strength dropping every day by 0.1-0.2. Topping up tank with 1.2EC solution bring back strength to 0.9-1.0EC
Start using AN Big Bud powder for day two off this week. For next slowly reducing Nitrogen and add more Big Bud. Next week start @ 1.2EC
Girls look superb all time, Wedding Cheesecake is going to be a biggest strain in this run. Two off them are gigantic plants, third one is little smaller.
Tropicana Cookies is short and bushy with lots off side branching. Need good defoliation next week . Purple Lemonade is also huge , all three girls
Flowering going nicely, obvious sign off formation off bud sites, pistils have shown an all girls.
PH was stabile and move from 5.85 min to 6.2 max. Swing all week without chasing perfect number.
Light distance start at 65cm from canopy finish week at 45-50cm , PPFD levels around 800-940 in center, trough whole week
Temperature vary slightly from 23c at start off day to 26c max at some points. AC Infinity T6 extracting fan program in AUTO to kick in @ 26c
Night temps around 21-23c, dehumidifier start to work at night time to bring down humidity, trying also to minimize Day/Night temperature differential for this week also
Continue in next week at same environment settings and light strength..
Likes
21
Share


@Love2Bud_UK
Follow
16/07 gave her the chop after 8 days flush and 2 days darkness. Aiming for at least 10 days drying time. My scales couldn't read her wet weight without being cut up, which in not doing yet.

Likes
35
Share


@StonedandSteady
Follow
9th W/Flower Harvest: No 9th Feed of #HumboldtCountysOwn this last few Weeks! I Flushed them out once a day with 1 Gallon of Cold Declorinated Tap Water for the last 7 days, letting thier pots dry out for 4/5 days and Checking the Triks every couple of days as well! Thier Packed, Stacked Up and Lights Upgraded!!! Cloned with my Steady's Saliva!!! We'll definitely Grow back to everything here soon! #Pre-Sexed 4/9/21 #Opium/#PabloEscobar *Fems* breed by Team #DivineSeeds #DivineSeedsSquad #DivineSeedsBreedingCompany I'm Very Excited and Extremely Gracious!!! These Cannabis plants are Camping out in the Closet for a week or so! Lol
My #PabloEscobar and #Opium *Fems* from #DivineSeeds Regs: SalamiLegF3's×2 and FireAlienRomulan look$ Outstandingly Awesome and Finished Up Phenomenally Fine into thier 9th week of Flower! Thanks Again for All the Love and Support my fellow Growmies and Growmets!!! These Magnificent and Magical Ladies were Growing in our 48×24×60 ViparSpectra Official Club 🌿 ®️ Grow Tent and under our #Osree QB1000w and #GrowStarStore Kokokala QB1000w but Finished out in Flower under our #BloomPlus BP1500w! #TNBNaturals The Enhancer Co2 Despersal canister and ph'd them w/ Declorinated watering w/ TNB ph Up and Down! Totally Top Quality Topz all Around! Thanks Again #GallowGlas420 #HarleyGrower #thehumancannabiniod #AlienBloodGenetix #TNBNATURALS #www.as420.ca #divineseeds #divineseedssquad #divineseedsbreedingcompany #HumboldtCountysOwn Family's and Teams!!! Your Genetics are Merry Magnificent, Mega Marvelous and Mighty Medical! Love um!!! I really Can't stress enough how Thankful and Grateful I am of All of you and what you've Shared with Us! Means the World!!! It's definitely a Pleasure being able to Grow with these Phenomenal Grow Lights! Please Enjoy! BudBrothers4-Life! Cheers Famz!!! Much Props and Much Topz!💯🔥#BloomPlus #Osree #GrowStarStore #Growatt #TNBNaturals #TNBTeam #HumboldtCountysOwn #GrowYourOwn #Bliss
Bloom Plus BP-4000
CA:https://www.amazon.ca/dp/B08DTDP5FF/ref=cm_sw_r_cp_awdb_imm_86Q7H2D5BGFYB9B6PR9K
US:https://www.amazon.com/dp/B08DTN3B84/ref=cm_sw_r_cp_awdb_imm_4B7XWCAS09M4V3W0AFJH
Bloom Plus BP-2500
CA:https://www.amazon.ca/dp/B08DTCYV9Y/ref=cm_sw_r_cp_awdb_imm_YDNA8G16PH3TB002VKGE
US:https://www.amazon.com/dp/B08DS53THM/ref=cm_sw_r_cp_awdb_imm_SX3AEDKRVAYQECF32BE4
Bloom Plus BP-1500
CA:https://www.amazon.ca/dp/B082XYLHRJ/ref=cm_sw_r_cp_awdb_imm_XEBFV7790EHT53B2J9B5
US:https://www.amazon.com/dp/B082XYLHRJ/ref=cm_sw_r_cp_awdb_imm_MB3PYZEVSQRZY096AB79
BloomPlus Instagram Link: https://instagram.com/bloom.plus?utm_medium=copy_link
Thanks Again Broski #SmokinPlantaz for Hosting your Bright and Tight Amazon Prime Day #BloomPlus-1500w Giveaway! I'm still Blinded by the Light!!! Lol (Song Pun) it's Ultimately Lit, Extremely Powerful and Brilliantly Bright! I also Love and Appreciate Everyone out here! Please! Go Over and Spread That Love to my Bro's YouTube Channel and Team #BloomPlus on their Instagram! I'll have thier Links posted ⬆️⬇️! BudBrothers4-L!!! Cheers Famz!!! Much Props and Much Pars!💯
SmokinPlantaz YouTube Channel Link: https://youtube.com/channel/UCDKJthWoS6-miAhq_lLb_-w
HumboldtCounty'sOwn:
Email: [email protected]
Phone: (707) 725-4119
Toll free: (866) 872-9434
Humboldt Bottling
Po Box 429 · Fortuna, CA 95540
HumboldtCounty'sOwn Website Link: https://humboldtcountysown.com/
HumboldtCounty'sOwn Instagram Link: https://instagram.com/humboldtcountysown?igshid=1qj809qkkwych
Vivosun Precision Pruner/Trimmer: https://www.amazon.com/gp/aw/d/B06Y1XVD1P?psc=1&ref=ppx_pop_mob_b_asin_image#
https://youtube.com/c/VIVOSUN
https://www.facebook.com/vivosun.official/
https://instagram.com/vivosun.official?utm_medium=copy_link
https://instagram.com/bloom.plus?utm_medium=copy_link
https://instagram.com/osree.light?igshid=1vrsbdyhzg2h8
https://instagram.com/growstarstore?igshid=2yjn0r00r6ru
https://instagram.com/divine.seeds?igshid=1r90iwe9xiwz8
https://instagram.com/thehumancannabinoid?igshid=17k159pumklkq
https://www.instagram.com/alienblood_genetix_official/
https://instagram.com/as420.ca?igshid=1f116alw054wp
The Grow Bags: https://www.as420

Likes
13
Share


@CanabisLoverHobbyGrower
Follow
Great week,.. put some real size on and can honestly see the buds growing daily, check and feed in a morning and at night and can visibly see a difference,.. ones gone purple ones stayed green but both look healthy, really happy so far, roll on next week 👌
Processing
Likes
8
Share


@eldruida_lamota
Follow
Esa familia, estoy de nuevo por aquí, os traigo la última semana de crecimiento de estas candy caramelo de Zambezaseeds.
Estoy bastante contento las 3 son simétricas están creciendo en un tanque de 7 litros en los cuales aportamos el primer riego con nutrientes para solventar alguna carencia leve, sobre todo de nitrógeno pero nada como echarles de comer.
El ph está controlado, la temperatura no aumenta de 26 grados y la humedad la mantenemos por encima de 50%.
Cómo apreciáis, todo va sobre ruedas, veremos que tal se comportan de ahora en adelante, saludos fumetillas y buenos humos.

Likes
5
Share


@69XINEYESEEKAYX69
Follow
Haven't been remembering to post weekly updates! Everything is going great the auto flower girls are budding nicely and the other ladies are starting to flower nicely I'm giving alternating nutrients using a few different fox farm nutrient feed charts with my own take on them from notes an suggestions. This is the part that is so enjoyable but so stressful!


Likes
4
Share


@buzbun
Follow
smoke is really good.strong taste and effect that you feel imideately.some times i catch a good paranoia with this strain.good psy effect. maybe it cause 11/13 light cycle. few hours after smoke good to sleep or eat smth good.not for day smoking.somy buds i stored in vacuum bags they very dense after this

Likes
6
Share


@realganjasmoka
Follow
Sugar royal is working well. Buds are full of tricomes. I think that could be a very powerful weed considering the 20% thc declared