The Grow Awards 2026 🏆 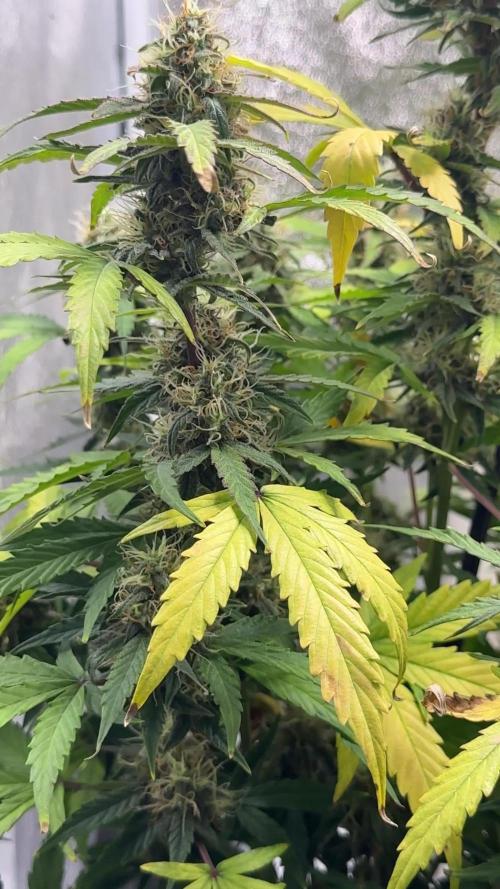


Likes
Comments
Share
@Anthonythegrower
Follow
Purple . I love this stage when the plant starts changing the colors of its leaves and buds.

Likes
62
Share
@Reyden
Follow
Cambiamo ancora le disposizioni per il Box Spider Farmer!
Ho tolto le 2 Royal Gorilla 🦍, 1 Gorilla 🦍 Glue di Zamnesia, la Original Skunk e la White Widow di Seeds Mafia che ora sono nel box piccolo a testa in giù ad asciugare 💜
Nel frattempo nel box di Spider Farmer ho introdotto Oracle Octane, White Runtz, Corbezzolo, The Sin e Calypso Sun Rock di Anesia seeds che finiranno la loro fioritura sotto la #SF2000 di @spiderfarmer ✨#SFgrow sono la bellezza di 8 genetiche diverse qui sotto 👇🏻


Likes
11
Share
@CanabisLoverHobbyGrower
Follow
Week 16,.. neglected the diary but they have been tied up to hold the weight as we're falling over, fed properly, looking ok, the bigger one has a bit of yellowing not sure if that's just because nearing the end but yeah, looking forward to getting them down tbh, didn't quite expect 16 weeks and still going, roll on next week


Likes
5
Share
@GHdog22
Follow
Soo taaste and speciacl smell og is oG G G G nice grow really good mineral line feedeng is best of the bestest ever seen


Likes
34
Share
@chee_52
Follow
👉🏽 Day 71 (5/16): Watered with ph'd RO water for the first time. Minor defoliation. I'll thinking of harvesting her at the same time as her tentmates, which will probably be around Day 75.
👉🏽 Day 75 (5/20): Harvest day! Will be doing a dry trim, so I just removed fan leaves. Now drying in the tent at 75ºF & ≈55% RH. (Will post harvest info/page after drying, since I forgot to weigh her wet.)
Thanks for dropping by! 🖖🏽🌿

Likes
62
Share
@MeaCulpa
Follow
OK, Ich habe den Kampf gegen meine Trauermücken aufgenommen..... und direkt sieht es aus, wie im Militär-Lazaret.
Ich habe 3.000.000 Nematoden (Steinernema feltiae) auf ca. 2.5L Wasser (ph 6.2) der Erde zugeführt.
Die Blätter mit einer Neem- und Rapsölmischung besprüht. Damit die Erde das nicht aufnimmt gibt es weisse Laken für die Patienten.😂
Ich habe keine Ahnung, ob es funktioniert. Mal sehen.
Ansonsten gefallen mir meine Babies echt gut.


Likes
12
Share
@btcywtsitw
Follow
Very happy with this weeks growth. So much sugar. I did lots of trimming after last weeks pictures. These girls were flushed yesterday and the smell is really starting to show. Will get some good trichome shots uploaded later today, starting to see lots of milk soon :)

Likes
20
Share
@French__flair
Follow
Deficiencies are beginning to disappear.
Las deficiencias están empezando a desaparecer.


Likes
42
Share
@TerpTurtle
Follow
12 day dry @ 58-63RH & 60-66F in blacked out dry tent | Glass Jar Cure
Early taste test & this Bud KOs leaving you in major terp sweats! Hits like a Sumo wrestler sitting on you tickling all over! Flower bowls hitting like fat juicy dabs, with overwhelming squeeze & flavor like you're drinking a smoothie!
Breaks down chunky and greasy with a vivivd dark purple color. LOUD N STANKY, opening a jar gives you the duck face funk face.


Likes
11
Share
@NONSENSE
Follow
Very nice genetic. I'll do same Jack H from Fastbuds for sure again. Plant was very strong and ready for training. I still did not smoked it, will replay later about the taste and power.
Likes
147
Share
@Zurban_Poison
Follow
Hello all friends!
Last week I disturbed my girls for the last time. did a very hard defoliation. also cleared of everything superfluous that was below the skrog.
Overall, both plants are doing great.
I think that the harvest should be excellent and high quality! Now all that's left is to wait!!
@Zammi_official what can you say abouth this Double Gorillas?😜


Likes
15
Share
@OrganikTek
Follow
Black Cream stretchig full on flowering. Shes polling up the net. Think i wont train here anymore.
Bomberry Glue Really its a diferent kind. Slow started and look at here now. Shes a beauty. Truly Ganja Leaves.
Wedding starting to flower. Stretshing good. Started Scrog on here.
Purple Couskush looking good. Like how the new branchs are so big for her but still stretching verticaly. Nice genetic nuace. Something to add to newer genetics.
Temps are getting up , vents are getting are dry and up VPD goes. trying some foliar to help.
Lets see what happens
Cheers Brotherhood

Likes
2
Share
@fabialien
Follow
Hidratamos por 24 hrs y pasamos a papel para continuar con la germinación.


Processing
Likes
6
Share


Likes
3
Share
@Ogbangbang2981
Follow
YEA!!!! That's what comes to mind every time I check out my grow space and see such beautiful plants growing especially my C4 Auto from fastbuds she coming along so beautifully it brings joy to my heart all I do is give her light and bat turd water mix and raw bat turd and let her take off I planted her sister on the outdoors to see the difference between the two indoor is looking a lot better to me . That's all I gotta say for this Thursday see you next week. Comment on my Ak48 Autoflower I got from persific seed bank