The Grow Awards 2026 🏆 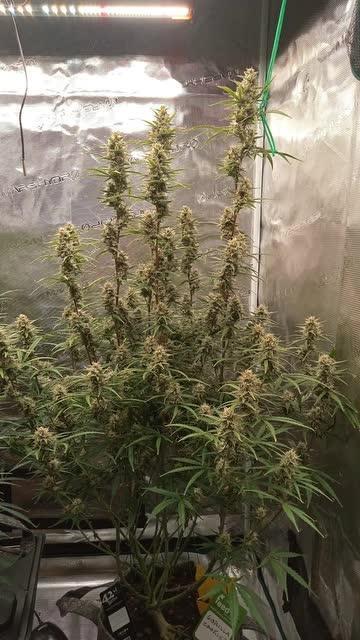


Likes
Comments
Share
@youdan
Follow
TRA 10 GIORNI RACCOGLIERO QUESTO SPLENDORE PER ADESSO HO TOLTO I NUTRIENTI E LASCIATO GIUSTO L'ESSENZIALE CON ENZIMI IN MODO POSSA TEMINARE TUTTO QUELLO CHE RIMANE NEL LORO VASO

Likes
6
Share
@Viridios
Follow
The Slurricane IX is a beast of a plant to grow, the growth is quick and quite bushy. I would advise to train these plants SCROG..or something.. the stretch is just crazy..im gona say prepare for a 200% + stretch. Thy will easily get out of of control if not managed well.
Pest resistance is good, i did not have any bug problems, but i did have a small WPM issue, but it was very crowded in there. Sorted it out by defoliation and a treatment of hydrogen peroxide took care of the problem.
Very thirsty plants, at there peak, 9 plants was drinking 110L a week.
Very stong smelling plants. Extremely dense flowers covered in a sluricane of trichomes.
Harvest of the plant is quite easy, not a very bushy cola..so its a easy trim.
Overall a great genetic to grow and a beautiful plants in itself.
@InHouseGenetics .. superb.
Thank you guys so much for giving us the privilege to grow such amazing genetics.
Keep up the great work.
Happy growing. 😁
😜

Likes
13
Share
@MrPott
Follow
She started out tiny but definitely surprised me halfway through. She doesn't really smell as a plant but in the jars and paper bags, she smells like berries and watermelons. Only been a week since I dried her in the fridge but I can't wait so I'm going to try to smoke some of her tonight. I also had to harvest partially as some of the lower buds are not quite ready yet which means I'm not done yet as of now. Will update more soon.

Likes
12
Share
@ZzTooRightOGzZ
Follow
All round the grow went well first time grow the forbidden runtz and I'm pretty happy about it.
Likes
8
Share
@Shalma_kush_420
Follow
Muy buenas mi gentee.
Otra semanita más por aquí, ya en la semana 5 de crecimiento.
Y se puede observar como va bastante bien, con buena estructura, buen color y buena ramificación.
Se le están dando riegos semanales con bioestimulantes de The hype company y aparte dos riegos de agua más semanales.
La temperatura la estamos empezando a subir, para esta semana cambiala a maceta final y pasarla a floración.
Así que veremos cómo sigue la próxima.

Likes
4
Share
@Green_Thumb
Follow
My o my, what can I say... These ladies are gorgeous! Along with adding in the 2000W along side my 600W, I cut out the grow solution in my nutes contrary to the instructions and my ladies are booming! We'll see how the rest of the week continues! I started a majority bloom with some added glucose for my feed to help with bud weight but they are really packing on. Hopefully next week will be my last week of feeding as trichrome production increases and I can start my 2 week flush!


Likes
2
Share
@Alejandroalvez123
Follow
Fueron 3 plantas que compartían espacio con otras 5 en un espacio de 1m2


Likes
5
Share
@McLovin53
Follow
Starting week 4 off with a few updates:
We lost two soldiers today, 11/25/23, and pulled both of the struggling watermelons from the herd.
Lowered the lights a bit as I felt they were a bit too high and to prepare for the real vegetative phase coming this week. DIY C02 bottles bubbling away nicely.
Transplanted the remaining girls to their final home (5 gallon fabric pots) on 11/26/23. Used Photone app to dial in to proper PPFD at 350 as I was a bit high.
Nearing end of week 4, I’m really starting to see rapid growth. Since I’m going with a SOG for this grow, I won’t be doing any topping but I will be doing some LST to start week 5 with 90 degree LST clips. (I’m calling it the 5x5 LST; 5 weeks at the 5th node pair) 😆
Likes
154
Share
@Tropicannibis_Todd
Follow
💩Holy Crap Growmies We Are Back💩
Code Name FBT2311
Well growmies we are at 49 days in and everything is going as good as it can 👌
👉Shes been doing really good , lots of buds and some nice colors and smells 👌💪she's the top of of the lot 💪
Lights being readjusted and chart updated .........👍rain water to be used entire growth👈
👉I used NutriNPK for nutrients for my grows and welcome anyone to give them a try .👈
👉 www.nutrinpk.com 👈
NutriNPK Cal MAG 14-0-14
NutriNPK Grow 28-14-14
NutriNPK Bloom 8-20-30
NutriNPK Bloom Booster 0-52-34
I GOT MULTIPLE DIARIES ON THE GO 😱 please check them out 😎
👉THANKS FOR TAKING THE TIME TO GO OVER MY DIARIES 👈


Likes
18
Share
@PrinceOfHerbs
Follow
Extremely sticky and a wonderful aroma.
I suspect just under 1-2 weeks until harvest
Dlowering Day 54

Likes
8
Share
@phobic94
Follow
This week I started feeding my plant with an ec between 0.6-0.8. I also lowered my lamp so they get more light and I topped the plants and started lst.

Likes
29
Share
@Spliffing_Around
Follow
So I did not expect that they would germinate overnight and ended up placing them in the bathroom for the time till the tent is here.
To be honest, it is difficult to find stuff for the grow, I order everything on Lazada, but it is also quite expensive. As I also mentioned, they sent me the sent nutrients without the Grow B part, 3 bottles of bloom and one grow. I ended up just ordering another set of nutes.
I would appreciate any light recommendation that I can add to the following light, so it would become decent lightning for all the plants. I am on a budget, so the cheaper the option at this point the better. The grow tent will be 2.4m x2.4, so I will be able to either add more plants or stretch these a lot.
Cal Mag is also on the way. Started the grow without the nutrients, but got PH meter. Sorry guys, I was just too excited to start. Any recommendations are appreciated.

Likes
3
Share
@MicroHidroGrow
Follow
Día 10. Las tropicana ya estan empezando a crecer y mostrar nuevas hojas. Las polaris vienen un poco más lentas, pero igual hay reacción. Por ahora el sistema viene funcionando bien. Tengo una mudanza en breve, así que puede que me pierda un poco en el seguimiento.
Processing
Likes
4
Share
@Therbalist
Follow
Very busy have some white Dynamite seedlings started for hopefully more feminised strains. My dream is to open a seed company and become the best seed supplier! Thanks for the views. Seeds should be on eBay by tommorow (regular ones)
Likes
153
Share
@DogDoctorOfficial
Follow
I love this community and the way its like a big family, thank you all for your love time and dedication, keep it up, growers love to you all 💚💚💚


Likes
44
Share
@Cogollo_eu
Follow
**Encontrarás la traducción a español al final de la descripción**
From/Desde: 10/05/19 || To/Hasta: 16/05/19
From day/Desde día: 78 || To day/Hasta día: 84
You can find the Money Maker Diary here:
** Podéis encontrar el diario de las Money Maker aquí:**
https://growdiaries.com/diaries/25667-gorillamakingmoney-gorilla-vs-money-m
-----IMAGES & VIDEOS-----
5 - HomeMade Organic & Cheap CO2 generator (more info in week summary)
9, 10, 11 & 12: The bud on the right is a Gorilla one, the buds in the left or/and in the middle are Money Maker ones.
15 - Same Gorilla plant buds, one affected by CO2 in the roots and the other not.
-----WEEK SUMMARY-----
The smell is more sweet and intense every day, friends that came home turned them eyes into crystals when they see this little babys. The size isn't awesome, but the high ammount of buds full of crystals plus the strong sweet aroma makes them awesome. Buds are growing and fattenning very very well.
This week i added a boost of HomeMade CO2, i never measured the results of this invention so i can't give CO2 measurements. This method is widely used in home aquariums and there is where it comes from. For those interested i'm going to write here more detailed instructions. The 4 liters i've made will last for about 2 weeks.
---NEEDINGS---
- 250 ml Bottle
- 6~10 l Bottle
- 400 g Sugar / l water
- 1 Envelope of organic baker's yeast / l water (CHEMICAL WILL NOT WORK)
- 3 mid plastic tubes 40~50 cm
- 1 short plastic tube 5~6 cm
- 4 tube adapters
- Hot glue to seal adapters
The process of creating CO2 is simple, mix water, organic yeast and sugar in a bottle, and the sugar will free CO2 in the process of fermenting to alcohol due to the yeast.
1. Make a hole in the center of the big bottle cap, insert an adapter and secure it with hot glue
2. Make 3 holes in the small bottle cap and glue the other 3 adapters
3. Link both caps with one of the mid tubes and insert the other tubes on free adapters
4. Insert a short tube in the bottom of the small cap in the adapter that came from the big cap
5. Watch the Video!!
-----WATERING CALENDAR-----
Plants are beginning to drain the pots a bit faster so from now on i will raise the water ammount on each watering day 0.25 l.
11/05/19 - 1,5 l with All week nutrients -(Nirvana & Blombastic) also Big Bud half dosed @ PH6.4 & 2 E.C.
14/05/19 - 1,5 l with Bud Candy, Big Bud, Nirvana, B52, Bud Factor-X, Sensizym & Blombastic @ PH6.4 & 1.5 E.C.
*****ESPAÑOL*****
-----IMÁGENES Y VÍDEOS-----
5: Generador de CO2 casero, barato y orgánico (más info en el sumario semanal)
9, 10, 11 & 12: El cogollo que sale a la derecha es de una Gorila, el de la izquierda y/o el de en medio son de una Money Maker
15: Dos cogollos de la misma planta, uno afectado por CO2 en las raíces y el otro no
-----SUMARIO SEMANAL-----
El olor es más dulce e intenso día a día, los amigos que vienen a casa a verlas se quedan ojipláticos al verlas. El tamaño no es una maravilla, pero la gran cantidad de cogollos llenos de cristales añadido al aroma que entra por las fosas nasales las hacen increíbles. Los cogollos crecen y engordan de maravilla.
Esta semana he añadido un boost de CO2 casero, nunca he hecho mediciones de los resultados por lo que no puedo darlas. Este método es ampliamente usado en peceras caseras y de ahí saqué la idea. Para aquellos interesados dejo aquí instrucciones más detalladas. Con los 4 litros de agua que he preparado yo da para unas 2 semanas.
---NECESITAMOS---
- Botella de 250 ml
- Botella de 5 a 10 litros
- 400 g de azúcar por litro de agua
- 1 sobre de levadura de postre orgánica (LA QUÍMICA NO FUNCIONARÁ)
- 3 tubos de plástico de tamaño medio 40~50 cm
- 1 tubo de plástico de tamaño pequeño 5~6 cm
- 4 adaptadores para los tubos
- Cola caliente para pegar y sellar los adaptadores
El proceso de generar CO2 es simple, mezcla agua, levadura orgánica y azúcar en una botella, y el azúcar liberará CO2 en el proceso de fermentación a alcohol.
1. Haz un agujero en la tapa de la botella grande, inserta un adaptador y séllalo con cola caliente
2. Haz 3 agujeros en el tapón pequeño y haz lo mismo con los otros 3 adaptadores
3. Conecta los 2 tapones con uno de los tubos y conecta los otros 2 tubos a los adaptadores restantes
4. Conecta el tubo pequeño en la parte libre del adaptador del tapón pequeño que viene del tapón grande
5. Mira el vídeo
-----CALENDARIO DE RIEGO-----
Las platas comienzan a secar los tiestos un poco más rápido, asi que de ahora en adelante incrementaré 250 ml de agua adicionales en cada riego.
11/05/19 - 1,5 l con todos los nutrientes semanales -(Nirvana & Blombastic) BigBud mitad de dosis @ PH6,4 & 2 E.C.
14/05/19 - 1,5 l con Bud Candy, Big Bud, Nirvana, B52, Bud Factor-X, Sensizym y Blombastic @ PH6,4 & 1,5 E.C.

Likes
5
Share
@Mo_Powers
Follow
it's very changeable weather again in germany. so far she's coping quite well. i've started to make a funny LST. I wonder what will come out of it ? :)
Likes
7
Share
@Ninjabuds
Follow
My ELUFAH UAP 1500 test grow is showing excellent results, with the plant thriving under my care. The addition of the ELUFAH Saturn Ring under canopy light has been a game-changer, significantly boosting growth. It's clear that the supplemental lighting is providing the plants with the extra energy they need for robust development and impressive yields.