


Likes
Comments
Share

@cookingwithninja
Follow
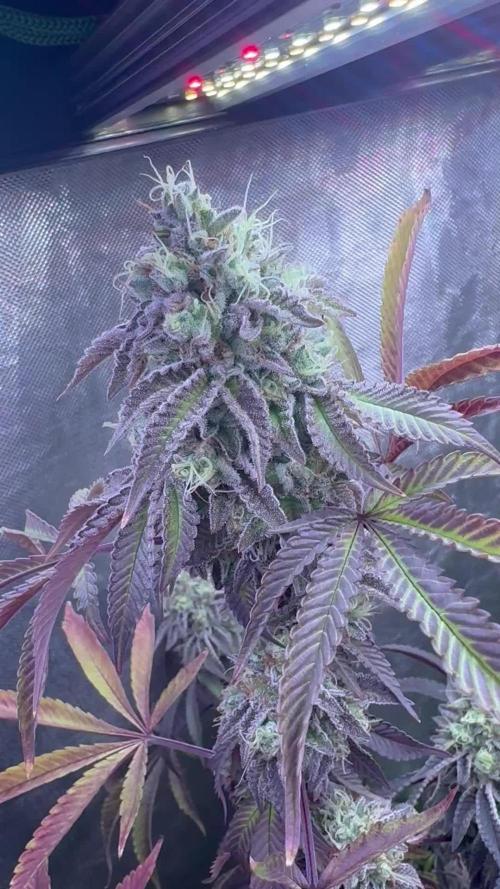
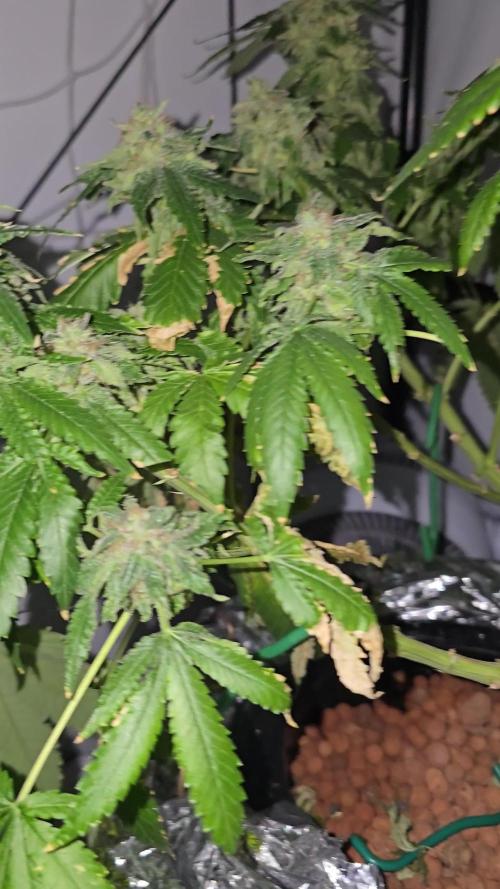
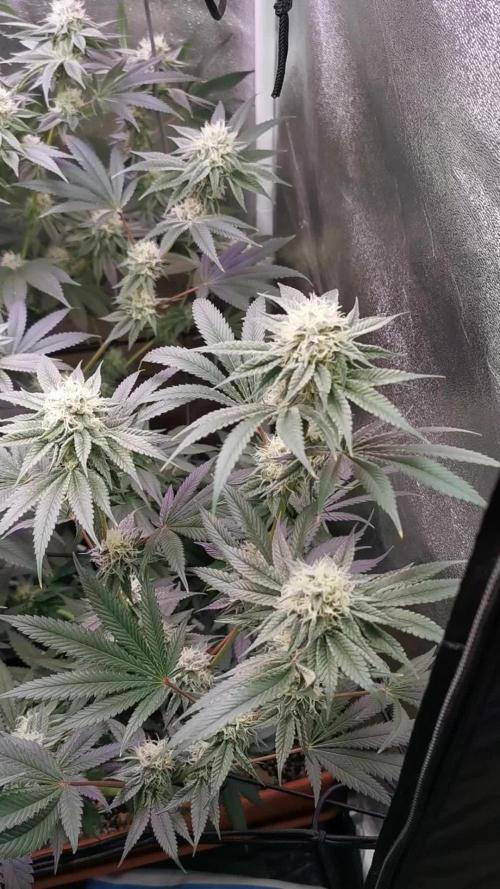
Week 8 pics are just screenshots from vids. Been trying nugs since week 6.




Likes
21
Share

@DogDoctorOfficial
Follow
Before starting this harvest chapter, I want to apologize once again for not uploading everything directly into the official harvest and smoke review tabs.
GrowDiaries has been struggling a little with very large uploads lately, and with the amount of photos, videos and information involved in this Ghost Train Haze harvest, I decided to split everything into multiple parts to make sure nothing gets lost or broken during upload.
And honestly… this plant deserves the full story.
So welcome to Part 1 of the Ghost Train Haze harvest. 🌱✨
Before talking about harvest itself, let’s do a quick recap of how we even arrived here.
This was another 12/12-from-seed run.
No traditional vegging.
Very little manipulation.
Minimal training.
Mostly just letting the plants naturally express themselves while guiding environment, airflow, watering and light intensity carefully around them.
Instead of forcing the plants into a shape, the goal here was to let them grow naturally into the PPFD and into the environment themselves.
And wow…
Ghost Train Haze really showed personality during this run.
Most of the attention naturally went toward the massive main plant everybody keeps seeing in the photos — the giant colorful spear covered in fading reds, dark purples and swollen flowers — but there were multiple plants in this room, and in this harvest report we’ll finally start talking about all of them and the different directions they took after harvest.
By Week 14, the room looked absolutely incredible.
The fading on these plants became something special.
Deep reds.
Dark purples.
Almost black tones in some areas.
Golden fading leaves.
Heavy trichome coverage.
Color spreading through the sugar leaves and surrounding flower tissue.
One of those harvests where the plants almost stop looking real.
And underneath all those colors:
extremely heavy flowers.
Dense.
Massive.
Sharp aromas.
Long spears everywhere.
The branches became so heavy during late flower that support was absolutely necessary. Yo-yos were holding branches constantly, helping prevent collapse under the weight of the flowers.
And the moment the supports came out during harvest…
everything opened and leaned downward immediately under its own weight.
That alone says a lot about the size and density of these flowers.
There are photos in this report where I’m holding entire plants, and honestly, seeing them outside the tent really puts scale into perspective. It’s one of those plants that instantly makes you imagine how unbelievably huge she could become outdoors in native soil with unrestricted root space.
Harvest day finally arrived, and from there the project split into two different paths.
Some plants were harvested whole and hung for traditional drying.
Others were fully broken down, every single flower removed from the branches, vacuum sealed into bags and immediately frozen for ice-water extraction work.
And this is where things start becoming really interesting.
Because this report is not only about harvesting flower.
It’s also about exploring different post-harvest directions and understanding why growers process material differently depending on their goals.
The flowers selected for traditional drying will continue their journey in Part 2, where we’ll focus much more deeply on drying conditions, moisture management, branch snapping, trimming and curing.
But for now…
let’s talk about the frozen material and ice-water extraction. ❄️
After harvesting, the flowers destined for washing were separated carefully and placed into vacuum bags before going into the freezer.
Freezing fresh material helps preserve volatile compounds, terpene expression and trichome integrity while preparing the flowers for ice-water extraction.
And no — this is not simply “throwing weed into ice.”
There’s actual science and technique behind this process.
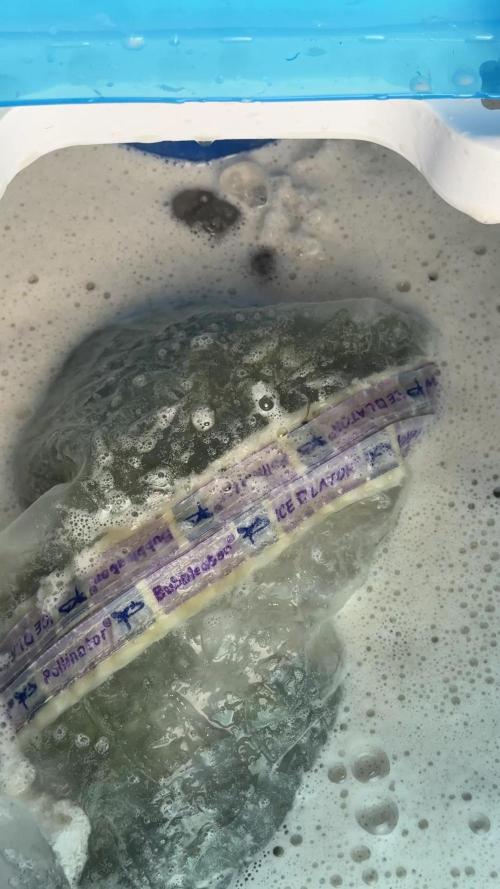
Before washing, the frozen material is combined with ice and extremely cold water, ideally close to 0°C. The goal is to make the trichome heads brittle enough to detach cleanly while keeping unwanted plant contamination as low as possible.
At the same time, the flowers need time to fully soak and rehydrate slightly before agitation starts. This helps reduce excessive breakage of plant material during washing.
And then comes the wash itself.
The bubble washer machine agitates the mixture gently, allowing trichome heads to separate naturally from the plant material and suspend inside the cold water.
From there, the water passes through a series of filtration bags with different micron sizes.
25 micron.
45 micron.
73 micron.
90 micron.
120 micron.
160 micron.
220 micron.
Each size captures different grades and sizes of resin heads and contaminants.
We are not using every single bag configuration during this run, and we’ll go much deeper into grading, collection quality, drying and final results later in the series. But since this report already includes videos and photos of the process itself, I thought this was the perfect moment to explain what ice-water extraction actually is — and what it is not.
This process is not about adding anything.
It’s about separating what the plant already naturally created.
Water.
Ice.
Agitation.
Filtration.
Patience.
That’s it.
And honestly…
watching these resin-covered flowers moving inside ice water almost feels hypnotic.
The harvest itself may be finished…
but the real post-harvest journey is only beginning now.
This report will continue in the next update very soon because there is simply too much material, too many photos and too much information to fit properly into a single upload without risking GrowDiaries crashing or losing content again.
Part 2 will continue deeper into:
the drying process,
environmental control,
trimming,
flower handling,
and the continuation of both post-harvest paths.
And eventually, Part 3 will close the circle with curing, smoke review, flavors, extraction reflections, effects and final thoughts.
As always, thank you to everybody following this journey.
To Zamnesia for the genetics.
To Plagron for the nutrition.
To all the gear keeping this room alive day after day.
To GrowDiaries itself.
To the community.
To the longtime followers and OGs.
To the new people arriving every day.
To the curious ones.
To the silent supporters.
To the lovers.
To the skeptics.
To the haters.
To everyone who stopped by, even for a moment.
Thank you for being here. 🌱
Part 2 coming very soon. ✨
📡 DELETED @ 1K Please stay tuned.we never quit https://www.youtube.com/@TheDogDoctorOfficial NEW 🙏 Thank you for your patience and continued support.
FOR DISCOUNT CODES AND MORE JUST FOLLOW THE LINK https://website.beacons.ai/dogdoctorofficial
📲 Don’t forget to Subscribe and follow me on Instagram and YouTube @DogDoctorOfficial for exclusive content, real-time updates, and behind-the-scenes magic. We’ve got so much more coming, including transplanting and all the amazing techniques that go along with it. You won’t want to miss it.
GrowDiaries Journal: https://growdiaries.com/grower/dogdoctorofficial
Instagram: https://www.instagram.com/dogdoctorofficial/
YouTube: https://www.youtube.com/@dogdoctorofficial Deleted by Youtube - https://www.youtube.com/@TheDogDoctorOfficial NEW
Vimeo : https://vimeo.com/dogdoctorofficial Under construction stay tuned ⸻
Explore the Gear that Powers My Grow
If you’re curious about the tech I’m using, check out these links:
🔆 Lighting & Environmental Control
• Future of Grow — Advanced LED lighting technology
https://www.futureofgrow.com/
DISCOUNT CODE: DOG20
• Lumiflora — Under-canopy LED lighting
https://lumiflorade.com/
• TrollMaster — Environmental controllers and automation gear (past collaboration)
⸻
Genetics
• Zamnesia Seeds — Genetics used in this project
https://www.zamnesia.com/
⸻
🌱 Soil, Substrates, Boosters & Root Support
• Plagron — Substrates, bio mixes, and supportive products
https://plagron.com/en/
⸻
🎒 Storage, Curing & Preservation
• Grove Bags — Curing and storage solutions
https://grovebags.com/
⸻
📸 Photography Equipment & Tools
(Not sponsors, but part of my creative toolkit)
• Sony A6700
• Sony full-frame macro lens + few more
• Stacking photography workflow - learning
• iPhone (for behind-the-scenes shots)
We’ve got much more coming as we move through the grow cycles. Trust me, you won’t want to miss the next steps, let’s push the boundaries of indoor horticulture together!
As always, this is shared for educational purposes, aiming to spread understanding and appreciation for this plant. Let’s celebrate it responsibly and continue to learn and grow together.
With true love comes happiness. Always believe in yourself, and always do things expecting nothing and with an open heart. Be a giver, and the universe will give back in ways you could never imagine.
💚 Growers love to all 💚
📸 P.S. – The Eye Behind the Lens
All photos in this diary (for now — except for the ones showing the camera, which I took with an iPhone) are taken with a Sony A6700 paired with a Sony full-frame macro lens and a few more.
Photography is part of the story — it’s how we share the fine textures, the glow, and the quiet details that words can’t always capture.
I’ve also started experimenting with photo stacking — a technique where multiple images, each taken at a slightly different focus point, are layered together to create one perfectly sharp image from front to back.
It’s not digital enhancement or AI; it’s pure photography — a way to reveal the plant’s beauty in microscopic depth, from trichome to petal.
You’ll even see a few shots of "ghost me" capturing the shots — camera, lens, setup — because every grow deserves not just to be cultivated, but documented like art.
FOR DISCOUNT CODES AND MORE JUST FOLLOW THE LINK https://website.beacons.ai/dogdoctorofficial
NEW DISCORD - Official Server Invite Link : https://discord.gg/ksjAkA5T74

Likes
36
Share

@squalino
Follow
🌿 Journal de Culture : Mac 1 Autoflower – Semaine 5
On continue sur notre lancée. Cette semaine, la Mac 1 a littéralement explosé, montrant que le stretch est maintenant en plein régime. Je la laisse s'exprimer pleinement.
Un Grand Merci
Un grand merci à @Mia_BIOTABS et @Mrs_Larimar pour leurs conseils qui portent leurs fruits, ainsi qu'à tous ceux qui suivent cette aventure de près. Votre soutien fait plaisir !
Paramètres de Culture & État de la Plante
Taille :
Elle a pris un sacré volume et culmine désormais à 68 cm (+28cm)
Lumière :
la plante prend tellement de vigueur qu'elle se rapproche de la lampe , elle est maintenant à 55 cm de la canopée.
Climat :
Toujours avec 24°C le jour / 21°C la nuit
50% d'humidité.
Arrosage :
Le système Autopot fait tout le travail. La plante reçoit uniquement de l'eau claire avec un pH stable à 6,3.
Maintenance & Observations
C'est la semaine du "laisser-faire". Je n'ai touché à rien depuis 7 jours :
Zéro stress : Pas de défoliation, pas de nouveau palissage. Je la laisse se stabiliser après les manipulations de la semaine dernière.
le 12/05
Nutrition :
Elle vit sur ses réserves et sur ce que les Biotabs libèrent dans le sol. Aucun signe de carence, la couleur est uniforme et éclatante.
le 14/05
apport de 50 cl de tea compost
preparation tea compost :
LE MELANGE :
15 grammes tea compost avec 5 ml d'orgatrex pour 1 litre d'eau ( 4 plantes donc ×2. 50cl par plante ) .
mélanger le tous dans un sceaux.
LA PREPARATION
materiel :
1 sceau
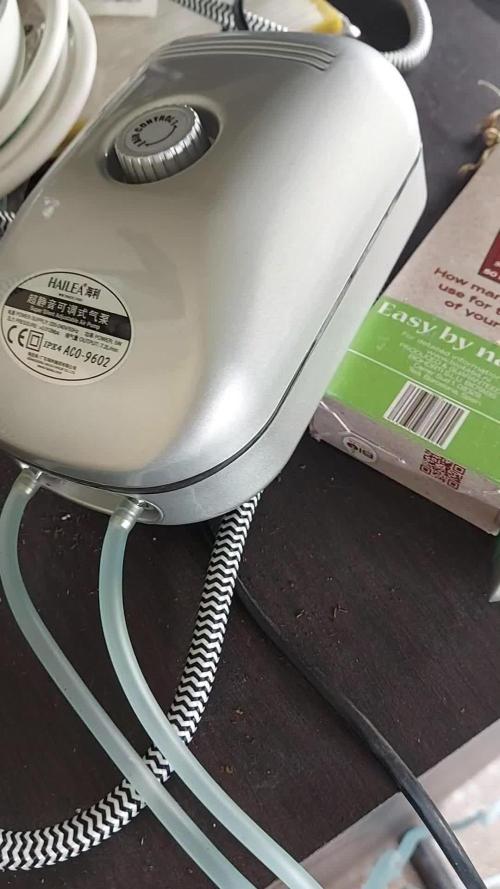
1 pompe à air pour aquarium. ( 15 euro ).
je vais utiliser pour 18h00 la pompe de mon aire dôme de l'autopots. j'ai acheté aussi 2 petit diffuseur d'air à 4 euros . ustensil utiles pour aérer le tea compost .
mettre les diffuseur dedans allumé la pompe et laisser pendant 18h00.
normalement le température idéal pour que les micro-organismes se développent est entre 18 degrés et 22 degrés.
pour ma part le mélange était dans ma salle de culture à enciron 24 , 25 degrés.
voir video et photos ajouter
18h00 après
filtrer le mélange pour éviter touts dépôts susceptible de moisir et ramener des champignons.
donner au plante 50 centilitres .
Le tea compost se garde mal donné dans l'heure qui suis le stop de l'aération
Analyse de la structure
Le stretch est impressionnant. La plante s'est bien élancée tout en gardant une structure robuste. Comme on peut le voir sur les photos, la canopée commence à se couvrir de pistils blancs de plus en plus denses, marquant l'entrée franche en floraison.
Les branches secondaires que j'avais écartées avec la ficelle ont bien profité de la lumière et rattrapent joliment la tige principale, créant une belle surface d'exposition. On commence à deviner la future formation des pompons.
L 'espacement entre les nœuds est idéal :
assez d'espace pour que l'air circule, mais assez serré pour promettre des têtes bien compactes. Elle a une allure de "sapin" parfaitement contrôlée.
Merci à tous de suivre ce journal ! La plante est en pleine forme, sereine, et commence à préparer ses fleurs sérieusement.
On se retrouve la semaine prochaine pour voir l'évolution des premiers trichomes !

Likes
2
Share
@HomeToGrow
Follow
Moin moin,
Die Blüte schreitet voran und viel Arbeit gab es nicht. Die Lemon Zkittle ist riecht top, ist aber winzig und die buds entwickeln sich auch nicht so gut wie erwartet. Die Apples and Bananas hat einen starken Geruch entwickelt den ich aber schwer zu beschrieben finde, als ersten wirkt der Geruch skunkig wird aber schnell von einer süßen leicht erdigen Aroma abgelöst.


Likes
4
Share


Likes
25
Share


@Soskar69
Follow
Day 51:The plants are doing great, they stopped stretching and now flowers are getting bigger and bigger. Today I feed them all(except the middle one) with qppm of 700,next time I'm planning to gave them a much more potent feed with a ppm of 1000. The middle plant it's not getting better, other leaves are getting yellow, and I don't know what it could be, for this week I will only gave her ph water with calmag an nothing else, I don't want to flush her because the stress would be too high and I'm so near the harvest that it would be pointless. Other than that I'm very happy, the smell is getting stronger and more vivid every day, the buds are getting bigger and juicy, I think the bloombastic is doing a great job, they will be A1 quality. Now I'm also starting to see the different fenotypes.
The Lsd-25 have 3 different feno:
1) dark purple : I have 4 plants of this feno, and this is the best fenotype. It is the more sativa feno, it starts slow and small but in the end it would be the biggest and with the bigger colas, and also it starts getting purple on it own, starting from the flower and progressing to the leaf. The smell it's very pungent and minty, it's a mix of fruit and mint. Overall it has all the things that you want in a great strain.
2) the pink: the majority of my plants (5) are from this feno. This fenotype is more indica than the previous, it is a lil bit smaller, but on the other hand it is the one that have the biggest number of flowers. It is bushy and have a lot of leaves. This one will get purple but only when you will drop the temperature around 18 °C, the purple is lighter than the other feno, almost pink, and the leaves don't get so purple like the other. The smell is like the first feno but not so pungent. Overall a good feno, just a lil bit harder to train and to work with.
3) the green goblin: I have only one plant of this feno. It's a perfect mix from the previous fenos, not too big and not too small, not so bushy and not too opend, the buds are not a lot but not too few. And to this point it's the only plant where I can't see the purple, maybe some shadows of pink in the main cola. Maybe it will get purple later but I don't think so. The smell is different from the other two, it's minty and earthy. Overall good feno but it hasn't the charisma of his sisters.
Day 54 : thank to the users on this grow I found out that the middle plant have root rot. I moved her in the bottom left corner where I have my fan, so the air circulates better, and also dropped down the RH, we'll see if she bounces back. So for her this week no water, I will wait till the soil gets dry. I fed the other plants today, 2 l each with a ppm of around 800, they all lookin very good, I hope that the disease won't spread to them. This grow I learned a lesson, next time I will be better prepared, I will give my plants mycrhrorizer to prevent root rot, and have multiple fans for better air circulation. I'm also thinking on buying the ghe ripen and giving it starting from next week , so I can harvest all my plants at the same time, because the plant #1 is behind the others ( longer vegetative stage) and the ill plant now is stuck and it isn't growing. Did you ever used ghe ripen? Is it worth it? Comment down below and let me know :)


Likes
Comments
Share


@SignalAndSoil
Follow
At one point, the water in the reservoir became anaerobic, causing the plants stress, so I cleaned it out along with the tray and reapplied the BioBizz nutrients according to the chart. I also added an aquarium pump to help keep the water stirred. When using organic nutrients, I realized that the pipes can become clogged, so every four weeks, I flush and clean everything. Other than that, and some temperature heat waves that I struggled with, the plants were happy.

Likes
20
Share


@Pulsar00
Follow
Welcome back in the Purple Project !
Buds still growing gently, nice earthy smell slowly tickling my nose.
No excess or deficiency at the moment.
I'm not using Rhino Skin and Bud Factor X cause I couldn't find them where I am. I Ordered some from a online spanish shop but it's never been sent ...
Stay tuned for big purple colas,
The Dude
Likes
26
Share


@Snacks_for_Argus
Follow
I’m really happy with this grow. The Fanta RBX has the most orangey/mandarin aroma i’ve ever smelled. The citradellic also has a great citrus aroma, but I can’t really point to a specific smell other than citrusy.
Humidity has gotten a bit better since I started intaking air directly from outside. Temperatures outside have also been very hot (which helps a lot with humidity) so the AC is staying on 24/7 from this point onwards 😭.
I will probably start giving ripening nutes from next week, up to week 8, and push these ladies to produce some larger and more resinous buds.
Cya next week!

Processing
Likes
3
Share


@MississippiRich
Follow
Week 2 is actually week 3.
Only giving water.
My dog decided he loved the plant so much, The he would dig her up when left outside!
I guess I am lucky the plant was young and she seems like she recovered very well. I think she is stunted, because she looks small compared to others I have seen.
I’m about to crack open and beer and wish for the best.

Likes
52
Share


@DogDoctorOfficial
Follow
One more week up we go 😇
Day 27 and all is going smoothly, having some issues with my humidity since i cant bring it lower than 60%, just got a second dehumidifier lets see if that resolves my “situation” with this humidity in the air 🤦😆😅
I have been running higher temperatures to help balance my VPD, some times is bether to embrace thing than try and figth them , non so ever i got a second dehumidifier heheheh 😅😈😇
5x White Mango WM
5x Alasken Purple AP
4x Blueberry BB
3x SAD S1
2x Badazz Cookies BC
19 in total for a 4x8x6 - 1,2x2,4x2
Light Lumatek Zeus 465W compact pro 2x at 100%
All i Grow is medicine for myself,
Stay safe, stay tuned and B Happy and do it for the love
Peace ✌️
D


Processing
Likes
15
Share


@No_Clout
Follow
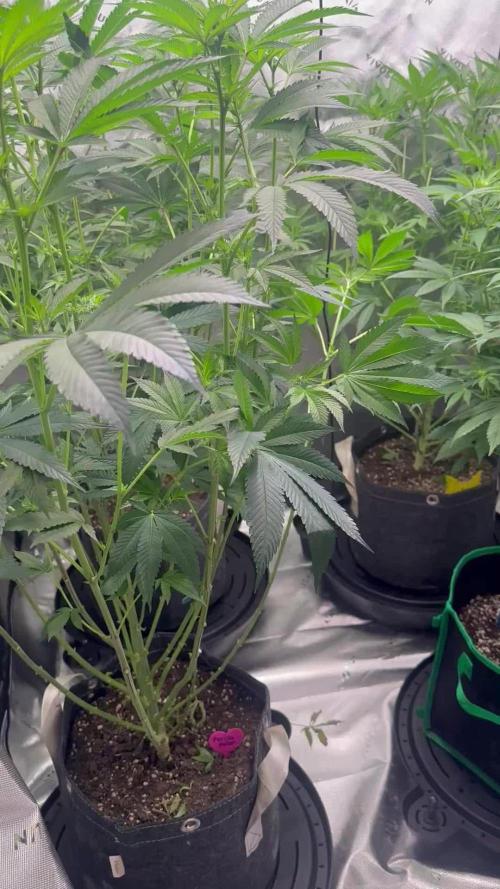
06/03/19 - These plants have grown so fast, normally at this stage my previous plants have been much smaller, only 14 days old and got a 8-9 wingspan on the fan leaves, I’m really happy I’ve turned to mills as I’ve had no faults with them yet, I did see a slight cal defiency on one of them but this was my own fault not the nutrients, I heard I dident have to add cal mag as their A&B had extra in it, but as I’m in coco I made a mistake but I’m hopeing that it’s gonna be a quick fix and they will be back to normal in the next few days 🤞🏻
09/03/19 - the gelatos seem like their doing fine, had a few brown specs but nothing progressed and it looks like their doing good.
12/03/19 - started to LST/leaf braid today as their already big enough for it and should be switching to flower at the end of next week




Likes
59
Share


@Insaniac_0
Follow
(10/28-11/03)
Starting a new grow with two 420 FastBuds Fast Flower seeds (thank you 420 FastBuds for making this possible)
I plan to be rough with these plants and top them both to 8 colas. This journal will be different than my last (alot less detail) but I will still look for new opportunities to learn something new that I can share.
I also plan to take at least 5 pics per week with 1 video and 1 'pretty' cover pic per week, however I also plan to delete the excess details at the end of each week.
I sanded both seeds on the edge and simply soaked a towel for germination. These seeds took 3 days to show a crack in the shell from the time that I placed them into the paper towels without glass of water soak prior- As soon as they cracked, I placed them into Rapid Rooters in an incubator until they showed tap root growing out from the bottom of the rapid rooters plug. That took a total of 6 days (now called Day 0) from paper towel to transplant day (now called Day 1) where they were about 1 to 1.5 inches above the soil line after I planted them in 5 gallon pots with about 2 tsp of Dynomyco Mycorrhizal Inoculant already mixed into the ph balanced soil that had been growing Happy Frog mycorrhizae for 12 days under cardboard.
I fed them each about two cups of plain de-chlorinated tap at 6.3 ph on day 2, and another .5 gallon of 5.8ph de-chlorinated tap on day 7(both plants top soil was 7.0ph before feed). I plan to ph read the top soil again tomorrow but it read 6.7 on both plants after 5.8 feed)
Likes
49
Share


@masterofsmeagol
Follow
6/9 I can't believe it but I had faith. The transplant yesterday LOOKED like it was fucked. I cleaned it up though and left it outside. This morning it was standing straight up. Both transplants were! I put tarps up to block the wind tunnel between buildings. It's still overcast and rainy. Sun isn't supposed to come out for a couple poke days. Chance of thubder storms tomorrow but I'm going to try to get everyone in their forever homes today. Or at least most of them. I plan to light dep a few right in the 3 gallon. I'm sure I'll be updating this after I get some work done.
UPDATE: I WENT OVER AND GOT THREE MORE TRANSPLANTED. THAT MEANS FIVE ARE OUTSIDE IN THE CAGE. TWO 10TH PLANET, 2 BLUEBERRY CHEESE AND A LITTLE PURPLE PUNCH. THE 3 GALLON POTS WERE RELATIVELY HEAVY SO I PICKED THE LIGHTER ONES TO TRANSPLANT. I LEFT THE ORHER TWO 10TH'S IN THE GARAGE WITH THE DOOR OPEN WITH THE REMAINING PLANTS. I ALSO ADDED WIND BREAKS AND SUPPORTS TO EVERYTHING. I WANTED TO GET EVERUTHING DONE TODAY BUT THERE MAY BE A THUNDER STORM SO IF I DONT GET IT DONE ITS NOT A BIG DEAL AND ILL FINISH TOMORROW. TRANSPLANTS WENT SMOOTH. I THINK THEY'LL GO EVEN SMOOTHER IF THEY DRY OUT A BIT. STILL HAVE THE 50 AND 40'S TO FILL. Took a bunch of videos but the don't want to load. I'll have to try tomorrow or later tonight.
UPDATE: I TOOK TONS OF PICTURES AND VIDEOS BUT THEY DONT WANT TO SEEM TO UPLOAD. IVE GOT SIX IN THERE FINAL HOMES OUTDOORS 20s and 30 gallon smart pots. Still have massive plants but I'm going to out those in the 50 and the 40. I'll finish this shit up tomorrow and get all the girls in their forever homes and if I don't have room for some I was planning on doing a light dep anyway so that will work out good. I learned a lot and transplanting went a lot smoother todsy than before. I feel really proud of myself. The last Transplant I did break a few leaves off that I didn't notice but whatever. I used tomato cages for suppirt on two and bamboo poles and string on the others. I'll add the vertical trellis as they grow. I'm proud of myself.
6/10 I got a lot done yesterday. Six are outside already. Two are in 20s in the garage. I'm planning on transplanting the rest today or tomorrow. I'll update later. Accidently uploaded lots of stuff on the wrong week. UPDATE: I TRANSPLANTED THAT SUPER TALL PURPLE PUNCH THAT I DIDNT TOP OR HST AT ALL INTO A 40 GALLON TUB. ROOTS WERE DRY AND THIS TIME IT ACTUALLY LOOKED LIKE THEY FELL AWAY. THE PLANT HOWEVER STAYED STANDINGVUP FINE. I THINK THIS PHENO IS GOING TO BE A TOUGH ONE. LOOKS GOOD LIKE AN HOUR LATER. I HAD THE 50 READY TO TRANSPLANT THIS MONSTER BLUEBERRY CHEESE I FIMed BUT THE POTS WERE SUPER HEAVY AND I FIGURED I NEEDED TO SLOW DOWN AND THINK. WE HAVE THUNDER STORMS COMING TONIGHT. TOMORROW IS GOOD. I MAY TRY TO FINISH UP TONIGHT BUT WE SHALL SEE. THE GOOD THING WITH DOING IT A FEW AT A TIME IS THAT IF SOMETHING HAPPENS OUTSIDE IVE STILL GOT A CROP INSIDE LOL. WHAT IM PLANNING TO DO IS EITHER LIGHT DEP THAT BIG BLUEBERRY CHEESE OR PUT IT IN THE FIFTY BUT IM PLANNING TO LIGHT 3 RIGHT IN THEIR 3 GALLON CONTAINERS. HAVENT DECUDED FOR SURE BUT IM THINKING THATS WHATS GOING TO HAPPEN.......of course videos won't upload and the ones that do are old videos. Damn. I need to sharpen my computer skills....and my growing skills. Especially transplanting. I suck at transplanting. I decided not to out all my eggs in one basket and left the 10th planet amd Blue berry cheese in the 20s in the garage. I pulled them out for light further but I'm ousting them back a little tonight. That way I'll have a back up if something catastrophic happens. I doubt it but better safe than sorry. I'm proud of what I've accomplished thus far. I've successfully uploaded my 1 minute plus video several times but it won't appear. Oh well. I'll try to load the videos tomorrow I guess. Just started raining. Just a light rain. Probably what fresh transplants like.
6/11 BEAUTIFUL outside. Today is the day. Most is done and I'll add the supports as trellis as they grow. This new grow space gets about twice as much sun as my old spot. The tar stops the burrowing insects. I'm getting everything out today. I just need to decide if I'm going to light dep that MASSIVE blueberry cheese or bite the bullet and put it in the fifty. Maybe I'll try to get some help from my cousin. Plants withstood the thunderstorm like Champs. I'll update as the day goes on. I planned better this year so I SHOULDN'T have an unmanageable jungle. UPDATE: WATERED THE 3 PLANTS LEFT IN THE 3 GALLONS (1 10th PLANET WITH GREAT BRANCH STRUCTURE AND TWO PURPLE PUNCH THAT WERE THE SMALLER ONES. IM GOING TO LIGHT DEP THEM. EVERYTHING IS OUTSIDE NOW IN A MIX OF 1/3 FOX FARM OCEAN FOREST, HAPPY FROG AND ROOTS ORGANIC 707 IN EQUAL PARTS. TRANSPLANTED WITH MYKOS. EVERYTHING IS OUTSIDE NOW. FINALLY DECIDED TO GET The MONSTER BLUE CHEESE I FIMed INTO ITS FOREVER HOME A 50 FALLON POT. IT WAS TGE EASIEST BEST TRANSPLANT OF THEM ALL. JUST LIKE AETTING A POT IN THE WHOLE. I DONT EVEN THINK THE PLANT NOTICED. ONE OF THE PURPLE PUNCHES HAD ROOTS OB ONE OF ITS LEAVES WHEN I LOOKED BUTVIT WAS STILL STANDING UO STEAIGHT. I KNOW SOME OF THE PLANTS LOOK DROOPY BUT WEVE HAD SEVERAL DAYS OF RAIN AND A MASDIVE THUNDER STORM. I BROUGHT OUT THE EARLIER TRANSPLANTS AS WELL. THEY ARE OUT OF THE SHOCK. WIND IS PRETTY HIGH BUT I DONT WANT TO ADD MORE TARPS. I THINK THINGS ARE SECURED GOOD ENOUGH FOR NOW. IM SUPER STOKED THAT TRANSPLANT WENT SO GOOD! Went back at 7:30pm. Some plants have a little bit of transplant shock and a little bit of burn but it's negligible considering they've been through a thunderstorm with pouring rain and extremely high winds. That blueberry cheese in the 50 transplanted so easy and still looks like it didn't even know the difference. I'll start light dep once I get a plan. Plants are recovering nicely but should something happen to one I could replace it. I'm interested in the light dep though and I've got a pretty good idea how to start.
6/12 The plants that had a little transplant shock are coming out of it. We had a thunderstorm and pouring rain the day of some of the transplants. Wasn't forecasted. High winds moved the plants around a bunch bit they are tough as hell. Everything is out now. Suppisedcto have showers the next few days. I'm putting together a feeding schedule abd setting up a spit to start light dep on the three plants I decided to flower early. The cage now gets twice as much sun as before. This is going to be a good year.
Went back over and plants are perking up and doing even better everytime I see them. I took a video but it might not upload until tomorrow. I may start a new diary for the light dep. I have a few places I'm thinking to use for light dep. I need to make a solid plan before I start so maybe a day or two. Trying to upload again but I doubt it.
6/13 Had a rushed morning but I watered the plants in the 3 gallons as they were dry. I had added more soil to a couple of the bags. The top soil is startingvtj dry out but the plants look good and we are supposed to get rain so I don't really want to water if it's going to be raining. I think I've found my light dep spot and schedule. I'll update after I do something.
WENT BACK OVER AND SPRAYED A LITTLE BIT OF WATER ON THE EXTREMELY DRY TOPSOIL THAT I HAD TOPPED SOME OF THE PLANTS OFF WITH. SHITTY THING IS THAT WAS ADDED AFTER THE THUNDER STORM SO IT MAKES IT HARDER TO JUSTE THE PLANTS WATERING NEEDS. I CAN TELL THAT ONE OFCTHE FIRST TEANSPLANTS IS STILL HOLDING WATER. I MEAN WE GOT A DOWNPOUR AND I DONT WABT TO WATER IF WE'RE GOING TO BE GETTING RAIN ANYWAY. IM GOING TO LOOK BACK OVER THE DIARY. THATS ONE GREAT THING ABOUT THESE. YOU CAN GO BACK AND CHECK YOUR WORK.
6/14 Glad I held off watering. It's raining today. Just showers. We haven't gotten any of that extreme wind we usually do. I have the plants supported but I still worry. Definitely more than I should. Plants are still doing good and acclimating to there homes. I have not started the light dep with the 3 gallons but I think I've found my spot. Once I start it will just be staying consistent putt8ng them in and out. I need to train them anyway. I have some research to do and a joint to smoke so I'll update later.