The Grow Awards 2026 🏆 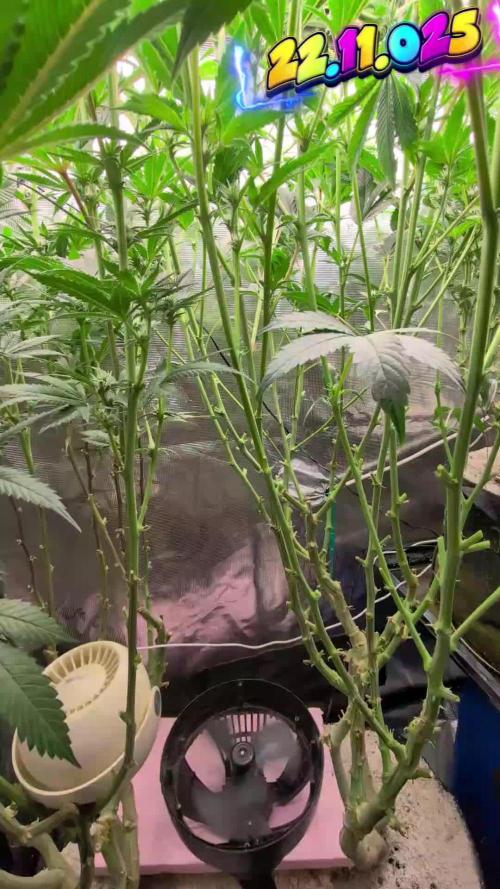


Likes
Comments
Share
@Yan420
Follow
This two were part of another diary and got moved out due to space reasons at VW8 and moved back indoors at VW20
https://growdiaries.com/diaries/218151-auto-god-s-glue-grow-journal-by-yan402
13.09.25 VW21 Both are looking good and are developing tighter nodes than when they were outside, I'm going to have to keep cutting them back every once and a while I also applied nematodes against thrips and fungus gnats.
20.09.25 VW22 some spots and some yellow leafs, I think it's a root problem, probably root bound, but both seem healthy and are getting thicker so maybe just top up with Coco coir and give a slight different nutrient schedule less Tri Part Bloom could do the trick MAYBE lol.
27.09.25 VW23 Topped up the pots with extra coco coir and trimmed the side roots a bit, both plants were root bound 📹
03.10.25 VW23 did a HST/LST session 📹
12.10.25 VW25 Done a major HST session to try and keep them in line with the Sunset Sherbet GF I have going in the same tent, rest in the video 📹
17.10.25 VW25 ffj/fpj/fish 30 → 60 ml
19.10.25 VW26 it just became a one plant diary, keeping #5, #6 gets it's own diary for testing nutrients.
20.10.25 VW26(?) Feed tweak: added 3 g Calcium Nitrate/ 30 L (≈ 15 ppm N + 10 ppm Ca)
24.10.25 VW26 did a defoliation and trimming session 📹
25.10.25 VW26 I'll be repoting tomorrow, 26.10.25 VW27 rest in the video📹
27.10.25 VW27 Epsom Salt 0 → 2.5, Calcium Nitrate 3 → 9 g
01.11.25 VW28 CalMag 60 → 30ml, TriPartBloom 20 → 30ml, Magnesium 2.5 → 3.5g
04.11.25 VW28 no more yellowing between the veins and no new spots, the changes to the schedule worked, rest in the video 📸
09.11.25 VW29 Did what I'm hoping is a last cleanup 🎥
12.11.25 VW13 Did another cleanup in the tent 🎥, also switched to the FERMAKOR PK Micro schedule, (10.11.25) added Phosphoric acid as a pH down in preparation for flowering
14.11.25 FW1 FERMAKOR PK Micros 40 → 50 ml
22.11.25 FW2 Calcium Nitrate 40 g → 35 g
🌱💦🌱💦🌱💦🌱💦🌱💦🌱
Day to day tasks & actions 🌿
🌱💦🌱💦🌱💦🌱💦🌱💦🌱
22.11.25 FW1 – Fed 5l of #1 → 2l runoff
23.11.25 FW2 – Fed 5l of #1 → 2l runoff
24.11.25 FW2 – Fed 5l of #1 → 2l runoff
25.11.25 FW2 – Fed 5l of #1 → 2l runoff
26.11.25 FW2 – Fed 5l of #1 → 2l runoff
27.11.25 FW2 – Fed 5l of #1 → 2l runoff
28.11.25 FW2 – Fed 5l of #1 → 2l runoff
29.11.25 FW2 – Fed 5l of #1 → 2l runoff
(*RUNOFF reused for indoor house plants)
🍶💧🍶💧🍶💧🍶💧🍶
💧 Nutrients in 30 L #1 Veg — FERMAKOR
🍶💧🍶💧🍶💧🍶💧🍶
💧 Calcium Nitrate (Calcinit / Nitcal):
45 g → 40 g → 35 g
= 1.33 g/L → 207 ppm N + 253 ppm Ca
= 1.17 g/L → 183 ppm N + 224 ppm Ca (current)
💧 PK Concentrate (FERMAKOR Base):
30 ml → 40 ml → 50 ml
= 1.00 → 1.33 → 1.66 ml/L
→ balanced 1:1 P:K + light micros (from extract)
💧 Home-made FFJ/FPJ (Fish + Veg):
30 ml
= 1.00 ml/L
Epsom Salt (MgSO₄·7H₂O):
8 g
= 0.27 g/L → 26 ppm Mg + 35 ppm S
💧 Fetrilon Combi 1 (Micros):
0.5 g
= 0.017 g/L
→ Fe 0.7 ppm • Mn 0.7 ppm • Zn 0.3 ppm • Cu 0.3 ppm • B 0.1 ppm • Mo 0.02 ppm
Phosphoric Acid (pH down) + Citric Acid (chelation):
→ First set pH with phosphoric acid
→ Add a little citric only if extra chelation is needed
💧 Target pH: 5.8 – 6.0 (drop test yellow-green)
📦 TOTAL Inputs:
60 ml → 70 ml → 80 ml / 48.5 g per 30 L
= 2.00 → 2.33 → 2.66 ml/L + 1.62 g/L (current)
⚙️✂️⚙️✂️⚙️✂️⚙️✂️⚙️
✂️ Tools & equipment ✂️
⚙️✂️⚙️✂️⚙️✂️⚙️✂️⚙️
✂️ 2× MarsHydro SP3000
⚙️ MarsHydro 150mm ACF Ventilator
✂️ Trotec dehumidifier (big unit)
⚙️ Mini no-name dehumidifier
✂️ Kebab skewers (LST – stainless)
⚙️ Wire + roast skewers (LST assist)
✂️ Scissors (HST)
⚙️ Vacuum (for spills & cleanup)
✂️⚙️✂️⚙️✂️⚙️⚙️✂️⚙️✂️⚙️✂️⚙️
🍒🍭🍬🌈🍒🍭🍬🌈🍒🍭🍬🌈🍒
🦄Fantasy Feast ( Seeds)🦄
🌈🍒🍭🍬🌈🍒🍭🍬🌈🍒🍭🍬🌈🍒
Species: Hybrid (Regular)
Genetics: The mother is Unicorn Whip by Dirty Bird Genetics. The father is Charcuterie by Cannarado Genetics.
Effect: Unknown Mixed effect body and head high
Flavor: Some phenos are Skunky gassy fruity, some are fruity sour citrus with a chemical touch and a touch of skunk
Flowering: Estimated 8–10 weeks
Resistance: Strong — Testing phase done
YouTube Link: https://youtube.com/-m8h?si=A7x4Zlr2kj-_ga31
Likes
9
Share
@MakFaso2022
Follow
Después de varios días sin subir nada
Moby 1: Le realize trasplante de tierra a las dos y les hice LST hoy es viernes lunes o martes estoy haciendo los esquejes en hidro la Moby 1 ya tiene pelos y quiere florar capas le saco esquejes y hago florar a la madre en el exterior cuida dola del frio total ya esta acostumbrada al clima a la Moby 2 le falta todavia pero la Moby 1 ya tiene ramitas para hacer esquejes y tengo todo lo q hace falta...
Moby 2: la mejor con ella crece bien en breve ya nuestra el sexo siempre va una semana y media o más atrás de la más grande la 1....

Likes
3
Share
@FarithAriasFajardo
Follow
Todo se ve muy bien por aquí hasta ahora, ya empezamos engorde. Esperemos cómo van respondiendo la siguiente semana que aumente las dosis. Muy feliz con los resultados obtenidos hasta ahora. Si que vale la pena dedicarles tiempo y ser paciente con el proceso. Seguramente la próxima semana iniciaré otros diarios con una cacería con unas regulares, una automática y otra feminizada junto a un esquejé de esta white widow que pude hacer.


Likes
21
Share
@Growin_it
Follow
Definitely in the chop zone now. Will start to flush anyway as I think I locked her up a little with too much top dressing.
The other plant is stacked. Looking forward to harvesting.
Some linalool, pinene, and caryophyllene coming through.

Likes
9
Share
@PrairieFrostGrow
Follow
***** Week 5 December 20 to 26, 2020 - Days 29 to 35 from germination *****
Going into the first full week of flower/transition. She was definitely going through the start of transition last week but I left it as a veg week and will call this the first flower week. She is not 100% and will not be but she has all of the signs of being a nice girl. She grew hard to start and she can take the nutrients levels, leaf colour is very good and she has grown evenly, nothing odd with growth. You just can't make up veg time with autos as they don't stop😞 For the first four weeks I end up staying so focused on making sure the autos are happy everyday and for the full day if at all possible..........as opposed to the first four weeks of a photo and I am a lot more relaxed and feel there is time to correct anything......its all good😂😂
This girl has obviously not been happy about everything in life over the first four weeks. She was put on a riser this week to help get her closer to the light. I still don't know exactly what I have done but suspect it was a combination of things in veg to slow her down. I feel she likely wants a quite dry media so the roots can breath more........I was not "soaking" the coco with the volumes of moisture but it was wet. Possibly could have cut watering volumes in half to see. Been battling pH drift though so I have it in my thick skull to give a good runoff amount........which can lead to a "soaked" media and that my have been part of it??? I also took four large fan leaves up higher on her, early on right after the first LST and think that pissed her off as well........I knew when I did it and thought I would "roll the dice" and take them but maybe should have left them.......cant go back but at least aware of it😀
Pulled her out this week and looked closer at her to see the bottom better. Her branches are soft so silica is increasing now that we are in flower. Colour was good below and not spotting or deformities. When tying down the branches, she pulled her self right up around the ties again easily enough by the next day. At this point I just want to get all the extra leaves out of there and let the air flow so I removed a number of fan leaves on her lower half, not too crazy but enough that she felt it I am sure.......she is already stunted so screw it and help give her a chance to get more light and grow taller was my thought😁👊
Little more detail.....
Dec 20/20, Day 29
- Dry out day after heavier feed yesterday.
Dec 21/20, Day 30
- need to add some moisture
- 1.5L watering with Magnificat @ 2ml = 200ppm and 5.7pH
- more of a watering today with some CalMag added because RO water being used.
Dec 22/20, Day 31
- dry out day today.
- going to let her go and feed in the morning tomorrow.
Dec 23/20, Day 32
- Feeding day today. Continuing with first weeks flower feed of 2ml/L.
- 2L feed with Micro, Bloom, Magnifical, AstroFlower, VeloKelp, Natures Candy @ 2ml = 800ppm and 5.8pH.
Dec 24/20, Day 33
- dry out day again. Still fair bit of weight in the pot compared to the other autos.
- pull out tomorrow and clean up lower growth and check runoff numbers.
Dec 25/20, Day 34
- 2L full feed again with the same 2ml/L feed as earlier in the week for all the autos. Added AN Rhinoskin as well for silica.
- 1150ppm and 5.9pH going in.........pots were really dry and perfect pretty well.
- Runoff was 1075ppm and 6.0pH.........I can live with that at week 2 flower😁😁
Dec 26/20, Day 35
- 1L full feed again. Had mixed up 12L yesterday.
- Added 2ml/L of Microbial Mass and Piranha = 1200ppm and 5.9pH.
- She needed her microbe allotment as we are at the start of flower.
- Bacteria added to help keep some of the nutrients in the media as she finishes.
- next watering is more of plain water and add Terpinator.
Nice girl Sweet Seeds.......I have messed her up but learning from her.......we will get one to smile about😬😬


Likes
25
Share
@Belverde
Follow
Hi guys, thanks for stopping by here..
Smell awesome for this two leady, not ultra resinous but very very sticky...
I love the structure of the buds😍..
Now they are at day 54 from 12/12..
Only water..
The bigger one I think it's fine for harwest in the next five/seven days..
The "smallest" one in seven or more few days..
Can't wait to dry cure and smell the aroma come out from the jair ..and also vape too and get super stone😎🤣..
See you next week...
Harwest day..
Bye ✌️
I hope you can see all three video because I can always see only the first one..

Likes
27
Share
@RDWCGrowing
Follow
5/23/2023
Week 7- Day 1 of Flower (Day 110 overall) (Day 49 of Flower)
There was a couple of small super small sucker buds on the lower stocks that needed to be cleaned off but that was it. Just watching them Flower!!
5/24/2023
Week 7- Day 2 of Flower (Day 111 overall)
Tucked a few fan leaves below lower buds but didn't see any blatant offenders that needed to be removed. I typically do start my checks in Week 8 but since this is a new strain I decided to go ahead and do a Trichome check just to see what was what.. Just as I thought nothing but clear glassy Trichomes. I will check again in one week....
5/25/2023
Week 7- Day 3 of Flower (Day 112 overall)
Just letting them grow today!! Smell is getting stronger I would say it is a hint of Pine and a heavier fruity smell.
5/26/2023
Week 7- Day 4 of Flower (Day 113 overall)
I did Nothing but took some pics and I enjoyed it!!!! It is nice to be able to just sit back and watch them on auto pilot.. :-) Tomorrow Water Change Day!!
5/27/2023
Week 7- Day 5 of Flower (Day 114 overall)
I admit it.. I had to defoliate a little bit.. I looked in while changing the water today and there were just a couple blatant offenders blocking the light from lower bud sites and those leaves they just had to go. Other than that I changed the water and this week is where I drop everything and start preparing them for this last phase of the grow. Loving a few of these buds they are starting to beef out very nicely.
I added 36 gallons
Mammoth Silica = .5Mil/Gal= 18Mil
Root DRIP = 1Mil/Gal= 36Mil
CalMag= .5Mil/Gal= 18Mil
FloraMicro = 3.8Mil/Gal= 137Mil
FloraGro= 2.8Mil/Gal= 100Mil
FLoraBloom= 4.6Mil/Gal= 166Mil
LiquidKoolBloom= 2.5Mil/Gal= 90Mil
TPS SIGNAL= 4.0Mil/Gal= 144Mil
ORCA = .5Mil/Gal= 18Mil
Water Temp= 70.1
Tent Temp= 76
Humidity =64 ** I have two dehumidifiers running on Ink bird controllers to try and keep the humidity down, In late in flower I like to keep the humidity above 45 but below 60.
5/28/2023
Week 7- Day 6 of Flower (Day 115 overall)
Opened the back of the tent today and boy did she need some defoliation love in the back. Other than that I took off a few little sucker buds trying to form. I did start to setup my Dry space as well as did a Trichome Check today and the brown tips are coming in nicely.
5/29/2023
Week 7- Day 7 of Flower (Day 116 overall)
Found a few baby sucker buds trying to form so I removed them. Other than that I am enjoying watching her mature.
I also started my Reverse of the Clone I took 6 weeks ago in Apr from #3. I am uploading footage of the reversing process for your viewing pleasure.

Likes
57
Share
@Silverback_Guerilla
Follow
2/24:
I'll be harvesting both BJ's and GG's on Friday night...they go dark tomorrow!


Likes
11
Share


Processing
Likes
5
Share
@Mrg7667
Follow
Starting to smell so strong! Like chem candies for sure. Cant wait to see how it changes these last couple weeks, still been somewhat smokey as you can tell from the ash on her! Sun is red is certain pics. Its starting to get colder here at night for sure lows 50s going to get into 40s next week!
Just started top max excited to see how that affects growth also noticed a little burn on some leaves from yhe fish mix did a week 6 leaf trim for light penetration. Just so little light on my pourch gotta utalize it well!
Also did one more preventative spray with the growsafe


Likes
2
Share
@Clemo
Follow
Not watered for 5 days, watered a little on last day week3
Growing well...
But don't know if I should trim them?


Processing
Likes
8
Share
@gothboiclique
Follow
Me costó adaptarme a la cantidad de agua que necesitaba, prácticamente 1.5 litros todos los días. Temperatura 23-25 centígrados, HR 45%.
Me pueden contactar por ig @federicocabreraf , por si quieren saber mas detalles o algún comentario que me quieran hacer, paz.
Likes
176
Share
@NuggetPawn
Follow
So, with the harvest complete and the dry finished, the rest is now going into jars for the final cure and storage.
Overall I enjoyed this grow, it needed minimal interventions and had a smaller work load compared to the other grows.
The amount of dried flowers is 752g (1.11gpw) so a decent haul, I threw a lot of B grade buds in the hash bag due to the large number of low level flowering sites (I need to rethink my canopy management) and also with the lack of stretch after flipping made the internodal spacing a bit too tight. Managed to extract 215g of grade a hash from her as well which I have pressed into a slab (pictures).
I learned many things along the way, namely root health and the importance of keeping organic additions as low as possible. I also decided to try out clones for my next run, just to get a little more canopy and growth consistency - those of which are in an aeroponics tub at the moment waiting to root (picture).
Thanks for those of you who followed along most of the way, good luck with all your grows!
Likes
62
Share
@Reyden
Follow
Riparto con un altro ciclo only @Fast_Buds con 2 loro Fast Flowering e 2 Auto Fiorenti di cui una CBD 20:1🙌la SF2000 lavora al 60% della sua potenza con una distanza dalla punta delle piante di circa 30cm. Ieri ho effettuato la miscelazione del terriccio con il 4 componenti Dogma Organics che è una miscela di diversi guani, letame bovino, rocce triturate meccanicamente, ceneri arboree e febacee tritate, acidi umidi e fulvici, kierisite e fosfato nat. Tenero,


Likes
9
Share
@Growin_it
Follow
This is my first Amnesia Auto. It has been an easy grow so far. Looking forward to the buds fattening up, which almost goes without saying. But, interested to see how loose or tight they will be.

Processing
Likes
4
Share
@Barcelona_Farmers710
Follow
Empezamos nuevamente con muchas genéticas para degustar!! Este cultivo será con productos nuevos aparte de la gama de @advancednutrients_es... de momento e decidido usar Mykos de @xtremegardening