


Likes
Comments
Share


@Organic473
Follow
Looking forward to this girls getting some height….vetting else looks good.

Likes
22
Share


@CanarianGrow92
Follow
After the transplant and some food the girls are looking great, nice and green 💚
Cant wait to start flowering 😁

Likes
6
Share


@Muravushka
Follow
During my previous grow, I harvested and made some bubble hash. Afterward, I dropped the used, wet buds onto this coco, and it seems some seeds sprouted from the leftover material. I’m not even sure if they’re photoperiod or autoflower, but hey—let's roll with it!
Both my pH meter and PPM meter are broken. I have no idea why they keep breaking so often. They’re ADWA meters, and while you can replace the reading elements, the replacements cost half the price of a new meter. It’s frustrating, and I really don’t want to keep buying them every time I start a new grow

Likes
277
Share


@Ju_Bps
Follow
Hello growmies 👩🌾👨🌾🌲🌲,
👋 Buds keep coming along but not yet bump.
💡I've removed 2 hours this week, in 2 times, 1 hour start week, 1 more hour removed mid week, because I'll have soon some photoperiod in the tent,
⏰️ 20/24 On
💪keep removing some leaves 🍃
💧 Give water each 2/3 day
1.5 l Water + Roots + Zym + Bloom + Green Sensation (1 + 1 + 5 + 1 ml/l)
1.5 l Water + Roots + Zym + Bloom + Green Sensation + Sugar Royal (1 + 1 + 5 + 1 + 1 ml/l)
PH @6
💡Mars Hydro - FC 3000
50% 38 cm.
Mars Hydro Fan kit
Setting 6, don't need more for the moment, no smeel out of the tent.
Have a good week and see you next week 👋
Thanks community for follow, likes, comments, always a pleasure 👩🌾👨🌾❤️🌲
Mars Hydro - Smart FC3000 300W Samsung LM301B LED Grow Light💡💡
https://www.mars-hydro.com/fc-3000-samsung-lm301b-led-grow-light
Mars Hydro - 6 Inch Inline Fan And Carbon Filter Combo With Thermostat Controller 💨💨
https://www.mars-hydro.com/6-inch-inline-duct-fan-and-carbon-filter-combo-with-thermostat-controller
Anesia Seeds - Frozen Black Cherry Auto🌲🌲🍒🍒
https://anesiaseeds.com/product/frozen-black-cherry-auto/

Likes
31
Share


@Santica_Garden
Follow
In Conclusion guys I just wished 2 out of the 3 ladies didn't stunt on me so I could have had more to harvest. But I am definitely getting alot better with my grows a definitely feel more confident in giving you guys reviews on my next strains that I have coming.
Thanks for Watching & Happy Growing guys, any questions just ask 👍🏾


Processing
Likes
3
Share


Likes
5
Share


@DaddyPrime2
Follow
5/07/24 day 15
I was worried with how small she is, I started her a little early for outdoor so she hasn’t been getting proper lighting but she’s not too far behind other plants at this age. Hopefully she’s set her roots deep and is ready to grow upwards
5/11 she’s loves the sun so much. I was worried about her but she’s gonna be fine 🌱
5/12/24 I gave her a tsp of Terp Tea Grow 711. This last week she had grown very well, she has 3 nodes total and is working on more
Likes
8
Share


@Growstopher
Follow
6.12.25.
6th week flower started on 6.9. Gorilla zkittles still looking like a Frankenstein after being stunted by tying her down and being way stressed out! Still growing away though putting on bud but this is the smallest plant i have ever grown! Little disappointing but can’t wait for next grow! I’ll never stop growing been going strong for 15 years!
Thanks for checking out grow I appreciate it!
Likes
28
Share


@RakonGrow
Follow
+
Day 72:
Pantine trichom view . it's ready to harvest.
Day 70:
watering both close to the night .
Day 66:
all nice, pantinchen slowly growing ,
pantine normal progress , 2L BottleWater with 100% Flores .
+

Likes
9
Share


@Cogollo_eu
Follow
**Encontrarás la traducción a español al final de la descripción**
From/Desde: 09/09/19 || To/Hasta: 15/09/19
From day/Desde día: 08 || To day/Hasta día: 14
Ocean Grown Cookies Diary / Diario de las Ocean Grown Cookies:
https://growdiaries.com/diaries/38831-oceangrown-cookies-blues-sisters
-----IMAGES & VIDEOS-----
V1 - Transplanting day. I'm using 10 l Aeropots as final recipient. I've used:
- Small layer of ATAMI HydroRokz (perlite) at the bottom of the pot, just for cover bottom holes and to retain a bit of humidity
- Over the perlite i placed 1l of mixture with BioBizz "All Mix" and Volcanic Soil
- Again over, 1l of mixture with BioBizz "Light Mix" + Volcanic Soil & Guano
- And filled the rest with BioBizz "Light Mix" + Volcanic Soil
It's the second time that i broke half of the roots of a plant doing a transplant, It happened to me just for not being careful enough to hold the soil by the lower part. While this is no good, no further signs of that mistake other than the recorded video ;).
V2 - Quick show up on how to correct the color of photos taken under red/ping/purple light.
First I merge the HDR image from 3 bracketed shots, then I apply my custom color adjustment in the HDR resulting image.
As i show in the video, to correct the red light, you have to enhance the blue and green curves, just play with a point in the curves until you find the best adjustment for each of both curves. Then you should go to tones, and play a bit with reds, pinks & purples... and.... Voilá, you can see the results, easy and effective..... but no more easy than using the right white spectrum.
P1 - Cookies Showdown before transplant
P7 - Volcanic soil and Guano
-----WEEK SUMMARY-----
This week was very easy, i didn't do anything to these babies apart from the transplant. This is the first time im mixing something with the soil, I hope not to overfeed the Cookies with the nutes, as i'm going to use the same nutrients i was using.
The first 10 days they were growing in my 60x60x40 tent (DP60), with a terrible chinese light that i always use the first week wen I plant.
PandaGrow 100W (50W draw) - http://www.pdgrow.com/index.php?m=Show&a=index&cid=12&id=53
So after transplanting when i place the plans under the Quantum Board or the Platinum LED, i've notice it on them immediately, they really don't like this kind of chinese lights.
Thus after the transplant the plants has started to grow and wide much more and much quickly.
-----WATERING CALENDAR-----
12/09/19 DAY 11 - 1,5 l after transplant with all week nutrients @ 0.8 EC & PH5.8
*****ESPAÑOL*****
-----IMÁGENES & VÍDEOS-----
V1 - Día de transplante. Transplantaré a AeroPots de 10 l. Para el transplante he usado:
- Una capa pequeña de ATAMI HydroRokz (perlita) en el fondo de los tiestos, sólo para cubrir los agujeros y retener un pelín de humedad.
- Encima de la perlita he puesto 1 l de mezcla de BioBizz "All-Mix" con tierra volcánica
- De nuevo encima he puesto otro litro de mezcla de BioBizz "Light-Mix" con guano y tierra volcánica
- El resto está relleno con una mezcla de BioBizz "Light-Mix" con tierra volcánica
Es la segunda vez que se me parter unas raíces por la mitad en un transplante, eso me pasa por no ser lo suficientemente cuidadoso como para agarrar el sustrato por su parte baja. Esto no es algo bueno, pero he de admitir que aparte del mal rato de que se te partan las raíces, a la planta no le sucede nada de nada, sigue creciendo al mismo ritmo que su hermana.
V2 - Un ejemplo rápido de como corregir la iluminación de una foto tomada bajo un espectro rosado o rojizo
En el vídeo primero compilo el HDR compuesto de 3 fotografías horquilladas y una vez compilado le aplico mi ajuste de color.
Como muestro en el vídeo, para corregir este tipo de luces hay que realzar las curvas de color azul y verde, simplemente con un punto por encima de la mitad de la línea media hasta encontrar los puntos más adecuados para tu luz. una vez encontrados, sólo hay que ir a los tonos y ajustar un poquito el rojo, rosa y morado.
P1 - Muestra de las Cookies antes del transplante
P7 - Tierra volcánica y Guano
-----SUMARIO SEMANAL-----
Esta semana ha sido muy sencilla, no les he hecho absolutamente nada a las pequeñas a parte del transplante. Esta es la primera vez que mezclo algo con el sustrato y espero no sobrealimentar las cookies ya que voy a seguir usando los mismos nutrientes que he usado con anterioridad y de la misma manera.
Los primeros 10 días han crecido en mi tienda de 60x60x40 (DP60), con una luz china terrible:
PandaGrow 100W (50W draw) - http://www.pdgrow.com/index.php?m=Show&a=index&cid=12&id=53
Siempre uso esa luz los primeros días de cada cultivo, por lo que al cambiarlas a la Quantum o al Platinum LED lo noto al toque, realmente no les gusta nada la luz china esa, inmediatamente se ponen a crecer y ensanchar mucho mas.
-----CALENDARIO DE RIEGO-----
12/09/19 DÍA 11 - 1,5 l después del transplante con todos los nutrientes semanales @ 0.8 EC & PH5.8

Likes
21
Share


@ChitownCannaChica
Follow
One plant and 40.5 grams. Super drenched in trichomes. Dense, sticky, and cookie flavor! Amazing buds! They are completely white with trics
Likes
3
Share

@Hempface86
Follow
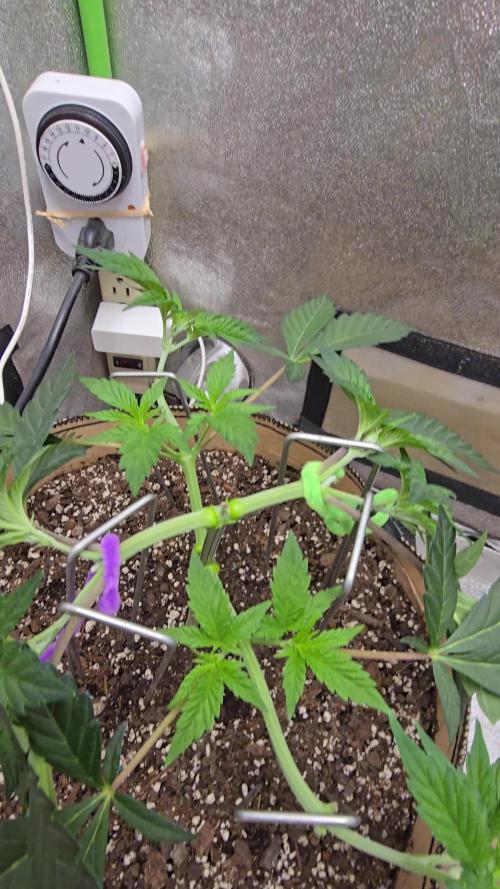
This lady is coming along nicely. I gave her a topping twice and um of the as you can see, I have her spread open to give the other budsights time to fill in... I'm thinking, maybe another week or two of veg, and then flip her ... in which that time I will be popping another bean .. God bless and Merry Christmas 🎅 🎄

Likes
10
Share

@CCSAUTOGROW
Follow
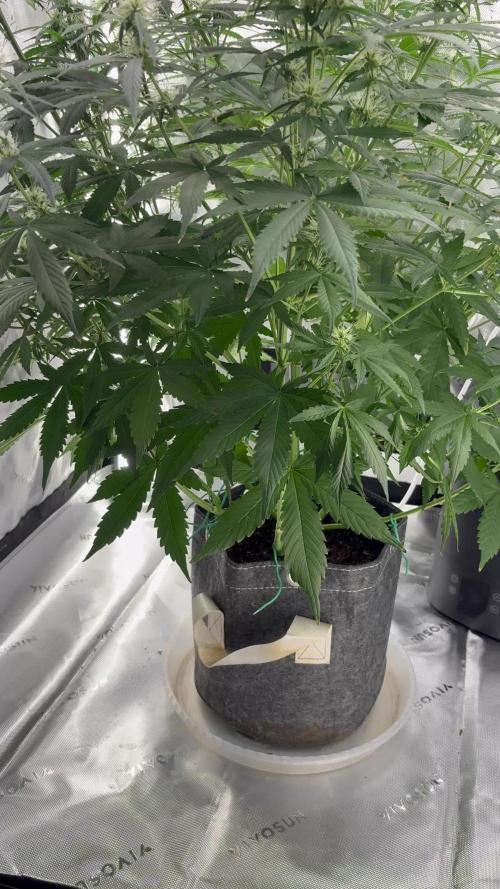
Week 3 flower update for Northern Lights Auto. Starting to stack quite nicely! A lot of bud production this week. She should yield really well. Her top grew right into the light & caused a little light burn. Had to bend the main top down.
Likes
9
Share

@MindFlowers68
Follow
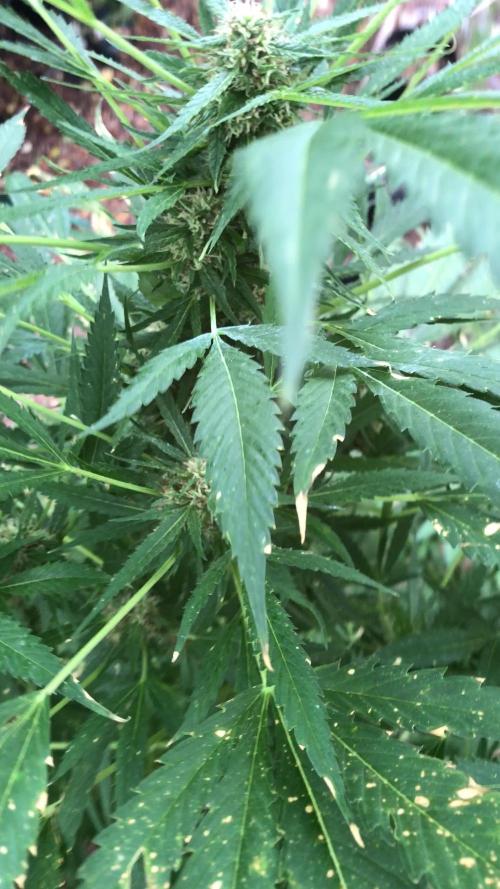
This was the final week. I had no choice to harvest early because pm was starting to settle on a lot of stuff in my garden. The UV light worked for like a day or two and it came back. It's just not worth it. It turned a lot of the buds hairs brown and the leaves did suffer a little damage. Part of that was the peroxide solution. I mixed a little too strong, and it didn't seem like it hurt the plants, but after a few days, they showed the damage. It just seem to burn the leaves a little not really the bud so that's good. There was three days of rain coming, so I wanted to get it cut down.I didn't intend on harvesting so early, and I have no place to dry this because other plants drying so I was forced into freezing it. I cut down branches and wet trimmed it into a bin and ran to the freezer every 10 minutes to get it frozen right away. I maybe could've dried it and had some decent flower but I figured this would be a good opportunity to learn about making bubble hash. I decided I wanted a stainless steel mixing vessel and found this beer brewer for a good price. I think it's gonna be solid. It has a nice drain at the bottom. Then I bought some 5 gallon buckets for spacers for my 5 gallon bubble bags I use the heat gun to peel the stickers off and to heat the bottoms up to make it a little easier to cut them out with the utility knife. I used the heat gun again to soften the edges a little bit so I don't damage my bags. I can't do my washes until I'm done trimming my flowers, but I got a 2 Inkbird temperature controllers to bring my studio down to bubble hash temperatures with my ac unit. I could wait a little longer until it gets colder but I'm not sure how cold it's really gonna get and I wanna get this done soon as I can. I'm gonna have to try it without a freeze dryer so that should be fun and I'm not going to micro plane it at all costs. I got 25 µm screens for drying that I will use a towel to wear most of the moisture out then see if it on to some parchment and I should be able to get my studio really cold and dry to get it dried relatively quickly. I'm seeing it recommended to be 30 to 40% humidity and 50° or so for about a week and it should be dry enough to press some rosin. I'm gonna try to separate out the full melt hash, but honestly I think I'm just gonna get a wide spectrum pool on this hash and just press it into rosin to make it easier to deal with. I kind of was trying to find the cheapest bags it's still decent and wasn't paying attention when I bought it really cause there's no 45 µm and my set and I'm saying that to be the lowest recommended the pool but also seeing a lot of people pulling some nice 25 µm so I think with my early harvest I might have some smaller truck head so I might not be a bad thing to have that bag as my lowest. I'm going to catch everything under 160 to 25.
Processing
Likes
13
Share


@Silverback_Guerilla
Follow
SUNDAY 5/19:
I accidentally left my UV timer in the "ON" position all night and half of the next day...fearing sudden death, I have moved everybody that was almost ready into the dark tent, including the most advanced Candy Cane x C4 and will start harvesting them tomorrow..maximum UVB stress for about 20 hours...if it works out that they are even more potent than expected without turning brown overnight, I'll claim it was "intentional," and purport it as an "advanced technique" 😉
MONDAY:
The big one still looks fine after the mega-UVB incident , so she's still sitting in the dark. I flipped on the green light and went into the tent for a sniff test on everybody. She smells more like a C4 than a Candy Cane...a delightful aroma!
The others have just about dried out..I'll probably start flushing a couple of them tomorrow and just water the others.
TUESDAY:
I harvested and wet trimmed CC4 #2 today. She wasn't very big, but her buds are ultra-dense and stinky. I also harvested the big one today(CC4#3) and hung her to dry in the dark tent. I decided to go ahead and flush everybody else today for the first time. I lowered the lights in the big tent several inches and set the light cycle back to 20/4, plus they are still getting hammered by the UVB for 6 hours of the day in 2 x 3-hour intervals.
WEDNESDAY:
I semi-wet-trimmed CC4 #3 and forgot to take photos..will do it when they are dry, prior to weighing and jarring it up.
CC4 #1 was dry today, so I took some photos of the dried buds prior to weighing it and jarring it up. She weighed in at 66 grams after removing the excess lumber. She's very frosty, but her buds are a little bit fluffier than I like.
THURSDAY:
The last several CC4's will be flushed for the second time tomorrow. 2 more of the harvested plants will get weighed and jarred up tomorrow, but the other two will still need another day or two to dry.
FRIDAY:
I decided to wait to flush til tomorrow. I didn't have time today, so I'll weigh and jar up a few plants tomorrow. I just stuck the dry ones into some 2-gallon jars with boost 62's for now. I'm seeing about 20-25% amber trichomes on a few of them. They should be capable of putting me on my ass for a while. I killed the first few with just a couple ambers here and there, and the next two with about 5-10%, so I should have a pretty good sampling from them to know what it has and hasn't to offer. Glad I chose to grow these accidental F1 hybrids...muah hah hah hahhhh...😆
SATURDAY:
I flushed the last 4 x CC4's with 3 gallons of ph-adjusted spring water today(and the remaining 4 other plants of different strains...my back is killing me..) and took some photos. Their foliage got pretty burnt from the mega-UVB overexposure incident, so I'll my work cut out for me with the trim..but damnit..they are getting super frosty and stinky!😋
I ran out of time, so didn't get around to weighing and jarring the dried plants. So, I just continued the cure in their big jars for the day.
Likes
4
Share

@therealgrowmie
Follow
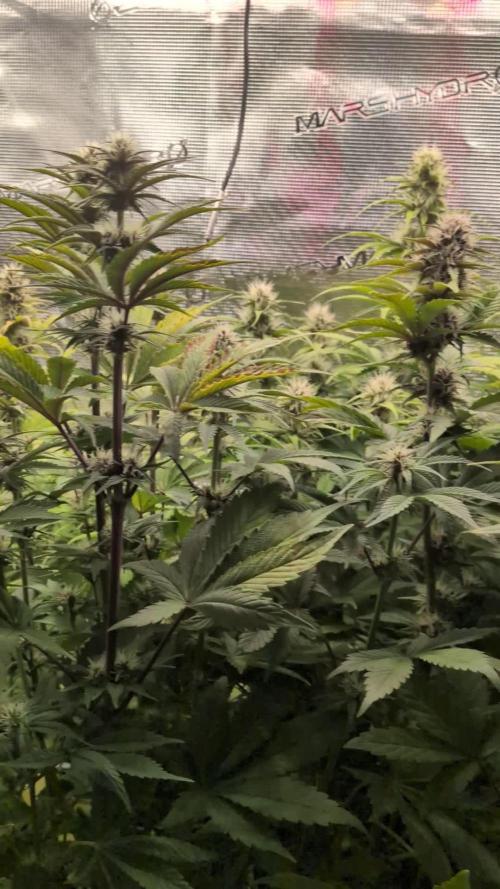
The plants are demanding way more nutrients at this stage - and unfortunately, they’re almost outgrowing the grow space 😅. We’re seeing medium-level deficiencies across the board and some mild heat stress (tacoing leaves).
To fix this, we’ll start adding fertiliser with every watering for the next 4–5 rounds and see how the new growth looks. The flowers still have the potential to become A-B-S-O-L-U-T-E-L-Y massive, so we stay calm and just feed, feed, feed! 🚀🌸
Stats so far:
💧 Watering: 1.5L every other day
💦 Humidity: ~65% RH
🌡️ Temp (lights on): 22–26°C
🌡️ Temp (lights off): 20–22°C
📈 Avg. VPD (lights on): ~1.2 kPa
Likes
5
Share


@BigGGrows
Follow
This week was good for the Cream auto. I performed some defoliation and undid the LST for a couple days as well as raised the lights to 24" to induce some stretching. I did selectively begin LST on the Cream towards the end of week 5. She has been getting 1/4 strength flower nutes and recieved a fresh top dressing of hot soil coco coir mix; as her roots were surfacing. So far so good. Atleast 20 budsites are visible and she has responded well to all the training and is coming into her stretch period. Now all we are waiting on is them white pistols to start shooting at the budsites. Hopefully week 6 will entail this! She should be at about half of her life span at this point. 4-5 weeks more of flower is expected before harvest.


Likes
19
Share


@4Haut
Follow
Hi@ALL,
it's the end of the second flowering week, unfortunately, I’m dealing with fungus gnats. As a countermeasure, I’ve used nematodes. The challenge is that during the flowering phase, I prefer to let the soil dry out completely before watering. However, nematodes require consistently moist conditions to survive. Additionally, I’ve read that nematodes can take three to four weeks to eliminate all the eggs – quite a long time. I might also try neem oil.
Also, I’ve noticed that the tips of 20%-25% of the leaves have turned brown and become crispy. This occurs both at the top and bottom of the plant. I suspect I’ve provided too much light. My biggest challenge currently is finding the right light intensity. I’m using an AC Infinity Ionframe EVO3 with 280W. According to the instructions, I should operate it at 100% intensity during the flowering phase when it’s 30 centimeters away. However, that feels like a full-blown laser show for the plant. (supposedly around 1600 PPFD). Now I’ve positioned it at 45 centimeters and 70% intensity. According to the Photone App, the upper part of the plant receives approximately 900-1000 PPFD. Unfortunately, I can’t fully trust my smartphone an the app… well, that’s what happens when you turn everything into science 😅
And one more thing caught my attention: the smell. It’s not there. I can hardly smell anything. My GG#4 is three weeks old and fills the entire room with its strong odor, but the L.A. Amnesia simply doesn’t smell like anything. Somehow, that worries me a little 😩
Overall, the plant seems "healthy" and does its thing, but I’m unsure whether to prune the lower branches. Although they receive light, they’re about 10-15 centimeters below the upper ones 😓
Wish you a nice day. 👋😀👍
GrowHard.GoPro. 💪
