The Grow Awards 2026 🏆 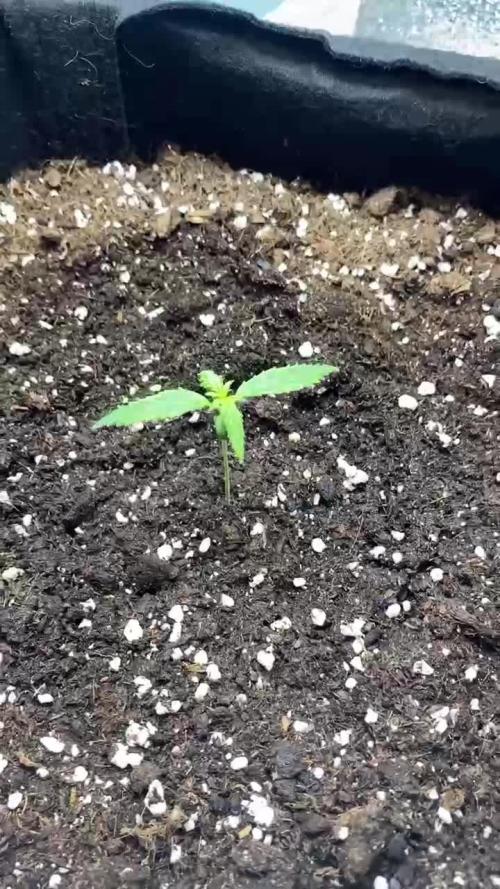


Likes
Comments
Share
@Sativa1444
Follow
HAZIRLIK
Dolabı yapmak bir aydan fazla ileri sürdü; aydınlatma, havalandırması, iç kaplaması, montajı, elektrik kabloları, fişleri, soketleri, prizleri vb. Tüm bunların ardından, sonunda bitirmem ve kotiledonların görünenlerin görünmediğini gördüm. Burada yaşadığım mücadeleyi okuduğunuzda, heyecanımı ve mutluluğumu paylaştığınızı düşünüyorum… =)
//LED'LER//
Torch LED'leri kullanıyorum ve bu LED'ler fiziksel olarak oldukça büyük olduğu için, dolapta ciddi miktarda dikey alan kaplıyorlar. Toplam 70 cm'lik aralıklardan 50 cm'ye düşüyorlardı ve toprak birleştirmeyle yaklaşık 40 cm'ye düştü, bu da başlangıç büyümesi için neredeyse hiç yer bırakmadı. Bunu çözmek için Torch LED'lerini plastik yuvalarından çıkardım ve bunları ayrı ayrı boyutlandırılmış ahşap plakaya düz bir şekilde monte ettim. Bunu yaparak yaklaşık 15 cm'lik alandan tasarruf sağladınız. Ancak dolap yapısı ve Torch LED'lerinin kendisi nedeniyle ciddi ısınma sorunlarının belirtileri.
//KABİN//
LED'leri açtığımda, 26,5°C'lik iç havayı alıp 37–38°C'de dışarıya atıyorlardı. Her lamba bana yaklaşık +4°C'lik bir ısı artışı sağlıyordu.
Durum böyle dönemde fan kapsamını artırdım; bu sıcaklıkta yardımcı oldu, ancak daha sonra içerideki nem 35–30'a, hatta %25'e düştü.
Ne yeteneğimi düşünürken, 12V çift taraflı bir Peltier modül kullanmayı planladım: soğuklukta bakır borular sararak bunu fan destekli bir sıcaklığa dönüştürdüm. Aslında işe yarayabilirdi, ancak sıcak ortamdan ısıyı uzaklaştırmak için ihtiyacım olan sistem çok hantal hale geldi. O yerde, "Büyüme hayali bitti" dedim ve vazgeçtim.
Birkaç gün sonra "Neden olmasın?" diye düşündüm ve dolabı balkona taşımaya karar verdim. Sonuçta, gizliydi - kimse içinde ne olduğunu bilmeyecekti - ve balkon uydu yoluyla mükemmeldi.
Dolap balkonunda olacağından, iç kısım ısıdan, yağmurdan, bölgelerden ve diğer zararlılardan tamamen yalıtılması gerekiyordu. Tüm delikleri ve ortamları sıcak silikonla kapatırım. Daha sonra ısıl işlem köpüğü yerleştirdim ve her şeyi bölme filmle kapladım.
Tüm bunları yaparken termostat, ısıtıcı, nemlendirme ve vantilatör için hiçbir şey görünmemesi için tüm kablo bağlantılarını da gizledim. LED aydınlatma için tek tek veya hepsi birlikte kontrol edilebilen ayrı lamba yuvaları ekledim. Ayrıca dolap kapağı açıldığında tüm ana LED'lerin otomatik olarak söndüğü ve yalnızca küçük bir 5W LED'in açık kaldığı bir sistemim oluştu.
Vantilatörü dolabın sağ üst arka köşesine monte ederek egzozu diğer noktalara yönlendirdim. Vantilatörün gücünde, negatif basınç o kadar güçlüydü ki hava yalnızca girişten katılıyordu - başka hiçbir yerde 0,001 m³ bile hava kaçağı yoktu. (Bunu hava verileri için değil, zararlıları uzak tutmak için yaptım.)
//SICAKLIK VE NEM//
Dolabı balkona taşındıktan sonra bu sefer ciddi bir soğukluk sorunuyla karşılaştım. Geceleri sıcaklık 8-9°C'ye düşüyor, gündüzleri ise 24-27°C'ye kadar çıkıyor.
Elektrikli fanlı ısıtıcılar kullanmak istemedim çünkü havayı çok kurutuyorlar ve tehlikeliler.
Peltier fikrinden ilham alarak tekrar düşünürken çözümümü bir PTC ısıtıcı kullanarak buldum. Hava bağlantıları olan iki alüminyum bloktan oluşan bir PTC ısıtma elemanı yerleştirdim ve gelen tüm havayı bu kanallardan mülkler.
Sistemi 24,5°C'de açılıp 24,6°C'de kapanacak şekilde ayarladım. Bu şekilde sıcaklık sadece 1,5° tolerans içinde -24,5 ile 26,5°C arasında dalgalandı ve LED sayıları azaldıkça daha stabil hale geldi. PTC'yi termostata bağlayarak ısıtma sistemini tamamladım.
Gündüz sıcaklık sorunlarının çözülmesi için, elektrikler 11:45'te kapanıp 17:45'te tekrar açılacak şekilde programladım; böylece 6 saatlik bir kesinti süresini elde ettim. Bu süre boyunca kabin yaklaşık 24°C'lik dış havayı çekiyor, maksimum 27°C'ye ulaşıyor ve ardından tekrar soğumaya başlıyor; tam da bu noktada PTC devreye giriyor. Böylece
daha önceki büyük yangının sorunu tamamen çözülmüş olmuştu.
Ayrıca nemlendirmeyi termostata bağlayıp %70'e ayarlayarak nem sorunu da çözülürm.
Tüm bu süreci 1,5 ayımı aldı ama değdi.
1-2-3. güne kadar tek led 3. günde 10. güne kadar 3 ledide açtım ama bitkide büyüme problemi olduğunu gördüğüm için ışıkları söndürüp tek ışık 40cmden devam ettim.

Processing
Likes
46
Share
@Visions
Follow
Week 6 is here. Finally starting to see a little fade. Full force on her flowers. They are already rock hard beautiful bastards. Stripped some dead weight and bigger fans over sights. At this point in the game I'm giving a low grow feed and high pk for 2 more weeks then flushing. Should be a 9 to 10 weeker. Trichomes are massive.
Day 40 she is showing pink and purple hues. Man even the clone is showing pollen signs! She smells super strong with berries.
Day 41 more colors and denser buds. Expected harvest day, day 63. Next feed which I fed plain water today, will be a heavy pk boost. She can take so much at this point, she can take a half tsp of flower fuel. So week 6 flower start a heavier feed for a week 10 to 11 ending. If not expect week 9. Noted. Shes going to be an amazing mom. Let's see what colors we get our of her dense ass buds.
Likes
10
Share
@JeyGanesha
Follow
Questa panty punch auto ha un profilo TERPENICO DOLCISSIMO, fruttata,e vaniglia...un profumo.....Una vera delizia tutta da gustare........
È la prima volta che faccio la panty punch auto, e devo dire che anche se ancora non la ho assaggiata, sono sicuro che sarà un altra pianta autofiorente che ci metterò la firma, come la forbidden runtz auto della fast buds(molto valide per la mia terapia)

Likes
5
Share
@dauntless
Follow
Week 5 started July 24, 2022
Growth is still strong into week five, I see no pre flowering, I think that is because she started really slowly due to me getting used to this new light, etc.
July 27, 2022
Smells like lime sherbet up in here. LST, light defoliation to get some light on the lower colas. Really watered in today for the first time soaking the media, she is stretching and I see maybe some hairs for pre-flower - hope not too too soon though, I'd like more height than nine inches before she fully stretched
Likes
36
Share
@Mazgoth
Follow
The grow is going fast enough and 0 problems,the smell is very very strong.

Processing
Likes
2
Share

Likes
28
Share
@DudeGrowsWeed
Follow
Hello GD Crew!!!
I’m glad to finally be back with a new diary. A LOT has happened since my last diary. The large room I was using back then got infested with spider mites. For a while I thought I had them beat, but they came back with a vengeance. So I thoroughly cleaned my 2x4 tent and set it up in the opposite side of the house. However, that part of the house is also now my new man cave and was under construction until a few months ago (its still not completely done yet, but close enough).
I have also switched back to LED lighting. I’m using a pair of Spider Farmer SF1000’s (100w) LED’s. I was using a 315w CMH fixture but felt I was getting better results with my old blurple ViparSpectra’s (both of which have died). Also, it was getting too hot in the tent with the CMH. To be completely honest the best weed I’ve ever grown was using a 1000w HPS, but that could possible melt a 2x4 tent and I’d be tripping circuit breakers all the time again. After a lot of research it looked like the Spider Farmer SF1000’s were the best bang for the buck in the LED market these days. They have the right components (Samsung LM301B diodes and MeanWell drivers) and have great specs. I was able to purchase them on Amazon Prime Day for $129/each (USD).
For soil I’m using Coast of Main Stonington Blend Grower’s Mix. I had been previously trying to amend and reuse old soil or mix old soil 50/50 with new soil and in retrospect that was a mistake. The PH was totally unpredictable as were what nutrients were available or deficient. I felt like I was always trying to fix soil problems and one thing would lead to another. So, from now on its fresh soil in every pot. I’m using 3 gallon pots with self watering reservoirs at the bottom. In addition to the Coast of Main Stonington Blend I’m also using Sungro Black Gold Seedling Mix. I filled the 3 gallon pots with the Coast of Main Stonington Blend first, then dig out a hole in the middle about the size of a grapefruit and filled that hole with the Sungro Black Gold Seedling Mix. Then I planted the seeds about knuckle deep in the middle of the Seedling Mix. This seemed to work great, both pots had small seedlings appear in 5 days.
This diary will focus primarily on FastBuds BlackBerry, but I am also growing a DinaFem Critical+ Auto at the same time. I’ve grown both of these strains a few times in the past with mixed results. But, I’m hoping this grow will be far greater than those in the past. My plan is to allow the Coast of Main Stonington Blend act as the ‘super soil’ it is supposed to be and not add any additional nutrients. I will however be adding RealGrowers Recharge on a regular basis (I love that stuff, it really makes a difference) and will probably also add some CalMag once in a while. But that’s all.
Additionally, I do not plan on doing much training with these girls. I will LST bend them over at a 45 degree angle around the time they hit their flowering stretch, but that’s all. Bending at a 45 degree angle gives better exposure to lower branches and allows those lower branches to produce larger tops.
Hoping for the best!!! Please feel free to comment and follow. I’ll be updating this diary weekly and will be doing videos in the future.
Here’s a breakdown of the equipment:
1 - 2x4x6 tent
2- Spider Farmer SF1000 LED fixtures (100w/ea)
1- Carbon filter
2- 3 gallon pots w/self watering reservoirs
Coast of Main Stonington Blend Grower’s Mix
Sungro Black Gold Seedling Mix
RealGrowers Recharge
Also, here’s what Coast of Main says about their Stonington Blend:
“Coast of Maine Organic Products Stonington Blend Grower’s Mix is a complex “super soil” designed for high performance container growing. It works well with tomatoes, and, where growing cannabis and medical marijuana is legal, growers have reported tremendous results. This soil incorporates mycorrhizal fungi, kelp, fish bone and alfalfa meal, as well as worm castings, peat, coir and lobster compost.”
Here are the specs on the Spider Farmer SF1000’s:
Materials: Samsung LM301B diodes and MeanWell Drivers
Power Draw: 100w
PPFD: 922 umols/s @ 12”
PPF: 250 umol/m2/s
PPE: 2.5 umol/J
Yield: 2.5g/W
Spectrum: 660-665nm,3000K,5000K, IR 760nm
LED: 218 pcs


Likes
45
Share
@PotCasso
Follow
Week 6 of Flower:
Watered in at 800ml, water only.
Now we wait for the fade(senescence).
View through the scope: Mostly cloudy some clear.


Likes
6
Share
@cwgrows
Follow
The preflower stretch has been incomparable to any Soil grow I've seen! These sativas already caught up and don't show any signs of slowing down.

Likes
33
Share
@LouShott
Follow
Day 22 - ppm=661 ph=5.4 Temp=27.4c-22.5c
Condition=1st bit of lst. Smell is already getting stronger, smell outside box
Day 24 - ppm=686 ph=5.4 Temp=26.6c-21.1c
Day 25 - ppm=709 ph=5.4 Temp=26.5c-20.8c
Day 26 - ppm=732-1100after ph=5.4 Temp=26.2c-24.7c
Added 1/2 strength flower nutes with remaining veg nutes
Day 27 - ppm=1107 ph=5.4 Temp=26.0c-23.6c
Day 28 - ppm=1121 ph=5.4 Temp=27.4c-22.6c
Did some tucking

Likes
15
Share
@BicRed
Follow
9th Week
I'm trying to address the deficiencies, I believe it's due to using coconut substrate. I am gradually reducing the daily light exposure by 1 hour until reaching 12/12. As it's the first time with Delta 9 in the cultivation, I have trow it foliarly.

Likes
Comments
Share
@MrDainAndToeniAsiaCrew
Follow
This week, we feed mycorrhizal fungi to the plants and it gets the excellent results. The plants grow extraodinarily.
Likes
4
Share
@Alanonthearth
Follow
ENGLISH BELOW 👇
Día 90 en total del clon, pude sacar dos generaciones declones antes de que entre en flora, pero a la primera generación se las comió por la noche un ejercito de hormigas negras.
Es impresionante como la planta se adapta a todos los procesos (incluso clonación y enraizamiento) de una forma increíble.
Cultivo con calendario lunar desde hace unos 10 años y está es la primera vez que veo una planta anticiparse y preparase unos días antes para los cambios lunares.
Muy divertida para cultivar, todas las semanas genera procesos diferentes, lo que hace muy dinámica y muy rápida.
Day 90 in total of the clone, I was able to get two generations of clones before it started flowering, but the first generation was eaten at night by an army of black ants.
It is impressive how the plant adapts to all the processes (including cloning and rooting) in an incredible way.
I have been growing with a lunar calendar for about 10 years and this is the first time I have seen a plant anticipate and prepare itself a few days in advance for the lunar changes.
Very fun to grow, every week it generates different processes, which makes it very dynamic and very fast.
Likes
202
Share
@CrazyHorse
Follow
Hello friends 😁
So far so good, Purple is nearly done, Cinderella start to develop a nice buds, Bruce Banner is very slowly recovering from problems. I think BB have got some roots problems, we will see in next 1 or 2 weeks a results.
Day 59 Purple Lemonade is running on regulate water, flush coming soon 😇
Stay safe, You Lovely Girls Growers 😇 💪 🙏
Likes
12
Share
@Roberts
Follow
Fast version A is doing good. She is getting too big if anything. I topped her tops again to help stop her reaching up taller. I am waiting on my photoperiods that are flowering to finish so I can move these plants to that room. Everything else is going good. Thank you Dutch Passion, SSSC, Medic Grow, and Athena nutrition. 🤜🏻🤛🏻🌱🌱🌱
Thank you grow diaries community for the 👇likes👇, follows, comments, and subscriptions on my YouTube channel👇.
❄️🌱🍻 Happy Growing 🌱🌱🌱
https://youtube.com/channel/UCAhN7yRzWLpcaRHhMIQ7X4g.
Likes
4
Share
@Hodo420
Follow
The plants are exploding in growth. Especially the gorilla cookies. I need to start doing a better job of watering my girls. I means its hard having to mix up all these nutrients at one time so I water my plants 2 at a time. I water 2 one day then the other 2 the next day. Im trying this method out cause it makes watering not so intense during dlower.
Likes
5
Share
@Satax
Follow
Everything is still going well overall. I’ve always had an issue with a Cal/Mag deficiency that I had to monitor for some of the plants. Otherwise, they’re swelling nicely — the Green Poison is starting to look really good and is showing signs of maturity, earlier than the others. I’m starting the flush on all the plants since I’ve fed them well during the grow, and I think they still have enough nutrients left in their systems.
The smell is very strong, and the buds are dense and resinous — it’s looking promising..
I’m going to start applying my stress technique on the plants by inserting screws into the stems and using a small scalpel to remove some bark along the trunks, in order to push the resin production even further.


Likes
5
Share
@lalee
Follow
hello. this is the first plant I have used big bud and bud candy but I don't test the water and the plant was damaged with high PH so I had to buy a PH meter and TDS meter so wish me luck with other plants


Likes
48
Share
@AsNoriu
Follow
Day 71. Girls are still stretching !!! Will supercrop biggest Blue Dream this Monday or maybe Sunday if i am lucky. I think next watering is on Saturday and it takes 2 days , so i can do it only before watering, less damage to plant and hopefully quicker recovery !!!
But they reach sky, so no other way !
This week will be updated after main actions.
Amazing run !
Day 72. Supercrop and watering day, before this - plants look amazing, but they reach sky and will go hermie in shade most of the time.
Will update AFTER ... ;))
Job done ! Moved monster to the corner and supercroped her hard, left two colas untouched. Think Blue Dream #2 could need same drastic measures ;)))
All girls got feed, raised lights to max. Hope stretch is over, otherwise half of harvest larva buds and i already cleared plants heavily ...
One more round of defoliation for sure !
Day 75. Blue Dream took supercroping like nothing, still reduced watering on 25% for two goes, tops already standing up, leaves reverted to new horizont and hopefully no bananas !!! ;))
Girls got water with CalMag and video is straight after last round, i water in 3 rounds, 30 min inbetween, have no run off most of the time.
Happy Growing !
