


Likes
13
Share


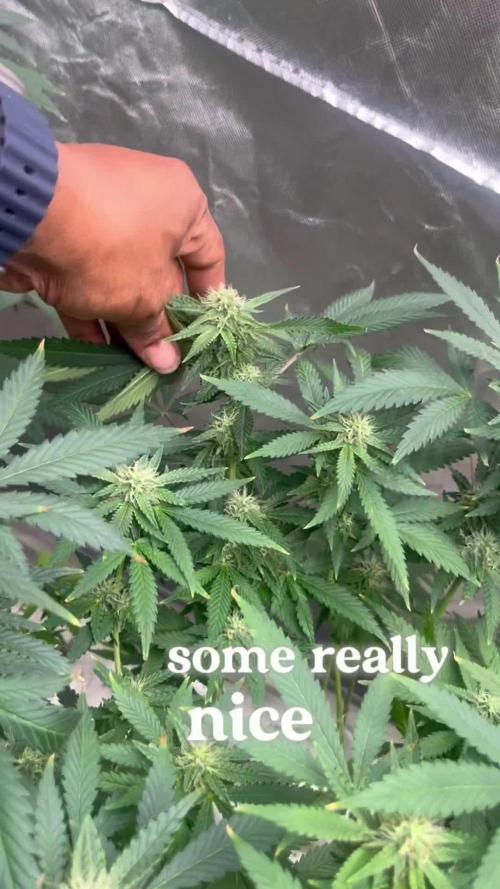
@Growyourownathome2x2
Follow
Day 24 since sprout 3rd of April was delayed transplanting these as I was waiting on my pots to arrive, all done now there looking happy in the new pots 😁🍁

Likes
23
Share


@JeyGanesha
Follow
Primeras semanas de flores.passaggio da 18/6 a 12/12
.adesso care piante sacre mie, ora datemi dei bei fiori per la mia terapia
...Om namah shivaya 🙏

Processing
Likes
4
Share


@samadhi
Follow
Week 14 in the books and all is going well. She continues to put on weight and density and smells absolutely amazing. A kind of earthy fruity aroma that I know will press into the excellent tasting rosin dabs.
I've given what may be her last feeding and will start checking trichs to gauge how much longer she has left. I've done some light defoliation this week to promote light penetration and am very surprised how even the lower nugs seems to be fattening up into something impressive. A good thing since I didnt really lollipop her. Seedsman genetics really are nothing to turn your nose up at. I'm thoroughly impressed and have no complaints with this how this run has gone. I also have to acknowledge the switch to organic as a huge step forward in dialing in my grow. I just couldnt seem to get nutrients right with mineral based but have had no issues with any of my girls since switching ti BioBizz. Top notch stuff, I must say.
I'm hoping we are nearing the end of this run as I cant wait to get her curing and pressed into something I can dab on as we roll into summer still in lock-down mode. That said, I definitely don't intend to rush her. :)
Thanks for following along! Do me a favor and click "Like" if you like what you see here and let me know what you think in the comments. Cheers! 🌱👊

Likes
5
Share


@Mr_nugs_lover_David
Follow
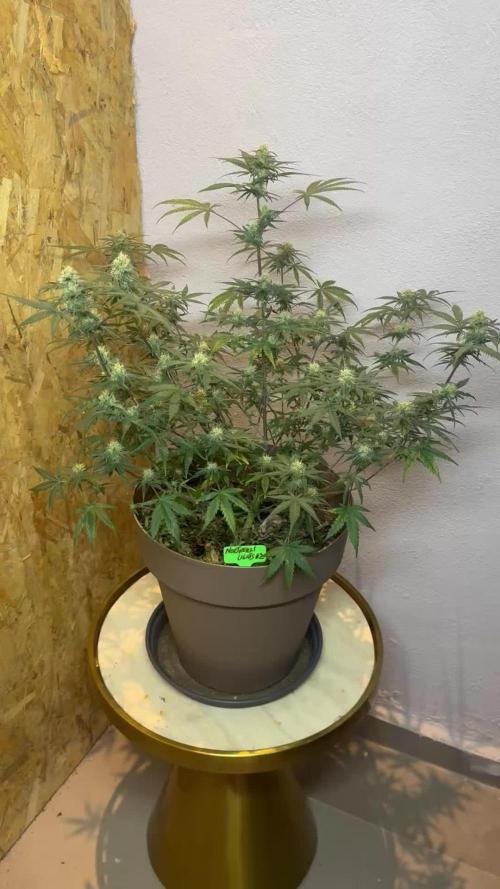
In this week the buds are starting to get more and more compact, very sticky flowrs, and the pheno #2 smells a little stronger than this pheno but still the same strong amnesia smell very apreciated, I'm a big fan of amnesia strains, and this amnesia pro by gea seeds is an amazing version of amnesia hypro very happy with her performance so far! Stay with me to see how this lady until the end of the road! 💛❤️💚👨🌾

Likes
2
Share

@Simba732
Follow
❇️ Another week officially checked off the list
❇️ Stretch phase: completed ✅ She’s done reaching and now locking in on flower power.
❇️ Loaded with bud sites and honestly, that’s a view I never get tired of 👀🔥
❇️ Citrus notes are starting to come through the nose knows 🍋✨
❇️ She’s growing very differently from her sister. looks genetic. No panic mode activated here 😌
❇️ Regular feed, quick pH adjustments, and we’re cruising
❇️ Week 10… let’s get it 🚀

Likes
176
Share


@NuggetPawn
Follow
Posted a day later than usual 🌝
Nice and easy week again, some early signs of senescence showing on a few leaves. Quite dry in there this week so a few leaves are looking a bit crispy but all in all they’re looking good with no signs at this stage that bud rot appeared on other bud sites other than the one I cut off two weeks ago.
The 18w Migro UVB will be installed next week, ready to be turned on two hours per day for the final three weeks.
🌱


Likes
35
Share


@eldruida_lamota
Follow
Venga familia que ya viene la cosecha de estas Cereal Milk de RoyalQueenSeeds, que ganas que tenia ya de darles machetazo.
No veas que pinta que tienen estas plantas.
Las flores aparte de prietas se ven bien resinosas, con 70 dias de floración.
a sido una genética con la que disfruté mucho cultivarla, es resistente , y no es para nada complicado cultivarla por lo menos en interior.
Agrobeta:
https://www.agrobeta.com/agrobetatiendaonline/36-abonos-canamo
Mars hydro:
Code discount: EL420
https://www.mars-hydro.com/
Hasta aquí es todo , espero que lo disfrutéis, buenos humos 💨💨.
Likes
43
Share


Likes
7
Share


@Nikkov
Follow
Today was the day I decided to prune the top of the 5 knot, and as the beginning of the week I watered again with top crop's top veg fertilizer
Likes
2
Share


@KEVS_BEST
Follow
Woche 5 - Vorletzte Woche der Vegetation und beeindruckende Entwicklung
Die fünfte Woche markierte die vorletzte Vegetationswoche, und die Pflanzen zeigten weiterhin bemerkenswertes Wachstum und Gesundheit. Die Nährstoffe und das Gießschema blieben unverändert, wobei der EC- und pH-Wert sowohl im Drain als auch in der Nährlösung stabil auf optimalem Niveau waren. Die Luftfeuchtigkeit wurde leicht auf 60 % gesenkt, während die Temperatur weiterhin im Bereich von etwa 22 bis 26 Grad blieb.
Die Pflanzen setzten ihr Wachstum in beeindruckendem Tempo fort und entwickelten enorme Seitentriebe. SPOILER !!!: Ohne jegliches zusätzliches Training bildeten sich am Ende der Woche 16 bis 18 Hauptnebenbuds sowie jeweils ein zentraler, kräftiger Headbud. Die Genetik dieser Pflanzen erwies sich als absolut außergewöhnlich.
ENGLISH
Week 5 - Final Week of Vegetation and Remarkable Development
The fifth week marked the penultimate week of vegetation, and the plants continued to show remarkable growth and health. The nutrient and watering schedules remained unchanged, with EC and pH levels stable at optimal values, both in the nutrient solution and the drain. Humidity was slightly reduced to 60%, while temperatures stayed in the range of 22 to 26 degrees Celsius.
The plants kept growing at an impressive rate and developed enormous side branches. Without any additional training, by the end of the week, they formed 16 to 18 main side buds along with a strong central head bud. The genetics of these plants proved to be absolutely outstanding.

Likes
60
Share


@BudBoutique
Follow
! this is my current status, gonna upload my last veg weeks within the next week - got a bit busy around Spannabis - thank you for your understanding! 💚
Welcome to Bud Boutique Grow Diary - really appreciate all your love and support :)
Dont forget to check out my other current grows!
🗓️ This Week:
- Stretch was super high within the first 3 weeks of flower
- Day 24: attaching once a week APTUS Foliar with Regulator & Nutrispray with the amazing CannaFogger by Petra Grow
- Day 28: bud development is super beautiful and praying up, even though the plant still pretty small and compacts compared to others
Thank you for still staying with me 💚
___________________________________________
--- 🌱 Strain (Sponsor) 🌱 ---
🏷️ Cookie Haze by Kannabia Seed Company
https://www.kannabia.com/en/feminized-cannabis-seeds/cookies-haze
--- 🥗 Nutrients and Feeding (sponsored by APTUS: APTUS Ambassador) ---
🍸 APTUS: full nutrient schedule extreme
-- Regulator, N-Boost, P-Boost, CaMg-Boost, K-Boost, Allin1 Liquid, Startbooster, Topbooster, Enzym+ every feeding
-- Fulvic-Blast, NutriSpray as Foliar each once a week
🔗 https://aptus-holland.com/
--- ♻️ Grow Control (Sponsor) ---
TROLMASTER: TENT-X + LM14 Light Adapter to dim/sunrise/sunset lights + Temp & rH Sensor all remote on App
🔗 https://www.trolmaster.eu/
--- 🚿 PetraGrow (Sponsor) ---
CannaFogger Foliar Spray
🔗 https://www.petratools.com/product/petragrow-cannafogger-atomizer-new-mini-fogger
--- 🏭 Grow Setup ---
💡LUMATEK Zeus Pro 600
* 🏠🌿 Indoor: Homebox 120x120x200cm (4x4)
* 📐🌀 PrimaKlima exhausting Fan 1180m3/h (running on 60-80%)
* 🌀 Can Light Filter 800m3/h & 1x Fanbox 1x Dyson fan for Air circulation
🔗 https://lumatek-lighting.com/zeus-600w-pro-29/
🔗 https://primaklima.com/de/shop/ventilatoren-de/ec-ventilatoren/pk160ec-tc/
🔗 https://canfilters.com/products/filters/
All Likes and comments are highly appreciated!!!
👨🌾 don't forget to check out my Instagram for daily educational content: budboutiquee
- Bud Boutique

Processing
Likes
9
Share


@APmonsta
Follow
End of week 10 looks like 3 of the ladies will start getting flush next week the others look like they will go until week 13 or 14 definitely wasn't my plans I was hoping around week 11 everything would be done. But even tho they are all the same strain and dropped the same day they finishing at different times wired but ok. I'M READY TO CUT but I have to let them run they course
Ps: the tricone production and smell is amazing on these plants once I pull them out of the net I will get sum awesome pics for your growers


Likes
5
Share


@BombBuds
Follow
Die Farben werden immer spektakulärer es ist der Wahnsinn!
Schädlingsbefall geht wieder zurück. Es wurden ein zweites Mal nemathoden ausgebracht und ab dieser Woche die umluftventilatoren stärker eingestellt.
Likes
1
Share


@AboGrows
Follow
this is probably week three of flower. grow diaries doesnt give me the option to select week one of flower it skips automatically to week 5. glitches still persiat with this site that im not happy about. also upload times for a 30 second clip takes really long and i have good internet. i have to cut it into two 30 second clips to make it worth uploading
Likes
17
Share


@JonnyKush
Follow
hello growmies! day 51 finally the pre-flowers begin to appear. I apologize for the few photos but unfortunately they really filled the box and I find it difficult. overall I have to say they look in perfect shape! I will keep you updated thanks for passing by. like and comment! good day and beautiful growth to you 🌳🌱
Likes
63
Share


@Wicked_Stix
Follow
Shes big
Shes beautiful
Shes a beast!
Shes my winner. The last plant standing of this run and she is getting flushed with ro water. I have taken late flower clones of this girl because it would be inhumane to let her die. I will reveg them if they root and dose one with silver to make a lot of beans. Beaming her with 720 watts of light her last week of life just because I can.
Ps. If she dont win diary of the month then its rigged🤣🤣
Likes
56
Share


@GrowingGrannie
Follow
12/26 - Gave her a bucket change today and increased the PK while lowering the EC just a tad - the pH and EC had been telling me for a couple of days that she needed a change and needed more PK but a slightly lower EC ... so that's what she finally got after Christmas stopped my intense care of her. She wasn't unduly upset - but she's showing me some love right now since the bucket and nute change-up... All of her flowers are bulking up nicely and her colors are getting intense - REALLY dark! Friends who stopped by over the weekend were as mesmerized as I am! Cheers to all - next up, NEW YEAR'S EVE and more great growing from all of you!
12/27 - Needing to adjust the pH today which isn't surprising.. always happens after a bucket change but I'll get it stable - meanwhile, she doesn't seem to notice which is just fine by me! Love her!!
12/29 - The lady has the grow closet all to herself now and I've been able to pull her over and down a bit to get the lower buds closer to the light... #2 Bruce is completely out of the tent, harvested and drying... but I've got one coming up - just popped the seed in a glass of water yesterday - but Pinky won't mind, she'll still be the Star of the Show in the tent... Buds are fattening up nicely for a sativa and are, actually, a little surprising to me! She really is a pretty, pretty plant if I do say so myself!

