




Likes
17
Share


@leliantu
Follow
Día 66 desde la germinación. 1 semana de floración, estoy cambiando el foto periodo de forma paulatina, para ver como se comportan las plantas, 1/2 hora cada 1 día. Las plantas han retomado su vigorosidad, tanto la Gelato como la California Orange están creciendo a buen ritmo y totalmente recuperadas después de haber estado unos días decaídas. Esta semana empece a aplicar en forma de riego foliar el estimulador de floración (Big One).

Likes
7
Share


@High_And_Hydro
Follow
- Ich hab die erste Woche des Biobizz Allmix Düngeschemas gestartet und gebe wie immer erstmal vorsichtige 100%, da meine Erde an sich durch den Kompost recht potent sein sollte.
- Außerdem hab ich mit meinem Calmag-Rechner mein Leitungswasser angepasst. Die Werte könnt ihr auf den Bildern sehen.
- Den PH-Wert passe ich ebenfalls auf 6,5 an.#
- Die Lampe bringt zur Zeit etwa einen PPFD-Wert von 350 - 360 µmol/s/m² bei 18 Stunden Beleuchtungszeit (DLI von 22 - 23 mol/d/m²). Sie wird aber nur eingesetzt bis es warm genug draußen bleibt. Tagsüber stehen sie jetzt schon draußen, sofern es nicht regnet oder stürmt.
Die Papaya Cookies macht sich hervorragend und sie ist sehr uniform mit den anderen Fastbuds Strains bis jetzt. Sieht gut aus finde ich 💪😁👍

Likes
9
Share


@Jakobyzone420
Follow
Soddisfatto del mio lavoro? SI ASSOLUTAMENTE SI . Questa è la mia prima esperienza nel campo della coltivazione della cannabis e sono veramente contento del risultato, ma non devo cantare vittoria troppo presto adesso manca la seccatura e la concia speriamo bene ahahah 🤣


Processing
Likes
7
Share


@MadeInGermany
Follow
Hi everyone 🤗.
The lady developed very well this week 😃.
Only she is a little more hungry than she got 😄 which is why she gets a little more of the Orcanic Grow Liquid from the next watering 👍😃.
Otherwise everything is going great.
I wish you a lot of fun with the update, stay healthy 🙏🏻 and let it grow 🌱
You can buy this Strain at
https://thecaliconnection.com/original-sour-diesel.html
You can buy this Nutrients at
https://greenbuzzliquids.com/
Type:
Original Sour Diesel ( Clone )
☝️🏼
Genetics:
Fem seeds- Original Sour Diesel to Original Sour Diesel BX3 RVSD Male
Reg seeds- Original Sour Diesel x Original Sour Diesel BX3 Male
👍
Vega lamp:
2 x Todogrow Led
Quantum Board 100 W
💡
Bloom Lamp :
2 x Todogrow Led
Cxb 3590 COB 3500 K 205W
💡💡☝️🏼
Soil :
Canna Coco Professional +
☝️🏼
Fertilizer:
Green Buzz Liquids :
Organic Grow Liquid
Organic Bloom Liquid
Organic more PK
More Roots
Fast Buds
Humic Acid Plus
Growzyme Big Fruits
Clean Fruits
Cal / Mag
Organic Ph - Pulver
☝️🏼🌱
Water:
Osmosis water mixed with normal water (24 hours stale that the chlorine evaporates) to 0.2 - 0.4 EC. Add Cal / Mag 2 ml per l water every 2 waterings . Ph with Organic Ph - Pulver to 5.8 .

Likes
17
Share


@The_Projexx
Follow
Welcome to week 6 of flower! Things are starting to shape up quite nicely and some of the plants are starting to get colourful! Its hard to capture on the current camera I'm using but my new one that's on its way should be much much better! Overall really excited to see what this week will bring!
I will be checking some of the ladies trichomes to see how far along we are either this week or next week to give me an approximate harvest window!
Huge shout outs to @MarsHydroLED for all their outstanding work on lighting and grow spaces that make it fun and easy to grow! Huge shout outs go to @Seedsman , @PyramidSeeds and @GreenHouseSeedCo for all their outstanding work developing genetics that give us that fine medicine!
HUGE HUGE shout outs to all my followers and to the people who stop into the diary alike! Keep inspiring to grow!
-The Projexx
Day#36F Pictures N/A. Ladies are starting to fade but they're still putting on mass daily!
Day#37F Pictures N/A. The terpenes an nose coming off the plants its INSANE we got lots of nice and unique smells going hard here!
Day#38F Removed some of the leaves blocking nodes, cleaned up the bottoms abit more.
Day#39F The ladies continue to put on mass and some of the leaves are really starting to turn purple!
Day#40F The ladies continue to cruise along. Fuel D.og#2 is starting to come back to a nice green
Day#41F Kings Juice#1 is really starting to show her fade now! Ladies continue to put mass on.
Day#42F Water increased to 5L each at 550PPM. Stalks are getting massive!
Recap: Things went really well this week, the ladies continue to put on mass on their rock solid flowers! With some of the plants starting to show signs of an open window for harvest Im going to break out the microscope next week to see exactly how far along we are! Over all really really pump about the plants , looking like its going to be a great harvest!


Likes
18
Share


@Chubbs
Follow
420Fastbuds
GelatoAuto
Week 5
What up grow fam. Hopefully everyone had a great 420. These 3 beautiful ladies are growing amazing. Started there transition into flower this past week. So where starting to get some great growth and all in all the plants look super healthy. Happy Growing
Likes
10
Share


@Schnabeldino
Follow
After I changed the lamps to 2 x 200 watts, the plant on the left also started to bloom.
I gradually had my equipment delivered and starting to go "Professional".
AC Infinity Controller and exhaust fan, from now on I can also check my values from outside

Processing
Likes
8
Share


@HonchosGrow
Follow
Looking great going into day 8!!! No nutes just plain tap water!
Likes
6
Share


@GreenMunchkin
Follow
Day 45 - 26/11 - She is looking very good, leaves a perky and buds are growing.
Day 47 - 28/11 - The trichome production is really starting nicely, I can start smelling her.
Day 49 - 30/11 - She was top dressed with fresh vermicast and a few teaspoon of a top dress mix (at the bottom), all of that was mulched with a layer of erograstus grass.
---------
Top dress mix :
Equal parts Alfalfa meal, Rock dust, Kelp meal, Insect frass.

Likes
23
Share

@Jakobyzone420
Follow
Ottime genetiche con qualche pecca però poca stabilità nel gusto centrale e tende a piegarsi per il peso delle foglie. Hanno lo stesso trattamento delle mendocino e loro sono molto più in salute
Likes
52
Share


@Ogchemst
Follow
Quick kush is called quick for a reason 👌, nice big indica leaves starting to grow and stretch pretty fast, i had to re pot one of the girls so one of them might look a bit sad but she will get better (its the salts)
Flushing and Buffering-
I am personally using Canna Coco Coir,mix with one brick of plagron coco coir(had one left).
1. Why you Should buffer your Coco. Lets get to reading! (Its Worth it for those that dont know about it)
There are cation exchange sites in coco that will interfere with nutrition until they are buffered. The cation exchange sites in coco naturally come loaded with sodium (Na) and potassium (K) cations. However, the Na and the K are only weakly held to the exchange sites. In the presence of calcium (Ca) or magnesium (Mg), the sites will release their Na or K cations and lock onto the Ca or Mg. These processes are known as “cation exchanges”.
Buffering coco is accomplished by soaking it in Ca and Mg. This allows the cation exchanges to take place prior to adding plants. Simply soak your coco in a solution of Cal/Mag water and the exchange sites will release their K and Na cations and lock onto the Ca and Mg. When the cation exchange sites bond with Ca and Mg rather than Na and K, it is “buffered”. The bonds that hold the Ca and Mg to the sites are very strong and cation exchange will largely stop. This means that all of the nutrients that you add to the water will be available to the plant at the ratios that you provide them.
2. Alot of growers Grow in Unbuffered coco coir and its a big mistake guys, I myself was a "victim"😬of unbuffered coco and it does cause alot of problems... now i am going to try and fix them!
-----GROWING IN UNBUFFERED COCO---
Many growers are unaware of the need to buffer the coco and they try to grow plants in unbuffered coco. In unbuffered coco, the cation exchange sites will strip the nutrient solution of the Ca and Mg and replace those cations with Na and K. This creates a sub-optimal Nutrient Element Ratio (NER) and renders Ca and Mg unavailable to the plant.
Failing to buffer the coco is why so many growers suffer calcium deficiencies in coco grows. Manufacturers of prepared coco products try to exploit these problems and convince growers that only their proprietary products are suitable for growing. However, it is actually very simple to properly buffer your coco yourself. This tutorial walks you through the process and provides all the information you need to turn even the cheapest brick of dehydrated coco into a superior growing medium.
I hope i Helped out someone who didnt know about this link on how to Buffer your Coco Coir is Here https://www.youtube.com/watch?v=OQi8AMMIyyA&t=18s
14/02/2019- I Decided tp raise up the amout of nutes and im giving them 1,5 ml per L so 15 ml's for 10 L / 2 Gallons of water

Likes
6
Share


@MasterKush714
Follow
So hey guys update just did a feeding last night then made the video update
im really happy with the vigor and growth of this grow, hopefully i can finish out the grow in the next 4 or 5 weeks lets keep it going guys thank!!!!
FOOOPPPP!!!!!!!!!!!! This stuff is amazing!!!!!! REAALLLY THOUGHH!!!!
LETS GROWWWWWWW!!!!


Likes
294
Share


@StarLorr
Follow
Welcome to my Ðivine ØĠ Ķush diary.
In this diary:
Seeds: sponsored by Ðivine Șeeds
Media: Promix HP
Nutrients: Advanced Nutrients, Diablo Nutrients, Gaia Green Power Bloom.
Light and Weather: Şun☀️and Mother Earth.🌎
___________________________
Feeding:
Tue 06Aug: 4L nutrients pH'd 6.5 and 4L water not pH'd
Wed 07Aug: 8L water not pH'd
Thu 08Aug: top dressed Gaia Green Power Bloom 6 tbsp
Sat 10Aug: 2L water not pH'd
Sun 11Aug:6L water not pH'd
Mon 12Aug: 8L water not pH'd
___________________________
*please note that most water only feedings are 2L at the time throughout the day in bottom saucer*
___________________________
Ķush Ķush survived the wrath of Debby(Tropical Storm)she stood her ground(in her pot)😂she did very well, check out the video😉
______________________________
Ķush Ķush and other sisters got the defoliation treatment, mostly fan leaves.
_______________________________
Top dressed her up with Gaia Green Power Bloom about half a 3/4cup as i can't keep up feeding her liquid nutrients in such industrial amounts😅but the results are already showing and she seems to like it, i will continue liquid nutrients feeding once or twice a week.
______________________________
Thanks for stopping by, likes and comments are appreciated!👊🏻😎
Keep on growin!
Keep on tokin!!!
😙💨💨💨💨💨

Likes
8
Share

@CannaArchive
Follow
Growth Stage:
Transition / Pre-Flower
Environment:
Temperature: ~25–26 °C
Humidity: ~60–62 % RH
Light intensity: increased to ~500 PPFD
Watering / Feeding:
Plants were watered with plain water + CalMag during this week.
No base nutrients were added, as the focus was on keeping stress low during the transition into flowering.
Observations:
Week 3 marked the start of pre-flowering for both Apricot Autos.
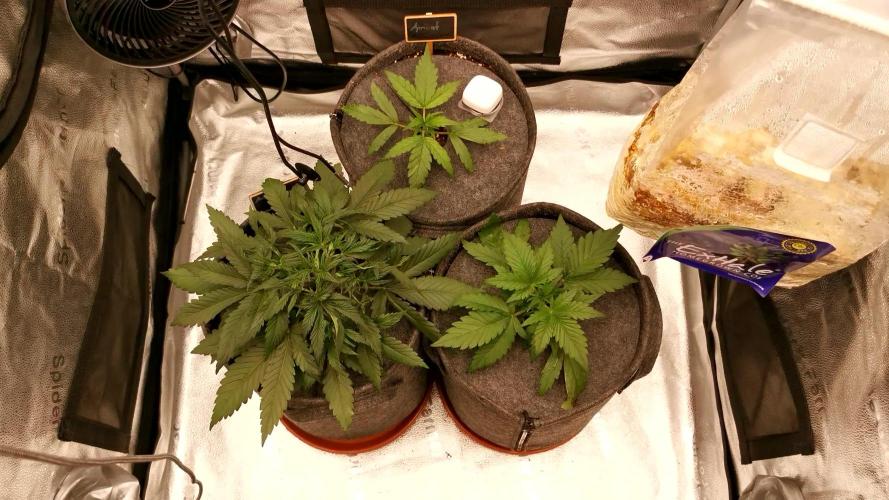
Apricot Auto #1 showed the first white pistils about one day after the Amnesia, clearly indicating the transition into flower. Growth looks stable, and the plant continues to improve compared to the earlier weeks.
Apricot Auto #2 entered pre-flower about one day after #1. While still noticeably smaller and less developed, it also showed clear signs of flowering and continued growing steadily.
The transition into flower felt slightly early for the Apricots, but the decision was made to let them run naturally without any intervention.
Training / Work Done:
No training or manipulation was done this week. The plants were left untouched to avoid unnecessary stress during the transition phase.
Notes:
Week 3 was mainly about observation and stability. Both Apricot Autos successfully entered pre-flower and are now preparing for the upcoming stretch and early flowering phase.
Processing
Likes
6
Share


@Mr_nugs_lover_David
Follow
She's looking very healthy and beautiful,she's developing well after the LST we applied she's loving her organic love,she is being fed with lactobacillus liquid made by myself,florians living organics which conteins a lot of different types of mycorrizae and worm castings.and bat guano which is the extract of guanokalong which is also full of fulvic and humic acids,and beneficial bacteria,she's in a living soil

Likes
23
Share


@GrowGuy97
Follow
Wish the buds would have got a little bigger but feel like that’s particularly my fault for a short Veg but overall I am blow away by the outcome for all the seeds to just be random bag seeds! 2 of the plants are drying now 3rd one will be cut tomorrow & the other 2 got probably 2 more weeks! Will do a taste & smoke report and also give a weight as soon as they dry & cure a little bit but honestly couldn’t be happier with my first grow! Thanks for all the support & help along the way & happy growing friends!🤙🏼✌️🏼🌱
Update on 1st plant - dry weight 42g, still smelled pretty Earthy when I put it in the jar but the smell is definitely coming out now, extremely sticky & frosty buds❄️: 1:🏼🙏🏼
Update - plant 2 Dry weight was 40 grams! Extremely happy with the out come this is honestly some of the best bud I have ever smoked! Amazing to me this came from a random bag seed, it has a very citrusy flavor, smells & smokes amazing! Honestly a 10/10 in my book, wish I could knew what strain this was so I could grow it again!😫❄️✌️🏼🌱
Update - plant 3 Dry weight 34g, smells & look phenomenal, the buds are much smaller & had the smallest yield so far but this is by far the best smelling so far! Will have a smoke update on this one soon, stay tuned friends & happy growing!✌️🏼🌱
Update - plant 5 dry weight was 52g it dried a little faster than plant 4 which I will probably jar tomorrow! Will update again with a smoke report soon, this plant brought my total so far up to 168 off 4 plants👍🏼 Thanks for following friends & happy growing! Also the butter I made from the trim was 🔥🔥


Processing
Likes
45
Share


@UKauto
Follow
Not long left for her now I don't think.
Buds are fattening up nicely the main cola is rock hard almost.
Ridiculously strong pepper smell to her haha if you give a bud a rub a lovely fruity smell comes through though. Gonna do a week of dragon force next week then possibly start flush depending on trichomes. I have even checked them at all yet but will get it done over the weekend.