


Likes
Comments
Share

@Bread_n_Buds
Follow
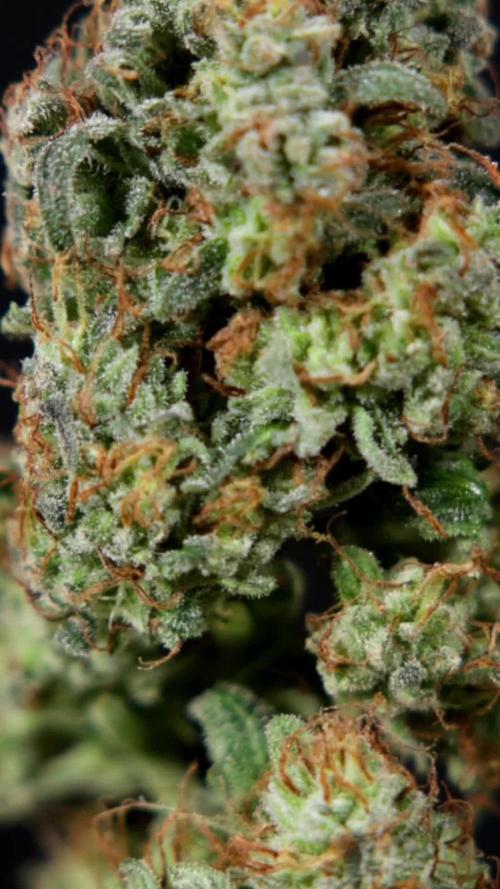
Our second Watermelon Candy Automatic, naturally only from Zamnesia, like all the plants I grow, is truly a great result. I'm very disappointed that I broke the main cola during LST when the flower hadn't yet formed, but I'm equally happy I didn't cut the plant as I was about to. In the end, the flowers turned out beautifully, and you can see them clearly.
Look at the flowers; they're beautifully plump, full of resin, and with a scent that feels like it's wafting under your nose like a spring breeze.
The trichomes are beautiful, and it's a truly stunning plant.
Techniques chosen: Here, we were using LST and the main branch broke, so we left a little LST on the remaining branches.
We're 100% organic and 1000% Plagron, as always.
The soil we chose is the recently launched Plagron Bio LightMix, which will allow us to get started with smoother and more reliable watering, without the sudden changes that liquid fertilizers can cause. A week's worth of soil is enough, so don't overdo it.
Choose your preferred style and calculate your results on the website:
www.plagron.com
Visit the new Growshop area on the Zamnesia website:
Z - https://www.zamnesia.io/it/531-growshop
A fantastic strain, not too tall but very bushy! Give it a try!
Z - https://www.zamnesia.io/it/7484-zamnesia-watermelon-candy-automatic-semi-seeds.html
Z - This feminized strain boasts everything you've come to know and love about the original cultivar, but with a few welcome improvements. Combining Watermelon x Candy Kush with a pinch of ruderalis genetics results in a strain you won't want to miss, we promise.
Being an autoflowering strain, the growing options are practically endless. So, whether you choose to grow it indoors or outdoors, one thing is certain: it will be extremely easy to grow. Otherwise, it will take care of itself without requiring any special care. With a little general care and pruning, you can control its growth all the way to harvest. It's perfect for beginners growing indoors, as well as more experienced growers looking for easy-to-grow, high-yielding plants.
Although it's not a particularly tall plant, its size can be easily controlled with LST, to which it responds positively. So, if you're interested in experimenting with this technique, don't be afraid to give Watermelon Candy Auto a try.
In just 9-10 weeks from seed to harvest, this strain grows rapidly and, just like the original, will display a bushy canopy completely covered in large buds. Regardless of your growing environment, you can expect impressive yields. Indoor plants produce 350-400 g/m², while plants left to flower outdoors produce 50-100 g/plant. These are quite substantial yields for an autoflowering strain.
With a THC level of 20%, Watermelon Candy Auto is a 50/50 sativa/indica hybrid, offering users the best of both worlds. After a few tokes, you'll feel more optimistic, and even the most stoic smokers won't be able to suppress a smile. After a few minutes, a deep sense of relaxation will take over, perfect for welcoming you home after a long day.
Overall, Watermelon Candy Auto builds on the qualities that made the original so popular, but it also has other qualities that make it a much simpler and more practical option.
You know it, but I recommend it. You'll find so much beauty here, essentially "the best that nature has to offer."
Z - www.zamnesia.com
Music // www.radionula.com
+ Feng Shui Music
+ Frequency 432Hz

Likes
3
Share

@BunnyBud
Follow
Week 3 – Vegetative Stage | Tester Log
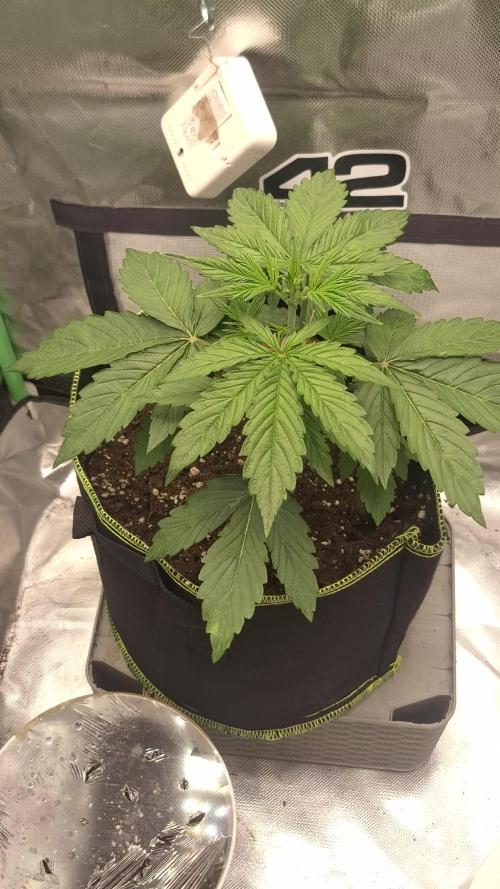
The plant has now entered week 3 of vegetative growth. A light feeding schedule with base nutrients and CalMag supplementation was introduced early to support healthy metabolic activity.
The plant shows good vigor and compact morphology, with short internodal spacing and symmetrical lateral development, indicating efficient light exposure and stable growth. Leaf color is mostly uniform healthy green.
A slight observation: the new emerging leaves show very light yellowing on the tips. At the moment it’s unclear whether this is caused by light proximity or a very mild nutrient excess, but it remains minimal and will be monitored and adjusted if necessary.
The seedling was kept under 12h light during the first week for acclimation, then switched to 18h light, which is currently maintained to optimize vegetative growth.
Overall the Sticky Orange XXL Auto continues to show healthy and stable early development going into the next growth phase. 🌱

Likes
2
Share


@Albanymedicinalgarden
Follow
Good growth, Blueberry powering through cal mag issue. Skywalker will be first to harvest for sure. Insane amount of frost on that plant. Glueberry og continues to require fairly frequent defoliations to open up canopy. Blueberry starting to get some subtle berry coming through.


Likes
2
Share


@Saintvicious
Follow
Can't Lst this thing enough. Seems like every other day it needs readjusting. Autos are crazy when they start going.
Likes
226
Share


@Kitties_and_Colas
Follow
~_~_~_~_~_~_~_~_~_~_~_~_~_~_~_~_~_~_~_~_~_~_~_~_~_~_~_~_~_~_~_~_~_~_~_~_~_~_~_~_~_~_~_~_~_~_~_~_~_~_~_~_~_~_~_~_~_~_~_~_~_~_~_~_~_~_~_~_~_~_~_~_~_~_~_~_~_~_~_~_~_~_~_
10/09/21
😿 well they held out as long as they could but 2:3 plants folded like a cheap suit.. a combination of stretch and crazy weight.. these buds are as dense as cucumber lol, even harder that the impossibly dense Critical P's we grew.. I had to invite a friend to give them a squeeze, to ensure there's more than 1 party to this fish tale lmao 😹..long story short the tent is a mess, we staked a few the best we could and made a few mains comfortable to finish on their side..we don't plan to move them until they're finished.. the next run in this tent will have to be aesthetically pleasing to make up for this hideous finish..*balance*..all plants are fading fast after cutting their feed, we're doing water only and they should be fully washed out come harvest ❤️..thanks for reading if you made it this far and happy harvests everyone!!💡🌱 😽💨
Youtube: https://www.youtube.com/watch?v=tZjRQlDaBvM
~_~_~_~_~_~_~_~_~_~_~_~_~_~_~_~_~_~_~_~_~_~_~_~_~_~_~_~_~_~_~_~_~_~_~_~_~_~_~_~_~_~_~_~_~_~_~_~_~_~_~_~_~_~_~_~_~_~_~_~_~_~_~_~_~_~_~_~_~_~_~_~_~_~_~_~_~_~_~_~_~_~_~_
10/12/21
Buds are swelling and the crystals are really piling on, however the tent is a mess lol...I'm really looking forward to harvesting these plant... trichs are still mostly clear, we definitely have some time left

Likes
14
Share


@MUSRIME_supreme
Follow
В нашем регионе, аутдор бесполезен :)
Проще было все эти семечки вырастить в индоре.
Всем спасибо за просмотр =)
Likes
34
Share


@Birale91
Follow
Day 71. Start week 4 looking great by now.
Day 74. Starting to have a bit smell of fruit with citrus. Hope her taste will be good.
Lots of trichomes on early stage of bloom. :)
Video on day 75 and 77.

Processing
Likes
54
Share


@Mimi420
Follow
Hello grower family!
FD 41,and looking awsome to me!Nice fat and dense buds on both.And the colours are amazing again!I'am sure that the reason for that is bat guano from Plagron.Eating like crazy,abaut 9l of solution for both,every 3 days.One more feeding with nutrient,and then start to flush them.
Stay green!🌱


Likes
4
Share

@PapaTerps
Follow
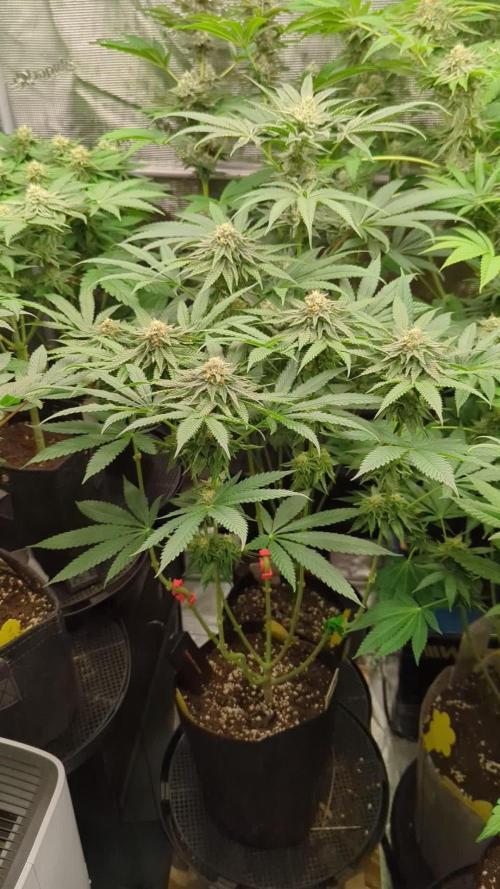
Studio Cherry - Wizard Trees
Week 5 Bloom
🌸 Great week for the Studio Cherry, she's developed nice sized nugs and is still working on bulking, she is also starting to show signs of maturity on her top most flower! Her scent has also come in, fresh morello cherry with a citrus kick; very pleasant!
✂️ No work again this week, she has good airflow and light is penetration to the lower budsites👌🏻
💧 Watered every three days with 3L of RO water - nutrients were mixed individually, in order and then finally pH'd to 6.3. I've altered her nutrients again to keep up with her flower production.
💡 PPFD: ~800
♒ VPD: 1.55kPa
🌱 Days from seed: 98
🌸 Days in Bloom: 37


Likes
15
Share


@RBK2023
Follow
Patiently waiting for all of the buds to get bigger and stack on that weight, still happy with how they are growing

Processing
Likes
7
Share


@DigitalJockeyKing
Follow
got bitten by a spider and realized i was always wondering what my spiritual animal was, and realized it was spiders after that awakening of asking mother natures help me and spiders made a blood pack and since then nature has been helping me out by protecting my plants, from thieves and bad rotten people. and nature gave me spiders to protect my children. one of my spiders thats protecting the rooibaard is called GREGGK.
Likes
23
Share


@nonick123
Follow
Día 34 (27/05) Riego con 750 ml H2O + Regulator 0,15 ml/l + P-Boost 0,5 ml/l + CaMg-Boost 0,25 ml/l + TopBooster 0,2 ml/l - pH 6.2
Día 35 (28/05) Riego 750 ml sólo H2O pH 6.2
Día 36 (29/05) Riego con 750 ml H2O + Regulator 0,15 ml/l + P-Boost 0,5 ml/l + TopBooster 0,2 ml/l - pH 6.2
Día 37 (30/05) Riego 750 ml sólo H2O pH 6.2
Día 38 (31/05) Riego con 750 ml H2O + Regulator 0,15 ml/l + P-Boost 0,5 ml/l + CaMg-Boost 0,25 ml/I +TopBooster 0,2 ml/l - pH 6.2
Día 39 (01/06) Riego 750 ml sólo H2O pH 6.2
Día 40 (02/06) Riego con 750 ml de Té de Compost de Floración
💦Nutrients by Aptus Holland - www.aptus-holland.com
🌱Substrate PRO-MIX HP BACILLUS + MYCORRHIZAE - www.pthorticulture.com/en/products/pro-mix-hp-biostimulant-plus-mycorrhizae
Likes
13
Share


@UncleOrganic95
Follow
Early in the week my girl got a big trim probably the last until the big chop.
I also gave her a spinosad treatment, and a compost tea with unsulfured molasses and other good compost ingredients.
At this point I'm just watching the buds grow and watching out for any unwanted pest.
The trichomes are still clear and some pistils (not many) are starting to turn brown so I believe I still have a few more weeks.
Likes
Comments
Share

@AlpenZilla
Follow
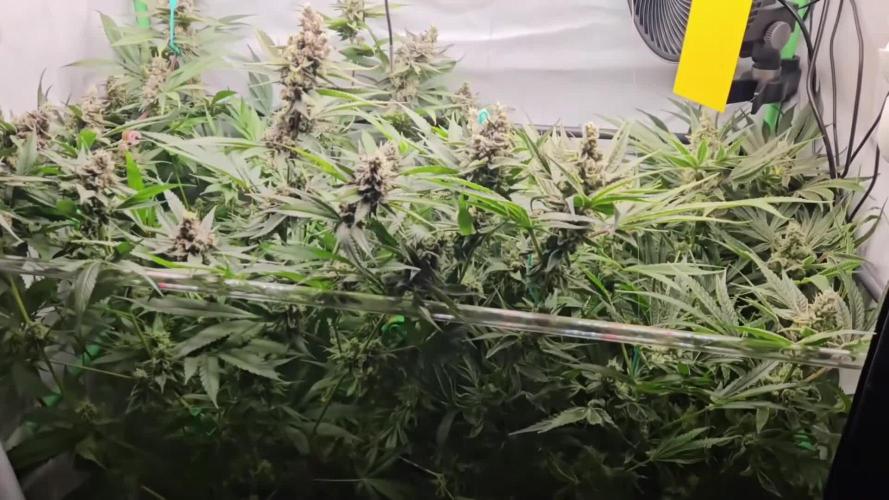
🗓️ Week 12 – Flower Week 8 ✅ (Late Flower)
🔹 General
The plants have now entered deep late flower.
Buds are gaining more density and resin, and the aroma is intensifying day by day.
For Cherry MAC Muffin, fruity-sweet notes are becoming dominant 🍒✨
🔹 Feeding
After a longer phase of reduced EC, feeding has been increased again.
Input: 1.65–2.0 EC / pH 6.3
Runoff has built up to ~3.0 EC, but remains stable – no signs of overfeeding or stress.
No flushing yet – the final flush with Flawless Finish is planned in about a week 💧
🔹 Observations – Cherry MAC Muffin
🍒 Development: Densest buds in the tent, very sticky and frosty
📏 Runoff EC: 3.0
✅ Status: No stress symptoms despite the high EC – watering frequency slightly reduced to maintain balance

Likes
2
Share


@Gumbassman
Follow
Sooooo my bbk has startet flowering, she smells nice and look good i gave her 800ml with a little bit of nutrition for flower. She looks like feeling fine about it. And sorry I don’t have a good natural light.
Likes
12
Share


@Mousse
Follow
Lampe 100%
Sooo… die Mädels sehen richtig gut aus. 🌱🔥
Die Blüte hat sich prächtig entwickelt, schön kompakt und richtig harzig. In der letzten Woche sind sie gefühlt explodiert. Einige Colas ziehen sich jetzt schon ca. 30 cm den Stängel entlang. 💪
Ich bereite jetzt alles auf die Ernte vor, Ende der Woche ist es soweit. Eventuell nehme ich vorher nur die Headbuds runter. ✂️
Die mittlere lasse ich allerdings noch weiterlaufen, sie hängt hinterher und bekommt deshalb ein anderes Gießschema, während die anderen schon in den Flush gehen. 🌿
Ende der woche wurde teil geerntet
Mo:
Gießen: #1:#3
4L-6L je
Dünger für Links und Rechts:
Canna Coco A&B = 1 ml/L
CalMag = 0,6 ml/L
Cannazym = 0,5 ml/L
Boost = abgesetzt.
pH: 5.8
EC: 0.8
Gießen: #2
4L-6L je
Dünger für Mitte:
Canna Coco A&B = 2 ml/L
CalMag = 0,8 ml/L
Cannazym = 0,5 ml/L
Sugar Royal = 0 ml/L
Green Sensation = 1 ml/L
pH: 5.8
EC: 2,1
Di: nichts
Mi:
Gießen: #1:#3
4L-6L je
Dünger für Links und Rechts:
Canna Coco A&B = 1 ml/L
CalMag = 0,6 ml/L
Cannazym = 0,5 ml/L
Boost = abgesetzt.
pH: 5.8
EC: 0.8
Gießen: #2
4L-6L je
Dünger für Mitte:
Canna Coco A&B = 2 ml/L
CalMag = 0,8 ml/L
Cannazym = 0,5 ml/L
Sugar Royal = 0,8 ml/L
Green Sensation = 0,8 ml/L
pH: 5.8
EC:1,9
Do: nichts
Fr:
Gießen: #1:#3
4L-6L je
Dünger für Links und Rechts:
Canna Coco A&B = 0,8 ml/L
CalMag = 0,6 ml/L
Cannazym = 0,5 ml/L
Boost = abgesetzt.
pH: 5.8
EC: 0.8
Gießen: #2
4L-6L je
Dünger für Mitte:
Canna Coco A&B = 2 ml/L
CalMag = 0,8 ml/L
Cannazym = 0,5 ml/L
Sugar Royal = 1 ml/L
Green Sensation = 1 ml/L
pH: 5.8
EC:2.1
Sa : nichts
So:
Gießen: #2
4L-6L je
-nur wasser mit pH5.8
-Teil geerntet
Gießen: #2
4L-6L je
Dünger für Mitte:
Canna Coco A&B = 2 ml/L
CalMag = 0,8 ml/L
Cannazym = 0,5 ml/L
Sugar Royal = 0 ml/L
Green Sensation = 1 ml/L
pH: 5.8
EC: 1,9


Likes
5
Share


@killerjoint
Follow
10-24-2024
ALL THE STRAIN RECOMMEND FLOWERING TIME IS 7-8 WEEKS
TRY TO FINISH WEEK 8
STILL HAS 19 MORE DAYS...
LAST FEED WITH NUTS .BURNED SOME OF TOP FAN LEAVES ......
BUT CHECK OUT QUEEN,DR SLEEP , WULFF ,POWER... CRAZY FROST TOE TO HEAD
SMELLS .............NEED TO RUN FANS WITH HIGHER SPEED FOR SMELL...
NO MORE NUTS....JUST WATER .....STAY IN THE COURSE...
STAY GREEN ....
10-27-2024
-HIT THEM WITH HUMBOLDT COUNTY NUTS
G10 -5ML PER GAL
SNOW STORM -5ML PER GAL
PURPLE MAXX-7ML PER GAL
EVERY TWO DAY NEED TO WATER....

