Likes
Comments
Share
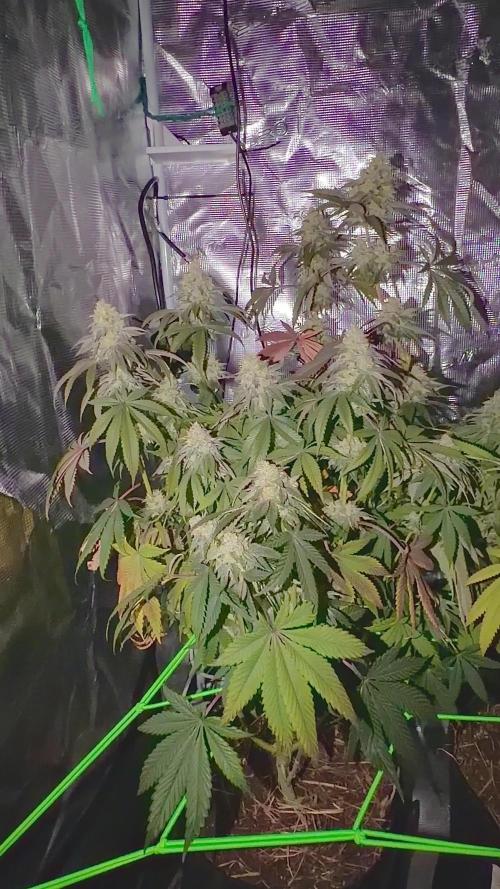
Harvest about a week early to not get any amber thricomes. The buds look amazing so sugary don’t want them to become amber. Will press like 70-80% into rosin. So don’t want no ambers’s. Otherwise this strain was amazing to grow! It was super stable all the time and produced some Sick buds for me! This shit smells like gods v*gina!
Likes
10
Share
@Prop207
Follow
3 Gal qStart Ph 6.5 45ml PBPG 15ml cal-mag 15ml silica blast End Ph 6.5 See some fungus gnat hanging about. Run off had some dead larvae, will hit dem fucks with some Hydrogen Peroxide brew.
Likes
3
Share
Beautiful Plant and good smell - smells like pungent hop with sweet hints. this was her last week. Week 10 she got only 10hrs of light for the first 5 days of the week. Day 66 - Last watering Day 68 - lights off Day 70 - harvest
Likes
8
Share
03/01 - (M) - Currently in pre-flower - She is growing amazingly - No deficiencies, wilted leaves or visual que's - I have changed her feeding program to daily micro-dosing between clean water and nute feed alternating days - She will be transferred into the 4x4 flower tent within the week. 03/01 - (C) - The clones are coming along nicely - Transplanted the 7 into 1 gallon pots last night - The substrate is the same as the mother with an added top dressing of worm castings last night - Increased feed formula on some of the nutes (Nitrogen/Silica and Cal-Mag) - High humidity/High heat is the name of the name the game - Specs to follow Clone specs - Week 2 Height - 13 Inches Temps - 82°(f) Feed Temp - 65° (f) Humidity - 79 - 81% Watering Vol - 2 cups every 3 days Nutrient Feed - Nitrogen - Silica - Cal-Mag - Microbes - Kelp - Horti Grow - Myco
Likes
1
Share
WEEK 24-30 March. Finally a new space for the girls, on an homemade recirculating system that I named AQUALOOP, consisting in 2 drippers connected to a water flow system added with air. Air is also blown directly into the substrate and into the reservoir !
Likes
12
Share
@rickhaZe
Follow
-hemos comenzado la 3ra semana desde germinación -día 21 fue aplicado vitamax pro de grotek nutriens en solución de 1 ml x litro -fueron regadas con 400ml o 0.4 L cada planta Dia:24 fue aplicado bud fuel pro para ayudar la pre floración
Likes
20
Share
She's doing very well. Gave her a little clean up today - removed some undergrowth that won't make to the top. Keeping her diet pretty much the same other than an increase in Cal-Mag this week - the other plant in my tent was showing signs of deficiency so I thought they'd both get a little boost since I've been treading lightly. She did a bit of stretching this week - grew about 5" taller! Looking forward to see some fattening of the buds! 👊 ----------- Day 65: PPM 668; PH 5.8. I think her drink is bit on strong side with PPMs increasing a bit since the rez change. Topped her off today with 3/4 gallon of filtered water to dilute things a bit. Sitting at 574 PPM; PH 6.2. Buds are starting to stack nicely and fatten. Day 66: PPM 553; PH 6.2. Let her be. Seems to be happier now that I've watered down her drink a little. Frost is starting to form around some of the buds and she's getting more fragrant. Day 67: PPM 584; PH 5.2. Gave her 3/4 gallon filtered water with light dose of nutes. She's now running at 553 PPM; PH 6.0. Day 68: PPM 563; PH 6.0. Let her be. Day 69: PPM 532; PH 5.8. Gave her 3/4 gallon filtered water/feed. Now at PPM 542; PH 6.2. Day 70: PPM 532; PH 5.1. Discovered my PH meter is toast and has been reading much higher than it should. Got a new meter and hopefully back on track. Thank goodness this plant is resilient. Gave her some PH up and sitting at 6.1.
Likes
15
Share
@Messypies
Follow
13/07/2020 - growth looking good. Highered lights to try to get plant to stretch 14/07/2020 - plants green and seems to be responding well to nutrients. 15/07/2020 - all looking good
Likes
17
Share
@Blkout959
Follow
Getting a early start since I'll be busy all week will add photos this week when I have a minute looking forward to the next few weeks happy Sunday everyone let's kick this coming week's ass
Likes
59
Share
@WhiteEdge
Follow
Flowering W2 D1 Middle girl - 75cm,h from yesterday 2-3cm 3cm, SUPERCROPPING on all main stems. Think there is no other way to reduce height at this point. Too late for topping, so supper cropping is the best option right now. After bending secure main stem with wire for first 2-3 days Add 10l solution to tank, clean return line and filters Light intensity - Max 850 PPFD in middle , Light distance - 55cm, DLI - 37, Light Interval 12/12 Midea AC-27c5% day/night, TM 68/63%, AC Infinity AUTO Day RH - 69/72%, Night RH - 63/74%, Day Temperature - 28/29c, Night Temperature -22c/23c, Leaf temperature 25/26, VPD Day - 0.8/1.0 , VPD Night 0.8/0.9 CO2 - 400+PPM Nutrient Tank - 2.80EC, PH-5.80 Temperature - 19/20c, ORP-410/450mV Day Misting - 15s ON/20min OFF + 1 x 5 minute long shot Night Misting - 15sON/30min OFF Runoff 12.00h-r3030ec - low runoff, 18.00h-r2980ec, 22.00h-r2860ec Flowering W2 D2 Super cropping looking nice, girls getting up they heads, leaving like this for now, no touching Light intensity - Max 850 PPFD in middle , Light distance - 55cm, DLI - 37, Light Interval 12/12 Midea AC-27c5% day/night, TM 68/63%, AC Infinity AUTO Day RH - 69/72%, Night RH - 68/70%, Day Temperature - 28/29c, Night Temperature -23c/24c, - getting warmer nights, reducing night/day temperature differential, slowly.. Leaf temperature 25/26, VPD Day - 0.8/1.0 , VPD Night 0.8/0.9 CO2 - 400+PPM Nutrient Tank - 2.80EC, PH-5.80 Temperature - 19/20c, ORP-410/450mV Day Misting - 15s ON/20min OFF + 1 x 5 minute long shot Night Misting - 15sON/30min OFF Runoff - 10.00h-3030ec/6.05ph, 22.00h-r2860ec Flowering W2 D3 Light intensity - Max 850 PPFD in middle , Light distance - 55cm, DLI - 37, Light Interval 12/12 Midea AC-27c5% day/night, TM 67/63%, AC Infinity AUTO Day RH - 69/72%, Night RH - 68/70%, Day Temperature - 28/29c, Night Temperature -23c/24c, - getting warmer nights, reducing night/day temperature differential, slowly.. Leaf temperature 25/26, VPD Day - 0.8/1.0 , VPD Night 0.8/0.9 CO2 - 400+PPM Nutrient Tank - 2.80EC, PH-5.80 Temperature - 19/20c, ORP-410/450mV Day Misting - 15s ON/20min OFF + 1 x 5 minute long shot Night Misting - 15sON/30min OFF Runoff - 10.00h-3080ec/6.08ph, 19.00h-r2890ec Flowering W2 D4 Foliar feed - Athena Stack 0.2ml + 1 drop H4SiO2 - 200ml Remove wire from tops-supper-cropping, Light intensity - Max 800 PPFD in middle , Light distance - 55cm, DLI - 36, Light Interval 12/12 Midea AC-28c5% day/night, TM 67/63%, AC Infinity AUTO Day RH - 69/72%, Night RH - 68/70%, Day Temperature - 28/29c, Night Temperature -23c/24c, - getting warmer nights, reducing night/day temperature differential, slowly.. Leaf temperature 25/26, VPD Day - 0.8/1.0 , VPD Night 0.8/0.9 CO2 - 400+PPM Nutrient Tank - 2.80EC, PH-5.80 Temperature - 19/20c, ORP-410/450mV Day Misting - 15s ON/20min OFF + 1 x 5 minute long shot Night Misting - 15sON/30min OFF Runoff - 16.00 r3130/5.95, 21.00h-r2900ec.. Flowering W2 D5 Runoff around 3450ec-5.95ph, girls looking great, growth 2-3cm/Day - 80cm Get some carbonization in tank, tomorrow new solution Flowering W2 D6 Runoff - 10.00 r3210, Nutrient Tank solution change, 2.80ec/5.95 , 2.92ec/5.99ph New irrigation timings - 20/20 - 20/30 Filter change, girls have some leaf tip burn, but stacking is great! Flush in midnight, 10min - 5+5+5+5, two longer feeds per day is sufficient ( 18.15 i 00.10) Checking runoff daily ,+3.0ec or more Flowering W2 D7 Foliar feed - Athena Stack + H4SiO2 - 200ml Canopy @ 86-88cm, growth for this week 15/16cm Light intensity - Max 800 PPFD in middle , Light distance - 55cm, DLI - 36, Light Interval 12/12 Midea AC-28c5% day/night, TM 67/63%, AC Infinity AUTO Day RH - 69/72%, Night RH - 68/70%, Day Temperature - 28/29c, Night Temperature -23c/24c, Leaf temperature 25/26, VPD Day - 0.8/1.0 , VPD Night 0.8/0.9 CO2 - 400+PPM Nutrient Tank - 2.80EC, PH-5.80 Temperature - 19/20c, ORP-410/450mV Day Misting - 20s ON/20min OFF + 1 x 5 minute long shot Night Misting - 20sON/30min OFF Runoff - 19.30 Flush5 r2940, 19.50 Flush5 r2830! reset after 10min flush, 00.30 Flush3 r3090
Likes
10
Share
Day 105. I do not have enough experience to tell if that is a long time to finish for an autoflower. 2 Days ago I added 8 liters of water pH'd at 5.9. I'm also curious of anyone knows if this strain produces amber colored thrichomes. I've read some stuff on the internet that certain strains produce almost none at all. I can't tell of people are telling the truth or I just should have more patience and wait for them to show up. The close-up pictures you see are from day 105. Almost all her sugar leafs are yellowish or completely yellow btw. I forgot to make recent pics of the cola's. I'll add some of day 103. On a sidenote, by the looks of it, the buds are still gaining some nice mass and density. Cheers, DangerMouse --------------- Day 107 ------------------- After 10 days of FloraRipen another batch of FloraKleen. I added pics of the trichomes and some buds. The runoff had an us/cm of 4500... Like I said before, my meter must be broken, right? After 48 hours of flushing I'll just change the water for pH'd at 5.9. Does anyone know what kind of bugs are in the runoff? The video is of the water that came out of the bucket. I've seen them before for did not capture them. The look a bit like springtails but does anyone know? There are none on the plant itself, just in the water. Let me know! Happy growing, DangerMouse
Likes
5
Share
@Caertner
Follow
Zuerst Füsse waschen... Dann ab ins neue Bettchen und schön mit Blähron zudecken.
Likes
22
Share
Le hice un scrog sin pensarlo . Veremos si aumenta la producción...yo creo que sí !! La malla scrog de los Master : #kanovikultivo #greenwolvesfarmer
Likes
35
Share
🍼Greenhouse Feeding BioGrow & Bio Bloom ⛺️MARSHYDRO The ⛺️ has a small door 🚪 on the sides which is useful for mid section groom room work. 🤩 ☀️ by VIPARSPECTRA (models: P2000 & XS 2000)
Likes
30
Share
✂️🍯 Tical x Zamnesia — Nectar Drip | Drying & Trimming Report 🍯✂️ And… we are back again 😄 Yes — we are dividing the reports once more. At this point it is probably becoming part of the diary itself, but honestly, there is simply too much happening during these runs to compress everything into one giant update without losing important moments along the way. So thank you for the patience. And welcome back to the next chapter of our Nectar Drip journey: the drying, the trimming, the resin collecting, the temple balls, and the beginning of the cure. 🌱 Quick Recap For anyone arriving only now: This run was grown from seed under 12/12 lighting from the beginning. No long vegetative phase. No giant training sessions. No massive shaping. Just letting the genetics express themselves naturally while observing: - structure, - morphology, - resin production, - flower behavior, - and overall cultivar personality. Last week reflected the harvest itself: - trichome maturity, - fading colors, - hanging branches, - macro photography, - stem structure, - and final harvest observations. One of the smaller plants was frozen immediately after harvest for future washing and extraction work, which we will still cover in a dedicated future update once we complete the washing process properly. But this week? This week belongs to the dry flowers. And honestly… these girls became something beautiful. Drying Process The flowers dried for roughly 10 days under controlled conditions: - approximately 18–20°C - around 60% RH - with the first couple of days closer to 45% RH to help release initial surface moisture safely This part matters far more than many people realize. Drying is not simply: “waiting until the plant becomes dry.” It is controlled moisture migration. The outside of the flower always dries first. The inside stays wetter longer. And the goal is slowing that process down enough for: - chlorophyll breakdown, - smoother smoke, - terpene preservation, - proper moisture redistribution, - and stable curing afterward. Dry too fast? The outside crisps while the inside traps moisture. Dry too slowly? Risk increases: - mold, - anaerobic conditions, - terpene degradation, - unstable cure. These Nectar Drip girls dried beautifully. Dense flowers. Excellent structure. No rushed drying. No hay smell. No collapse. Just slow clean progression. And when the branches finally gave that satisfying “click” instead of bending… we knew it was time 😄 ✂️ Trimming Time So: gloves on, trim bin ready, studio lights running, music playing quietly in the background, Mr. Baggy supervising operations as always 😄 …and branch by branch, the process began. We trimmed entirely by hand using Zamnesia curved-point scissors. And honestly, these scissors became one of our favorite trimming tools. The pointed curved tip allows: - deeper precision, - cleaner access between calyxes, - easier sugar leaf removal, - less accidental flower damage, - and better control overall on dense compact flowers. Especially important on cultivars like this one. Because Nectar Drip became DENSE. Not airy. Not fluffy. Proper compact greasy flowers. The kind that fight back while trimming 😄 Every branch had to be broken down carefully: - separating buds individually, - removing excess leaf material, - preserving flower shape, - protecting trichome coverage, - and trying not to spend half the trimming session glued to the scissors. And yes… the resin production here was honestly ridiculous. 🖤 Resin Everywhere This cultivar is oily. Not just frosty visually. Oily physically. The gloves became coated quickly. The scissors accumulated thick dark resin constantly. The trim bin slowly filled with golden material underneath. And every few minutes we found ourselves scraping resin from: - gloves, - scissors, - fingers, - and tools. That sticky dark material eventually became beautiful little temple balls. And honestly? The way this resin behaved says a lot about the quality of the cultivar. Some resin stays dry and crumbly. This one softened almost instantly with minimal heat. Just body temperature alone was enough to: - soften, - bind, - darken, - and become workable. Extremely greasy resin. Extremely rich trichome expression. The little temple balls became: dark, soft, sticky, shiny, and incredibly aromatic. Beautiful medicine already before even curing properly. 🏆 Final Dry Numbers And now the final flower numbers for the dried plants: 🌱 337.3 grams dry flower Plus: the frozen material resting in the freezer for future washing and extraction work. And honestly? Very happy with these numbers. Especially considering: - the quality, - density, - resin production, - flower structure, - and the overall level of expression these girls delivered. This was not “big yield but average flower.” This was genuinely high-quality medicine. 📦 Storage & Beginning The Cure After trimming: the flowers were placed into glass jars for curing. The temple balls also rest curing slowly inside glass. And now another important phase begins: time. Because curing changes everything. Terpenes settle. Moisture equalizes. Harshness fades. Aromas deepen. Smoke smooths out. The cultivar slowly reveals its final personality. And honestly? This Nectar Drip already smells incredible. Sweet. Creamy. Fruity. Almonds.Dark. Warm. Slightly candy-like. With this deep resinous backend that keeps evolving every day. The room smelled unbelievable during trimming. At some moments it genuinely felt like opening: fruit candy, fuel, cream, and warm resin all at once. Very unique profile. Very memorable. 📸 Documentation & Studio Sessions Of course, we documented almost everything: - trimming time-lapses, - resin collection, - temple ball formation, - close-up flower shots, - drying branches, - sticky gloves, - macro details, - cinematic studio moments, - and behind-the-scenes chaos 😄 Because honestly… these moments matter too. A grow diary becomes more than just showing finished buds after enough weeks. It becomes documentation: - of process, - mistakes, - lessons, - atmosphere, - obsession, - patience, - and passion. And this run definitely carried all of that. ⏳ What Comes Next? Next update will probably become the final chapter: - curing review, - smoke report, - terpene evolution, - effect profile, - overall strain impressions, - and our honest final thoughts about this Tical x Zamnesia collaboration after living with the medicine properly. And honestly… we are extremely excited for that one. Because this cultivar already feels very special. 🙏 Final Thanks And as always… thank you. To Zamnesia. To Tical. To Plagron. To F.O.G. To Lumiflora. To the gear. To the platform. To the supporters. To the silent followers. To the OGs still here since day one. To the curious new visitors. To the people learning quietly in the background. To the skeptics. To the lovers. To the haters too 😄 And to everybody who stopped scrolling long enough to spend even a few moments here with us. That alone deserves gratitude. This collaboration genuinely feels special. And honestly… I still feel like Nectar Drip has one more beautiful chapter left before this journey fully ends. 📡 DELETED @ 1K Please stay tuned.we never quit https://www.youtube.com/@TheDogDoctorOfficial NEW 🙏 Thank you for your patience and continued support. FOR DISCOUNT CODES AND MORE JUST FOLLOW THE LINK https://website.beacons.ai/dogdoctorofficial 📲 Don’t forget to Subscribe and follow me on Instagram and YouTube @DogDoctorOfficial for exclusive content, real-time updates, and behind-the-scenes magic. We’ve got so much more coming, including transplanting and all the amazing techniques that go along with it. You won’t want to miss it. GrowDiaries Journal: https://growdiaries.com/grower/dogdoctorofficial Instagram: https://www.instagram.com/dogdoctorofficial/ YouTube: https://www.youtube.com/@dogdoctorofficial Deleted by Youtube - https://www.youtube.com/@TheDogDoctorOfficial NEW Vimeo : https://vimeo.com/dogdoctorofficial Under construction stay tuned ⸻ Explore the Gear that Powers My Grow If you’re curious about the tech I’m using, check out these links: 🔆 Lighting & Environmental Control • Future of Grow — Advanced LED lighting technology https://www.futureofgrow.com/ DISCOUNT CODE: DOG20 • Lumiflora — Under-canopy LED lighting https://lumiflorade.com/ • TrollMaster — Environmental controllers and automation gear (past collaboration) ⸻ Genetics • Zamnesia Seeds — Genetics used in this project https://www.zamnesia.com/ ⸻ 🌱 Soil, Substrates, Boosters & Root Support • Plagron — Substrates, bio mixes, and supportive products https://plagron.com/en/ ⸻ 🎒 Storage, Curing & Preservation • Grove Bags — Curing and storage solutions https://grovebags.com/ ⸻ 📸 Photography Equipment & Tools (Not sponsors, but part of my creative toolkit) • Sony A6700 • Sony full-frame macro lens + few more • Stacking photography workflow - learning • iPhone (for behind-the-scenes shots) We’ve got much more coming as we move through the grow cycles. Trust me, you won’t want to miss the next steps, let’s push the boundaries of indoor horticulture together! As always, this is shared for educational purposes, aiming to spread understanding and appreciation for this plant. Let’s celebrate it responsibly and continue to learn and grow together. With true love comes happiness. Always believe in yourself, and always do things expecting nothing and with an open heart. Be a giver, and the universe will give back in ways you could never imagine. 💚 Growers love to all 💚 📸 P.S. – The Eye Behind the Lens All photos in this diary (for now — except for the ones showing the camera, which I took with an iPhone) are taken with a Sony A6700 paired with a Sony full-frame macro lens and a few more. Photography is part of the story — it’s how we share the fine textures, the glow, and the quiet details that words can’t always capture. I’ve also started experimenting with photo stacking — a technique where multiple images, each taken at a slightly different focus point, are layered together to create one perfectly sharp image from front to back. It’s not digital enhancement or AI; it’s pure photography — a way to reveal the plant’s beauty in microscopic depth, from trichome to petal. You’ll even see a few shots of "ghost me" capturing the shots — camera, lens, setup — because every grow deserves not just to be cultivated, but documented like art. FOR DISCOUNT CODES AND MORE JUST FOLLOW THE LINK https://website.beacons.ai/dogdoctorofficial NEW DISCORD - Official Server Invite Link : https://discord.gg/ksjAkA5T74
Likes
5
Share
Short video on her progress. Preflowers started so time to add worm castings and banana FPJ
Likes
6
Share
Started with the LST. The idea is to not top them, just do LST. This week I'll probably start making my SCROG net and start tucking.
Likes
13
Share
1/14: Fed today. The Cheese is getting fat and reeking with a funky odor! The Zkittlez and Bubbleguns are fattening nicely as well, but they smell more like candy. 1/18: Fed today and rearranged. Increased UVB exposure by another 30 mins per day 1/21: Fed today.
Likes
12
Share
So I harvested 1 Grlato Cake seed 🙃22 Gelato cake × Dosi-punch, & 18 Gelato cake × Lamb's Bread. Already germinating the gelato × dosi mix. Excited to start the next diary
Likes
31
Share
For my first legal grow, I was gifted a giant Sherbert Creamsicle (Clone of above): This is a positively delicious and unique herb that I have fallen in love with. Additionaly, handed 2 bushes of my first cross BMX(Clones of the small one above) which turned out to be better than I expected by far. I have Transplanted all three into 7 gallons of Roots Organic 707 with 2tbs per gallon Bio-Live. Because she is so hungry, I applied 2 doses of 7-1-1 grow terp tea. Once before and once a few days after transplant. They are looking pale but coming around soon I think. Then it's time to flip my first big one. Sherbert Creamsicle is in the back and the 2 BMX are in the front in the pics. There are some small BMX testers around the sherbs too. It is done. Light cycle switched. Now just water and wait. Day 5: I fertilized lightly with a 1 tsp/gal tea of 50/50 Roots organic Grow/Bloom. I hope that from here I will be able to rely on all that soil to take her at least halfway through flowering.