


Likes
3
Share

@tony_kiffton
Follow
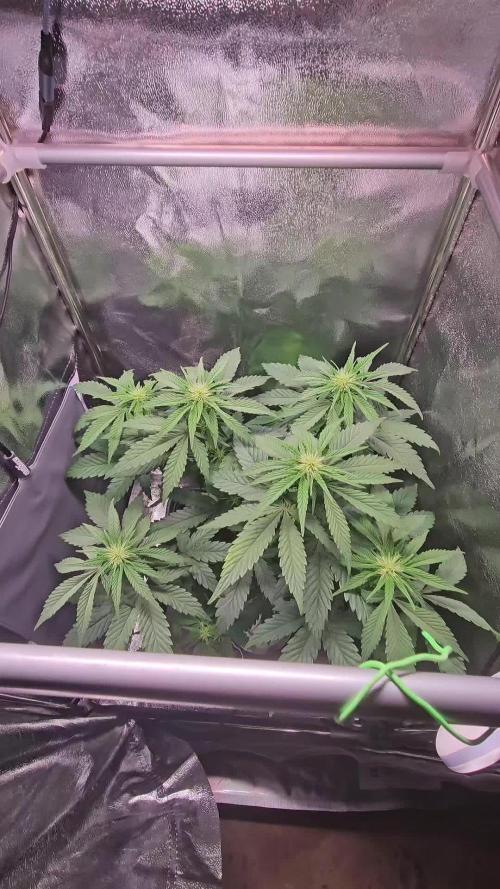
Habe nochmals kleine Triebe und Popcorn entfernt ... wächst trotz kalter Temperaturen munter weiter - umgetopft in den 6 Liter Endtopf aus Stoff mit Floragard Rosenerde aus Deutschland !


Processing
Likes
14
Share


@Okie4
Follow
Good week so far !! On to my last strength of nutrients !! Then the flush begins. Girls are starting to bulk up. Had to purchase a dehumidifier to keep the humidity down this week. Wish I knew exactly how long this strain went.. any idea ?

Likes
40
Share


@Peeman
Follow
Welcome back✊
Outdoor season is finally showing the labours of love with buds a plenty.
Can you feel the excitement? 🙌
Big time aromas in the garden this week are really quite something.👌 Everything from bananas and grapes to sweet & sour citrus and even dirty diaper. What?
Yup that's right...My Blue Fire's smell like 💩 just like the clone mother and she's pure FIRE!!! I've grown this strain indoors but this is my first time growing it outside so I'm really looking forward to the outcome. 👍
Sept.14 the girls are putting on some serious weight. Colas are fattening up nicely but with that extra weight I’ve had to add more support and netting. 💪
Sept.15 last night temps got down to 8 celsius (46F) and today's high was 20 (68F). It's supposed to get even colder by the weekend followed by more average temps next week. Please God No Frost.🙏
Sept.16 Warmest day of the week at 25 celsius although very hazy probably due to the wildfires out west. Prayers for y'all out there. 🙏
The garden is looking amazing today with buds fattening up everywhere. Strawberry Banana #1 in front of the wall is furthest behind as far as bud development but is the tallest of the bunch at over 10 feet.👆 Bless that momma👏
Sept. 17 and just my luck Trainwreck #1 has a bit of bud rot on the 2 big main colas.😠 Damn I babied that girl and kept her dry her entire life. WTF
Sucks having to harvest her early but shit happens so the 2 colas got chopped this morning and are hanging to dry. On the bright side, one of the colas wet weight was almost 11 ounces.
Sept. 18 & 19 overnight temps got down to 4°C luckily no frost.
Sept. 20 and most of the potted girls fan leaves are starting to yellow. Good sign that they are using up their last bit of nutrients from the leaves themselves. I’m guessing 1 or 2 more weeks and my first round of girls will be getting no more nutrients and starting their final flush. Trainwreck and Blue Fire are the furthest along while the wall girls are a couple weeks behind especially Strawberry Banana.
That’s it for now
Til next time...
Be well and see ya soon


Likes
Comments
Share


@dwotTV
Follow
Into week 8, growing well, buds continue to stack up on this very singular up and down outdoor plant. Smells good, excited to see how the next few weeks go. Scratched 1/4 cup of Coast of Maine Fish Bone Meal into the soil and watered late in the week.
Likes
32
Share


@Felloffthegrid420
Follow
Wow I'm love these two lady idk how I'm going chop and idk how close they are any tip are they ready now I was hoping they fill in but I don't want over do it when should I cut today my last day of feeding??
Likes
4
Share


Likes
3
Share


@Dargaville_Dukes
Follow
Really nice growth this week. I'm going to give it one more week in veg and then change to flower. I think she's going to be a beast 😊

Likes
4
Share


@KCChiefers
Follow
Day 71 Update: Watered both plants with almost a gallon until runoff. Water was just plain pH balanced water. Plant #1 has 5 days left on flush and Plant #2 has 11 days left on flush. Although with my tent filling up, I will probably harvest Plant #1 tomorrow as I don't think 4 days of being in there will make a difference in the end product.
Day 72 Update: Harvested Plant #1 today. Plant #2 has 10 days left on flush.
Day 74 Update: Watered plant with 3/4gal of pH balanced water until runoff. Plant #2 has 8 days left on flush. Also, added another stake to help support a heavier branch.
Day 76 Update: Placed buds from Plant #1 in jars to start curing...maybe a little bit too long drying, but if that's the case I'll toss a boveda pack in. Plant #1's yield was 57.2g or 2oz 1.2g. Plant #2 will be harvested sometime next week and I will update the harvest page as soon as buds are dried and weighed.

Likes
23
Share


@Ksouth1
Follow
Last week went well. Not much happening besides watching her fattening up daily. Had to up cal-mag another.5 mL per gallon because I noticed the start of some minor spots on a couple of the top leaves. She is drinking a decent amount. About a gallon and a half of water every other day. The buds are getting big and I am going to get a decent yield. Until next time happy growing to everyone!

Likes
41
Share


@Cannaguy
Follow
Some of the leaves have been starting to yellow indicating that the plants are now needing a little more feed and are getting towards the end of their life cycle! The smell of the gelato x gmo is overwhelming when I first approach the plants, and the blueberry x mother of Berry is a more subtle sweet/fruity smell.


Likes
28
Share


@TeamQuality420
Follow
Will be adding a whole lot of notes to the last couple weeks just trying to get all my harvest pictures up :)
This one was a pure treat to grow . I am confident using exotic seeds that they can produce some if the world's best cannabis , hands down .
They all were bushes , not too much stretch in flower at all .
Usually in the first run with a strain I'm just figuring it all out.

Likes
7
Share


@NORTHWALESAUTOS
Follow
Some mad crazy growth going on here lol.
But iv been informed by a fellow grower that's she's going to be a monster of a plant. So we'll see.

Likes
17
Share


@JonnyKush
Follow
day 73 I was not ready for all this! 🤣🤣 they literally exploded and I started seeing purple on these buds I had to tie them up so the weight of the flowers didn't break the branches. compared to El Patron that I also have in my tent, Purple is much fatter and shorter. they have a very sweet scent and I can't wait to taste it, but alas I will go there a little longer. I have to say that 6 photoperiods are too many for my 1m x 1m x 2m tent. in addition to this I have noticed that they are very hungry. like me and give me some advice. thanks for stopping by, have a nice day and happy cultivation 💜🌳💜🌳💜🌳💜🌳
Likes
6
Share


@NattyMeds
Follow
Still getting slightly thicker.. insanely dense buds. Smells like Minty-sweet funky Gas. Definitely a very minty dominate smell which is exciting and interesting.
Also compared to other strains that ive grown I like her fiery-orange pistils vs brownish color. Looks very appealing. This will be the last week of feeding flower nutes.. next week I plan to give her Cannazym and some boost(sugars). Last week will just be enzymes and or just plain water.


Likes
Comments
Share

@DogDoctorOfficial
Follow
👑 Godfather OG – Pheno B
Week 9 | Just Let Me Grow
Welcome back to another chapter of the 8×8 Adventure! 💚🌱
Some plants ask for attention.
Some plants demand it.
And then there are plants that simply look at you and say:
“I'm good. Just let me grow.” 😂
Godfather OG Pheno B is definitely one of those girls.
This week, she's happy.
She's growing.
She's adapting.
She's building flowers.
She's beautifully green.
And she's asking for absolutely nothing.
So what am I doing?
Exactly what she wants.
I'm letting her grow. 🌱
🌿 The Happy Girl in the Room
There is something incredibly satisfying about walking into a room full of more than twenty plants and finding one that simply looks completely comfortable in her surroundings.
Godfather OG Pheno B is giving me exactly that feeling.
She's not complaining.
She's not demanding anything.
She's not asking for a special intervention.
She's just continuing to do what she has been doing from the beginning:
growing beautifully.
And honestly, I love it.
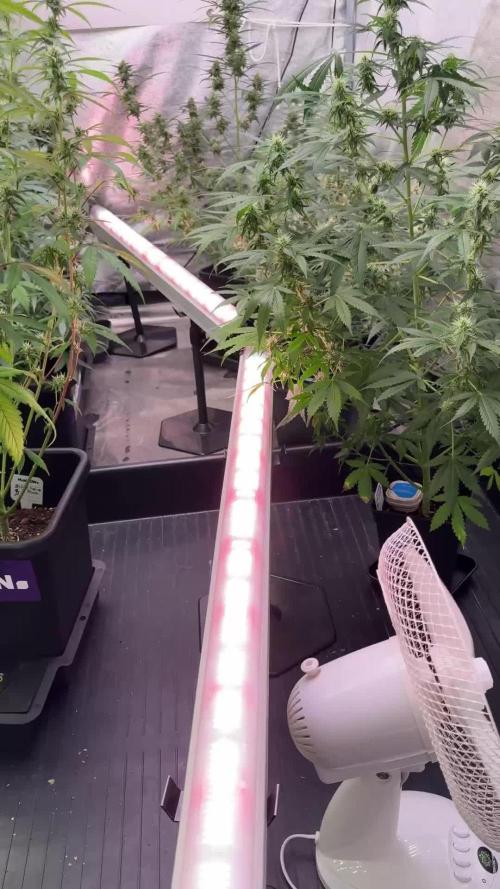
At around 160 cm, she's among the taller plants in the room.
But I want to make something clear.
This run isn't about producing gigantic plants.
We haven't been chasing enormous heights.
And that's something I'm actually very happy about.
The plants are growing into what I would consider a beautiful, manageable size, while still creating strong structures and plenty of flowering sites.
For me, that's a win.
👑 A Different Queen From Her Sister
And once again, her relationship with Godfather OG Pheno A makes the phenotype hunt even more interesting.
Same genetics.
Same room.
Same lighting.
Same irrigation.
Same reservoir.
Same general treatment.
Yet two very different personalities.
Her sister has been one of the demanding girls in the room.
Pheno B?
She's basically:
“Don't touch me. I've got this.” 😂
And I respect that.
That's exactly why I don't want to force every plant into the same behaviour.
The whole point of this experiment is to give the genetics the opportunity to express themselves.
And Godfather OG Pheno B is expressing herself beautifully.
🍃 That Lush Green
One of the first things I notice about her is the colour.
She's lush.
That beautiful, healthy green is still running throughout the plant, and it gives her a very strong visual presence.
The foliage looks happy.
The structure looks balanced.
The plant is carrying herself confidently.
And when I compare her to some of the more demanding phenotypes in the room, the contrast is fascinating.
She's not screaming for anything.
She's simply using what we're providing and turning it into growth.
That's the kind of response every grower loves to see.
🌸 The Buds Are Coming From Everywhere
And this week, the flowers are really beginning to take over the story.
The bud development is becoming much more obvious, and the structure is starting to show exactly where this plant is heading.
What I particularly love is the consistency of the flower formation from bottom to top.
We're not just seeing beautiful development at the highest points.
We're seeing flowering sites developing throughout the plant.
And this is where the lighting strategy becomes especially interesting.
The combination of the overhead lighting with the inner-canopy and under-canopy lighting is doing an outstanding job.
Light is reaching much deeper into the structure.
And we're getting flower development throughout that vertical space.
That makes me very curious about how these lower flowers will continue to develop as we move deeper into flowering.
💡 Above, Inside & Below
This is something I've been particularly happy with during this run.
The Future of Grow LED Black Series provides the main overhead light.
But we're not asking the top light to do absolutely everything.
The inner-canopy lighting and the LumiFlora under-canopy lighting are helping bring photons into areas that traditionally receive much less direct light.
And when you look at Godfather OG Pheno B...
you can see why that matters.
She's tall.
She's open.
She's got flowering sites distributed throughout her structure.
And now we're seeing that flower development progressing from the upper canopy down toward the lower areas.
That's exactly the kind of structure I wanted to see.
Not one giant flower-covered ceiling with forgotten branches underneath.
Instead:
light → leaves → flowers
from top to bottom.
And so far, it's looking beautiful.
🌱 No Need to Interfere
This week there was no reason for me to make major changes.
No dramatic training.
No unnecessary defoliation.
No attempt to reshape her.
No trying to make her behave differently.
She's already giving us exactly what we want.
So I'm following one of my favourite cultivation rules:
If it isn't broken, don't fix it.
Sometimes growers feel like they need to be doing something constantly.
But plants don't need our hands on them every day.
Sometimes the best thing you can do is observe.
Look.
Listen.
And leave the plant alone.
Godfather OG Pheno B is making that lesson very easy this week.
Twelve Genetics. One Ecosystem.
This is where the 8×8 Adventure continues to become more interesting every week.
We're running twelve different genetics and more than twenty plants in the same overall ecosystem.
They all have access to the same environmental conditions.
They share the same feeding strategy.
They share the same lighting philosophy.
And yet every plant finds its own way.
Some demand more.
Some demand less.
Some stay darker.
Some become lighter.
Some stretch aggressively.
Some stay compact.
Some become extremely aromatic.
And some...
just quietly get on with the job.
Godfather OG Pheno B belongs to that last group.
She's adapting.
She's comfortable.
And she's building.
🍽️ Feeding
The room continues with the shared flowering nutrition strategy:
🌱 Plagron Terra Bloom – 2.2 ml/L
🌱 Power Buds – 1 ml/L
🌱 Green Sensation – 1 ml/L
🌱 Sugar Royal – 1 ml/L
⚗️ Lemon Kick / pH Plus as required
The important part isn't simply the recipe.
It's the response.
And her response has been very clear:
She's happy.
She's growing.
She's flowering.
She's maintaining that beautiful green.
She's not asking us to change anything.
So we're not going to create changes just to feel like we're doing something.
Consistency remains the strategy.
🌡️ The Environment
The room continues running under stable conditions:
🌡️ Day temperature: 29°C
🌙 Night temperature: 25°C
💧 Relative humidity: 60%
⚗️ pH: 6.0
⚡ EC/TDS: approximately 2.0 mS/cm
💦 Solution temperature: 25°C
🌱 Substrate temperature: 26°C
💨 CO₂: 639 ppm
💡 Light schedule: 12/12
? Pot size: 15 L
💧 Watering: approximately 1.3 L/plant/24h
Again, the environment stays consistent.
And Pheno B is showing us that she likes it.
📸 Behind the Lens
This girl is becoming a photographer's pleasure.
The full-plant photographs show that elegant vertical structure.
The closer shots reveal the flowers developing throughout the plant.
And the foliage...
That green.
That beautiful, healthy green.
It's one of those plants where the longer you look, the more you notice.
First you see the overall structure.
Then the flowering sites.
Then the individual flowers.
Then the pistils.
Then the early resin development.
And suddenly you're standing there staring at one little flower for five minutes. 😂
That's the danger of growing.
You start with:
"I'll just check the plants."
And twenty minutes later you're photographing a single flower from seventeen different angles.
We've all been there. 😂📸
🌸 The Structure Is Speaking
One thing I really like about this phenotype is the overall structure.
She's tall without feeling awkward.
She's open without looking sparse.
She's producing flowering sites throughout the plant.
And she's maintaining enough foliage to support that development.
This is one of those plants where I don't feel the need to impose my own vision on her.
Her structure already makes sense.
She's doing her thing.
And she's doing it well.
That's what I mean when I say that the plants are telling us their own stories.
We just have to be patient enough to listen.
🔍 What I'm Watching Now
At this stage, my curiosity is shifting.
The question isn't really:
"Will she flower?"
We already know the answer.
She is.
The question now becomes:
How much will these flowers build?
How much density will they develop?
How much resin will accumulate?
How will those lower flowering sites respond as we move deeper into the cycle?
And what will this beautiful green plant look like when the flowering structure really starts to mature?
Those are the questions I'm interested in now.
And fortunately...
I don't need to do anything to answer them.
I just need to wait.
👑 Let Her Shine
There's something particularly satisfying about this phenotype.
She's not trying to be the biggest.
She's not trying to be the loudest.
She's not asking for special treatment.
She's simply doing her job.
Growing.
Adapting.
Flowering.
And looking beautiful while doing it.
She's around 160 cm, making her one of the taller ladies in the room, but that's exactly what I like about this run.
We haven't created a jungle of enormous plants.
We've created plants with beautiful proportions and beautiful structures.
And Godfather OG Pheno B fits into that picture perfectly.
💚 The Beauty of Doing Nothing
Sometimes cultivation is about knowing when to act.
And sometimes...
it's about knowing when not to.
This week, Godfather OG Pheno B doesn't need intervention.
She doesn't need correcting.
She doesn't need reshaping.
She doesn't need me trying to improve what is already working.
She needs time.
And I'm more than happy to give it to her.
Because every week, she's showing a little more of what she's capable of.
A little more flower.
A little more structure.
A little more resin.
A little more personality.
And now we're reaching the point where those little changes are starting to become very obvious.
🔮 Looking Ahead
Next week, I expect the flowers to continue building and becoming more defined.
The stretch should gradually become less important as the plant shifts more of her energy toward flower development.
I'm particularly interested in watching those lower and inner-canopy flowers.
With the combination of the overhead, inner-canopy and under-canopy lighting, we're giving those areas a much better opportunity to develop.
And so far...
they're responding beautifully.
So the plan?
Keep the environment stable.
Keep the reservoir consistent.
Keep observing.
Keep photographing.
And most importantly...
don't get in her way. 😂🌱
👑 Godfather OG Pheno B — Week 9
So here we are.
Another week.
Another chapter.
Another little piece of the phenotype story revealed.
She's around 160 cm.
She's among the taller plants in the room.
She's lush.
She's green.
She's healthy-looking.
Her flowers are developing beautifully.
Her structure is exactly the kind of structure I enjoy seeing.
And she's asking for nothing.
She's simply growing.
And perhaps that's the most beautiful thing about her right now.
She's comfortable enough in her environment that she doesn't need us constantly trying to intervene.
She's found her rhythm.
And now we're watching that rhythm turn into flowers.
🙏 Thank You
A huge thank you to everyone following the 8×8 Adventure.
This project keeps reminding me why growing multiple phenotypes together is so fascinating.
We can give them the same room.
The same light.
The same irrigation.
The same nutrition.
The same environmental conditions.
And they still find completely different ways to express themselves.
Godfather OG Pheno B is showing us the peaceful version of that story.
Her sister is asking questions.
This girl is answering them with flowers. 😂👑🌸
Thank you to GrowDiaries for providing the space where we can document, compare, learn and share these journeys.
Thank you to Zamnesia for the Godfather OG genetics.
Thank you to Plagron for the nutrition supporting the garden.
Thank you to Future of Grow LED for the powerful overhead lighting.
Thank you to LumiFlora for helping bring light into the lower canopy.
Thank you to TrolMaster for helping maintain environmental stability.
And finally...
thank you to everyone following along.
Every comment.
Every question.
Every observation.
Every person who stops by simply to watch these plants develop.
It means a lot.
This isn't just about reaching the finish line.
It's about seeing what happens along the way.
And Godfather OG Pheno B is giving us one of the most enjoyable stories in the room right now.
She's happy.
She's adapting.
She's beautiful.
She's building flowers from top to bottom.
She's getting more interesting every week.
And she has only one thing to say:
“Don't worry about me. I've got this.” 😂🌱👑
And you know what?
I believe her.
Growers Love, my friends, and I'll see you next week! 💚👑🌱
Likes
7
Share


@Jason420
Follow
Eine Genetik die mir echt Spaß bereitet hat groß zu ziehen. Extrem schöne Headbuds und extrem Starkes Trichomenbild. Die Trichome überzeugen nicht nur in der menge sogar noch in der größe, so riesige teilweise dazwischen was mir einfach ein lächeln auf den Mund zaubern. Der geruch als auch der geschmack ähneln sich sehr. Eine Blumige Tropische Note mit einem leichten Herben Kiefer Hintergrund. Cinderella Jack zu rauchen knallt stark und hält lange an. Die Sativa richtung kommt eher raus mit einem schönen Kopf high und einem angenehm entspannten Körper.

Likes
16
Share


@DreamIT
Follow
-Sponsored by:
💫PARADISE SEEDS💫-💡VIPARSPECTRA💡-💐GREEN BUZZ LIQUIDS💐-🛠️WEDRYER🛠️
🏁18/6 hello growerz, with today I start the resumption of diaries on GD. I have 13 new genetics in germination and as many diaries. I start by putting the seeds in water for 24 hours, after a day I will put the two seeds in two different jiffies, one with humic acid from greenhouseseeds and the other with just plain water. Get comfortable and follow the updates 😉👋🦄
19/6 The seeds were divided and placed in two different jiffies, one with humic acid and one with water only.
21/6 after another 24 hours in the dark the jiffies were moved under the lamp. let's start the dances!
23/6 The seed in the humic acid jiffy has already sprouted and the cotyledons have opened. look forward to updates on the brother in the water only
24/6 we await the release of the seed in jiffy
25/6 still nothing for the second seed .-. I'm starting to worry
30/6 the second seed is officially dead, I caught a glimpse of it in the jiffy and by pressing it lightly it exploded. I will always wear a new one from paradise seeds, stay tuned
__________________________________________
Personal advertising (contains affiliate links)
__________________________________________
🦄 winners and holders of the most prestigious awards, since 1994 they offer genetics of the highest quality! Anonymous shipping!
✅https: //bit.ly/Paradiseseeds_
__________________________________________
Did you know that Green Buzz Liquids fertilizers are 100% vegan? A complete line of products ready to give the best to each of your plants! Visit the site and see my journals to see how they work 🦄
🤯 And with the code "dreami t" you will immediately receive a 15% discount on your purchases
✅https: //bit.ly/GreenBuzzLiquidsPro
__________________________________________
👀 Are you looking for a good lamp to start with? 👀
🌞Viparspectra has something more than the others, take a look at their site.
⏩ Use "GDVIP" for an extra discount or "DREMIT3" for an extra 5 %% discount
👀 Search for it on Amazon
✅Amazon USA: https://amzn.to/30xSTVq
✅Amazon Canada: https://amzn.to/38udUVe
✅Viparspectra UE: bit.ly/ViparspectraUE
✅Viparspectra USA: bit.ly/ViparspectraUS
______________________________________________
🌈 Tired of blowing on your weed hoping it dries quickly? Check out the Wedryer website! You will find a well-made accessory that will help your weed dry in just 8-10 days without the annoying risk of finding mold or other annoyances! (no affiliate links)
✅https: //bit.ly/Wedryer_
______________________________________________
📷🥇Follow the best photos on Instagram 🥇📷
https://www.instagram.com/dreamit420/
Backup
https://www.instagram.com/dreamit4200/
🔻🔻Leave a comment with your opinion if you pass by here🔻🔻
🤟🦄💚 Thank you and good growth 💚🦄🤟
