
Likes
Comments
Share


@Cannibalgardens
Follow
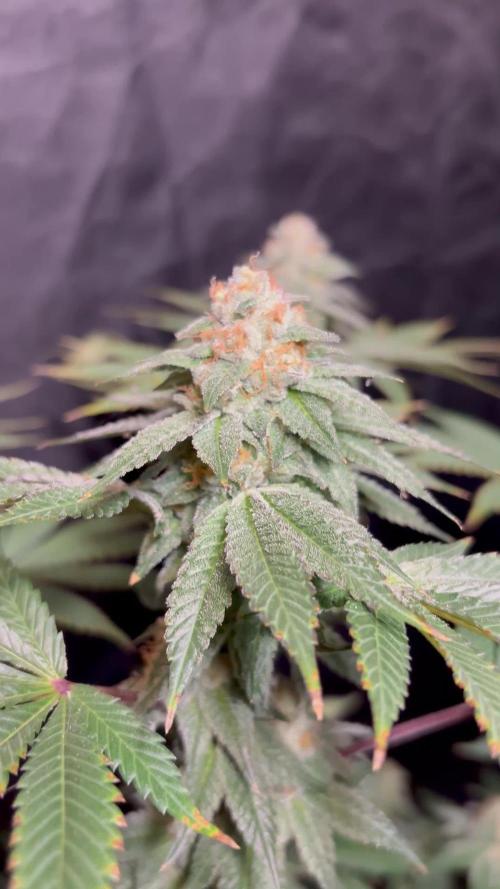
Well I will be running this girl again very soon as she has produced some of the sweetest smelling buds I have grown so far . The colour purple is found around the buds and the tricohmes have a very good stickiness to them which makes for some great quality medicine . The team at the actual company seed stockers were very easy to deal with and they answered all my questions . I'm honestly going to run her outdoors this spring in southern Ontario she will be big girl outdoors for sure ... If you want a strain that's resistant to stress and humidity then this is your girl no dought .
Cheers canna family and best of luck with your growing future


Likes
2
Share

@Oldwied
Follow
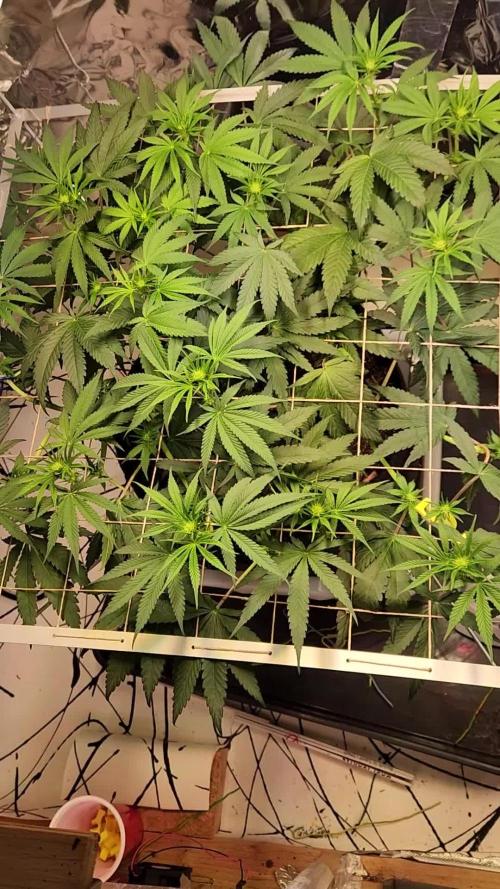
The second week is over every thing looks fine.
The screen is nearly completely filled and I think the most stretch is done. But the stretch with more than 60% is strong.
No signs of hermies visible.
Light Power: 80%
Day 60
Flower day 13
Photoshooting
Likes
17
Share


@Ts1Ko
Follow
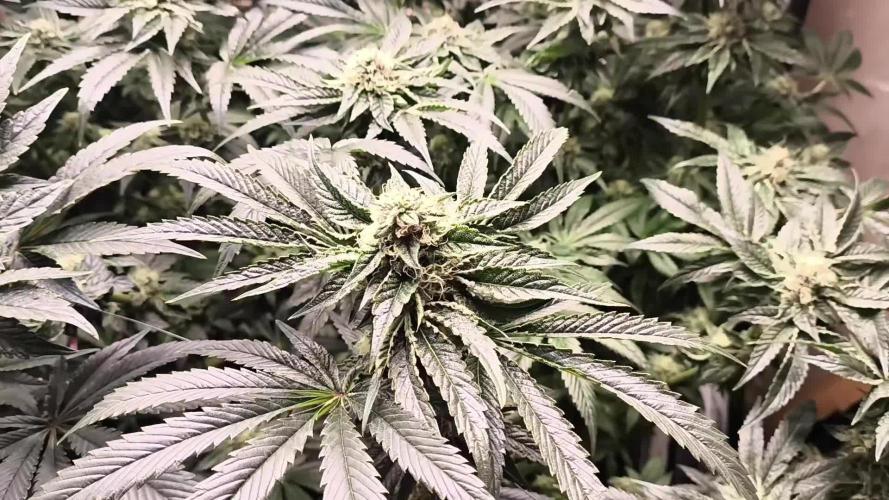
So. From the early beginning, this plant was my favourite. So she didn't dissapoint me. If we remember that fact that for last 3 weeks i was taking some every day, overall outcome was still very good. the high is amazing, and the smell is 'something'. I would recommend this strain to everyone if you are thinking to get one.

Likes
10
Share


@GIJOSE
Follow
Week 9 veg
Sorry for the long absence, I had some fam issues I had to take care of. In today's video we go over the neutriants, and introduce the new placement of our grow tent. Cheers everyone!
-G.I.JOSE


Likes
2
Share


@ThatMaoriBro
Follow
Very Early flower about to some 50/50 284 dry amendments next week apart from that just been using my tap water not been pHing and shes been happy as rain
Likes
18
Share


@growingpepini
Follow
Leaves turned yellow so we took her away from direct sunlight. She has not been watered for 3 days and the yellow spots seem to be going away. We are still not sure about keeping her on the shadow or taking her back to direct sunlight.

Likes
46
Share


@GanjaReaper
Follow
Welcome back guys,
This time bigger and different!
For this time I'm going back to the basics and i will be using 240 Amnesia Haze clones!
I start with the old 3 liter pots and they will be repotted into 7 liters, there was no space to have them in 11 liters in the upcomming weeks.
The grow Medium is special lightmix soil from the growshop( it has like ph 5.8-6 with ec 1-1,2 in it). Beneeth the soil i putted Expanded Clay so the water will go out more easily.
I have got 12 x 600 watt HID lamps in there, but for now I am just using a few.
I'm very busy at the moment so my growroom isn't finished yet. This is only half of it.
I had to start because those clones, which i have orderd, where deliverd lol. So there was no time left.
The lamps are high at the moment because the clones need time to root. If you have your lamps to low when just planted your clones, your clones will dry out and die.
They need to settle first for a few days.
Day 7:
All went well. I do have a ''bad'' corner. Thoose plants are strugling to develope.
Nothing mayor, it is normal with this many plants that some clones doesn't root and grow properly.
Next week i will decide which one I keep and which I throw away because I don't like to make two schedules, feeding buckets and more, just for a few weaker plants lol.
The lamps are at 60-70cm from the canatopy. Some preff it higher and only at that range when flowering.
But I want to have it like this because I want strong stems, more bushy plants instead of weak stems and long ugly anoying plants that produce fluffy buds.
These sativas love to stretch and grow big, I personally don't like that, so I try to force strong stem and bush growth.
Also increasing a bit in Aptus Regulator might force it as well.
I did sprayed them with Canna Cure as well, to prefend against all kinds of stuff and give them a little feeding via the leafs.
Currently still to busy in real life. Hopefully I finish my full grow room in the upcomming days, spread the plants and maybe even repot them into bigger ones.
The rooting and growing proces goes well. They must go a bit larger untill I force them into flowering.
See you guys next week.

Likes
Comments
Share


@OnePrettyFlyGuy
Follow
Something tried to nibble on Plant B, however there are no signs of pests and no further damage anywhere else (I have 6 other plants in the garden too). Plant A has already begun to develop stipules on its first set of true leaves too!
Had their first feed on day 14 (2ml Fish Mix + 0.1ml Mono-silicic Acid), and were fed again on day 16 (2ml Fish Mix, 2ml Bio-Grow, 2ml Bio-Bloom, 0.1ml Mono-Silicic Acid).
Processing
Likes
23
Share


@HanzGrowz
Follow
Just waiting it out now. No added nutrients, just water. Bubba and Black Dog have exceeded their expected flowering time, and both are at 95% cloudy with 5% or so still clear. Chemdawg and The New can take up to 70 days or more so we’ll see if they’re late too.
Bubba is a foxtailing machine. It was one weekend in early Flower when heat/humidity got out of hand while I was away for 3 days. She hermied a bit and I’ve had my eye out for bananas ever since (find a few every so often). Taking a risk to keep her in the tent with the others but if I catch them early enough the others should be ok. Interestingly I found a YouTube video of a guy that ran bubba and had the same foxtail development (also the same scent description and look overall). Nothing like the gorgeous fat purple budded girl I had last year but the citrus smell on this lime green bud pheno/version is impressive. Curious to see how the smoke compares.
Scent combo from all four plants is amazing!

Likes
5
Share


@ChiloteAnonimo
Follow
Día 01 de su octava semana de flora.
Pandemia kush y la Trimosa x mimosa sin apical se van a cortar a mediados de esta semana.
El resto por cuestión de tiempo voy a apurarlas cortandolas en 10 días más.

Likes
20
Share


@Maryjane23
Follow
Ciaooo a tutti siamo a 19 gg di fioritura Le piante stanno benissimo eseguito lollipop eliminando tutti i rami sotto che non prendevano luce! (50%)
Legata una caramelo perché troppo alta
e fertilizzata con 4 ml di bloom perché dava segni evidenti di carenza!
Le piante stanno benissimo e stanno dando molta soddisfazione nonostante un inizio poco incoraggiante! Si vedono le corone formarsi!
Ciao a tutti alla prossima settimana
Maryjane23


Likes
37
Share


@iMpulsive_Grow
Follow
Day 29!
Will slowly start incorporating some nutes or maybe on week 6
Day 30! And day 28’s
The leaves are getting really sticky ....
-There’s little light burn on a few leaves due to turning up my wattage on my grow lights way to high. 🤦♂️🏼dimmed my lights and all good now.🌱🌱🌱☺️
Day 31!
Started to do lst all of them with a simple technique. Just a piece of tape...
Day 32!
Not much to say other than they are loving life
Day33!
Improved the lst by giving the bottom of the stem some support. I also added my first video 🌱🌱🌱
this strain it’s average height is 3 ~feet
Day 34!
The low stress training has made them so happy and grow faster. The other 2 are at day 32
Day 35!
She is fkn awesome with her two young’s

Likes
55
Share


@Roberts
Follow
The Blue Planet fruity Pebbles is starting to bulk. She will take longer then the one I grew in Athena nutes. She is gonna produce more as well. Everything is going well. She has lots of frost on her. Thank you Medic Grow, and ILGM. 🤜🏻🤛🏻🌱🌱🌱
Thank you grow diaries community for the 👇likes👇, follows, comments, and subscriptions on my YouTube channel👇. ❄️🌱🍻
Happy Growing 🌱🌱🌱
https://youtube.com/channel/UCAhN7yRzWLpcaRHhMIQ7X4g
Likes
3
Share


@Krautbauern
Follow
The plants are growing fast and soon I will have to repot them in 14 l Pots with the Allmix Soil from Bio bizz.
Bruce Banner 3 Seeds tobe ahead in the race 🏎️
All pics are from Day 11

Likes
7
Share

@NewMan
Follow
Došel bud candy , další uz dávat nebudu a dojedu to bez něj. Vlhkost nahoře 55% ale vysoké VPD takže to bude chtít nejspíš další hračku zvlhčovačku.Jinak je to snad cajk..
Likes
4
Share


@pzwags420
Follow
On day 1 I changed out my reservoir. I lowered my nutes to 650 ppm(25% reduction). I adjusted the PH down to 6.1. My left plant has some burnt tips from either PH shift or over fertilization. My hope is that the lower ppm will help to resolve the issue before it spreads.
On day 2 I adjusted the reservoirs PH from 6.3 to 5.9.
On day 3 the reservoirs PH is 6.0. I installed my new 200 watt HLG Rspec. I adjusted PPFD readings to 700-1300 PPFD on all tops.
On day 4 I adjusted the reservoirs PH from 5.8 to 6.2.
On day 5 I adjusted the reservoirs PH from 6.4 to 6.0. I diluted my nutrients in my reservoir by removing one gallon of nutrients from the rez and and adding 2 gallons of straight tap water to the rez. This brought the nute concentration from 770 ppm to 540 ppm as the plants will be entering the ripening stage in a few days and they have too much nitrogen judging by the extremely dark green leaves and burnt leaf tips on some branches of the left side plant. The buds seem slightly smaller then my last run which may be due to an excess of nitrogen and maybe not enough light as some of my tops are taller then the others making proper PPFD challenging. All in all the girls are coming along nice and I look forward to the final weeks of flowering 😀
On day 6 I adjusted the reservoirs PH from 5.9 to 6.2. I think I have halted the nute burn as I haven't seen it progressing any more on the leaves. I will continue to monitor closely during these final weeks. The trichome production is increasing with some trichs on top of colas starting to go cloudy. The pistils are turning brown with roughly 40-50% are turning brown all signs I'm getting closer to the harvest window 😆. I dimmed my light to give 600-1000 PPFD to tops.
On day 7 I reduced my temps to 75 during the day and 68 at night. I adjusted the PH of the reservoir from 6.6 to 6.1. My reservoirs ppm was too high so I diluted the rez with 2 gal of tap water. This brought it down to 480ppm. The average ppfd to all 14 tops is 604 with no top receiving more than 1000 ppfd
Likes
4
Share


@Big0zGrower420
Follow
Got a couple more days until day 56 (week 8) but just wanted to add a few things from this week. The flush is coming along nicely and getting some really nice colors to come out, Really excited for the finish.
Just uploaded the day 56 pictures, shes looking beautiful!

Likes
5
Share


@0xcrlt
Follow
- June 19th - 10 days after planting the seedling - the plant is developing very well - the first shoot is emerging
- Day 13 - today the lady was watered with 0.8 ml of BioBizz Bio-Grow mixed in a total of 400 ml of water

Likes
6
Share


@BudeCo
Follow
Everything is ok
Growing faster than i wish.
I should defoliation again and put some clips tomorrow.
Need some topping after almost a week.
Its health and fine.


Likes
57
Share


@LockDownGrow
Follow
Ok so the taste test is :
I like this over the girl scout cookies and the BlackBerry for daytime ,
It's a very nice euphoric head high that turns you into a creative genius , you feel like you could do anything you put your mind too, the buzz sticks around for a while too ,
It's really nice indeed , and a few months cure and she will smell fantastic ,