


Processing
Likes
14
Share


@Skunk_Life85
Follow
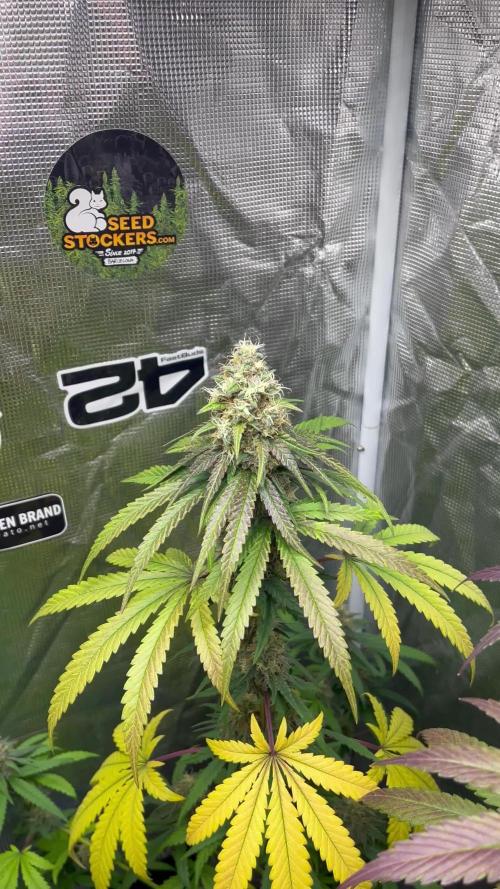
She is in full bloom mode😁😁😁. Nice tight nodal spacing. Compact plant. Hasn't started to smell yet. I bumped up her nutes to 700ppm. I started some Aurora Innovations nutes. She is a happy plant. I'm excited to see how she fills out.

Likes
5
Share


@Lifesgarden420
Follow
They really know how to provide great genetics
We have never had an issue with any of their strains one of our favorite brands to grow all year round thank you so much for this great contest to help bring the world together thank you again @divine.seeds


Likes
9
Share


@newenglandgrowers
Follow
Using some Neem oil and hydrogen peroxide ONLY ON MEDIUM (since I'm in flower), to get rid of these dumb fungus gnats I think they are the reason for the brown spots forming on the leaves. Installed a trellis this week to help spread out the canopy and improve airflow, however when I did this my dumbass accidentally snapped one of the colas, luckily I think it'll be ok because it seems to have only snapped the outer skin layer on only one side of that stem (I wrapped a piece of duct tape around the little snap to help secure it). This week went well I think I've got the fungus gnats under control, the stem I partially snapped still looks to be completely healthy and growing well so no complaints here successful 2nd week of flower👍🏾

Likes
39
Share


@420DeepGrow
Follow
Gracias al equipo de Terpyz, XpertNutrients, Marshydro y Pro-Mix, sin ellos esto no seria posible.
*💐🍁Kosher Kush X MDC TEST:
Test de una nueva cepa proveniente de dos grandes genéticas, Kosher Kush x Mandarine Cookies, una de ellas está en sustrato Pro-Mix Hp Mycorrhizae.
💡FC6500: Eficiencia líder en el mercado: la lámpara de cultivo LED FC-E6500, que ostenta un estatus líder en el mercado, es una solución rentable con un PPE de 2,8 µmol/J y un rendimiento máximo de 2,5 g/vatio. Ofrece un PPF alto de 2026 umol/S y es adecuada para una cobertura de vegetación de 1,50 m x 1,50 m y una cobertura de flores de 1,20 m x 1,20 m.
Iluminación versátil y uniforme.
https://marshydro.eu/products/mars-hydro-fc-e-6500-730w-commercial-led-grow-light/?gad_source=1&gclid=Cj0KCQjw1qO0BhDwARIsANfnkv9IIrYSbmJqz8PqpJOIyWwJfp5bc3SGJgUV68USLQ4tjmXDYwoBuAsaAue3EALw_wcB
🚥 MarsHydro ADLITE UV/IR/RED:
Para lograr un crecimiento óptimo de las plantas y maximizar los rendimientos es un arte simple que depende en gran medida de las condiciones ambientales adecuadas. Reconociendo las limitaciones de la iluminación natural y las soluciones de iluminación tradicionales para satisfacer estas necesidades únicas, lanzamos ADLITE. Estas luces especiales UV, IR y roja están diseñadas para llenar áreas del espectro, proporcionando las altas longitudes de onda que las plantas necesitan para un crecimiento y desarrollo óptimos.
Consigue aqui tu Adlite:
https://marshydro.eu/collections/adlite-supplemental-lights/
🏠 : Marshydro 1.50 x 1.50 x 1.80, carpa 100% estanca con ventanas laterales para llegar a todos los lugares durante el grow
https://marshydro.eu/products/diy-150x150x200cm-grow-tent-kit
🌬️💨 Marshydro 6inch + filtro carbon para evitar olores indeseables.
https://marshydro.eu/products/ifresh-smart-6inch-filter-kits/
🍣🍦🌴 Xpert Nutrients es una empresa especializada en la producción y comercialización de fertilizantes líquidos y tierras, que garantizan excelentes cosechas y un crecimiento activo para sus plantas durante todas las fases de cultivo.
Consigue aqui tus Nutrientes:
https://xpertnutrients.com/es/shop/
📆 Semana 4:
Muy buena semana, toda la carpa se ha llenado de lindos erizos que comienzan a alargarse desmesuradamente.
La cantidad de resina aumenta dia tras dia, estan comiendo como locas.
Con los Adlite de Marshydro y el FC-6500 se pueden apreciar futuros buenos cogollos, las plantas se desarrollan salvajemente 💪🏻🔥.
El olor de la carpa es bastante intenso ☠️.
Potencia del foco: 100%.

Likes
67
Share


@Sider79
Follow
Very slow , not what I expected for a auto 🙄 but another experience to add to the ongoing endeavor.
By now with other autoflowers I've grown they would be much further along like at least second node space.
But I feel ill turn this one around & this will be as good as the others here on Grow Diaries. 🤞💚💚💚💚

Likes
28
Share


@Trickybis82
Follow
Hello my fellow growmies,
Please find this week pictures and updates. I am into the final stretch with Runtz Muffin & Wedding Cheesecake.
After this week I will put them onto ripen for there last couple feeds before I then start the flush process.
The smell coming off these plants is ridiculous lol it makes the room smell like a fruity cake factory 🏭 🤣.
Grape gusher is a little behind the other girls but that is fine because she is a giant with so many bud sites perfect!
I will update next week.
Peace and love people!

Likes
33
Share


@Northern_Ent
Follow
June 7: she’s doing better but still not right after the frost a couple weeks ago.
Check out coyowolves howling on video.
June 8: removed frost damaged colas and composted immediately with coffee grounds, peat pot bottoms, some HP Pro-Mix from a couple of failed peat pots and LAB. Cannabis was assimilated almost immediately and it looked like good compost after about two days. This was my Coffee Canna Compost which was used for some autos.
June 10: gave it 2.5 mL/L of FPJ as a soil drench rather than just the usual 1 mL/L as a weekly foliar spray. Plant seemed to grow a lot in the next few days so maybe I should do that more often.
June 11: looking better since the frost damage setback. Not as strong in the cool weather as the two Quebec Cannabis Seed plants but as we move into summer this plant should be fine.
June 13: recovered the six inches of height lost when I removed the frost damaged colas.

Likes
16
Share


@GrowerGaz
Follow
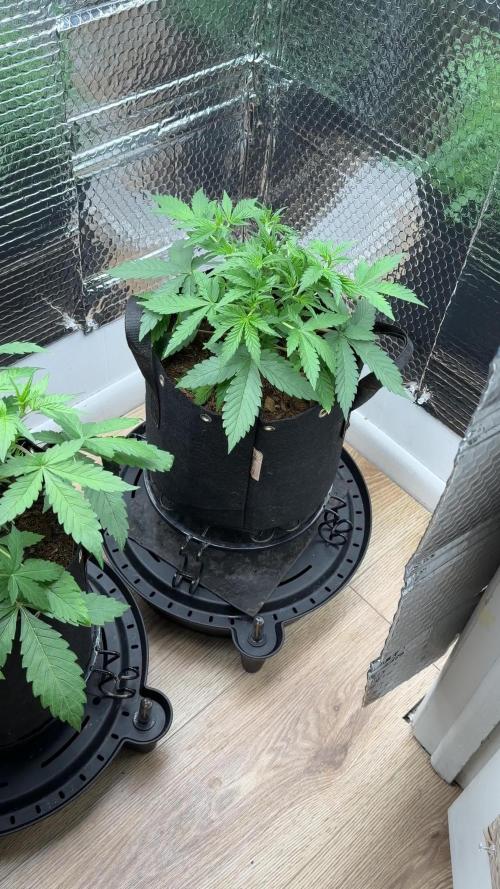
This week are repotted the plants and will move the four in BAC lava soil up to my Dr120 this week. I have just cleaned it and like to leave it empty for a week , move the food source for any bugs. They have just had water this week and are bouncing back from being topped.
The two in dwc are staying in this tent.


Likes
2
Share


@Master_Yoda
Follow
I used a heating pad on a thermostat set to 82° Fahrenheit. It only took about three days for the seeds to pop. Note the germination kit in the back left of the tent
Likes
18
Share


@Hashy
Follow
This was a good harvest for 9L pots, good root structure. The plant pulled out some real nice colours at the end of its life, if I could have lowered temps a bit I bet she would have looked stunning with the fade.
Smoke report coming up in a few mins.

Likes
2
Share

@eldruida_lamota
Follow
Vamos familia, actualizamos la septima semana de floración de estas Runtz de MSNL.
La temperatura que estuvo entre los 24-26 grados y humedad dentro de los rangos correctos.
En cuanto a las plantas las veo verde sano, estiraron bien y ensancharon bastante también.
En este indoor hay que decir que no tengo ninguna plaga.
Se nota que los nutrientes de la marca Agrobeta, añadí Thor y Mega Pk, hacen sus funciones.
Las flores empezaron a engordar y a llenarse de tricomas, por el momento todo correcto, os dejé también alguna novedad y un cambio en la sala,
agradecer al equipo de Mars hydro por el nuevo TSW2000. (los últimos 5 años cultive solo con los leds de esta marca).
- os dejo por aquí un CÓDIGO: Eldruida
Descuento para la tienda de MARS HYDRO.
https://www.mars-hydro.com
Hasta aquí todo, Buenos humos 💨💨💨

Likes
7
Share


@Jays_Not_Here_Man
Follow
Fattening and stacking! That’s what’s up this week. Ladies are doing well, still fine tuning the new Cronk Nutrients. Some slight phosphorus deficiencies showed this week. To be expected with this type of flower growth so fast. Learning lots with this run, overall I’m very impressed with the Cronk Bonnie and Clyde Autoflower mix, still need to fine tune though. Happy Gardening 🇨🇦❤️🌱😎💨

Likes
2
Share

@Stoney_Stark
Follow
Sticky Mango Auto — Week 4 Update
Grower: Stoney Stark / Little Lilly Farms
Stage: Late Veg → Early Flower Transition
⸻
Growth Overview
By Week 4, a noticeable size difference has developed between the two plants. One plant is nearly double the size of the other, while the smaller plant has entered early flower first, showing visible white pistils. This staggered development is not uncommon in autoflowers and appears to be influenced by early root-zone moisture differences.
The larger plant remains in late vegetative growth, while the smaller plant is clearly transitioning into flower.
⸻
Moisture Management & Wicking Adjustments
2/1
Signs of overwatering observed. Pots were placed on stands to remove them from the wicking rope and mat. The absorbent pad was removed from the pot showing more stress, while the healthier plant remained on the mat.
After ~11 hours, both plants were returned to their wicking material.
2/2
Plants continued to show signs of excess moisture. Both were again placed on stands to fully disconnect from the wicking ropes.
2/3
Decided to extend dry-back by another 24 hours to allow the root zone to re-oxygenate.
These adjustments helped slow water uptake and encouraged healthier root respiration before flower onset.
⸻
Flower Initiation
2/5
First signs of flower observed — white pistil hairs visible.
2/6
Smaller plant clearly showing pistils. Both plants were low-stress trained by tying down branches to open structure and manage height differences.
⸻
Feeding Log — 2/6
• Total volume: 1 gallon (split evenly)
• Amount: ½ gallon per plant
• PPM: 877
• pH: 5.9
Nutrients (per gallon):
• Armor Si — 1 ml
• Micro — 5 ml
• Grow — 2 ml
• Bloom — 4 ml
• CaliMagic — 1.5 ml
• Floralicious Plus — 1 ml
⸻
Nutrient Strategy & Purpose (Week 4 Transition)
Armor Si (Silica)
Used to strengthen cell walls and improve stress resistance. Especially important here due to recent moisture stress, training, and the upcoming stretch phase.
Micro
Provides essential micronutrients (iron, manganese, zinc, copper) that support chlorophyll production and enzyme activity. Keeps growth balanced as the plant shifts metabolic focus toward flowering.
Grow (Reduced)
Nitrogen is still needed, but at a lowered rate. This supports continued leaf function without pushing excess vegetative growth, which can be counterproductive once flowering begins—especially for the smaller plant already showing pistils.
Bloom (Increased)
Phosphorus and potassium are ramped up to support flower initiation, root signaling, and early bud site development. This helps both plants transition smoothly despite their size difference.
CaliMagic
Calcium supports cell division and structural growth, while magnesium is essential for chlorophyll production. Critical in coco, especially during stretch and early flower when demand increases.
Floralicious Plus
Provides organic acids and bioactive compounds that enhance nutrient uptake, improve root efficiency, and help buffer stress from training and environmental adjustments.
⸻
Notes Going Forward
With one plant entering flower ahead of the other, feeding will remain balanced but conservative on nitrogen while continuing to support early bloom development. Moisture management will stay a priority to prevent further root stress and ensure a smooth transition into full flower.
Likes
3
Share


@Ogbangbang2981
Follow
oh did I add I noticed she showing sex this morning as the sun rises
so this morning Feb 18 6:22am I decided to up my nutrients
with the first bottle of nutrients I mixed was on a early veg level so I just add 2ml of each my fox farms advance nutrients along with some algas ( made with seaweed somewhere on the island ) which is a root stimulant and a few drops less than a teaspoon of molasses. and gave my baby a deep feed hope I dont regret this hope I dont get nut burns .


Likes
12
Share


@CampaCavallo
Follow
2ª settimana vegetativa 💚
La piccola CRITICAL LEMON cresce bene, bella e forte🍋⚡💪🏻
Trapianto effettuato da vasetto da germinazione a vaso 6,5 litri definitivo! 👍🏻
Sta per arrivare anche il controller TENT-X gentilmente prestato dagli amici di TROLMASTER

Likes
21
Share


@pifflestikkz
Follow
Day 1 - Popped into glass of water.
Will leave in dark warm place for 24-48 hrs till they sink.
Day 2 - seed sank, now decided to place in paper towel, in a bag in the cupboard. Will wait 24 hrs for tap root to emerge and to 2-3cm this time.
Day 3- transplanted into final 3gal fabric pot. Water only pH balanced.
Day 6- still nothing to see, first time using fast buds... But the name is not doing this seed justice 🤦♂️🤣 hopefully she'll break through by end of weekend 🙌✌️💚
Day 10 still no sign of her.
Marking it as failed to germ 🤦♂️💚
Likes
53
Share


@Roberts
Follow
Merlin Mintz is doing good. She just got into the solution. Everything is looking really good at the moment. Thank you Spider Farmer, Aeque Genetics, and Athena. 🤜🏻🤛🏻🌱🌱🌱
Thank you grow diaries community for the likes, follows, comments, and subscriptions on my YouTube channel. I greatly appreciate all the support. 🌱🌱
🌱https://youtube.com/channel/UCAhN7yRzWLpcaRHhMIQ7X4g