


Likes
Comments
Share

@420DeepGrow
Follow
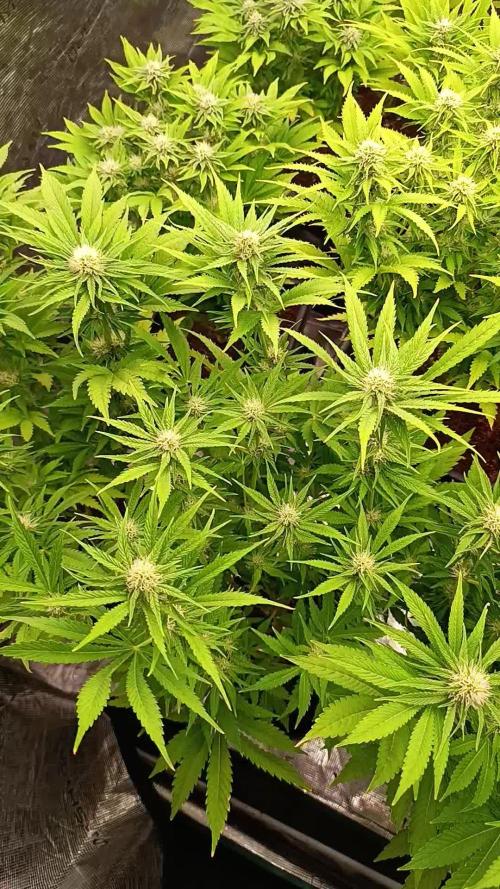
📆 Semana 5
El estiramiento queda completamente atrás y los erizos ya están bien formados en cada punta, compactos y uniformes. Los cálices continúan apilándose con orden y empieza a notarse un aumento real de densidad, aún sin llegar al engorde máximo.
La resina comienza a cargarse con más presencia, cubriendo brácteas y hojas cercanas, anticipando la fase de volumen que está por venir. Los pistilos siguen activos y blancos, manteniendo el ritmo de construcción floral.
La estructura permanece equilibrada, bien expuesta y sin estrés, con la energía centrada en consolidar flores y potenciar la producción de tricomas.
Seguimos creciendo fuerte 💪!

Likes
18
Share


@KirosWS94
Follow
I go for 7 weeks of veg, done with the LST last week and now i am waiting to get some height 40-45cm and switch to flowering.
The broken stem of last week didnt survive. 😪
This week i give 350ppm, 650pmm was too mutch i think.
I dont know if the high PPM of Run-Off was from overwatering or overfertilization, so i start to water less frequently every 6-7 days with RO only and see what the Run-Off says, the last time i water with RO only and the Run-Off was 856PPM, now i hope the Run-Off go down to 100-150PPM and start again with nutrients. 😵😵
13/3
Today i set up my second lamp 400watt HPS to check temps...all good!
After i put the Co2 bag in grow room, i saw that the plant's can handle very hot temperatures, and i think they like somewere between 29-31C when the temps go high they look very happy, before the Co2 bag in this temperatures they struggled.
14/3
Defoliate all plants and two plants topped for 12 and 9 (the broken one) colas, the other two stays with 8 colas.
Water 4 liters RO only and again the Run-Off was at 850PPM.
Flush with 20-25liters tap water at 180PPM (Too hard in my town) and the Run-Off go down at 280PPM 💪
Next week i will give very small doses at 300-350PPM and see what is going to happen.


Likes
28
Share


@MadeInGermany
Follow
Hey everyone 😃.
Day 1 :
The seeds were placed between 2 moist towels to germinate and sealed in a box.
Day 2 :
No change .
Day 3:
Both seeds have sprouted and you can see a small tip of the root coming out.
Day 4:
The tip of the root looks out about 0.5 - 1 cm.
today they were set in stone wool blocks.
These were placed in water beforehand and mixed with a little Rizotonic to stimulate root formation.
Day 5:
Today, both seedlings stick their heads out about 1 cm 😊.
(The grow box is sprayed under the hood every day to keep it moist.)
Day 6:
Today the heads are already looking 2 cm out.
Day 7:
Both rock wool blocks were planted in Canna Coco, and some water with an Ec mixture 0.4 was added.
So they stay under the hood for about 7-10 days.
(The lid is opened a little wider every 2-3 days to get used to the lower humidity.
I hope you have a lot of fun with the update, stay healthy and let it grow 🙏🏻😊
You can buy this Strain at :
https://www.royalqueenseeds.de/feminisierte-hanfsamen/115-amnesia-haze.html
Type:
Amnesia Haze
☝️🏼
Genetics:
Original Amnesia Haze
👍
Vega lamp:
2 x Todogrow Led
Quantum Board 100 W
💡
Bloom Lamp :
2 x Todogrow Led
Cxb 3590 COB 3500 K 205W
💡💡☝️🏼
Soil :
Canna Coco Professional +
☝️🏼
Fertilizer:
Green House Powder Feeding
☝️🏼🌱
Water:
Osmosis water mixed with normal water (24 hours stale that the chlorine evaporates) to 0.2 EC. Add Cal / Mag to 0.4 Ec Ph with Organic Ph - to 5.5 - 5.8 .
Likes
21
Share


@buddhi_coop
Follow
This week I did a compost tea which they really liked. I just watered them with water. Ph 6.3. They’re still growing slowly but I think l figured out why. I had a light coming off of my extension chord that was in the tent. I didn’t realize it till last night & thank goodness I did.
Likes
16
Share


@Philhsy
Follow
My biggest harvest yet, 385g dry oh my god. Never thought hydro could yield sp much so fast. And fastbuds genetics helping me achieve that. The strain is so potent we smoked a joint 4 people and had to put it out bwcause everyone got so stoned. Wonderful. But curing now so im looking forward to those terpz and maybe a little else you never know what surprises beholds. Hsy out!

Likes
2
Share


@BONGAPPETREATS
Follow
What’s up yall!!??
Week 6 and we got some serious buds growing in. Some of the sites that I thought wouldn’t produce actually surprised me.
I haven’t changed much with this grow. I think the flush I did worked well and the plant seemed to react in a positive way.
Trellis net and some LST just to get light down to the lower sites seem to have worked.
No real change in nutrient and feeding. I do feed every watering so there I no skipping. I still use the General Hydroponics flora series and some cal mag. That’s literally all!
See y’all in week 7

Likes
2
Share


@DrPeeper
Follow
-Clones have been transplanted into 3.5" pots. The sixth plant eventually rooted however it was the smallest, was a backup, so I did not bother to transplant it.
-Megacrop amounts above are actually g/gal, not tsp/gal. I do wish Grow Diaries would add mass for us dry soluble nutrient addicts.
-Mother is doing fine, I took a second set of cuttings off her for a local buddy who would like to grow her out as well.
-The mother has also given me a good idea of what to expect later on in veg when I begin training.
-Grow will eventually be planted in 5-gal fabric pots then moved to a 4x4 tent w/ Autopots and a 650w 3000K LED Bars for further training and flowering.
-I intend on offsetting the transplants, bending the girls over for LST, and eventually train under a scrog net in the flower tent. The mother seems to support this training as that is what I did with her to reduce height yet maximize the number of cuttings I could harvest quickly.

Likes
53
Share


@Pr3m_85
Follow
Last days with nutes.
Peace to all ✌️🏽✌️✌️🏾✌️🏿✌️🏼✌️🏻
Day 59 : started to flush with ph'd water.
Day 60 : flush 💦
Day 61 : flush💦
Day 62 : flush💦

Likes
8
Share


@Kirsten
Follow
23.3.25:
Hulkberry 💜💚 is sprouted, and now progressing well. It was a slow start, as I did not soak the starter plug and the seed kept drying out.
I also added more perlite than usual and so when I was watering the seed, everything was moving with the perlite.
Now that we have broken soil, I did need to remove the shell as it had dried out and became stuck. It came off easily enough, and I did not cause any damage to the plant.
The extra perlite should be fine now, as we have roots to keep us in place at last, as well as the starter plug.
When I get some more coco I will top dress, as the level of the soil has lowered since it was filled due to the extra perlite.
That probably won't be soon though. It will probably coincide with the normal top dress schedule.
The super soil mix I made was approximately constituted 8 gallons of;
☆ 60% Canna Coco
☆ 30% Perlite
☆ 9% Worm castings
☆ 1% Organic dry amendments.
- Ecothrive Life Cycle
- Ecothrive Charge
- Diatomaceous Earth
- Ground Cinnamon
- RHS Mycorrhizal Fungi granules
- Great White Mycorrhizal Fungi blend
Thanks for hanging out 🍃 ✌️ 💚 🙂
Likes
34
Share


@Northern_Ent
Follow
Oct 5: Bruce is doing great. I was getting worried she wouldn’t finish in time but she’s picked up the pace and the weather is still good. Sort of. Hitting zero tonight and high of +3 C tomorrow. After that it’s sunny for two weeks with highs near 20 C.
She’s turned purple the last few days and is putting on weight. 👍👍
She also broke a limb when blown over (again). Removing big fan leaves that are shading bud sites.
Oct 6: she’s beautiful. Removed some large fan leaves that were shading bud. Feels weirdly warm tonight.
Still using the 730 nm far red light for a few seconds at dusk as a bloom booster. Now down to just over 11 h of daylight.
Oct 10: looking good this morning.
Oct 11: been removing fan leaves to get as much light on the buds as possible. Sunlight is weak and low to the horizon but this month continues being unseasonably warm. We’re usually getting quite hard frosts by now but the forecast is warm for another two weeks.
Some nice purple showing from the lowish overnight temps though.
I just checked, and yes, it has been “extremely hot” again for the last 30 days.

Likes
7
Share

@Dagnele
Follow
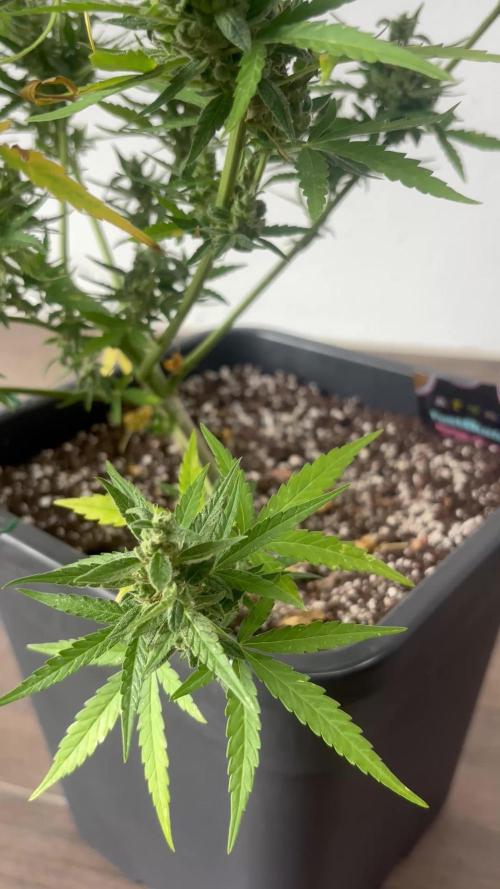
Flowering Update – Late Flower
This week the plants continued to bulk up, and the buds are noticeably denser than before. The trichomes are becoming increasingly cloudy, showing that harvest is getting close.
The weather has improved compared to the previous heat wave. Daytime temperatures are around 33°C, while nighttime temperatures have dropped to about 20°C. The larger day/night temperature swing has finally triggered some purple coloration on the Banana Purple plants, which was a pleasant surprise after weeks of waiting.
Overall, I’m very happy with how both the naturally grown plants and the LST-trained plants turned out.
One interesting observation is the difference between the Sour Jealousy plants:
* The natural plant developed fewer but much larger and thicker colas.
* The LST plant produced more flowering sites, but the individual buds are noticeably slimmer.
This suggests that, at least in my setup with autoflowers and relatively small pots, LST increased the number of buds but didn’t necessarily improve the overall size of each cola.
The Banana Purple plants are clearly the most advanced. Most pistils have turned orange/brown, and the trichomes are mostly cloudy. They appear to be about one week away from harvest.
The Sour Jealousy plants are slightly behind and will likely need another 1–2 weeks to fully mature.
After gradually reducing the flowering nutrients, I decided to stop feeding ATA Terra Max completely on the Banana Purple plants and continue with plain water until harvest. The Sour Jealousy plants will receive one or two light feedings before switching to water only.
I also changed my watering routine. Instead of watering daily, I now water only when the pots feel light, allowing the root zone to dry slightly between irrigations. This should improve root oxygenation and avoid unnecessary stress.
Overall, despite the extreme heat earlier in flowering and even a hailstorm that damaged several fan leaves, the flowers remained intact and continued developing well. I’m very satisfied with the progress and excited to compare the final yield and quality between the naturally grown plants and the LST-trained ones for both Banana Purple and Sour Jealousy.
Likes
9
Share


@AgentOrange
Follow
Think I’m going to have to harvest maybe a little early as I will not be around to water the plant.🤷♂️🤷♂️ bit to sure if it’s ready or not.
What do you think is it to early and how early ?
Likes
24
Share


@Hawkbo
Follow
Growth has been steady and everything is thriving right now. Might need to get a new dehumidifier soon mine is starting to shit the bed so RH levels are a little high with lights out but the heater keeps them low enough to get by at this point. I removed all the fan leaves on these 2 around day 17 and they didnt skip a beat. I will be removing the fan leaves on everything on day 21, these 2 were flipped a week earlier than the test to remove males. Hope everyone is practicing their social distancing skills. Use the code bangdang at any of my sponsors for 10% off.
@greenbuzzliquids
@growlightscience.led
@rainscience_growbags
@gorilla_grow_tent


Likes
7
Share


@eldruida_lamota
Follow
Vamos familia, actualizamos la 4 semana de floración de estas Gelato Olandese de Dutchfem Seeds .
Y es que hasta aquí todo va correcto , están enormes, tienen un buen color, se ven sanas, y van progresando las flores adecuadamente.
La alimentación de Agrobeta la están aceptando muy bien , ya se las puede apreciar.
Agrobeta:
https://www.agrobeta.com/agrobetatiendaonline/36-abonos-canamo
Mars hydro:
Code discount: EL420
https://www.mars-hydro.com/
Las maximas de temperatura no superan los 26 grados y las mínimas no bajan 20, así que no me puedo quejar.
Los niveles de humedad también son los correctos van entre 50%/65% de humedad relativa.
Por supuesto el Ph lo estamos dejando alrededor de 6.
Hasta aquí es todo, buenos humos 💨💨💨.

Likes
Comments
Share

Likes
69
Share


@nonick123
Follow
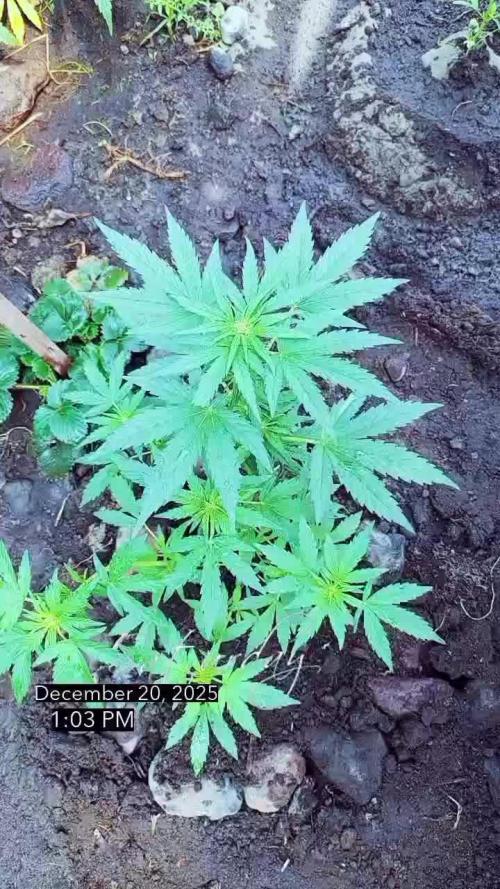
Día 37 (08/07) Ajustes de LST en todas las plantas! 🚀
Día 38 (09/07) Ajustes de LST en todas las plantas. Las ramas inferiores están creciendo como un cohete! 🚀😍
Riego con 250 ml H2O pH 6,5
Día 39 (10/07) Las plantas se muestran sedientas! Creo que el cepellón está lleno de raíces y piden el trasplante!
El crecimiento no se ha visto afectado de momento
Riego con 500 ml H20 pH 6,5
Día 40 (11/07) Paso a regar con 500 ml / día, ya que hace mucho calor (30 ºC) y efectivamente las plantas ya han copado la maceta de raíces
Riego con 500 ml H20 pH 6,5
Día 41 (12/07) Riego con 500 ml H20 pH 6,5
Clones! Mi experimento vuelve a demostrar que NO necesitas complejos productos de clonación ni sistemas para obtener clones!
Hace 15 días puse 2 clones con el tallo sumergido en miel durante 5 minutos en una maceta de 400 ml con PRO-MIX HP BACILLUS + MYCORRHIZAE
He mantenido la humedad alta con una cúpula de humedad casera hecha con una botella de agua PET de 5 litros cortada por la mitad y pulverizando a diario.
Han estado los 15 días en mi terraza con luz indirecta, y temperaturas que rondan los 30 - 32ºC durante las horas centrales del día
Hoy los he trasplantado a una maceta de 1 litro porque ya habían formado raíces y empezaban a formar nuevas hojas!
🐥🐥🚀🐥🐥
Día 42 (13/07) Riego con 500 ml H20 pH 6,5
Día 43 (14/07) Trasplante a maceta definitiva de 21 litros de ROOTPLUS Pot de GSKOREA GLOBAL!
Estas macetas son una maravilla!
Proceso de trasplante:
Se prepara con 17,85 Litros (85%) de sustrato PRO-MIX HP BACILLUS+MYCORRHIZAE + 1,05 Litros de Humus de Lombriz (5%) + 2,01 Litros de Insect Frass (10%) + 210 gramos de Earth Vibes Super Soil (10 g/L substrato)
Se llena la maceta de sustrato con las manos (limpias) y rompiendo los trozos más gruesos, para que el sustrato esté aireado y esponjoso, sin presionar
Se coloca una maceta vacía de 6,5L para que quede la forma perfecta de la maceta donde están actualmente
Se espolvorea la parte proporcional de la probeta de microorganismos sobre el agujero de trasplante
Se saca la planta de su maceta actual (bonitas raíces 😍) y se coloca en la maceta final
Se riega muy lentamente hasta percolación profunda con H2O EC 0,5 pH 6,5
Una vez asentada, complemento con un riego de 500 ml con 25 ml/L de Humus de Lombriz Liquido
Se coloca mulch (acolchado) de paja para evitar traspiración excesiva y cuidar a los microorganismos del suelo
A ver como reacciona al trasplante!
Aplicación foliar Kelp hidrolizado de Lurpe Solutions a 0.25 ml/l
Realizo ajustes de LST aprovechando el trasplante a la nueva maceta. De momento tienen una canopia muy bien formada!
💦Nutrients by Lurpe Solutions - www.lurpenaturalsolutions.com
🌱Substrate PRO-MIX HP BACILLUS + MYCORRHIZAE - www.pthorticulture.com/en/products/pro-mix-hp-biostimulant-plus-mycorrhizae
Likes
15
Share


@Messypies
Follow
13/07/2020 - growth looking good. Highered lights to try to get plant to stretch
14/07/2020 - plants green and seems to be responding well to nutrients.
15/07/2020 - all looking good


Likes
5
Share


@Ensign420
Follow
Greetings fellow growers 🖖 and welcome to my first grow ever. This adventure actually started several months ago when I decided to stop buying flower from dispensaries and just grow my own bud. How hard can it be!?
This is actually my second seed of this strain. The first bean sadly died due to over watering (sorry girl, RIP). I was literally watering the cube to the point where water was dripping from the bottom, then heavily sprayed the humidity dome and tray with the vents completely closed. Everyday. Multiple times. I never let the dome or try dry out. So after about 8 days of not sprouting, there was a funky smell of rot. So that was that.
Later I learned that rockwool retains a lot of water and can easily drown seeds. So a wet/dry cycle is best for rockwool germination.
So even after hours of researching and digging through forums and tutorial videos, I was still under prepared for this journey. Did not consider how delicate the germination phase is. Oh well. Lesson learned. Reset and try again!
I hope everyone is safe and stoned during this corona crisis. Just like everyone else in the world, I want this pandemic to be over with. But in the meantime, let's grow some weed! 🖖
[START OF WEEK 01]
Day 01 - Monday - 08/03/20 - Total Days: 001
-----------------------------------
- [0830]: Light Schedule: 24Hrs/0
--- Soaked cube in 5.5 PH water for 10 min. Did not shake water out.
--- NO NUTES! Only PH'd down to control the PH levels.
--- Did not use the default hole (way too deep).
--- Flipped cube upside down and made a shallow hole for the seed (less than 0.25" deep).
--- Placed seed in and pinched hole close. No additional water added.
--- Sprayed the tray and dome with straight water (5.5 PH).
--- Vents are cracked opened a for ventilation (about 1/4 opened each).
--- Distance between the light and tray was 53"
--- AC was set to 80 °F
--- Exhaust fan was set to 86 °F
--- Room average temp was at 85 °F
--- Dome humidity was at 85-99% when sprayed.
--- Allowing to completely dry before respraying.
- [2200]: Dome and tray were completely dry! Sprayed only tray and dome with more water.
Day 02 - Tuesday - 08/04/20 - Total Days: 002
-----------------------------------
- [0845]: Sprayed dome and tray in the morning. Everything was dry.
--- Hoping for the best!
- [2130]: Everything was dry again, so sprayed dome and tray at night along with a light spray on the cube.
Day 03 - Wednesday - 08/05/20 - Total Days: 003
-----------------------------------
- [0830]: Everything was dry again. Resprayed dome and tray. Slightly sprayed cube.
- [2125]: Hooo damn!! She popped! Am little stub is visible! Resprayed dome and tray again.
--- Still going 24/0 for lights.
- [+0033]: Just checked up on her and I swear she grew a bit taller! Getting excited!
Day 04 - Thursday - 08/06/20 - Total Days: 004
-----------------------------------
- [0845]: Wow! Went from a little stub to fully sprouted overnight! Everything was pretty dry again so resprayed dome and tray.
- [2200]: Tap root is visible! Over 1" long too! Just resprayed dome and tray again.
-- Going to prep for hydroton transplant tomorrow!
Day 05 - Friday - 08/07/20 - Total Days: 005
-----------------------------------
- [0930]: She keeps growing!
-- Added a bit of CalMag to the spray bottle (8 drops to 650ml of distilled water). Resprayed dome and tray. Water was at a 5.4 PH with 141 PPM.
- [1045]: Prepped the bubble bucket with 4.5gal of water. Water is high enough to reach about 0.25" above the bottom of the net pot.
--- Added 3 drops of Superthrive
--- Added 3.5ml of CaliMagic
--- Added 2ml Hydroguard
--- Then PH'd down to 5.6
--- Solution Strengh: 120 PPM
--- Water chiller is set to 20 °C
- [1100]: Transplant time!
--- Filled the net basket 1/3 with hydroton. When placed in the bucket, air bubbles are not visible, but are slightly below the surface (slight digging will reveal the water/bubbles below).
--- Removed plastic on rockwool cube and placed in basket, then filled around and covered with hydroton. Making sure to block any light from passing through the net pot and into the nutrient solution.
--- Covered with a half-bottle dome sprayed with the CalMag water from earlier.
--- Hoping for the best!
- [1300]: Raised Bucket 5" higher. Now light distance is 48" to top of bucket.
- [1820]: Lowered tent exhaust temp to 76 °F
--- Lowered AC to 75 °F
--- Raised bucket even higher so light distance is 30" to top of bucket.
- [2300]: Looking good!
--- Sprayed dome and surrounding hydroton with more CalMag water.
--- Attached timer to light! So new 18 Hrs On/6 Hrs Off light schedule.
--- Lights On: [1600] (4pm)
--- Lights Off: [+1000] (10am the next day)
--- Decided to go with lights on during the evening/night and off during the later mornings/afternoon (the hottest part of the day) to see if temps can be controlled better.
--- Please survive girl!
Day 06 - Saturday - 08/08/20 - Total Days: 006
-----------------------------------
- [0800]: Everything was dry. Resprayed hydroton and dome.
- [2000]: Here first night cycle seemed to go well! Get'n taller!
--- Dry again. Removed the dome.
--- PH went up to 6.5 so PH'd down to 5.7
--- Ran the top feed drip ring for a bout a minute to wet the hydroton and rockwool with the nutient solution.
---Too scared to leave the top feed on 24hrs (I don't want over water her and cause dampening-off). Will let dry before re-watering.
- [2100]: After closer inspection, I think she's looking a bit yellow.
--- Decided to add a bit of grow nutes to the bubbler solution.
--- Added 2ml of Sensi Grow A
--- Added 2ml of Sensi Grow B
--- Solution strength after adding more nutes: 176 PPM
--- PH went up to 6
--- I hope that the extra chelating properties of the 'PH Perfect' solution is enough of a buffer for proper nutrient uptake.
Day 07 - Sunday - 08/09/20 - Total Days: 007
-----------------------------------
- [0800]: Water dropped a bit (mostly due to evaporation) so solution strength was at 190.
--- Checked PH again. Was still at 6, so PH'd down to 5.4
--- Ran the top feed for a minute to wet the hydroton a bit.
- [0915]: Since she's looking perky but still a bit yellow. So decided to up the nutrient concentration even more before lights out.
--- Added 2ml more of Sensi Grow A
--- Added 2ml more of Sensi Grow B
--- Solution strength after adding more nutes: 199 PPM
--- PH went up to 5.8
- [1700]: Checked nutrients.
--- PH: 5.9
--- Solution strength: 202 PPM
--- Added 4ml of Voodoo Juice
--- Added 4ml of B-52
--- PH after adding more nutes: 5.9
--- Solution strength after adding more nutes: 238 PPM
- [2130]: Decided to make a new foliar spray to address the continued yellowing.
--- Started with 500ml of distilled water.
--- Added 3 drops of CaliMagic
--- Added 3 drops of Sensi Grow A
--- Added 3 drops of Sensi Grow B
--- Added 3 drops of B-52
--- Added 1 drop of Superthrive
--- Solution strength: 164 PPM
--- PH was at 5.9 and did not adjust.
--- Gave her one spray.
--- Also sprayed the surrounding hydroton.
[END OF WEEK 01]

Processing
Likes
10
Share


@Ktims420
Follow
Huge growth this week , a week behind but taller than my blue dreamatic’ auto . Looking nice and healthy but I am running out of room could have done lots of lst on these babies but I just don’t have the space. Lots of tall stalks not just one main one . Loving this strain, very tolerant for new growers. All ears to feedback good and bad. 💚
Likes
5
Share


@Johngrowbr
Follow
First week of pre flowering, just changed the schedule of the lights and the photoperiod
