
Likes
Comments
Share

@sunshinegroww
Follow
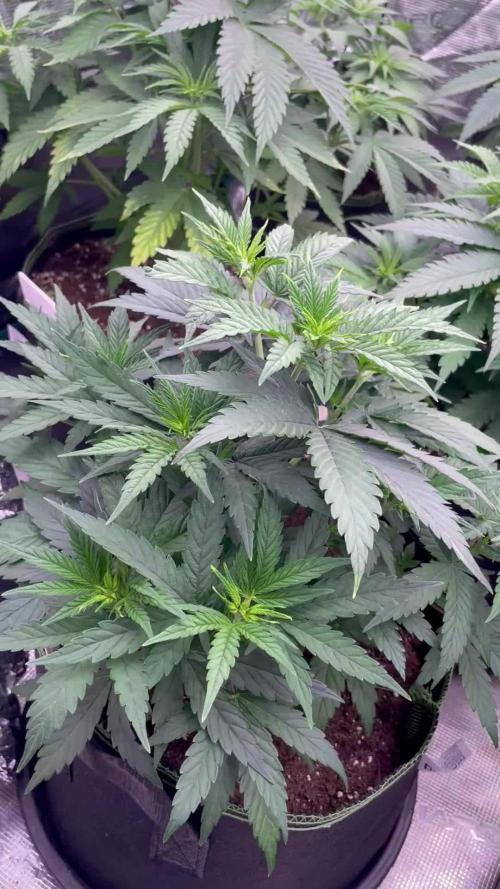
Looking great bushy and happy I will give her few more says and switch to 12/12 as she is in super happy stage,she had nothing but feed and water

Likes
7
Share


Likes
14
Share


@BLAZED
Follow
Week 13 (10-10 to 16-10)
10-10
Temperature: 27.4 degrees (lights on) 20.4 degrees (lights off)
Humidity: 82% (highest) 51% (lowest)
Watering: 1250 ml. PH 6.5 EC: 0.6 (without Hybrids & PK+)
The strength of the light is set to 90%, distance is at 29.5 cm / 37 cm. LUX: 22.300 / 27.300
11-10
Temperature: 26.6 degrees (lights on) 20.4 degrees (lights off)
Humidity: 74% (highest) 52% (lowest)
Watering: 700 ml. PH 6.5 EC: 0.6 (without Hybrids & PK+)
12-10
Temperature: 26.8 degrees (lights on) 19.9 degrees (lights off)
Humidity: 76% (highest) 60% (lowest)
Watering: 400 ml. PH 6.5 EC: 0.6 (without Hybrids & PK+)
13-10
Temperature: 26.8 degrees (lights on) 20.9 degrees (lights off)
Humidity: 85% (highest) 60% (lowest)
Watering: 1000 ml. PH 6.4 EC: 0.6 (without Hybrids & PK+)
14-10
Temperature: 24.9 degrees (lights on) 19.5 degrees (lights off)
Humidity: 74% (highest) 49% (lowest)
Watering: None.
15-10
Temperature: 23.8 degrees (lights on) 18.4 degrees (lights off)
Humidity: 64% (highest) 49% (lowest)
Watering: 1200 ml. PH 6.4 EC: 0.6 (without Hybrids & PK+)
16-10
Temperature: 23.5 degrees (lights on) 19.4 degrees (lights off)
Humidity: 54% (highest) 50% (lowest)
Watering: 1000 ml. PH 6.4 EC: 0.6 (without Hybrids & PK+)

Likes
44
Share


@hinterhofgrower
Follow
🌱: the mild deficiency symptoms grow out slowly, Trichomes are developping
💧 : 2l, 10l SIP
💡 : Dli: 45 mol/m²/d,
🤔:

Likes
31
Share


@Untergrownd
Follow
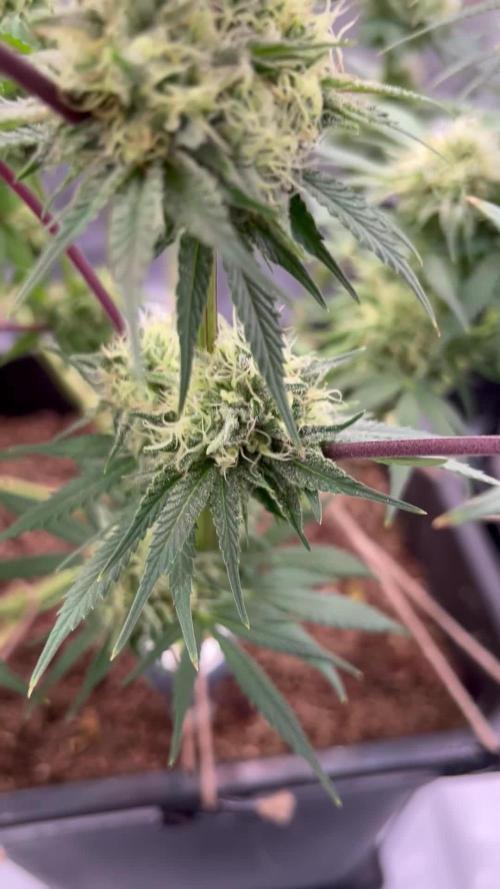
Smallest yield, best smoke, nice terps and taste. She was 2 weeks behind and could not catch up to the others.


Likes
9
Share


@NanoLeaf
Follow
End of Week 8 (First week of flower)
Increased the CO2 to 1200ppm and the ladies love it, already started stretching within the first 3 days of flower which shows that CO2 definitely boosts the grow cycle of cannabis.
The main top-sites are popping up everywhere and everything looks evenly spread out. I defoliated again because the fan leaves are growing so fast and blocking bud sites. I also did one last lower canopy maintenance and removed small and stalky bud sites and stems below the trellis net to make sure I get maximum energy distribution to the main colas.
I also added some GHF BioEnhancer to make sure the soil-microbes are happy and that the plants reach their maximum potential.
Pest Report: EXTERMINATED!
Thrips VS Ladybugs VS Neem Oil...
I decided to fight fire with fire - I purchased Swirski-Mites from Koppert (They are beneficial insects that feed on the eggs and larvae of thrips and other unwanted pests). As for the adult thrips - I got very lucky and found about 10 Ladybugs in my garden and decided to introduce them into my grow room as they will feed on adult thrips and any other unwanted pests.
Then to be extra sure I know that neem oil hinders the life cycle of pests like thrips causing them to stop colonising in my grow room. So I sprayed the ladies every day during the dark period to make sure there are no pests that I or the Ladybugs have missed.
Mission accomplished. No more wilting and definitely no more thrips.

Likes
12
Share


@CeezarMoolawn
Follow
Going into the second week of Earyl Veg , Will post pictures around 7pm est, Thing ae going along swimmingly
with temperatures around 75-81 , And humidity at around 41-58 percent, im sitting around 1.3 vpd . (Ideally want 0.8-1.1 Vpd.
Having an issue with Holding temperatures during its light off state , Tried to close up the tent 5-10 mins before lights off , and turn off humidifier , to hopefully hold temperatures, Will also update this comment, on Temps when light turns back on.
May need to add a heater outside the tent's vent to keep temperatures above 65 during Light off.
Lights off appears to sit around 67 and 50-70% humid ,
Lights on Still ranging from 77-81 and 35-50% humid,
Added a humidifier to help increase humidity, as well as turned off my Filter/Fan , and just have clip fan as outtake , and one clipped on the Tray blowing towards the ladies


Likes
8
Share


@SherbGrows
Follow
Ganja Farmer Seeds - AK 2.0 XL auto
Day 19 from sprout
Starting on week 3 soon
Light: ViparSpectra XS2000
Watering every other day to every 2 days
Started LST on the GaniaFarmer seeds. They have much faster growth than the Fastbuds growing in the same 4x4. I decided to LST only and not top the Ganja Farmer seeds.
See you next week!

Likes
12
Share


@Gorrilla420
Follow
Another good feed this week and took a few leaves off, both plants doing really well, drinking loads with the sun and size of them. Not much smell yet but plenty of time for that.
That’s all this week, happy growing 🌱


Likes
18
Share


@StickyFingah420
Follow
Planta resistente, de estructura mayormente indica, con una producción importante de resina.
Planta de rápido desarrollo que tolera bien el estrés provocado por el topping, LST y frío.
Altura media, con flores realmente densas y duras, tal como prefiero, avanzando en la floración dejará ver colores rojizos que deslumbrarán.
Se desarrolló muy parecido a una Gelato que crecí del mismo banco.
Un desarrollo fuerte y rápido para terminar brindando hermosos brotes que desprenden sabrosos aromas dulces y lucen una apariencia de dispensario innegable!.
Sin duda buen trabajo de Fast Buds en estas genéticas.
Likes
13
Share


@Dunk_Junk
Follow
She grew another 10cm this week!!!
Slow and steady!
Looks like she is making some nice dense flowers, but we'll see in a few more weeks.
I note she is very bushy for an auto. Very similar to an Auto Purple Kouskush I grew a few months back! 💪
Likes
13
Share


@Paultemp
Follow
Grow in coco coir with perlite 80/20
Systeme auto pot 7gallons
Remo nutrients
Aelius led 300gh for flower
Huge buds Nice thc and smell crazy i will try again for sure

Likes
38
Share


@Dr_Doobie
Follow
Like I said, great strain. I’ll cherish these last few ounces of headies.
I’m going to keep this log going as I set out to flower some Apple Zauce and the fuck if I’m not going to complete what I set out to do.
AZ 2 was culled and mulched. I got 3 pollen samples from it. I’m looking forward to chucking a lil pollen when the time is right.
AZ3 is recovering well from almost being trashed. Even so, I may be waiting to put it into flower. I’ll decide this week it’s right on the line of being healthy enough to flip. Either way it has a week or two before that happens.
AZ4, 5, 6 and the reveg are all super healthy and getting nice and tall. They’re all competing for canopy space and it’s a lovely sight. They are all still in .5 gallon veg cups and I will be transferring them all directly into both hdx bins with the rev’s soil mix this week or next. I’ll give them a week or two after that and then flip. I’ll also label each and grab cuttings before I flip.
I also got a pack of fast bud gorilla cookies autos that I’ll be popping and keeping in the veg tent after this batch heads into flower.
That’s the report for this week. Thanks for cruisin and happy growing! 🌱✌️🏼

Likes
11
Share


@ChefSpliff
Follow
Week 3 has come and gone and it was a sight to see!! All the pistills came in nice and strong. I have to get in there and defoliate every couple a days a bit. This will be the last week of defoliation. Once I can see the main bud sights I will do my final trim. Started reducing the Nitrogen as the stretch faze comes to an end and up the bloom ferts. I cant raise my light much more so I hope they stop stretching this week. Im excited to see the flowers grow into these pistills and watcch the calayx swell.

Likes
54
Share


@EhlersChick
Follow
2019.01.05 - ShishkaBerry Clones Day 97 / Flowering Day 45. Looks like about 2-3 weeks to to go AND THEY SMELL AMAZING!
I had a brush with nutrient burn a few days ago but they're recovering nicely. These are very hardy plants, very strong and healthy.
Most of the colas are about 15 inches (38 cm) tall, but #5 is 23 inches (58 cm) and it's on the verge of falling over due to the weight (YAY!!)
Some of the pistils are starting to brown & I've given them their final haircut. As this is my first "real" grow, I'm not sure how to estimate what the final yield may be but I'm hoping for 50 grams per plant per the clone producer.
2019.01.09 - ShishkaBerry Clones Day 101 / Flowering Day 49 (video) - two of them are top heavy to the point I've rigged a little cord around the stalks and Velcro-anchored them to the wall. I find that the trichomes of this strain are much smaller than the unknown bagseed I last grew. Do they naturally vary by strains or have I done something wrong?
Likes
36
Share


@Bread_n_Buds
Follow
And here we are facing a beauty that is maturing, you probably miss a week or a little more, I think I gather next weekend.
The colors are there, I'm flushing, she is really beautiful she swelled well and we're sure it will be very good. Odor: paradise
LIGHT >> MARSHYDRO SP3000 AT 100% OF POWER ..
TENT >> MARSHYDRO 120x60x180
CHECK IG >> https://www.instagram.com/marshydro_aliexpress2/
Buy >> marshydroled.aliexpress.com
TENT >> MARSHYDRO 120x60x180
CHECK IG >> https://www.instagram.com/marshydro_aliexpress2/
Buy >> marshydroled.aliexpress.com


Likes
1
Share


@zazini
Follow
time of writing this il be starting run #3
il be making a diarie for it
orange bud auto
/ dutch passion
superlemon haze auto
/ greenhouse seeds
king juice auto
/ greenhouse seeds
strawberry banana auto/ 420 fastbuds
Likes
2
Share

@Drehpaper
Follow
Tag 64-70 / Blüte Tag 36-42
Luftfeuchtigkeit 50
Tag 28
Nacht 25
PPFD 879
DLI 38
Höhe 55
VPD 1,47
Lampe Abstand 40cm
Lampe auf 70%
Hab sehr mit der Hitze zu kämpfen, hoffentlich kommen in den letzten Blüte Wochen paar kältere Tage!
Geruch wird immer süßer wenn man meiner Nase glauben kann!!!
Blüte Woche 6 ist durch!
War leider paar Tage unterwegs!
Nächste Woche wird wieder ausführlicher.
