
Likes
Comments
Share

@DogDoctorOfficial
Follow
Grow Report — Nectar Drip
GrowDiaries Week 10 (Actual Week ~6–7 from Seed)
First things first, a small clarification for anyone following the diary closely.
On GrowDiaries this report appears as Week 10, but in reality the plants are around week 6–7 from seed. The reason is simple: the first entry in the diary was created during germination and no photos were uploaded at that moment, so the timeline shifted a little on the platform.
So for accuracy:
plants are currently around week 6–7 from seed and well into early flower.
Now let’s talk about what has been happening.
⸻
Quick Recap
For anyone just arriving to the diary, here’s the short version of the journey so far.
The goal of this run has always been simple:
grow healthy plants, observe them carefully, and share the process honestly.
The environment has been kept stable and relatively simple:
• 12/12 from seed
• balanced feeding schedule
• steady environmental control
• minimal intervention unless the plants ask for it
Up until now we mostly focused on guiding growth and observation, allowing the plants to express themselves naturally while keeping the canopy organized.
And they are doing exactly that.
⸻
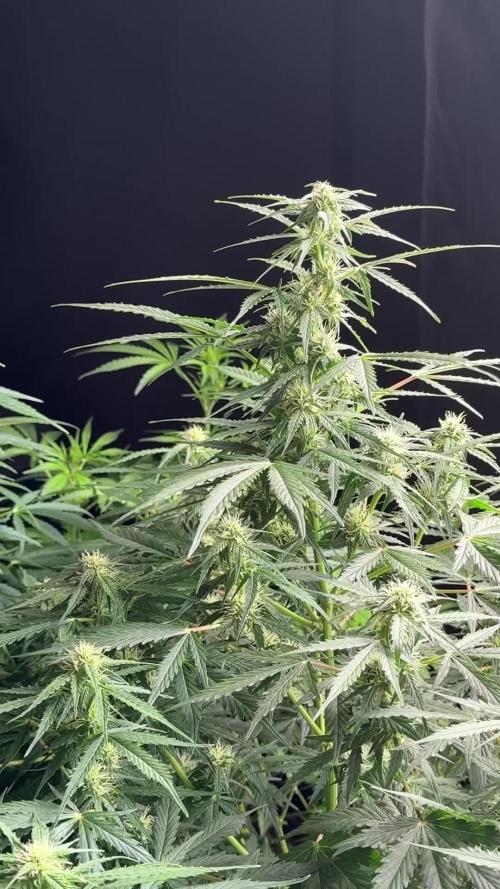
This Week — The Garden Is Exploding
This week the girls are looking absolutely incredible.
Structure is strong.
Color is perfect.
Leaf health is excellent.
And the most exciting part:
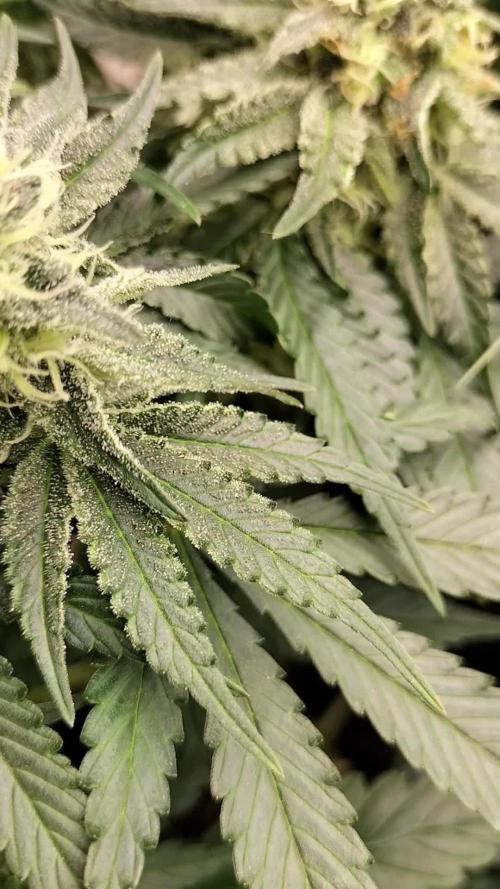
trichomes are already everywhere.
Even at this stage the plants are starting to sparkle. Resin production is clearly ramping up and the flowers are stacking beautifully.
Height is now roughly around one meter to a little over one meter, creating a very healthy canopy without stretching out of control.
Honestly, these are beautiful specimens and a joy to watch develop.
⸻
Defoliation — Why We Did It Now
This week we performed a targeted defoliation.
This was not done because the plants were struggling or because something was wrong.
We did it by choice and by timing.
The reasoning is simple:
It is often easier and less stressful to remove certain leaves earlier in flower rather than waiting until the canopy becomes dense and airflow becomes restricted.
So we removed only what was necessary to:
• improve light penetration
• increase air movement inside the canopy
• reduce future humidity pockets
• allow the flowers to develop in a more open environment
Nothing aggressive.
Nothing excessive.
Just removing leaves that were clearly blocking key flower sites.
This kind of intervention is always a balance. Different growers prefer different approaches, but in this case it felt like the right moment to open the canopy a bit.
Now we observe how the plants respond.
⸻
First Structural Training
This week also marks the first time we applied some stronger structural training to these girls.
Until now the plants were mostly guided and allowed to develop naturally.
At this stage we introduced a bit more direction to the structure so the canopy develops evenly and future flower sites receive better light exposure.
Again, nothing extreme.
The idea is simply to help the plant organize itself for the next weeks of flowering.
The real feedback from this will come in the next report, where we will see how they react.
⸻
Environmental Conditions
The room is currently running around:
Temperature: ~28°C
Relative Humidity: ~68%
Outside conditions at the moment are:
~10°C with about 87% humidity
Considering the outside environment, we are actually very happy with how stable the room is staying.
But one thing worth mentioning:
We don’t chase room VPD numbers too aggressively.
What really matters is leaf VPD and plant response.
Plants tell the truth much better than charts do.
Right now the plants look extremely happy:
• strong leaves
• no stress signals
• steady growth
• excellent resin development
So the environment is clearly working for them.
⸻
Nutrients
Feeding remains exactly the same for now.
No changes this week.
The current nutrient schedule continues to support healthy growth and there is no reason to modify something that is clearly working.
Sometimes the best move in the garden is simply:
don’t change what isn’t broken.
⸻
Introducing a New Team Member
This week we also officially welcomed a new member to the team:
Mr. Baggy.
He has already been making appearances around the garden and many of you may have spotted him in some of the photos.
He’s now officially part of the crew and helping around the studio and garden.
Please give him a warm welcome when you see him around the diary.
He’s a cool guy and we’re happy to have him with us.
⸻
Gratitude
As always, huge appreciation to everyone who takes time to visit this diary.
To the:
• longtime followers
• new visitors
• curious growers
• supporters
• skeptics
• lovers
• haters
Everyone has a space here.
If energy crosses paths here, something is being exchanged and that always has value.
Special thanks as well to:
• the breeders behind these genetics
• the GrowDiaries platform
• the entire GD community
And of course to the sponsors supporting the project.
⸻
What To Expect Next
Over the next weeks we will mainly observe how the plants respond to the structural adjustments made this week.
Things we’ll be watching closely:
• flower stacking
• resin development
• canopy response after defoliation
• structural balance of the plants
If everything continues like this, the next weeks should be very exciting.
The girls are clearly entering the phase where the flowers start building real weight and character.
And we’ll be here documenting every step.
🙏 Thank you for your patience and continued support.
FOR DISCOUNT CODES AND MORE JUST FOLLOW THE LINK https://website.beacons.ai/dogdoctorofficial
📲 Don’t forget to Subscribe and follow me on Instagram and YouTube @DogDoctorOfficial for exclusive content, real-time updates, and behind-the-scenes magic. We’ve got so much more coming, including transplanting and all the amazing techniques that go along with it. You won’t want to miss it.
GrowDiaries Journal: https://growdiaries.com/grower/dogdoctorofficial
Instagram: https://www.instagram.com/dogdoctorofficial/
YouTube: https://www.youtube.com/@dogdoctorofficial Deleted by Youtube
Vimeo : https://vimeo.com/dogdoctorofficial Under construction stay tuned ⸻
Explore the Gear that Powers My Grow
If you’re curious about the tech I’m using, check out these links:
🔆 Lighting & Environmental Control
• Future of Grow — Advanced LED lighting technology
https://www.futureofgrow.com/
DISCOUNT CODE: DOG20
• Lumiflora — Under-canopy LED lighting
https://lumiflorade.com/
• TrollMaster — Environmental controllers and automation gear (past collaboration)
⸻
Genetics
• Zamnesia Seeds — Genetics used in this project
https://www.zamnesia.com/
⸻
🌱 Soil, Substrates, Boosters & Root Support
• Plagron — Substrates, bio mixes, and supportive products
https://plagron.com/en/
⸻
🎒 Storage, Curing & Preservation
• Grove Bags — Curing and storage solutions
https://grovebags.com/
⸻
Straw Baggy Links
🌍 Website
https://www.strawbaggy.com/?ref=339 10% discount code for our Community - Dogdoctor10
📸 Instagram
https://www.instagram.com/straw_baggy/
⸻
📸 Photography Equipment & Tools
(Not sponsors, but part of my creative toolkit)
• Sony A6700
• Sony full-frame macro lens + few more
• Stacking photography workflow - learning
• iPhone (for behind-the-scenes shots)
We’ve got much more coming as we move through the grow cycles. Trust me, you won’t want to miss the next steps, let’s push the boundaries of indoor horticulture together!
As always, this is shared for educational purposes, aiming to spread understanding and appreciation for this plant. Let’s celebrate it responsibly and continue to learn and grow together.
With true love comes happiness. Always believe in yourself, and always do things expecting nothing and with an open heart. Be a giver, and the universe will give back in ways you could never imagine.
💚 Growers love to all 💚
📸 P.S. – The Eye Behind the Lens
All photos in this diary (for now — except for the ones showing the camera, which I took with an iPhone) are taken with a Sony A6700 paired with a Sony full-frame macro lens and a few more.
Photography is part of the story — it’s how we share the fine textures, the glow, and the quiet details that words can’t always capture.
I’ve also started experimenting with photo stacking — a technique where multiple images, each taken at a slightly different focus point, are layered together to create one perfectly sharp image from front to back.
It’s not digital enhancement or AI; it’s pure photography — a way to reveal the plant’s beauty in microscopic depth, from trichome to petal.
You’ll even see a few shots of "ghost me" capturing the shots — camera, lens, setup — because every grow deserves not just to be cultivated, but documented like art.
FOR DISCOUNT CODES AND MORE JUST FOLLOW THE LINK https://website.beacons.ai/dogdoctorofficial
NEW DISCORD - Official Server Invite Link : https://discord.gg/ksjAkA5T74

Likes
52
Share


@DogDoctorOfficial
Follow
Day 30 Flower and It looks like my humidity problem is coming to an end 😅 the second unit outside the tent is finally showing some results, I’ve also change my air circulation , i fixed al off them in a way that it creates a wind vortex, i think this is helping with the humidity also. I will post a litle video showing my air set up 😇
As for the rest all is going as normal, today mb tomorrow’s day for new defoliation, apart from that just giving them all my love and care ❤️
Day 31 F defoliation day
Day 33 and still in love with my girls
5x White Mango WM
5x Alasken Purple AP
4x Blueberry BB
3x SAD S1
2x Badazz Cookies BC
19 in total for a 4x8x6 - 1,2x2,4x2
Light Lumatek Zeus 465W compact pro 2x at 100%
All i Grow is medicine for myself,
Stay safe, stay tuned and B Happy and do it for the love
Peace ✌️
D


Likes
11
Share


@RunWithIt
Follow
Alright, so I applied some mykos on all of the BanDads, photos and autos alike. Just poured some at the base of each plant and gently rustled the soil to get it mixed in at root level. Then gave them all a nice blast of nutes for the first time. I'll be upping the dosage with the Liquid Seaweed next week.
Loving how sturdy they all are already! I can tell this is going to be a lovely run for sure.
You may have noticed I also added a Dos-si-dos and ChemP Auto into the tent as well. Just wanted to get them both started before sending em outside for spring 😊
Cheers all and happy growing 🎆😊

Likes
30
Share


@Mazgoth
Follow
Going little bit slower but will see,(UPDATE D51)i put an CFL 200W lamp at day 48 until harvest,the older lamp was a waste of time and waste of money,hope the plant will get a lot bigger with this light

Likes
8
Share


@LokalGrenz
Follow
Week 6
Started today transplanted them sat it’s Thursday now this Saturday March 9th is a week since looks like they are taking tk the new home okay so far hope this keeps up
March 8th did a second topping today on both but on every top just two on each plant and I’m done topping March 9th is one week since transplant next Thursday I thinking I will flip then or that Saturday just want them to show stronger signs of growth by then
March 9th some deflation everything still looking okay

Likes
5
Share

@ElTemploGenetics
Follow
Aunque el vídeo es unas semanas antes, empiezo esta semana con lavados de raíces.
Likes
10
Share


@Fat_Olsh_Farms
Follow
Forming a nice cross shape. Filling out nicely
Don't forget to pH up if you decide to try the maxigro. I use it every other watering, watering slowly until 10-15% runoff
Day 33 super cropping like a boss.
Likes
7
Share


@Car1bGrow
Follow
First week went well, got two plants in coco coir and one in soil. One of the plants in potting soil came up a day after the other two but they’re doing fine
Likes
15
Share


@Budassgrower7
Follow
This is week 7 for this girl day 44 now and I took the first node, usually ever gets to develop rigth for me, this is the last week for veg stage,looking forward to see how she bloom 🤩🌱💚
Day 48 she is looking beautiful tomorrow I star giving bloom nutrients
Likes
1
Share

@Raul2021
Follow
Día 81 de cultivo, día de cosecha y secado, se retiran las hojas grandes y se cuelga dentro del armario a secar, con un deshumidificador trabajando entre 50% y 60% de humedad.
Se han obtenido cogollos grandes, resinosos y con muy buen aroma afrutado y dulce.


Likes
20
Share


@Cannibalgardens
Follow
These guys and gals at fastbuds have some great strains and so far my favourite has been this strain .. second time growing her and she is bigger then my first with lots of purple stinky buds ...the over whelming smell you get is this plant the purple buds smell the strongest right now . .cheers
Likes
35
Share


@g_slim
Follow
The plants are comming along nicely. They got some horsetail extract in the past 2 weeks, nothing else. I will top dress with a handful guano the comming days.
The sativa pheno seems to be the furthest aong in terms of trichromes. We will see, when we start looking at the trichromes with a microscope soon.
Numbers 1 and 7, the indica phenos, are similar. Only number 1 is lagging behind 7-10 days.
All plants started to receede from their bigger lower fan leaves. I keep picking them of as they turn yellow.
Happy growing everyone!


Likes
11
Share


@TechDCo
Follow
Week 1
27/01/2025
TF and MS
Feed HydroSol: Increased to 8ml/5L
28/01/2025
TF and MS
Light Increased: 313watts
DLi: 35
Rapid Growth has started again.
Feed Increased: HydroSol 10ml/5L
HP 12%: 1ml/5L
Uploaded today's pictures and yesterday's for comparison on how HydroSol is doing?
I topped MS. Hopefully by doing this now TF will catch up but that's not why I topped her. She's known for being bushy; so will be good to bring her up to her second level before branching. Giving the rate she is growing; we haven't to worry about stunting Growth.
H202 is also know to to cause mutations at high levels. I tried to start this diary with HP 12% from seed and it worked until micro-organisms in the air and water; what distillation has missed the "vocs" the cardon didn't catch. Caused them to later on because of free radicals and this is why high levels of HP can cause mutations and cancer when it steals atoms by ripping them apart. "Call the bomb swaddles" when mixed correctly or 'incorrectly 💣 lol
28th Today
Little VT of the 5L jerry can starter pots (DiY)
I think this process is allowing for optimization of Air/feed pks.
I'm at least 2-3weeks ahead from a normal grow because of this style growing.
I know, I know, I lost 3weeks from the first failed attempts. But it's okay 👍 I'm okay with that. Now I know and it's logged in the dairy for future reference I can quickly glance over before I start another one. Like hey 👋 "Time is valuable, read ya diaries" honestly, I don't have dementia i have human forgetfulness/error.
Its still in the experimentental phase.
Took tf out the propagator
31/01/2024
Nothing much to see
I've did everything for TF and still looking droopy. Exactly the same as MS.
I think she'll grow out of it!
01/02/2025
I know, I know what ya thinking, it looks like spider mites on MS only leaf but honestly I think its of the h202. I deffolled her only leaf. Sprayed it with h202 and no reactions happen. No mites.
The Future TF is looking much more lively.
Oh well. No speed-run this time round!
I shouldn't of took 4wks off from growing. Rhythmic nature of thing and getting in the swing off it. It's easy to do but I am always in two minds with everything I do. I can't help but cause "Self sabotage' every time I get to ahead of myself, by running my mouth 💯 blah blah blah; always beside myself.
Aye' they say "God is next to Cleanliness" if that's true it'll be impossible for me to be beside myself haha 😄
Its all fun and games 🎮 🙃
01/02/2025
Midday
Light Increased: 560watts (max) for this power supply. I disconnected the 1200watts one for each light is 600watts. It's currently half-power with 600watts max for two lights at 300watts each. Better than having mishaps with the full power supply 1200 being turned up accidently say in a not ventilated enough little tent. I'd rather pass on that anxiety 🙃
Plants: Under jerry cans with dli at 20.
This should by dinfintion let them gather themselves for 3days; while the sun is blazing outside the can. Even though I could lower the light. I think the high light intensity outside the cans the plants know.
Midday VT
MS looks likes shes a clone 😳 👀 but she ain't!
One day I will get these protocols right. But atm ; atlas, it's all in jest n fun!
MS defiantly looks like a clone but she's not; i have taken pictures since she hatched everyday
03/02/2025
Midday
Freaky Pablo and The future 2 germinated
Sprayed with weak solution of Hydroclonic Acid + h202 very mild.
Now the fun begins!

Processing
Likes
6
Share


@Sticky_Green_Fingers4
Follow
Pushing out the last stretch this week and starting to so signs of some nice flowers, will update again next week folks hopefully with some nice looking flowers 😁
Likes
19
Share


@Sublyme_ness
Follow
seems like she is having a nitrogen problem... unsure if its genetics or what. will just be giving water to see what happens and hope for the best.
pruned to expose bud sites a bit more.
crystals now forming. the crystals smell almost sweet.
day 51 7/3. gave a ph water of 6.2 and with some cal mag. think ph too high. maybe light too high too. moved up slightly to get twmp to 26.5.
going by cutting in water im hoping i am right as far as ph. #science.
* dayb51 top bud seems to be moving again. ph worked?
DIARY adjusted to proper weeks now..
Likes
7
Share


@Athos_GD
Follow
D55. Plants are really changing at this point. Calyx’s are getting swollen. Still some clear trichomes.
Likes
15
Share


@IsseyBukkake
Follow
Day 56! - 14/01/21
Girls are pretty happy.
The 2 runt phenos are annoying me now theyre the stretchiest in the tent, taking up heaps of room and still barely getting any light..
One of the girls has a calcium issue, which is odd, but im hoping to combat it before its too late.
Definitely going to have to do a staged harvest, not what I wanted but hey, gotta do what you gotta do.
Thanks for stopping by.
