


Likes
Comments
Share


@GoldenTouchCrops
Follow
At this point they have grown out of their 3 gallon pots and we transplanted them into a 15 gallon but only filled with roughly 13 gallons of soil.
We have 2 different phenotypes, 1 is very uniform and even the other is lanky yet resilient. They both recover well from training and have a strong sativa "haze" like smell.
I have been feeding them evenly and giving them great exposure to the light with our LST.
About 2 days after the transplat we did some lollipopping and more lst to get that light to penetrate and help these girls grow nice and big. For week 7 we will begin flowering, stay tuned!

Likes
36
Share


@BigDaddyK
Follow
Love this strain , I don’t quite understand this new harvest procedure , dry weight 320g

Processing
Likes
20
Share


@CanadianFillmore
Follow
Starting week 3 with good growth on all three plants but plant 3 is doing the best, she has the longest branches and I've tried them downwards. I also trimmed-off the lowest leaves and branch/future bud sights. The girls look good and I look forward to another week of progress.

Likes
4
Share


@Growyourownathome2x2
Follow
Thursday 16th march day 59 Harvested a couple days earlier then planned as my humidity was getting a bit high and worried about risking mold I decided to chop, have to get a good dehumidifier soon, everything looking lovely, nice and dense with very strong fruity potent smell definitely the best looking plants I have grown to date not the biggest buds but they look quality, chopped plants whole gonna do my best to keep the temp and rh% in the dry room as close 60/60 as I can to get a nice slow dry, 🍁😎 I only took the wet weight from 1 plant back left plant was 270g with large fan leaves removed

Likes
97
Share


@DudeGrowsWeed
Follow
Happy New Year!!!
Over the past week I cut down 2 of the 3 Blackberry’s, they are hanging and drying now. The 3rd is definitely looking better than the first 2. I think the first 2 will probably be turned into edibles, rather than smoked. The 3rd is looking much better overall and especially in terms of bud development, she will probably be smoked.
The lights went off before I was done taking pics, so some pics will look a little different. The pics with the lights on I had to color correct, they still look a little more on the yellow side than in reality, but much closer to reality than the pre-color corrected versions. Once the lights went off I turned the flash on for my camera, those pics did not need any color correction. You can see the differences in the pics of all plants, the first 2 are color corrected with the lights on, the last 2 are taken with a flash and no color correction.
I read several books on cannabis over the past few days, some good, some not so much. One that I liked was “Marijuana Cultivation Reconsidered: The Science and Techniques For Huge Indoor Yields” by Read Spear. This book is available on Amzon’s Kindle Unlimited service, which costs $9.99/month, but they offer a free 30 day trial (which is what I’m using at the moment). Reed’s book is broken down into 3 sections, the first and third go fairly deep into the science behind growing, he does a pretty good job at breaking it down in easy to understand terms, but I had to read several sections 2 or 3 times to really get it (or just move on with as much understanding as I could digest). The second section is the nuts and bolts of growing. Most was a review but there were several topics he touched on I hadn’t thought of in a while. And again its well written. He also offers the section only in a separate book called “Small Spaces, Big Yields”. If you are not interested in going deeper into the science behind growing, “Small Spaces, Big Yields” is what I would recommend (if interested in reading books on cannabis).
I took some notes while reading and I’m going to add some of these notes in my dairy updates over the next few weeks. This week I’m going to include a note on electrical, this should be a fairly basic concept, but it is super important IMO…
“Electrical Items In a sealed grow room or in a tent, you will have water pooling on the floor from time to time. There is no avoiding this. Mop it up when you see it, and never put your electrical gear directly on the floor. Never. Not even for a moment. In fact, let me stress this point in bold capital letters. ALL ELECTRICAL GEAR MUST BE MOUNTED SECURELY ON A WALL OR TENT POLE.”
-Read Spear
I’ll add more did bits like this in my diaries over the upcoming weeks.
If anyone has any good book recommendations please let me know in the comments. I’m looking for books that might not be as popular as the ones by Jorge Cervantes or Ed Rosenthal (I’ve read those). I did just order “True Living Organics” by The Rev which I’m looking forward to reading. But I’m looking for more. I really want to step it up and learn as much as possible. Your comments, feedback and recommendations are very much appreciated!
Until next time, Happy Growing! Stay Positive! And have an amazing 2019!!!
Likes
16
Share


@Tipton
Follow
Lots of smells have become their own... The fried banana has this crazy skunk smell with a real earth dirt smell once the skunk fades... The orange cake NO kidding, smells like a fresh peeled orange and some kind of batter smell... It's nuts...
The big Z has the immediate Skittles blast with a earthy afternote... And the paint is just like the last one and smells real chemical like! When u say the name it makes u smell the paint... Is that just me???? Hahaha anyways... Thats what I got .. everything is going amazing and for day 37 I think they've filled out real nice... Now hopefully they fatten up in the next 20-30 days!!!!


Likes
13
Share


@BrigadeDesTerps
Follow
Nouvelle semaine en intérieur, j’ai du éliminer une grande gotti et la graine inconnue, c’etais malheureusement des mâles.
Je pense que je devrais bientot en éliminer une troisième, la deuxième grande gotti, elle ne sait toujours pas déclarer mais à première vu on dirais un mal, mais faut encore attendre pour en avoir le cœurs net.
Rien a dire de plus, elle commence chacune à bien developper leur pistil.
Frosty est petite mais bien charnue, je ne crois pas qu’elle va donner beaucoup mais elle va donner un bon truc je le sens bien 🙏🏻
Aladdin kush #1 se porte bien, et ce malgré son tronc fendu en deux. Elle se développe très bien, et prends une belle hauteur, je sens qu’elle va me donner de belle chose!
Aladdin kush #2 tous comme sa sœur mais sans le tronc fendu bien sûrs.

Likes
7
Share


@mkrmkr
Follow
From this point on, the plants of my two active diaries will be together in the grow with a 12x12 photo period. So I'll put the same photos in both diaries.
Likes
10
Share


@HegauHillsFarmers_M11
Follow
Tag 49 - Ende der 7. Woche.
In dieser Woche haben die Blüten nochmal ordentlich an Volumen dazu gewonnen und produzieren eine dicke Harzschicht. Auch der Duft der Blüten wurde in dieser Woche intensiver.
Da sich die Pflanze nun vollkommen auf die Produktion der Blüten konzentriert, habe ich den Dünger nochmal etwas angepasst/verändert um der Pflanze alle Nährstoffe zu liefern die sie für die Produktion der Blüten benötigt.
An Tag 43 wurde die Pflanze gedüngt.
Nährstofflösung:
2 ml/l - B-52 Advanced Nutrients.
4 ml/l - pH Perfect Sensi Bloom Part A
4 ml/l - pH Perfect Sensi Bloom Part B
2 ml/l - Bud Candy Advanced Nutrients.
2 ml/l - Big Bud Advanced Nutrients.
Davon hat die Pflanze 1l an Tag 43 erhalten.

Likes
2
Share


@Islandgrowbro
Follow
First time using diaries just getting accustomed to everything as a new grower.
Second crop grown these are all clones from that first grow from seeds.
Faced a lot of issues in the first grow was a major learning curve. Produce some average buds. But I think I got a handle of things now.
Feel free to leave a comment tell me what you think!
First batch of clones done right. Still lost a lot due to humidity and moisture but 80/100%.
Planted clones placed under 24/7 light to start the veg. Will replant soon.

Likes
29
Share


@eldruida_lamota
Follow
Vamos familia, mirar que porte estás green poison, sweet seeds hizo un buen trabajo y a eso, hoy traemos un seguimiento de este clásico.
.
La humedad anda entre 50% la temperatura está entre 20/22 grados , y como siempre el ph, está en 5,8/6,0.
.
AgroBeta:
1 ml x L Growth black line , vía radicular.
0,2 ml x L Tucán , vía radicular.
0,2 ml x L Flash Root , vía radicular.
0,05 ml x L Gold Joker, vía radicular.
.
Hasta aquí todo familia , espero que os este gustando, un saludo y buenos humos 💨💨💨.

Likes
7
Share


@Growingdoors
Follow
He transplantado los clones a macetas nuevas, los he puesto bien profundo porque me parecía que estaban muy largos, agregué vermiculita y estopa de coco, en el sustrato, así como Mykos de Xtreme cerca de las raíces, lo he probado antes y va genial para desarrollo radicular.
La tierra nueva estaba muy seca por eso el volumen, pensaba hacer una poda apical pero no estoy seguro si me ha salido un FIM porque intenté partir solo la punta para no entorpecer el desarrollo vegetativo, pero estaban muy deshidratadas y he tenido que pellizcar con las uñas. Veremos qué ocurre.
La planta madre tiene unas hojas que nacen con sectores de un color verde más tierno, pero con el tiempo se vuelven verdes como las otras, también han salido algunas hojas con forma distinta, intentaré luego subir unas fotos, los clones aún no muestran nada de esto, podría ser que la mutación esté solo en algunas ramas y los clones no tienen esas mutaciones? Me gustaría verlos en floración para ver si vale la pena mantener a la madre, es la que desarrolla los tallos menos fuertes pero también he comprobado que es la que mejor resiste el frío, la madre tuvo pulgones y los clones también pero parece que los he eliminado con spruzit, espero no aparezcan pero por si a caso intentaré hacer otra fumigación.
Con la nueva maceta están muy cerca del foco, es un LED y no produce mucho calor pero me da miedo las quemaduras de hojas, veré qué puedo hacer con eso.
Muchas gracias a todos por sus comentarios y buenos deseos, buenos humos y poro paz
Edito, las he cambiado a la mañana siguiente al piso de abajo del armario porque me pareció que se podían quemar con la lámpara, ahora estarán bajó un LEC 315W, he regado anoche ambas con el mammoth p, hoy tienen un color muy bonito, y se ven muy felices, creo que no las había visto así de bien. Seguiré actualizando. Gracias por sus comentarios


Likes
Comments
Share


@Comfrey
Follow
23.-30.07.
Die Woche verging wie im Fluge. Strawberry Haze Auto duftet mittlerweile sehr fruchtig mit Zitrusnoten.
Die Blüten schwellen nach einem krassen Stretch an. Das intensive LST und das Entfernen störender Blätter hat dazu geführt, dass die Blüten sehr gleichmäßig Sonnenlicht bekommen und später in der Blüte die Luft gut zirkulieren kann.
Zwei Tage der Woche standen die Pflanzen unter der Markise, es hat über Stunden heftig geregnet.
Das Gießen läuft wie gewohnt nach Gefühl. An heißen Sonnentagen bis zu 1,5 Liter.

Likes
7
Share

@BlossomB
Follow
The Perfect Student & My First Topping
🌿Unstoppable Perfection🌿
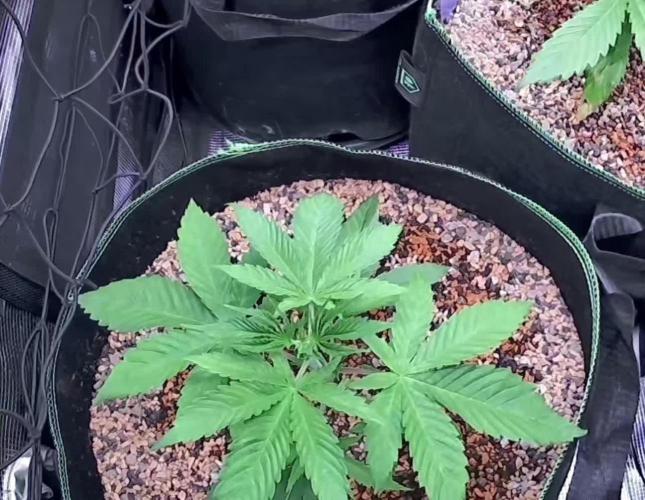
Die Tropical Chimera ist seit Tag 1 mein absoluter Musterschüler. Sie ist das Paradebeispiel für eine wunderschöne, perfekt symmetrische und kerngesunde Pflanze. Ganz ehrlich: Wenn ich es nicht besser wüsste, würde ich glatt behaupten, sie ist eine Kunstpflanze – so makellos steht sie da. Sie wächst, und wächst, und wächst... einfach unzerstörbar!
🌿A Heartbreaking Milestone: First Topping🌿
Diesen Samstag war es so weit. Da sie meine erste photoperiodische Pflanze ist, hatte ich durch sie auch mein „erstes Mal“ beim Toppen. Ich muss gestehen: Es fiel mir wahnsinnig schwer, mein Baby zu „köpfen“ . Ich trauere dem entfernten Kopf immer noch ein bisschen nach...
🌿
Aber die Chimera? Die ist aus Stahl! Während ich noch trauere, zeigt sie absolut null Anzeichen von Stress. Sie hat sich keine Sekunde hängen gelassen, keine schlaffen Blätter, nichts. Sie ignoriert den Eingriff einfach und wächst munter weiter, als wäre nichts passiert. Wahnsinnige Vitalität!
🌿Pure Vitality – No Additives🌿
Auch hier bleibe ich meiner Linie treu: Kein Dünger, absolut nichts. Sie ist so gesund, vital und tiefgrün, dass sie offensichtlich alles hat, was sie braucht. Am liebsten würde ich sie einfach ewig weiterwachsen lassen und unendlich viele Klone von dieser perfekten Genetik ziehen.
Likes
26
Share


@darb35
Follow
Day 50 - 1L water with calmag (ph 6.5)(91-95 cm)
Day 51 - 1L water with half dose according to biobizz schedule (ph 6.3)(91-95 cm)
Day 52 - 1L water with calmag (ph 6.4)(91-95 cm)
Day 53 - No water (92-96 cm)
Day 54 - 1.3L water with half dose according to biobizz schedule (ph 6.3)(92-96 cm)
Day 55 - 1L water with calmag (ph 6.4)(92-97 cm)
Day 56 - 1L water with half dose according to biobizz schedule (ph 6.3)(92-97 cm)
Likes
22
Share


@Njaak
Follow
Login issues led to missing a couple weeks, but things have been super smooth.
Buds are looking sweeeet and hairy. And they're really fattening up. She's one thick hairy lady.
Following the nutrient schedule without deviation, swapping and cleaning the reservoir every week (H2O2 clean), and keeping the humidifier filled.
I swapped the pump. First one randomly stopped working for no apparent reason. New one I spec'd with a much lower pump rate and it's a great improvement. No splashing, just a trickle recirculation so I keep it on 24/7.
The pH monitoring is so so so much easier now with the good Apera pen. What a difference it makes over the generic ones.
Likes
15
Share


@tsf_homegrow
Follow
5.3. Tag 116 sie bekommt noch 1-2 Wochen und dann geht’s in die Blüte. Die Triebe werden in der Zeit weiterhin auseinander gehalten. Und versucht die aktuelle Form bei zu behalten. Den Haupttrieb und die zwei ersten Seitentriebe werde ich zurückführen damit diese vorne den anderen Armen nicht ich weg sind. Happy growing.💛✌️


Likes
42
Share


@AsNoriu
Follow
Day 21. I post one day earlier, but its a huge week for them.
Cleared space, install chicken wire fence.
Added worm castings, epsom salt, mono potassium, calcium nitrate , Great White, Biosys and hope they will be ok.
Next visit in two weeks.
Root system was good, couple girls had mini root bound on the bottom, so timing was perfect !
Sherbet was strongest, purple haze weakest, both Apples were ok too.
Happy Growing !!!
