


Likes
Comments
Share

@DogDoctorOfficial
Follow
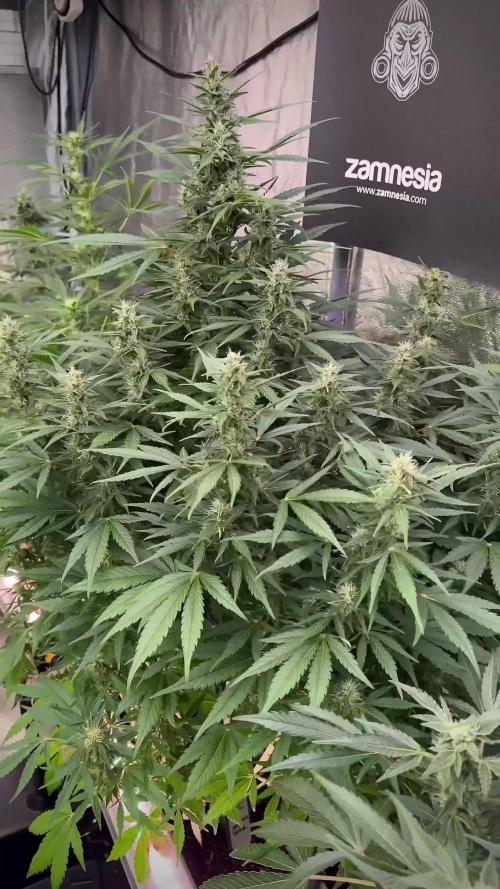
🌿 Cosmic Noodles — Week 6 Flower (Week 10 from Seed)
✦ Context & Run Setup
12/12 from seed. Autoflower expression under controlled flowering conditions — a hybrid rhythm between speed and structure.
What we’re seeing now is the result of early structure + stable environment + precise feeding.
And also… one lesson plant that deserves respect.
⸻
⚠️ The Overwater Plant — A Necessary Decision
This week, we made a call.
Not emotional — responsible.
One plant, previously pushed through intentional overwatering conditions, did not recover. Root zone remained compromised, oxygen exchange was limited, and overall plant vitality continued declining.
What we observed:
• Persistent droop and lack of turgor recovery
• Slowed or stalled bud development
• Increased risk profile (humidity pockets, potential for rot/microbial issues)
At this stage in flower, the plant wasn’t just underperforming —
she was becoming a liability to the room.
So the decision was made:
✂️ Harvest early, remove risk, protect the ecosystem.
Yield was minimal — but that was never the point.
This plant served as a living case study.
💡 Key takeaway for the community:
Overwatering is not about “too much water” —
it’s about lack of oxygen in the root zone.
Once that balance is lost for too long, recovery becomes unlikely.
Respect to her. She taught more than she produced.
⸻
🌱 The Rest of the Garden — Absolute Explosion
Now… the contrast.
The remaining plants are doing the exact opposite.
They are:
• Vigorous
• Structurally stacked
• Visibly happy
✦ What we’re seeing:
• Bud sites fully formed and stacking aggressively
• Dense, symmetrical structure across the canopy
• Leaves holding a deep, healthy green
• Strong transpiration and daily drinking rhythm
These girls are not just growing —
they are driving energy exactly where it needs to go.
⸻
💧 Water, Feeding & Plant Demand
Current intake:
• 1.6 – 1.8L per plant / 24h
This tells us everything:
• Root systems are active
• Transpiration is strong
• Environment is dialed
✦ Parameters:
• Temperature: 26°C
• RH: 60%
• EC: 2.0
• pH: 6.5
• CO₂: ~1000 ppm
This combination is creating:
→ Efficient nutrient uptake
→ Strong metabolic activity
→ Continuous flower development
They are eating, drinking, and converting.
⸻
🌸 Bud Development — Where It Gets Beautiful
At ~Week 6 flower:
• Calyx stacking is now visibly dominant
• Buds are transitioning from formation → mass accumulation
• Structure is tightening, weight is coming in
And the key detail:
👉 The plants are still pushing fresh growth, not fading early
→ This means the engine is still running strong
You’ve built a system where:
• Energy is available
• Environment supports it
• Genetics are expressing fully
That’s why they look like this.
⸻
🌿 Plant Size & Structure
• Average height: ~1.2 meters
• Even canopy with strong tops
• Light penetration still effective
This is the sweet spot:
👉 Big enough to produce
👉 Controlled enough to manage
⸻
🔍 Why They’re Thriving (While One Didn’t)
This is the real lesson of this week.
The difference wasn’t genetics.
It was the root environment.
Healthy plants:
• Oxygenated root zone
• Stable wet/dry cycle
• Consistent nutrient availability
Overwatered plant:
• Oxygen deprivation
• Root stress → reduced uptake
• Cascade effect into weak growth
Everything above the soil is just a reflection of what happens below it.
⸻
🔮 What to Expect Next
Coming into the next phase:
✦ Expect:
• Continued bud swelling
• Increased density and weight
• Possible early signs of fade (depending on feeding strategy)
• Higher demand for stability (environment becomes critical now)
✦ Watch for:
• Humidity control (as buds thicken)
• Airflow through the canopy
• Any signs of internal moisture pockets
We are entering the “everything counts” phase.
⸻
🤝 Closing Words
To everyone watching this journey:
• Day one supporters
• Silent observers
• Question askers
• Even the doubters
This is for all of you.
To the community, to GD, to the sponsors, to the genetics —
thank you for being part of this process.
Because this isn’t just a grow.
It’s:
→ Learning
→ Sharing
→ Improving together
⸻
And to the garden…
One plant taught us a lesson.
The others are showing us what happens when everything aligns.
This is balance.
📡 DELETED @ 1K Please stay tuned.we never quit https://www.youtube.com/@TheDogDoctorOfficial NEW 🙏 Thank you for your patience and continued support.
FOR DISCOUNT CODES AND MORE JUST FOLLOW THE LINK https://website.beacons.ai/dogdoctorofficial
📲 Don’t forget to Subscribe and follow me on Instagram and YouTube @DogDoctorOfficial for exclusive content, real-time updates, and behind-the-scenes magic. We’ve got so much more coming, including transplanting and all the amazing techniques that go along with it. You won’t want to miss it.
GrowDiaries Journal: https://growdiaries.com/grower/dogdoctorofficial
Instagram: https://www.instagram.com/dogdoctorofficial/
YouTube: https://www.youtube.com/@dogdoctorofficial Deleted by Youtube - https://www.youtube.com/@TheDogDoctorOfficial NEW
Vimeo : https://vimeo.com/dogdoctorofficial Under construction stay tuned ⸻
Explore the Gear that Powers My Grow
If you’re curious about the tech I’m using, check out these links:
🔆 Lighting & Environmental Control
• Future of Grow — Advanced LED lighting technology
https://www.futureofgrow.com/
DISCOUNT CODE: DOG20
• Lumiflora — Under-canopy LED lighting
https://lumiflorade.com/
• TrollMaster — Environmental controllers and automation gear (past collaboration)
⸻
Genetics
• Zamnesia Seeds — Genetics used in this project
https://www.zamnesia.com/
⸻
🌱 Soil, Substrates, Boosters & Root Support
• Plagron — Substrates, bio mixes, and supportive products
https://plagron.com/en/
⸻
🎒 Storage, Curing & Preservation
• Grove Bags — Curing and storage solutions
https://grovebags.com/
⸻
📸 Photography Equipment & Tools
(Not sponsors, but part of my creative toolkit)
• Sony A6700
• Sony full-frame macro lens + few more
• Stacking photography workflow - learning
• iPhone (for behind-the-scenes shots)
We’ve got much more coming as we move through the grow cycles. Trust me, you won’t want to miss the next steps, let’s push the boundaries of indoor horticulture together!
As always, this is shared for educational purposes, aiming to spread understanding and appreciation for this plant. Let’s celebrate it responsibly and continue to learn and grow together.
With true love comes happiness. Always believe in yourself, and always do things expecting nothing and with an open heart. Be a giver, and the universe will give back in ways you could never imagine.
💚 Growers love to all 💚
📸 P.S. – The Eye Behind the Lens
All photos in this diary (for now — except for the ones showing the camera, which I took with an iPhone) are taken with a Sony A6700 paired with a Sony full-frame macro lens and a few more.
Photography is part of the story — it’s how we share the fine textures, the glow, and the quiet details that words can’t always capture.
I’ve also started experimenting with photo stacking — a technique where multiple images, each taken at a slightly different focus point, are layered together to create one perfectly sharp image from front to back.
It’s not digital enhancement or AI; it’s pure photography — a way to reveal the plant’s beauty in microscopic depth, from trichome to petal.
You’ll even see a few shots of "ghost me" capturing the shots — camera, lens, setup — because every grow deserves not just to be cultivated, but documented like art.
FOR DISCOUNT CODES AND MORE JUST FOLLOW THE LINK https://website.beacons.ai/dogdoctorofficial
NEW DISCORD - Official Server Invite Link : https://discord.gg/ksjAkA5T74

Likes
170
Share


@Master_weeda
Follow
Bonjour à tous les padawans et les maîtres jedis
Jour42 ma plante entre bien en floraison je pratique sur elle une defolliation pour permettre aux têtes de prendre la lumière
La floraison des plantes de cannabis
La plante de cannabis passe par différentes étapes de vie avant de parvenir à la récolte. Ces étapes sont : la germination, la pré-croissance, la croissance et la floraison.
Pour les autofloraisons il n'est pas nécessaire d'avoir de changer le cycle de lumière elle entre en floraison automatiquement voilà d'où elle tient son nom "d'autofloraison"
L'origine de l'auto-floraison vient de la sous-espèce "cannabis sativa ruderalis" , qui à l'origine produit de très faibles niveaux de THC. C'est en croisant cette variété de marijuana avec d'autres qui produisent des niveaux de THC plus élevés qu'à vu le jour ce magnifique compromis que sont les variétés auto-fleurissantes avec des taux de THC très satisfaisants. En parallèle, cela a permis d'améliorer la production de ces variétés, qui initialement étaient exceptionnellement basse.
Pour des résultats optimaux, en culture Outdoor (extérieur), je recommande que la germination des graines de marijuanaAuto-flo se fasse entre avril et août.
En culture Indoor(intérieur), la photopériode idéale que ce soit pour la croissance comme pour la floraison est de 20h de lumière. N'oubliez pas que ces graines ne sont pas tributaires de la photopériode pour passer en floraison.
Il est préférable d'utiliser des pots d'une capacité de 10 à 20L dès le début, étant donné que leur cycle de vie est réduit, les auto-flo n'ent pas besoin de plus de volume pour se développer. Vu sa petite taille (et la discrétion) elle fait l'objet d'un bon choix pour la culture de cannabis sur balcons.
La première variété de Lowryder auto-floraison a été créé à partir de cannabis indica sativa croisé avec des génétiques de cannabis sativa rudelaris par la banque de graines de marijuana "The Joint Doctor". Puis vinrent la White Dwarf de "Buddha Seeds", la Roadrunnerde "Dinafem", l' Auto Stoned d' "Autofem", la Speed Devil de "Sweet Seeds" , la Maxi Gom de "Grassomatic", la Flash, la Gnomo de Kannabiaet bien d'autres.
Jour42 defolliation (video)
Avant toute chose n'oublions pas de bien désinfecter ses outils et bien ce laver les mains.
Quesque la defolliation ?
LES CULTIVATEURS AMATEURS, PRENEZ GARDE, MAIS NE PRENEZ PAS PEUR
La défoliation consiste à retirer les feuilles des plants de cannabis en intérieur afin d'accroître le rendementfinal. Le cultivateur amateur doit faire preuve de vigilance lorsqu'il commence à appliquer cette technique de taille. Malgré le débat sans fin entre ceux qui prônent cette technique et ceux qui la dénigre, il n'y aucune raison pour qu'un amateur ne s'y essaie pas afin de voir si ça lui convient ou non.
COMMENT DÉFOLIER
Que vous tailliez les feuilles ou les branches des plants de cannabis, il vaut mieux utiliser un sécateur stérile qui est confortable en main. Arracher des feuilles à la main manque de finesse et engendre souvent par accident, l'arrachement des couches d'une tige en plus de la feuille. L'objectif principal de la défoliation est de permettre une meilleure pénétration de la lumière et de promouvoir la production de plus grosses têtes. Les feuilles éventails qui font de l'ombre doivent être retirées. Tailler la tige principale et/ou les pousses secondaires n'est pas de la défoliation.
La règle d'or lorsque vous donnez à vos plantes un rafraîchissement est de commencer avec les feuilles nourricières les plus grandes et les plus larges, en taillant du bas vers le haut. Il est important de retirer les feuilles stratégiquement et non pas au hasard. Pensez également qu'il vous faut limiter votre rafraîchissement à approximativement 10 à 20 % des feuilles totales de votre pied. Il est très facile de s'emporter durant la taille et de se retrouver avec des plantes chauves. Un excès de taille de feuilles empêchera la photosynthèse et paralysera vos plants.
QUAND FAUT-IL DÉFOLIER
Il est assez rare d'appliquer la défoliation comme seule technique pour obtenir un fort rendement. La taille des feuilles est généralement associée à d'autres méthodes de tailles et de palissage pour un meilleur rendement telles que le topping ou étêtage, le FIMming, le LST, le manifolding, le supercropping et le ScrOG. Les cultivateurs utilisant la méthode ScrOG auront besoin de retirer toutes les croissances inférieures ainsi que les feuilles et les tiges se trouvant sous le filet.
Les plants de cannabis peuvent être défoliés dès lors qu'ils sont passés de la phase de plantule vers la phase de croissance végétative. Cependant, il est recommandé aux cultivateurs amateurs de laisser aux plantes 1 à 2 semaines de croissance végétative avant de s'attaquer à la défoliation de celles-ci. De plus, certaines variétés sont plus sensibles à la taille que d'autres et de ce fait, seront plus stressées par la taille des feuilles. Surveillez minutieusement le comportement de vos plants après la taille. Une période de convalescence de minimum 3 à 7 jours avant de recommencer la défoliation est fortement recommandée pour éviter trop de stress aux plants. Les cultivateurs peuvent également défolier pendant la phase de floraison, ce qui permettra à l'énergie de la plante d'être concentrée vers la production de têtes tout en limitant l'ombre et l'excès d'humidité. Néanmoins, il est important de ne pas défolier trop tard sous peine de simplement blesser ses plants inutilement.
LES AVANTAGES DE LA DÉFOLIATION
Évidemment, l'avantage numéro un de la défoliation, c'est l'augmentation du potentiel de rendement de cette technique de taille pour tous types de cannabis allant de la photopériode aux variétés autofloraison. Ce n'est pas un secret que les fleurs qui reçoivent plus de lumières deviennent plus grandes et larges que celles dissimulées dans l'ombre des feuilles. De plus, retirer les feuilles intérieures des plants touffus aide à prévenir toutes menaces de moisissure. Les plants très feuillus avec un feuillage intérieur dense produiront une quantité importante de têtes pop-corn. Dans le pire des cas, les branches de têtes et les têtes qui sont denses succomberont au pourrissement.
Si vous observez des gouttes d'eau se former sur la surface des feuilles, il est grand temps de penser à faire de la défoliation. Libérer la zone inférieure et médiane des feuilles est un excellent moyen d'améliorer la circulation de l'air.
LES DÉSAVANTAGES DE LA DÉFOLIATION
Les plants de cannabis en intérieur bénéficient de la défoliation pour deux raisons. La première est parce qu'ils reçoivent la lumière d'une source stationnaire au-dessus d'eux, et la deuxième est parce que les conditions environnementales sont contrôlées par le cultivateur et non Mère Nature. Les plants d'extérieurs eux, n'y gagnent pas beaucoup, car les cas échéants se vérifient pour eux. Le soleil traverse le ciel, illuminant sur sa route, différentes portions de la plante de son lever à son coucher.
Les cultivateurs en extérieur n'ont pas besoin de manipuler les plantes afin qu'elles se développent en adoptant une structure plate puisque le soleil est infiniment plus puissant que n'importe quelle lampe de culture et qui plus est, il est toujours en mouvement. Tailler les feuilles des plants extérieurs les rend également plus vulnérables aux conditions humides et brise leurs barrières naturelles contres les nuisibles.
De nombreux cultivateurs d'intérieur peuvent, et malheureusement, c'est souvent le cas, réduire le rendement final à cause d'une défoliation faite au mauvais moment et/ou excessive. Tailler les plantules n'est pas conseillé et engendre souvent des plants nains. Scalper les plants matures est encore pire, et au lieu d'obtenir de longues branches de têtes, vous obtiendrez probablement encore moins de fleurs. De même, tailler des plants malades ou en mauvaise santé à n'importe quelle période de la croissance risque de paralyser la croissance plutôt que d'encourager la formation de fleurs denses.
Jour44 Arrosage une fois sur 2 topmax de biobizz
Jour46 arrosage avec de l'eau ph6.3 à laquelle j'ajoute 0.8g par litre d'eau de feeding enhancer greenhouse.
Jour47 léger arrosage.
Jour48 léger arrosage

Likes
60
Share


@m0use
Follow
Alright! This week is finally done and this will be the last vegetative growth week for the plants. Switching to flower tonight :D
I have done some defoliation and a bit of lollipopping to the 3 plants, I was noticing the shadows where quite dark on the tent floor and the plants where not crazy tall so they needed to be managed, If I was outdoors I would just LST them some more and not worry about any of it but indoors the airflow is tight and it was needed, cleaning up the undercanopy was none negotiable or some bad things would have happened in flower. Mainly molds or worse WPM. I also removed the string supports I has on the plants when they broke from some LST I did a few weeks ago.
In the stripping down of the plants I removed a lot of lower immature growths and took out some immature branches, I have all these sitting in a glass of water and will clone them out for shits and giggles, I think their is about 15 of them or more, maybe I will go and plant them aorund my neighbourhood in municipal planters. Plus now I can work in the topdressings that will be required in the upcoming weeks to keep these plants happy and healthy. Going to continue amending in some of the bokashi in the feedings as well as worm castings as they give off a nice ammount of microbes for the soil. I wish I had some of my LABs for this grow but I did not make any.
The clones from before are doing fine, just did not take any pics of them.
The butterwort is doing a fantastic job of eating up the gnats. I have some nematodes on hand for when its had its fill as I won't want them getting into the flowers as they ripening.
Big shoutout to Medic Grow for sponsoring the lighting in my tent, They have provided me with 2x Mini Sun 2's in the 240w configuration, They use the v1 growing spectrum that is a all purpose seed to harvest spectrum so their is no hassle of switching it mid grow. If you interested in learning more about Medic Grow products please visit the web link below.
https://medicgrow.com/
https://growdiaries.com/grower/MedicGrowLED

Likes
52
Share


@HazeyBobby
Follow
The week ends Sunday Mar-1, being day 61 of flowering since flipping the light. From first pistils shown, it's day 45 which is a more accurate snapshot of where the plants actually are in their maturity.
The buds development is progressing albeit slowly and trichomes are still clear across the canopy with lots of frost on the sugar leaves.
The buds have beautiful structure and quite fluffy. Swelling has started on some calyxes.
Light is maintained at 30cm above the canopy, with single daily fertigation at lights on - watering 3L per day. Fertigation pH target is 5.9-6.2 whilst flowering. Stopped the practice of fertigating at lights off due to the springtales infestation. Need to allow at least 2-4hrs of lights on period after fertigation. The coco is not dry but still damp on the surface after 24hrs from fertigation.
Trying to maintaining an average RH in the space at 50% but it's getting harder now with all flowers.
-----------------------------------------------------------------------------------------------------------------------------------------------------------------------------------------------------------------------
The grow setup includes;
- Secret Jardin DS120W tent (120cm x 60cm x 180cm) placed inside the bedroom. Passive & active intake of air is from a closed off section of the room where the central heating boiler sits - the intake is warm air (20 degC.) and fairly dry (40% RH) during the winter months.
- Mars Hydro SP250 LED light
- extraction fan - AC Infinity Cloudline T6
- ventilation fans
- aquarium heater
- small oil heater
- small dehumidifier
- 20L Airpots and 3.5L general pots for seedling stage
- Canna Coco substrate and nutrients
- GHE Flora trio nutrients
- pH and EC/TDS meters
- 2x Govee Thermo/Hygro meters (one at canopy the other at the roots level)

Likes
10
Share


@SgtDoofy
Follow
3/6:
Yesterday I fed half strength nutrients ph'd to both. Amnesia's runoff ph was 5.5. So I made another half gallon of half strength and ph'd it to 7.5 to get Amnesia's runoff to be 6.5. If only I had done this sooner and didn't mess up with the PH testing drops as opposed to using a ph meter, Amnesia's leaves could have still been green. I've been removing all of the dried, crispy ends as I find them, leaving the rest of the leaf intact to suck up as much light as possible. Timelapses are showing that the buds are fattening up well though. Trichome production has kicked in and is covering the leaves. Beautiful colors all around.
3/8:
I don't think I can wait any longer to feed Amnesia. Vacation starts midday tomorrow, Thursday, and I'll be away until Monday evening. I'm mixing up a half strength nutrient mix with molasses and epsom salt. I'm also going to try to set up a timer/pump system to water sunday night.
Likes
26
Share


@Hawkbo
Follow
They're settling in to the pots nicely and the flower tent is about to be cleared out. Need to do some work around the tent before I can move them should be a week or 2.
Likes
16
Share


@DniceWJ
Follow
LSD is now 52 days today I did low stress training some defoliation also add a nutrients for the week. I was confused on how to stop her from getting to the light. I lost my net so on the 54th day I created a homemade net out Pipe cleaners. Wish me luck so far everything looks great 👍🏾


Likes
5
Share


@CanOli95
Follow
The Day has come to flip the lights 🌱☄️⏲️
Plants are healthy enough and producing lots of new leaves. Stems are also getting thicker and Turgor ist there. I bend some stems and used the net to gain a bit of control, but not like real Scrogg should be done, but that's not what I'm aiming for.
I also cut of stems and leaves from the bottom, which are not necessary. Later, at day 19 -23 , I will do a bigger defoliation, to get a thinner carpet and allow weaker growth to gain more light. I still don't use NPK fertilizer, only rooting acceleration and Silica in form of Mono-Silic-Acid with Hints of Boron.
As you can see, the ladies are developing a healthy green, not like you could see in the weeks before.
The plant in the left side suffered from Wind damage, I just hung up the Vent a bit higher and decreased the power.
Likes
35
Share

@m0use
Follow
Not a whole lot happening this week. Just waiting for the plants to mature and go from there.
The mites are prioritizing the weaker plants and I am ok with that. I have introduced some predator bugs that should eat them. They are the ones that tend to eat thrips and white flys however the guys at the grow shop said if they only have mites they will eat them instead. They won't however go onto the webs if they start forming any. I have not seen any webs but who knows, might be some hidden. little fuckers are good at going undetected for a while.
Just giving them water now till its all done and over with. Will not be drying this crop as that's when the mites will go crazy. Fresh harvest and frozen asap.
The one CBG plant seems to be thriving in all the chaos looks nice and healthy and good frost on it. Some of the other plants are loosing some upper main leaves. Could be fade. Could be issue in the roots. Don't really care, so close to being done.
Added one photo of honeymints from an old grow for a contest.
Likes
17
Share


@DudeGrowsWeed
Follow
6’-4” & 5’-8” as of today, 6’-0” average height.
These ladies are beautiful! Everyone who comes by the house just stops and stares when they get near my garden. So do I 👍🤣
I had to move some plants outdoors from my indoor grow due to losing the battle to high heat and humidity. Two are super close to harvest, one might get cut over the weekend. Feel free to comment and let me know what you would do. Thanks!


Likes
7
Share


@PCGrows
Follow
This plant was going to be outstanding Until I stressed it out w a hug move
Processing
Likes
18
Share


@Canadian
Follow
The plants seem to be growing very fast very strong.
thank you for reading I will continue to update have a happy grow

Likes
2
Share


@Ninjabuds
Follow
Bubble og man these ladies loved being topped they were not growing the fastest before topping but after getting topped they have really been stretching out they very much have a scrog potential the branchs bend easily and have good distance between nodes to work with
The day has come and it's time to flip these ladies to flower. I was planning on letting them go untill Friday and let the smaller ones grow just a bit more but they will be fine. I have the eternity cup contest in mind and I'm thinking timing so I need to get these lady done and out my tent lol. This past week I turned the light up alot getting them ready to flower they have grown a bunch inhavendone lst maybe 5 it 6 times on the branchs and they arw nit bendy anymore that will help durring flower.

Likes
34
Share


@ElLocoDeLaHabitacion420
Follow
Alright! final thoughts I pulled 93.7gs I think I could have pulled more. Ill do a couple things different next time, better soil, maybe coco and better feeding schedule! I think I couldve fed her more with no problems! super strong strain! 100x100 recomended and ill definetly will get a higher tent and a better light for sure!0
Likes
24
Share


@wavedin
Follow
Second Week :
I will now add pictures daily the most i can.
I start using Fertilizer during watering I use Plagron for everything except Roots Booster.
Little girls are going well, i'm impressed by how fast they growing. Things are doing great for now.
If you have any advice or if you just want to talk about the growing or the setup you can send me a message
Day 15 :
I watered the plants today and spray Vita Race (4ml/L) on the leaves.
They keep growing really fast, I can see the new floor coming
Setup :
600W Hps Lamp Phillips
Lumatek Digital ballast
40cm long Cool tube Prima Klima
Adjust-A-Wing Large Enforcer
400 m3/h Extractor PrimaKlima
Carbon Fliter (forgot brand)
Black Silver Box 120x120x200
For the soil I use BioBizz Lights Mix and Canna Terra Pro+
I mix them 50/50.

Likes
2
Share


@Saintvicious
Follow
Just keep watering as it drys. Supporting buds along the way that are getting too heavy. Smells like skunk and gas. Little fruit but not much. Trics still getting thick. Look forward to it finishing. Tricomes still cloudy. Little amber on sugar leaves but it's still going strong. Some leave fading finally to fall colors.


