
Likes
Comments
Share

@Lvnsource
Follow
Feed log;
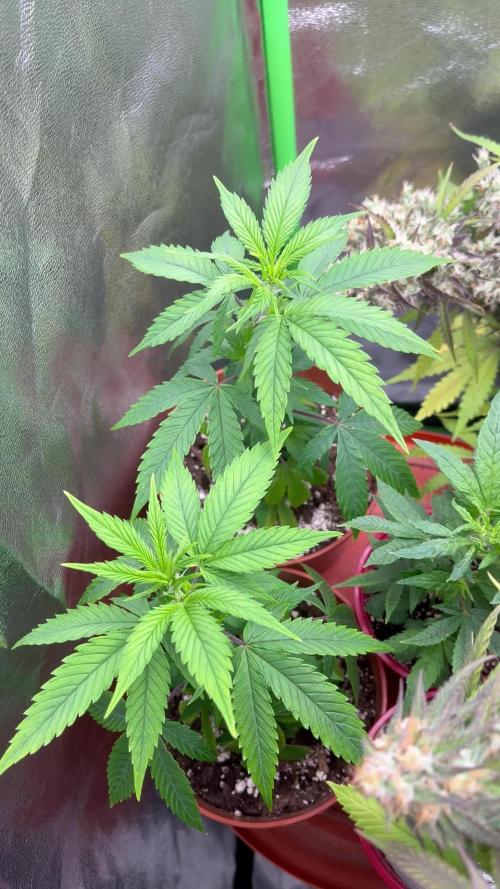
D:23 - 320ml - Si,[0ml],Ca/Mg,[+0.266 EC & +0.192 EC],[pH 6.0],[0.508 EC], Foliar: 10.4 - Si,[0.1ml],Vega[0.4ml], pH[6.0],[0.814 EC] Previous irrigation: D:21
The girls have put on some nodes since last update; they are coasting under 450 - 500 PAR, have to shuffle them because of space constraints. Also haven’t spotted any roots coming through the drainage holes yet 👍


Likes
18
Share


@Luca90
Follow
I think will harvest the watermelon this week and start drying it and curing it soon as well northern light which was a free seed and didn’t start its life very well is the one that end it up being the hugest one! Even if it was my first growing I took some risk with the northern light cause I used fim on it as well as huge defoliations and lst
Will update at Harvest time from today I’ll stop feeding the northern night and I will also stop watering the watermelon until it’s time to harvest

Likes
2
Share


@EtnoGrow
Follow
Well, those in the catalog died or did not germinate well, apart from that, the 6 seeds without breed that we have saved from good buds that came into my hands germinated well. here I share a little of what could be recorded, as you can see there is a bigger one that was the attempt to germinate the cars with an approximate age advantage of 25 days, with that criterion I will comment on this one in particular and the others in your set.
The largest in age also has the largest pot of all of 11 liters approx 3 gallons
The 2nd largest is for having the 2nd largest pot of 7 or 8 liters approx 2 gallons
The remaining 5 are in pots of 3.5 liters or 1 gallon
We also started fighting with the high temperatures due to the weather, which will go down as the months go by in our favor, we turn on lights at night and turn off the lights during the day to compensate, which we will manage just as well as the plants adapt, as will be seen until 3 o'clock 4 week of flowering, which is the one we are currently going through when this diary is being updated
Likes
54
Share


@TheCannaProphet
Follow
~ AirCube Active Oxygen Ebb/Flow System sponsored by GrowAce, featuring Strawberry Gorilla Auto by FastBuds ~
Well guy's and gal's here we go again on another exciting Autoflower run together! This time will be different as I will be doing a 'Hydroponic' run utilizing the AirCube Active Oxygen Ebb/Flow System by GrowAce, who were kind enough to sponsor me for this run, so it should be interesting to see what results I get and have some fun along the way!
•Let me first tell you about this 6 Pot Ebb/Flow system from GrowAce:
"The AirCube system is the one and only Ebb & Flow grow system on the market that combines the benefits of air pruning with a fully automated Ebb+Flow system! With the AirCube's proprietary fabric pot in bucket design, this system is guaranteed to outgrow any other Ebb + Flow system on the market. The results speak for themselves- grow MASSIVE roots that result in MASSIVE fruits!
Air Pruning- Air Pruning only happens with fabric pots. As the roots reach the fabric walls of the pot, they penetrate and grow into the breathable fabric. Once penetrated, the roots are exposed to air, which causes the tips of the root to dehydrate and naturally prune themselves. This natural pruning process forces the roots to grow tons of lateral fibrous feeder roots. This results in a plant that utilizes the entire root zone and fills the entire pot with tons of roots. These fibrous feeder roots are incredibly effective in uptaking water and nutrients, resulting in a plant that grows healthier and more vigorously!
Oxygen Benefits- Without oxygen, nutrient absorption cannot occur. On a molecular level, oxygen is needed to transmit nutrients across the cell walls and into the roots of a plant. With the AirCube's proprietary bottom lifted draining design, the system actively draws all of the water out of the bucket pulls vital oxygen into the root zone.
Maximum Versatility with Any Grow Medium: The AirCube System is the only system on the market that allows you to use any growing medium you like. Use coco coir, soil, peat moss, perlite, vermiculite, hydroton, rockwool or any other medium you wish! This system is the most versatile Ebb and Flow bucket system in today's hydroponics industry.
Temperature Control- with the fabric pots constructed with highly porous polypropylene fabric, heat dissipates easily and effectively. Unlike standard plastic pots, heat isn't trapped in the root zone. Heat in standard plastic containers can reach temperatures of up to 125 degrees. When this type of heat is trapped and unable to escape, it can damage your plant's health and limit the potential of your harvest. Growing in the AirCube System, plant roots grow cooler, healthier, and more vigorous.
Largest Pots in its Class- this system features 5 Gallon grow buckets, the largest pot size of any other ebb and flow hydroponic system in the market.
Modular and Expandable- start with 6 grow buckets and expand up to 36 grow buckets with the optional 105 gallons PopTank reservoir!"
For my medium and nutrients I decided to also switch things up from my regular Organic runs, going with Plagron Nutrients and Root Royale 70/30 Coco/Perlite. When filling the fabric pots with medium, I first added just under a gallon of horticulture perlite from Nor-Cal as a base layer to ensure good drainage and then filled the remainder with the Root Royale.
•Now for one of my favorites, and award winning strain from my friends at FastBuds... Strawberry Gorilla Auto:
I'll be running Strawberry Gorilla Autoflower which is a 55/45 Sativa/Indica Hybrid. "ATTENTION ALL! Due to our continuous efforts in evolving our breeding process, we are proud to confirm that our Strawberry Gorilla Auto has now become one of the most potent autoflowers in the world! Paving the way to our recent success where she ranked on top & brought home the gold at the very first American Autoflower Cup in California. Moreover, she proved that not only modern autoflowers can compete with photoperiods, but they can even beat them in their field. At the most recent edition of the Farmer’s Cup and competing against various photoperiodic strains, Strawberry Gorilla Auto took home the title of 'Highest Combined Terpenes' in the highly sought-after 'Home Grow Hash' category, with an impressive 97.163 mg/g total terpene content! Our exceptional genetic selection's crowning Strawberry Gorilla Auto strain is a spectacular hybrid known for producing yields of up to 600 gr/m2 in 70 days. This is a very manageable grow that can reach heights of up to 150 cm - due to its magnitude we recommend it for more experienced growers, as a huge plant may be a little overwhelming for first-timers. This show stopping sativa heavy hybrid is perfect as an all day smoke, producing a taste bud tingling, pungent berry and diesel terpene-rich flavor combo that leaves you with a grin from ear to ear, a perfect choice for those looking for a day-and-night autoflower! "*
*References: GrowAce.com, 2fast4buds.com
______________________________________________________________________________________________________________________________________________________________________________________________________________________________________________________________________________________________________________________________________________________________________________________________________________________
The Setup:
• AC Infinity 4x4 tent
•AC Infinity Cloudline T6 Exhaust Fan w/ Controller 67
•HLG 650R w/UVA Bar *** For some reason GD does NOT have a listing for the USA version of the 650R so I selected the closest match to it.
•AirCube Active Oxygen Ebb/Flow 6 pot System
•TrolMaster Hydro-X Controller for light
•AutoPilot APC8200 co2 controller fed by a 50# tank
•16" Hurricane oscillating fan and 8" floor fan
•Tent cooling via filtered outside air delivered by AC Infinity Cloudline T6 fan
•BlueLab instruments: PH Pen and Truncheon Nutrient Meter
______________________________________________________________________________________________________________________________________________________________________________________________________________________________________________________________________________________________________________________________________________________________________________________________________________________
Weekly Updates:
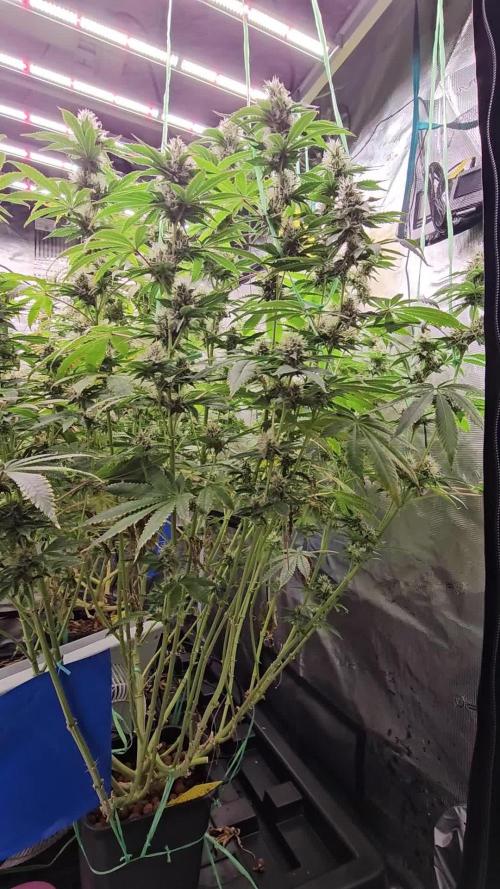
11/1- Here we go into the fourth week for the FastBuds Strawberry Gorilla Auto's and they are all looking great, and are very healthy!
I'm continuing the feed schedule of six, 15 minute feeds daily and am leaving the nutrient level at 900ppm. The HLG 650R is now at 100% output, and is hung 28" from the canopy.
I'm keeping a close eye on all of them, looking for the first signs of flower. I also am diligently tucking shade leaves away daily trying to get some light down into the plants.
11/3- Yesterday I decided to do a little bit of defoliation, removing the largest shade leaves on all three which really helped with light penetration. Today all of the plants looked none worse for the wear, and as spunky as ever!
11/5- All three plants are now in flower, I have done LST on all three, tying down branches with horticulture wire. I've also done some defoliation on each plant as they got extremely bushy and were getting zero light down into the lower sections of them. All have responded extremely well to the training and are looking great!
Tomorrow I will empty and clean the reservoir along with the 'brain bucket' as the water has really gotten funky and has an odor that I don't like. Going forward, I'm going to be doing weekly changes on the reservoir where I'll empty/clean/refill and add fresh nutrients. In between changes I'll just be topping off the reservoir with straight water and only checking the PH.
11/7- There goes the first week of flower for the FastBuds Strawberry Gorilla's and they're all looking pretty darn good, all things considered. I can't wait for next week to see these girls really start to get going! Thanks for stopping by!😎❤️
💚 Thank you for checking out my passion in life! Please visit as often as you wish and I hope you enjoy this journey as much as I know I will! Grow what you love, Love what you grow!💚

Likes
7
Share


@BIYEI
Follow
Al empezar a cortar se noto un aroma muy penetrante, se ve que el sabor estara estupendo, aun no la eh probado pero supongo estara de 10.
Likes
11
Share


@PanGrower
Follow
I have now installed osmosis, the water after it is 15 PPM. Fertilizer added 100% 2 weeks of vega, and finally ppm 730
Likes
9
Share


@Garamantes
Follow
After 4 days of heavy rain, the first mold appeared...
So I spent about 18 hours searching for plants and picking out mold with tweezers
After last year's experience with another seed bank, I expected the plants to be very affected by mold, but I have to say that Fast Buds genetics coped very well! Mold appear mainly on blisters to which the stem of the leaf leads water, which then collects between the stem and the blister
I trimmed the plants more so that the air flows better and that water does not stick to them
The plants look healthy and the flowers are gaining strength
Especially the dark purple phenotypes look very dense and hard. it also looks very resistant to mold
Very pleasant sweet fruity scent
I haven't seen my children for 3 days, it's raining extremely ... the last time I was chased out by swarms of ants in the early evening, I've never experienced this before, there were maybe a million of them and they sat on me and on the plants
I'm finally going to visit them tomorrow, I expect I'll have a lot of work to do with mold and I hope the swarms of ants haven't harmed them in any way
Likes
3
Share


Likes
57
Share


@SmokieMcPot
Follow
***UPDATE***
ITS CHOPPIN DAY!! Late in day 87 I was going for macros. Made the decision while seeing MANY yellow trichomes that Wedding Glue from FastBuds is DONE! Attaching pics to the beginning of the weeks uploads. She sure turned out pretty asf didn't she? Lights out occurs in like 30min, and I'm going to work through the dark period stripping the large fans off. Utilizing my green Christmas lights hung up above lol. May turn light on low for a quick pic before chopping/hanging. Next update will be harvest!
2 Girls 1 Cup week 12? Hopefully the finish is this week... My my my how WG has fattened up the last 2 weeks. Trying to get some good macros since it's too hard to hold the scope to my phone and focus everything. Probably better for the existing trics too since they're not being touched.
Day 84- these trics are taking their sweet time to ripen. Was considering picking up some GHE Ripen to speed the process up.. especially because a local shop is closing and everything is 40% off. Let's keep it simple this run. I'll get some additives for the next grow to enhance GHE's perfected formulas of macro/micros in the Flora series. An update on the "sample" I clipped from WG the other day. It's not dried/cured proper. Actually been sitting in a brown bag with the outlet of the tent blowing on it lol. Can taste some vanilla in it through the chlorophyll and shit still in the flowers. VERY heady effect that hits me like a friggin wave. Creativity and energy uplifted for sure. Looking for the bodies in there too to help with pain, so we shall wait even longer for those ambers to show.
====================================================
==========================
==========================
Day 85- stepped up our hole a size or two.. lol. May bring home the step bit to drill again before a dark period at the end. The girls STINK! Getting VERY close to chopping day. Ooooh I can't wait (but I gotta). Headies lasting between 2-3hrs which is great.
====================================================
==========================
==========================
Day 86- yellowing more as the days pass. no more ambers showing yet.. wasn't able to score anything good from the local shop today since it was almost empty already. Picked up a grove bag to give it a whirl with curing. May put some in glass to compare side by side with the bags. Figured I'd give their roots an ice bath since I've done other bro science. Shit, GK still hasn't popped a nanner after all I've put her through 🤣.
*edit* added some late day WG only pics to show her fall colors coming in. Moving in fast now. Gotta get back up in WG's guts now and scope the progress daily.
====================================================
==========================
==========================
Day 87- the smell in the tent has become so powerful, I next day air'd a new charcoal filter 🤣. This one was reaching the end of its lifespan anyway.. but oh boy has the aroma increased. May be starting the 48hr lights out within the next day or two from the smells of it.
====================================================
==========================
==========================
As always, thanks for stopping by and checking out my current grow. If it's your first time, check previous weeks for these girls progress throughout their lives. days 27-70 timelapse @ https://youtu.be/8JdUkR36Wfc
Likes
17
Share


@mcjordan
Follow
Week 11 started, I was hoping for a harvest soon, but looking at buds and comparing to other growers, seems like plants arent quite ready yet. Will harvest at end of week I think.
So week 11 has ended, I got myself a better microscope mid-week, looking through microscope and comparing whats written on the internets it looks like it still isnt quite ready. Perhaps I'll go for an early harvest, what could go wrong?
Will wait few days to decide if want to harvest at next week start or wait much longer. First grow, zero experience. :D


Likes
13
Share


@Arkain_Jenetics
Follow
Everything is going good. Some are showing some sort of deficiency . Lowered lights a little bit. Going to start watering every other day. One of the critical thunder autos is like 8 inches tall lol definitely breeding her.

Likes
1
Share

@TheBulldozerSicily
Follow
Ripeto sempre le stesse cose, pultroppo senza commento non mi fa pubblicare le foto. Le piante vanno alla grande, tutto perfetto. Peccato me ne è morta una altrimenti il box era completamente pieno! Ma va bene. Ci rifaremo la prossima volta


Likes
14
Share


@DaddyPrime
Follow
6/22 looking good after I tried to spread her out more. She responded well
6/26 sexy ass plant


Likes
51
Share


@nonick123
Follow
Día 36 (25/11) Aplico ligero LST a LSD-25 Auto
Parece que OG Kush Auto se ha ralentizado un poco tras el Lollipopping y la defoliación
Día 37 (26/11) CBD Auto 20:1 #2 & LSD-25 Auto han parado el stretch y se dedican a engordar los cogollos
LSD-25 Auto sigue generando unos colores preciosos con todas las hojas inundandose de color morado / purpura
OG Kush Auto está empezando la floración en todos los nodos
CBD Auto 20:1 #1 es un monstruo que no para de crecer! Le hago un ligera defoliación (3-4 hojas) y Lollipopping en un par de nudos inferiores
Día 38 (27/11) CBD Auto 20:1 #1 sigue imparable hacia el cielo! Empieza a formar timidamente los nodos...
CBD Auto 20:1 #2 muestra pistilos rosas en el ápice! 😍
Día 39 (28/11) CBD Auto 20:1 #1 non stop! 🚀 Elimina algunas hojas que tapan a los brotes inferiores
LSD-25 Auto empieza a generar tricomas! 😍 Elimino un par de hojas que tapan los cogollos de la zona media
Día 40 (29/11) Solo riego. NO tiempo a más!
Día 41 (30/11) Día sin riego. Todas las plantas presentan el sustrato humedo
CBD Auto 20:1 #2 empieza a engordar muchos los cogollos y a mostrar pistilos entre morado y rosa 😍💥
Día 42 (01/12) CBD Auto 20:1 #1 non stop! 🚀 Elimino algunas hojas que tapan a los brotes inferiores
LSD-25 Auto tiene unos colores precisosos. Im in love
OG Kush Auto la floración está a tope! Elimino algunas hojas que tapan a los brotes inferiores
💦Nutrients by Bio Tabs - www.biotabs.nl/en/
🌱Substrate PRO-MIX HP BACILLUS + MYCORRHIZAE - www.pthorticulture.com/en-us/products/pro-mix-hp-biofungicide-plus-mycorrhizae
"GDBT420" 15% DISCOUNT code for the BIOTABS Webshop https://biotabs.nl/en/shop/


Likes
59
Share


@JeyGanesha
Follow
Iniziò fioritura,.oggi 2 agosto, secondo giorno a 12 ore...dopo aver sofferto anche lei 3 mesi dentro AD un vaso da un litro... adesso con questo vaso da 11 dovrei riuscire a portarla. A maturazione,,,💪😂

Likes
85
Share


@Grey_Wolf
Follow
Whew!! That was a Hot Week just past. Several days in a row of around 40 degrees followed by 38 and 39 degrees.
Today however is Overcast and much cooler with about a 60% chance of rain later on. The Wifi plant hasn't seemed to mind the hot weather in fact she grew another inch or three. During summer and high temps it's beneficial for your outdoor grown plants to be given some Seaweed or Kelp solution. There is something in it that is fantastic for stress relief in all plants. It can be used at any time of the day and growth stage of the plant and is simply watered in or applied with a foliar sprayer.
I also added to the soil 1 smalll scoop of Great White Mycorrhizal powder and Azospirillum. These are root innoculants that will keep the plants root zone healthy and happy.
all thats needed is to thoroughly water it into the soil and your good to grow.
I used my Bluelab soil ph probe to measure the soils ph which seems to be pretty stable at 6.5 so all good there not much else to report for now
so I shall sign off for this week. Thankyou for checking in on my Diary update and because i wont be updating until after Christmas day I'd like to wish all of you a very
Merry Christmas. Grey Wolf 19th December 2019
