
Likes
Comments
Share

@RanTanPlan_69
Follow
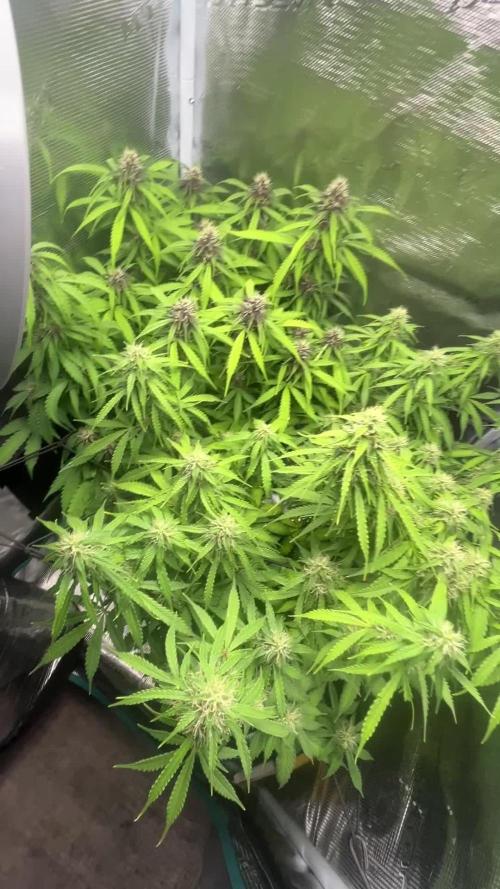
Week 8 is starting !
Bella is getting very dark (but wonderful) colors. She is flowering fast !
Gigi is making her flowers bigger and bigger.
Patience is the key but I can’t waiiiiit !! Grow ladies ! Grooow !
Quick cleaning was done (dead leaves, 🍁 cutting the small « suckers » so the big flowers get the energy)

Likes
12
Share


@Dankybongtoker69
Follow
Didn't have someone to come water the plants. 5 days away. Plants dried right out. Defoliated both and fed and watered. We will see what happens. Plant one has mostly orange hairs. Plant two is on the whiter side. Buds are still filling in. I have definitely learned that I need to move on to a more automated system for my lifestyle. Gonna try to make the best of the next few weeks and watch the trichomes turn. Day 66-67 flushed soil with pH water

Likes
18
Share


@Earthsower
Follow
I haven’t fed her this week as I trying not to over feed her. She has been doing very well under natural sunlight. She is coming out of the seedling faze she has five fingered leaves coming through. I will continue the draught until I see signs of wilting!


Likes
Comments
Share


@Simba732
Follow
🔘 We’ve wrapped up another week, folks!
🔘 She’s officially in full bloom now
🔘 Over the next few weeks we can expect another stretching also her buds to start bulking
🔘 I’ve begun dialing back the Grow nutrients and switched up my additives for this stage. Added Big Bud and Ancient Soil, both from Advanced Nutrients.
🔘 No training was done this week. Since she was shifting into her bloom phase, I wanted to let her breathe a bit. She’s gotten very bushy which is great but I’ll be doing a light defoliation in the coming week. Gotta keep insects and mold far away.
🔘 Happy growing 💚

Likes
9
Share


@bigolebuds
Follow
Week 9: Still coasting, but on the last day of this week the plants showed some major signs of being both thirsty and wanting some more nutrients. Not only were some leaves dried and shriveled, but others were limp and some new leaves started showing slight loss of green.
I'm attributing this to our delay in watering the plants this week and it being time for another round of 444. This will be their last full Veg fertilizing, before we flip. In 3/4 weeks we will feed half strength 444, half strength 284, another round of bloom boost, some recharge for the soil and we will hope for the biggest, densest, dankest mugs possible! Idk how I forgot to mention but at this point our babies are mothers! We let some of the branches get a little longer than we should before snipping and voila.. an opportunity for a new plant and maintained genetics.
A little behind on the scrog net, getting 2 plants out this tent, and feeding extra silica.. but I think our babies are gonna push through.

Likes
3
Share


@Xabii
Follow
Had to do a root wash, again, also cut some really bad roots of, also saw lots of new healthy root growths since last week, upping ORP and wash last week seemed to have helped.
Overall still very unhappy but that is on me, learned that prepping a plant in DWC and then transplant it to NFT is not a good idea, better do it as usual directly in NFT so that the roots follow the stream better, usually at this time there would be at least 3x the amount of roots.
Also switched back to the 10cm diameter tube, will stick with that one from now on, very good experiences in the past and this one does not, maybe RH does not rise enough in a 16cm diameter tube.
Also changed the light cycle to 18/6 from 24/0, in the timelapse I see phases where the leafs droop slightly and come back, kind of like the night cycle but less, seems to me like the plant wants to go to "sleep" even tough it was raised in 24/0 and I have good experiences with 18/6.
Values are average of the day.
DATE - EC(us/cm)
20250430 1952
20250501 1649
20250502 1722
20250503 1735
20250504 1719
20250505 1750
20250506 1796
DATE - PH
20250430 6.03
20250501 6.24
20250502 6.27
20250503 6.24
20250504 6.21
20250505 6.15
20250506 6.13
DATE - ORP (mV)
20250430 259
20250501 248
20250502 225
20250503 233
20250504 222
20250505 235
20250506 307
DATE - °C - RH% (Tent Temp/RH)
20250430 25.9 42
20250501 25.4 47
20250502 26.6 48
20250503 24.2 51
20250504 23.7 46
20250505 24.5 45
20250506 24.0 47
DATE - °C (Reservoir)
20250430 20.4
20250501 20.4
20250502 21.7
20250503 21.1
20250504 19.5
20250505 19.3
20250506 19.6
DATE - CF
20250430 19.52
20250501 16.49
20250502 17.22
20250503 17.35
20250504 17.19
20250505 17.50
20250506 17.96

Likes
Comments
Share


@DaddyPrime2
Follow
10/16
day 2 of drying. i trimmed a couple buds wet but theyre so dang sticky. will update as things progress. drying conditions have been 60-62
10/20/24 jarred for curing. jars have been 62-65% burping multiple times a day.
11/07/24 she has a really nice high. intense mental high with quite a bit of physical relaxation. laughing non stop. watching movies that felt super intense but not paranoid or any discomfort. couldn't/didnt want to move my legs. a very well balanced and comfortable

Likes
20
Share


@Threecube
Follow
Week 6 and they are still in the vegetation phase. Still growing it under 1 95w cfl 6500k. I really learned that leaving your plant in a small pot for too long can really stunt growth and slows down the whole process... It's growing pretty fast right now and every day i see how the plant is getting bigger. Did some LST to give new branches more light.
Leave any tips :)

Likes
53
Share


@DogDoctorOfficial
Follow
Ladies, gentlemen, and all the wonderful beings following this journey, I am thrilled to announce that we have reached the highly anticipated harvest week for our beautiful PCRs. This has been an incredible journey, and now it's time to reap the rewards of our hard work and dedication.
The PCRs are nothing short of perfection. Their frost-covered buds are a sight to behold, glistening like they've been kissed by winter's breath. The trichomes are abundant and sparkling, making these ladies look absolutely stunning. The aroma is intoxicating, a true testament to their strong genetics and the care they've received.
Upon taking them out of the tent, I was amazed by their strength and resilience. Despite my best efforts to make them dance, these ladies stood tall and proud, requiring no support at all. This just goes to show the exceptional quality and sturdiness of the PCR strain.
Aptus Holland's Enzym+. This product is a game-changer, breaking down dead root material and turning it into usable nutrients, ensuring our soil remains rich and fertile for future grows. Speaking of which, I do plan to reuse the soil, thanks to the amazing benefits of Enzym+. This enzyme product not only helps with nutrient uptake but also keeps the soil ecosystem healthy and thriving.
Here's the final stats for this week:
TDS: 130
PH: 6.8
Temp: 21°C
A huge shout-out to Aptus Holland for their incredible products that have consistently supported my plants' growth and health. Also, a massive thank you to Art Genetix for creating the phenomenal PCR strain that has brought so much joy to this grow.
To all my fellow growers, followers, and the entire community, your support and encouragement mean the world to me. This journey wouldn't be the same without you. As we move forward, let's continue to spread love, positivity, and the joy of cultivating these amazing plants.
Stay tuned for the final results and more updates as we dry and cure these beautiful buds. Until then, keep growing, stay positive, and never stop believing in the magic of cultivation.
Peace, love, and happy growing!
Genetics - P.C.R. @Art_Genetix_Team https://artgenetix.world/
Nutricion @aptusholland https://aptus-holland.com/
LED Power @Lumatek and @viparspectra
As always thank you all for stopping by , for the love and for it all, i fell blessed to have you all with me for one more love journey Thank you Thank you Thank you , you guys are great and have been amazing , thank you for everything !
#aptus #aptusplanttech #aptusgang #aptusfamily #aptustrueplantscience #inbalancewithnature #trueplantscience #dogdoctorofficial #growerslove
With true love comes happiness , Always believe in your self and always do things expecting nothing and with an open heart , be a giver and the universe will give back to you in ways you could not even imagine so !
Friendly reminder all you see here is pure research and for educational purposes only
Growers Love To you All
Discount Codes :
@thecannakan DOGDOCTOR 15% off
@theneutralizer PORKIT5-DOG 15% off
@kannabiaglobal DOGDOCTOR 30% off
@seedsmangenetics DOGDOCTOR 10%off
@terpyz.mutant.genetics DOCTOR 15% off
Have a fantastic week!


Likes
71
Share


@Mosquito_Haarlem
Follow
Week 12 is begonnen.
Ze heeft niet lang meer te gaan, dus vanaf vandaag 19 juli krijgt ze alleen nog maar Spa Reine mineraalwater. Dit om overtollige metalen en mineralen weg te spoelen wat de smaak ten goede komt. It contains no carbonation and has a very low amount of minerals.
Ze ziet er echt heerlijk uit, de toppen worden zwaar en ze begint steeds meer door te leunen naar één kant. Het past allemaal net aan in de tent.
Ik zal gedurende de week nog verse foto's updaten dus hou het in de gaten 🧐
Dag 21: ik heb de hoofdstam vastgebonden want ze leunt naar een kant omdat ze te zwaar wordt.
To be continued....

Likes
10
Share


@Fat_Olsh_Farms
Follow
Forming a nice cross shape. Filling out nicely
Don't forget to pH up if you decide to try the maxigro. I use it every other watering, watering slowly until 10-15% runoff
Day 33 super cropping like a boss.

Likes
102
Share


@love_2_grow
Follow
D49 - The first day in the third week of flower, and all is well.
I still haven't seen any thrips on her, but you can never be too careful since I have them in my other tent, so I went full Rambo by cutting up a package and using a teaspoon to place predatory mites on her leaves and taking care to avoid the flowers.
I also redirected the airflow to not blow directly on her and I'll leave the sawdust there until tomorrow and then brush it off.
D53 - Not much to report really, except that I switched on the UV light. She is just doing her thing, slowly fattening her buds.
D55 - I gave her 1.2-liters of compost tea @ pH 6.5 today. We're only at the end of the third week of flower, but she has several yellow leaves already.
Likes
3
Share


@bigsmoke42069
Follow
Great strain, would recommend.
Nice smoke/vapor, friends love it, stupefying and euphoric, no heavy couch lock like heavy indicas.
Taste great in The Mighty vaporizer, citrus with a hint of pine.
Likes
15
Share


@dank604
Follow
Flush started today. It is SO nice to see colas coming out from the side!! Just like some of the pics I've seen from other wonderful growers here! I plan on growing more in 3 gallon pots but tent-size is an issue for me but I'll figure it out :D
Likes
35
Share


@SativaSteve88
Follow
Flowering coming on really well now and things seem to be going ok, one plant stretching a lot faster than the other so hopefully it slows down want these to be a little smaller in size than my previous grow
Likes
62
Share


@Reyden
Follow
La tenda (4x4) è in fioritura da circa 2 settimane e la SF2000 lavora a pieno regime riuscendo a coprire bene e in maniera efficace praticamente ovunque, ho trasferito la Purple OG Punch di SSSC che è l’unica autofiorente e mi stava crescendo troppo in altezza per stare nell altro box e quindi aggiungerò lei in questo diario!😄💥🎬💚
Tutte le Gorilla 🦍 sia di Zamnesia che di RQS sono state defogliate nelle foglie più gialle e con carenze, le 3 piante di Seeds Mafia invece continuano così cercando di recuperare le altre in altezza…ora le Gorilla 🦍 sono tutte a 1.800 EC mentre le 3 di SM sono a 1.600 EC, la PPOG è a 1500 EC.
Ci vediamo presto con altri aggiornamenti e grazie di essere passato!
Grazie Spider Farmer ancora per questo LED SF2000, questo nuovo modello fa veramente la differenza e le piante crescono in maniera ottimale!!! 💯🙌🌱


Likes
175
Share


@the_curious_grower
Follow
as the second week of June is just on it's end and the weather has had it's ups and downs with a lot of rain and some nice sunny days the plants keep growing day by day.
The tallest plant reached a height of 86 centimeters or 33.85 inch so i'm getting close to the 1 meter mark. But hopefully they will grow much bigger as they have plenty of time left. Last year i a grew Blue Dream and a Chocolope in pots which reached a total height of 1,38 meter, which both yielded 30 grams each. What i should mention about the plants from last year is that the seeds weren't bought but came out of a friends weed. So this year it was all out with premium seeds, more knowledge and experience, great soil and hopefully the best weather


Processing
Likes
9
Share


@Kushizlez
Follow
Zkittlez
Yield: 39.4
Smell: 7/10 - sweet, candy, berry, gassy, piney hints
Bag appeal: 6.5/10 - slightly leafy/stemy
Crystal coverage: 7.5/10 - very impressed
Ash: 8/10 - thick, uniform white ashes
Fire holding: 8/10 - stays lit for seconds
Smoke: 7.5/10 - taste is decent, needs curing
High: 7/10 - indica dom
Comment: looks nice, smells nice, tastes nice, burns great but smalls didn’t fill out.
51.5/70 = 73% 👍🔥


