

Likes
62
Share


@Santica_Garden
Follow
So this is how things are looking for both the Exodus Cheese and GH Cheese, grow is going really well, learnt some more way of improving on my future grows. I have uploaded a video for you guys with all the information, any questions just ask away 👍🏾🌱💚

Likes
134
Share


@Herbalize
Follow
Hello folks
5th week of flowering, the flowers have grown well and already smell amazing !!!
My second remo had nuts burn, she's not as strong as the first, but she still develops well ( 5th photo )
They had a little stress because of the heat but I cannot do better
I'm really surprised how frosty the buds are and how the smell is strong !!! its an amazing strain ! 😍
Follow, like and comment if you enjoy it
I also have a second diary with 2 Moby Dick
Peace Love & Weed 😍👊


Likes
8
Share

@NoProbation4Weed
Follow
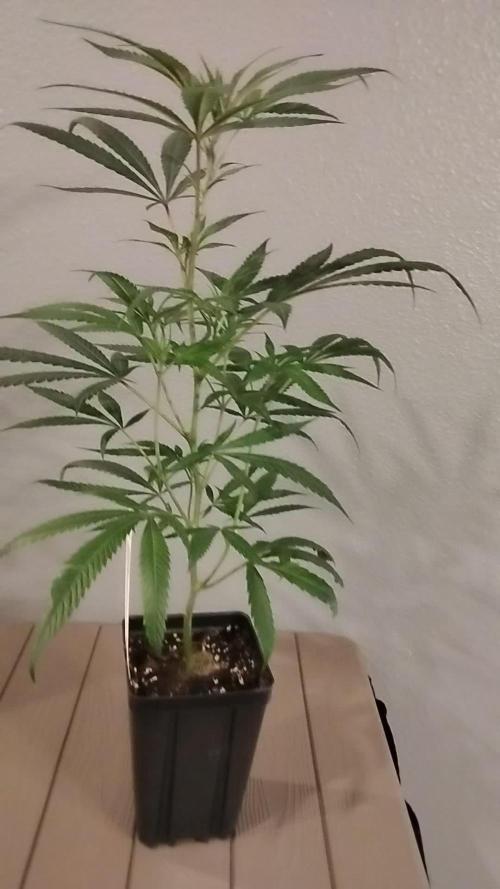
Both plants look very healthy and are showing vigorous growth. They only receive nettle manure tea occasionally and no other supplements or fertilizers. Considering this minimal input, they are in excellent condition and look outstanding.
Likes
10
Share


@Kayaboy
Follow
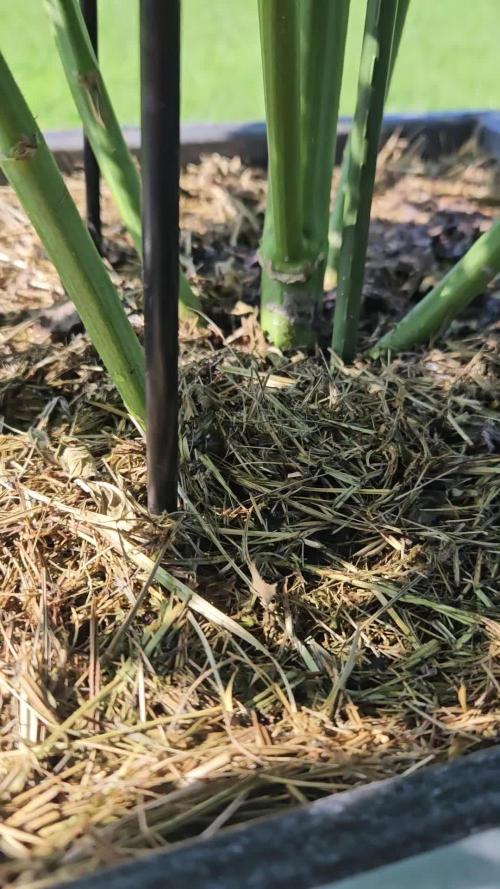
This week lowered the soil ppm to around 700 so i can be in control of nutes and follow up with any deficiencies it might appear , straight away the leaves started fading like 10% so i know im feeding now and not the soil....
Also applied first topping and guess i will go for another two toppings to create 8 main colas with no small stems whatsoever for thick dense buds. ... well see how she responds. So far she didnt even feel the topping no stress apparently and lower branches getting higher after 10 hours so i guess more toppings to follow soon xxx
Mid week Update:
Transplanted today and ready to veg further ..No signs of stress from topping or translplating. Xxx
Mid week Update:
Stripped off the side branches leaving only the leaves and thinking of mainlining or just let them with just one topping and no further trimmings...I will decide later this week xxx happy growing all

Likes
45
Share


@masterofsmeagol
Follow
9/3 Shook the plants off this morning and took a few pics and did a video. Let's see if it uploads. Plants are doing good. Toasted toffy is due for another plant doctor application tonight. It seems like I'm losing lots of leaves. Looking back on my other diaries I guess it's normal. BUT I could've had pest/pathogen problems then. I'm over thinking it. Toasted toffy only needs a few more weeks. It will definitely outvrun the disease. The nugs are super dense too. The plant in the 50 is loosing leaves faster than I'd like. It is also one of the furthest along. The big leaves that turn yellow look like it's a calcium/magnesium issue. The stalk and branches are all bright green and healthy looking. So are the flowers. It could be something below the soil. I couldve been overwatering but last time I waited until it drooped. It will be fine though. I'm happy with my results so far. Not my best or biggest year but I'm going to put in the work and Mae these plants produce the best quality cannabis that im able too. Also I think plant doctor may kill insects. K bicarb with dawn does too. I've found a few dead bugs like flies and pillars. Pillars actually seem to be gone. Not many moths either. Unless I see them I'm not going to treat them for it. This is that magical time where you get to watch the plant produce those beautiful flowers. Despite some small problems I'm very grateful for what I have. I've worked hard for it.
9/4 Watered everything but the sherb pie which was still heavy with leaves yellowing. It's tied for the furthest behind in flower with the seed in the 10. I treated the toasted toffy with 1/4 gallon (4tsp/gallon) of plant doctor. I avoided flowers as much as possible and tried to just get a few leaves. I used the rest on the soil. I just wanted it to absorb a little faster. That's why I sprayed the foliage. It's not 4 days it's 14 days when tje plant doctor just leaves behind a bunch of potassium and phosphorus after it's done its job. Can't be used in a 14 day interval with copper and I think that's what treats septoria best. I dontvknow if I can use that in flower. Doesn't really matter. Things are looking good. Plant Doctor and the K bicarb seem to be doing there job effectively as long as i stick to the application times. I made a short video but didn't upload. I'll try again but I may have some medical emergencies that need to be dealt with. If not I should defoliate and tie down some event horizon branches. I thought about treating the other event horizon as well. I'm not positive it has septoria but it wouldn't hurt anything to be practice. It AT LEAST has a couple suspucuous spots. I smelled a skunk as soon as I got out of my car. It can't get in my grow but I might put out traps to catch it. We'll see how it goes. Video seems to be uploading. It's at 31% so I'll wait for it. I think I've got like four or five weeks on my toasted toffy and one event horizon and the one in the 50 that I THINK is red runtz. That's good that I'll have different plants to harvest at different times. It's seeds from here on out though. It was hard to find info on some of the strains I'm growing but they all have ONE thing in common. They are EXOTIC and they are at least MODERATELY DIFFICULT to grow. AT LEAST lol. Last year I picked the right seefs and strains and it greatly helped. Still, if these are difficult strains to grow, then I'm doing a good job.
EDIT: I WAS STONED BUT IM PRETTY SURE I TREATED THE PLANT IN THE 50 WITH PLANT DOCTOR. DIDNT SPRAY BUDS. TRIED TO GET THE LEAVES THEN USED THE REST ON THE SOIL. I REMEMBER BECAUSE A STREAM ACCIDENTLY HIT A COUPLE LEAVES ON THE HUGE PLANT IN THE 10.
9/5 Sherb Pie was light and drooping. It's not to far in flower and still seemed moist yesterday with a little bit of weight. I watered it a gallon. I defoliated a little but I need to go through that plant. I have a bunch of plants that need a little work. The 50 gal seed is losing lots of leaves. I must not be feeding it enough, overwatering or maybe theres some sort of lock out. The plant looks nice and healthy. Leaves just turn yellow and die. Looked like a calcium or magnesium deficiency but i saw a septoria spot. I wouldn't think I've over feed or locked out using the small amounts of nutes I've used. It will be time to feed again soon. It's in the middle of flowering and still has leaves. I'm hoping things work out. I just have an anxiety disorder and worry too much. I'm GOING To have a great harve! I just need to keep moving forward and putting in the work.
9/6 What a fucking shitty morning. I did research on how to keep skunks out of your garden. Because I smelled it and the neighbors shot a few. Dad put traps out and it caught one. It wasn't a no spray trap so I approached it with him. Both had tarps. I kept telling him to throw it while I was distracting it bur he got a cramp and only got it over half. The half away from my garden. It's pretty far and down in a field but still. We had talked all morning about how to release it. I offered to drive their dog to take it for a walk so his alcoholic girlfriend wouldn't spiteful put the dog on its run. It wouldn't be sprayed but I made it out like it would ruin my plants. Picked dad up and got him to the bathroom. In that 30 seconds the stupid bitch grabbed the dog and brought it outside despite me YELLING "Can't you wait 5 minutes!? We've been dealing with this all morning. I heard fuck you in my head and she did it anyway. Dog ran at the skunk barking and it sprayed. Not a lot but I was fucking pissed. She's a full blown alcoholic and doesn't like me around early or the fact that my old man's 80 and house is mine. Anyway I got back and there was NO SKUNK SMELL. AT ALL! I WATERED EVERYTHING BUT SHERB PIE AND FED EVERYTHING BUT SHERB PIE. ILL FEED AND WATER THAT TOMORROW. WATERED A GALLON WITH A QUART OF FEED. Researched my strains found out they were all "difficult" to grow. One year ago to the Day I cut my first tenth planet. I got a couple close to a few weeks but the others will be later. If I can pull this off though I'll have some crazy quality! Grateful for what I have that's for sure! I doubled beastie bloom this time. We'll see how it goes.nothings uploading. I did some vids a pictures but I'll have to upload today.
9/7 I think it rained last night. I forgot to water and feed the sherb pie but I'll do it when I get back. I shook off the plants the best I could. I need to get the leaf blower out now and put it to use. Buds are swelling like crazy. GMOs are very tight flowers. Same with the event horizon. Rock hard nugs. With the gmo's I'm not worried. The were monster cropped so they have enough leaves even if some do die off. The toasted toffy only has like four weeks left. Same with the event horizon. The plant in the ten is the furthest behind but it's extremely healthy. I removed some leaves from the bottom and large fan leaves. The plant in the 50 I hope finishes before it loses all its leaves. I treated it with plant doctor and SOME people strip their plants but I don't. I'm grateful for what I've got. Won't be the biggest harvest but WHEN I make it to the finish line I will have some incredibly potent strains. I'm proud of myself to even get these to finish seeingvthe level of difficulty on cultivation. I'm trying to upload some stuff. We'll see.
9/8 Apparently it rained pretty hard last night. Took forever to go through and shake everything off and defoliate what needs it. Sherb pie is praying to the sky and almost totally purple. It's flowering so much more in the last couple days. Everything has. Even the one in the ten is stacking up! I defoliated most of what needed it and I was soaked. I noticed a branch on the middle gmo that was getting heavy and starting to break away from the trunk. It wad wobbly but I don't think there was a break un the Cambrian. I made a sling with rope (couldn't find zip ties) and I pulled it tight amd secured that branch to the tomato cage. GMO buds are hard as rocks. Everything is in overdrive. They liked that beastie bloom. I have cha ching but nothings ready for that yet I don't think. We'll the event horizon and toasted toffy might be I'll have to check. It's been beautiful today but not too hot. Lots of wind which is good. I'll upgrade supports as needed. Flowers are progressing at an amazing rate. Weather is supposed to be great the next few days. I'll keep this updated.
9/9 Had to shake the plants off. WATERED EVERYTHING BUT THE SHERB PIE WHICH WAS REALLY HEAVY. It's also lost a lot of leaves and the majority of leaves have turned purple. Toasted toffy and event horizon and red runts are pretty far into flower. I tried to take some pictures. Even the ten is blowing up! That looks like I'm going to switch to cha ching when flower gets further. Trichs are developing nicely on the ones further in flower. This year it's going to be quality over quantity. All these strains are ranked HARD to grow but have insane cannabinoid profiles and high THC %'s. So if I can keep it together for another month I'll be golden. Looking forward to it. This is the fun part. It's also the anxiety provoking part. I've learned a lot just since joining grow diaries.

Likes
23
Share


@Gram_Solo
Follow
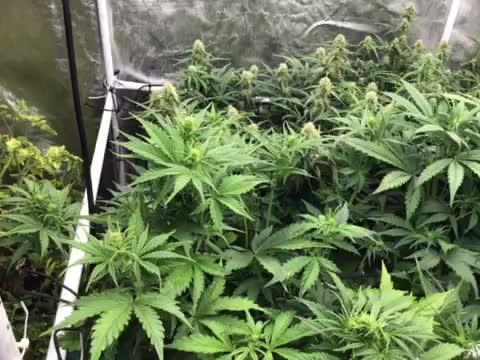
Final Week for 2 of the Runtz
🔥🔥🔥
I am flushing the 2 plants at the front of the tent! they looking super frosty and feel dense! 100% ready now!
I am doing all the others with same feed as last week , added overdrive aswell as there is some frost picking up and amber trichomes!
Smells so good! early harvest very soon!
2 front plants will be put into drying next week for 15 days. then others should be ready to repeat 😁
Update 03/05/25
I have now put the 2 plants being flushed in the 3x3 for a 3 day dark period then we doing the Chop and dry for around 15 days
Will take some snaps this weekend and pick up that frossst! update very soon! 1 looking so phat! I snapped a main stem off in early flower and its pumped into 2 massive colas!!
BOOM!
Nearly at the end of the grow!
its been Emotional! 😎

Likes
44
Share


@Ukfarmer420
Follow
Bannandaddy auto by ethos genetics it is a brilliant plant a bit small but 10/10 buds, smell like redbull lol


Likes
29
Share


@GrowPro3500
Follow
Just two more days in the dark, then it’s chop time!
This run I’m testing out my DIY dry box — got a fan rigged up for airflow, should do the trick.
Final harvest update dropping in like two weeks… fingers crossed for some sticky fire!
Stay tuned, it’s about to get frosty!

Likes
12
Share


@ChuckChunks
Follow
The calyxes are blowing up on the pheno 1, great purple shades on the leafs and sugar leafs. The trichomes on the leafs showing a few amber heads, important to check the trichomes on the bud. In mine case mostly cloudy at the moment.
Pheno 2 is creating more trichomes. It seen that the buds are getting more frostier and giving them the last boost by foxtailing a bit. Not because of the heat or the light, but getting to the end of their life.

Likes
13
Share


@MrSpooky882
Follow
Die Woche war sehr gut, ich habe am 21.7. Entlaubt und das hat den Pflanzen sehr gut getahn erst recht die genetisch fehlerhaften Pflanzen haben das gut angenommen.
Dann habe ich das erste mal gedüngt, weniger als hersteller Angaben und mit Madame Grows pre flower booster mal sehen was der kann wird 2 bis 3 mal in der vor Blüte benutzt...mal sehen😎
The week was very good, I have on 21.7. And that has done the plants very well, especially the genetically defective plants have accepted this well.
Then I fertilized the first time, less than manufacturer information and with Madame Grows pre flower booster let's see what it can be used 2 to 3 times in the pre-flower... let's see😎

Likes
111
Share

@Herbalize
Follow
Hello folks 😎
9th week of flowering, we are near the end !
1 more flush and it will be time to harvest 👌, I love to see the leaves fade like that 😍
This week the outside temperatures have dropped a lot, very cool for the end and especially for better drying so im happy !
All trichome are milky and some amber, I could leave it another week longer but I want to be able to smoke it the day, and not stay glued to the sofa 😁
So the harvest will be done after about 60/62 days
Anyway, I really liked this run ! and I would try other strains of this bank really soon
stay tuned and see you next week for the final upload guys 😘
I also have another diary with one Pineapple kush from RQS if you want to see
Peace Love & Weed GD Fam😍👊

Likes
37
Share


@CruellaDeVil
Follow
Soweit war diese Woche alles in Ordnung bis ich mitte der Woche entdeckt hab das die Orange Bud an zwei Stellen das schimmeln angefangen hat..
Hab alles grob weg geschnitte sie dann im endeffekt trotzdem paar Tage später geerntet weil die Trichome für meinen Geschmack schon ready waren.
Hab die Luftfeuchtigkeit dann nochmal versucht weiter runter zu bekommen.


Likes
17
Share


@Hawkbo
Follow
Gave it some water yesterday with some herculean harvest, clean fruits, terpinator and grozyme and kinda flushed it out just to try and prevent build up. It's starting to fatten up a little bit now. All the purples are Putang crosses or mandarin cookies R1V2 #2.

Likes
2
Share

@Thedudesincolorado
Follow
I suspect that my 1st and 2nd Frostbanger went into early flower, due to not having a divider in between their roots (I forgot) and they’re in the same 35 gallon bin, the 2 frostbanger in 40 liter grow bags,,much larger and just now beginning to flower. Right on schedule.
Likes
2
Share


@Green_Peace
Follow
Been told this is a lovely strain to grow so looking forward to seeing how she does. Fell over after a few days and needed help to stand up but other than that and some minor calmag defiency which is probably already corrected for, she's doing fine and catching up to the others in the tent fast.
Hope you all enjoy my first attempt at a 1 week timelapse. I'll intend to record the whole grow this way so follow along for updates and please let me know any tips/tricks any of you may have for recording / editing. This plant is the front right in the video.
Happy growing, happy smoking!
Likes
2
Share


@frankterpenes
Follow
This is the last day of her life. Shes getting a bath of sun with 40c outside. After she will finish in the dark until i harvest her tomorrow
Shes trying to get pollinated by throwing some new pistils here and there, but trichomes are cloudy mostly with amber tone. Not a lot of clear one.
Processing
Likes
14
Share


@TheDankofScotland
Follow
Royal haze auto is in its 9th week from seeds 3 weeks into flower it really likes last and to be honest I would recommend it definitely it hasn't had one issue at all so far I'm giving it 3.5ml of coco ab per litre


Likes
3
Share


@NyBushDr
Follow
Good morning, today is day 36 of veg and the start of week 6. As you can see the ladies got transplanted into their final 10am fabric pot homes! These ladies like it a bit cooler and more humid so I’m still keeping vpd at .9 with the temps maxing out at about 77! I also needed to bump up watering - they ran through a half gallon super quick so I went to a gallon and they needed it every 3 days ! Still sticking to my every other watering of fish shit and silica! Still a few weeks of veg to go, mainlining slows down the process and I need to fill the canopy horizontally before I start to let them grow taller and after that flip!