
Likes
Comments
Share

@DogDoctorOfficial
Follow
❄️ The Frozen Archive #2 | LSD
From Fresh Frozen to Temple Ball
Hello GrowDiaries family! 👋❄️🌱
Welcome back to The Frozen Archive.
For those joining the journey for the first time, this series follows our exploration of fresh frozen material, ice & water extraction, solventless concentrates, curing techniques, and everything that happens after harvest.
If you would like a complete introduction to the Bubbleator machine, fresh frozen material, and the fundamentals of ice & water extraction, I highly recommend checking out The Frozen Archive #1, where the entire process is explained in detail.
This entry focuses on a specific genetic:
LSD by Zamnesia.
And what a beautiful plant she was.
For anyone curious about her journey from seed to harvest, the complete cultivation diary is available on my profile. This report picks up where that story ended.
The flowers were harvested.
The material was preserved as fresh frozen.
And now it was finally time to see what LSD had to offer through ice & water extraction.
⸻
A New Wash, A New Lesson
Although this is only the second entry in The Frozen Archive, this extraction actually represents my third wash using the Bubbleator machine.
The first archive introduced the machine and documented my first experiences.
This time I approached the process with a little more confidence, a little more understanding, and a lot of curiosity about how LSD would perform.
One of the goals of this series is not simply to show the results.
It is to document the learning process itself.
The successes.
The mistakes.
The observations.
The improvements.
And hopefully create a useful archive for both the community and my future self.
⸻
The Material
Unlike trim runs, this extraction was performed using fresh frozen flowers.
Entire buds were harvested, frozen immediately, vacuum sealed, and preserved until extraction day.
By freezing the material directly after harvest we aim to preserve as much of the plant’s original profile as possible before beginning the washing process.
Months of cultivation eventually lead to this moment.
The plant changes form.
But the journey continues.
⸻
The Wash
The process itself follows the same methodology introduced in Archive #1.
The Bubbleator was loaded with:
? Ice
🌿 Fresh frozen LSD flowers
💧 Cold water
The flowers were placed inside a properly secured 220-micron wash bag, positioned inside the machine, covered with additional ice, and submerged in water.
From there the machine could begin its work.
One thing that quickly becomes obvious is how important temperature control is.
Throughout the wash I monitored the water carefully and aimed to keep conditions as close to 0°C / 32°F as possible.
Cold temperatures help maintain trichome integrity and improve separation during agitation.
Patience becomes one of the most important tools in the room.
⸻
Watching The Transformation
One of my favorite moments remains watching the water change.
At first everything appears clean and transparent.
Then gradually the water begins taking on a different appearance as trichomes and plant material enter suspension.
The Bubbleator quietly continues its work while the ice maintains the environment.
And while the machine washes…
Well…
The grower medicates. 😄🌱
Some traditions are important.
⸻
Collection & Multiple Washes
Once the cycle was complete, the water was drained through the filtration bags.
This is where the magic becomes visible.
The resin that was previously attached to the flowers begins collecting inside the bags.
The first collections looked extremely promising.
As always, multiple washes were performed.
Each wash tells a slightly different story.
Eventually there comes a point where the material being collected becomes noticeably greener and contains more contamination than desired.
That is usually the signal that the best material has already been recovered.
At that point it is time to stop chasing quantity and preserve quality.
⸻
Freeze Drying… Dog Doctor Style
After collection, the resin was transferred for drying.
This particular batch spent approximately five days drying in the freezer before reaching the condition I was looking for.
Once sufficiently dry, the material was broken apart and worked into smaller pieces to increase surface area.
It then spent additional time drying before the next stage could begin.
The goal is always the same:
Remove moisture.
Preserve quality.
Remain patient.
⸻
Working The Resin
This is where things become truly enjoyable.
Once dry, the resin was carefully worked and mixed together.
The purpose is not simply aesthetics.
The goal is to create a more homogeneous material where everything is evenly distributed.
The process requires patience.
Heat from the hands.
Gentle pressure.
Time.
Slowly the texture begins changing.
The colors become more uniform.
The material becomes increasingly workable.
And eventually…
The temple ball begins to emerge.
⸻
Temple Ball Formation
Watching loose resin transform into a temple ball never gets old.
What begins as dry collected material slowly becomes something completely different.
A smooth surface develops.
The texture evolves.
The appearance changes dramatically.
And suddenly the extraction takes on a form that has been used for generations.
This batch produced a beautiful temple ball with excellent visual appeal and impressive characteristics.
⸻
The No-Oxygen Cure Experiment
This entry also begins a long-term experiment.
Part of the material was placed inside parchment paper, sealed inside a vacuum bag, and stored without oxygen.
The objective is simple:
Observe.
Learn.
Compare.
How will the resin evolve?
How will the aroma develop?
How will the texture change?
Will it butter?
Will it remain stable?
Will the temple ball age differently?
Only time will answer those questions.
For now the material continues resting.
And we will return in a future entry to see where that journey leads.
⸻
Early Impressions
Although the cure is far from complete, early signs are extremely encouraging.
The material melts beautifully.
The bubbling behavior is exactly what I hoped to see.
The aroma remains rich and complex.
And after a quick three-week check on the vacuum-cured material, everything appears to be moving in the right direction.
Now comes the hardest part.
Waiting.
⸻
Looking Ahead
This is not the end of the LSD story.
This is simply the beginning of its next chapter.
The temple ball continues curing.
The vacuum-sealed resin continues curing.
And in a few months we will return to compare the results and see how time has transformed the material.
For now, I am extremely happy with the outcome and excited to continue learning.
That is ultimately what The Frozen Archive is all about.
Learning.
Documenting.
Improving.
And sharing the journey.
⸻
P.S.
A huge thank you to Zamnesia for the LSD genetics and for the Bubbleator machine that made this exploration possible.
And a special thank you to Plagron for supporting the cultivation side of this project.
The LSD plant documented here was grown from seed to harvest using the Plagron lineup, including Terra Grow, Terra Bloom, Pure Zym, CalMag Pro, Green Sensation, Power Buds, Power Roots, and Sugar Royal.
The flowers became fresh frozen.
The fresh frozen became resin.
And now the resin begins its cure.
Everything is connected.
Grower’s Love everyone. 🌱💚❄️📚

Likes
10
Share


@Kali_DC
Follow
pH fluctuate daily sending the PPM to spikes to higher. Minor tip Burns, plants are healthy and eating all It can.


Likes
26
Share


@Roberts
Follow
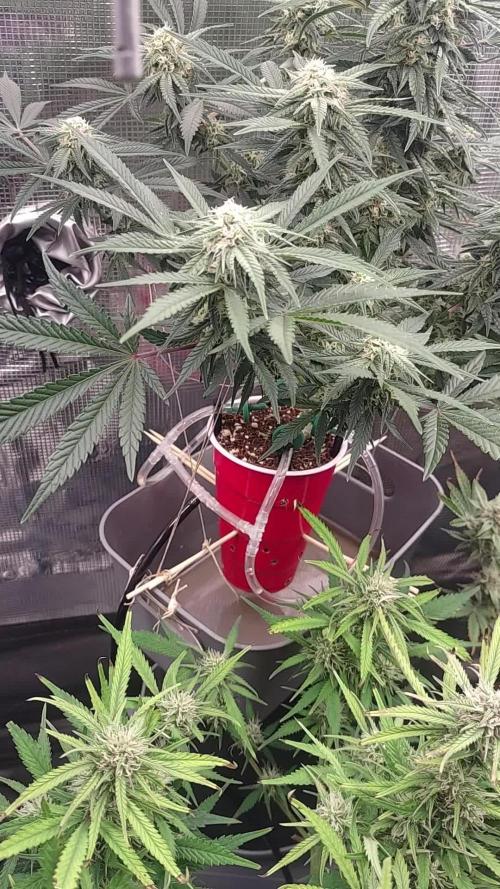
G13 autoflower is doing great under the Medic Grow mini Sun-2, in the Athena blended nutrition. She just got a solution change today to the blooming mix. I expect her to really start stretching good. Everything is looking really good now considering the rough start. She is making excellent progress. Thank you Medic Grow, Athena, and Weed Seeds Express. 🤜🏻🤛🏻🌱💪🏻🌱
Thank you grow diaries community for the 👇likes👇, follows, comments, and subscriptions on my YouTube channel👇. ❄️🌱🍻
Happy Growing 🌱🌱🌱
https://youtube.com/channel/UCAhN7yRzWLpcaRHhMIQ7X4g

Likes
7
Share


@StickyFingah420
Follow
Semana de cosecha! Al fin el tan esperado momento momento se aproxima y no puede tener una mejor pinta! Realmente he quedado maravillado con la belleza de este fenotipo muy parecido al que promociona el banco en su portal, así que muy satisfecho por eso.
Solo esperar a que se seque bien el sustrato y estaremos cosechando estos bellos frutos 🤩😍

Likes
Comments
Share


@gr3g4l
Follow
Esta semana notamos que los Led estaban demasiado cerca de las copas cuando los apicales mostraron un inicio de albinismo así que tocó alejarlos un poco, a 40 ctms áprox. igual poco menos.
Las dos Amarettotarmac muestran una diferencia notable en la morfología de los cogollos pero de olor ambas afrutadas, cereza, fresa, algo muy rico y notable a larga distancia, que huelen mucho. xd

Likes
2
Share


@EtnoGrow
Follow
here already a little more grown and applying the techniques lst apical pizzicato experimenting, Seeing how the techniques are manifested, some were done poorly, so their results were somewhat strange or curious, if they did, you judge, errors such as not cutting the apical trying to do the pruning, poe error from fmi and only cut the tiny growing leaves that's why you will see those rare leaves
Likes
5
Share


@AlpenZilla
Follow
🏆 Harvest Report – Cherry MAC Muffin
Final dry yield: 161.71 g
The highest-yielding plant of the entire grow – dense, heavy flowers with excellent structure and minimal stem weight.
The buds cured into a standout mix of:
🍒 Cherry sweetness
🍦 Soft creamy undertones
🌈 Deep purple highlights on the tips and sugar leaves
The resin concentration was extremely high, giving the buds a frosted, almost glassy look.
Drying went smoothly thanks to the tight flower formation and healthy fade-out during flush.
No oversaturation, no nutrient residue – everything finished clean and aromatic.
Cherry MAC Muffin ended the run as the visual and aromatic highlight of the tent.
Outstanding vigor, strong late-flower development, and one of the densest structures of the grow.

Likes
50
Share


@AsNoriu
Follow
Day 85 since seed touched soil.
Trim jail !!!
2.4 meters of hanging frosty buds and air ;))))))
Happy Growing !!!

Likes
15
Share


@Trueorganics84
Follow
I love this girl. She grows tall and fast. Super easy grow so far. Just starting to lst her a little bit more.
Posted 4 videos on how I make my tea. I use this When I start seeing hairs until the last 2 weeks.
Then I flush
Just a compost tea you see here.

Processing
Likes
23
Share


@eldruida_lamota
Follow
Como estamos familia, a día de hoy, viernes, llevamos exactamente 7 días en la fase de floración y todas ellas están marcadas por su sexo.
Todo va sobre ruedas, tenemos mínimas de 20,5 y maximas de 28,5 grados. la humedad no supera nunca el 60%.
Altura mínima lemon kush 25cm.
Altura maxima northern light xl 42cm.
•las power plant xl Han pegado un estirón serio, están empezando a ensanchar bastante.
•una marea verde desde semilla, con tan solo 5 semanas de crecimiento y un solo trasplante desde que se germinó, para controlar un mal crecimiento.


Likes
11
Share


@Yukagrls
Follow
This plant is completely organic. I only poured water and 2tsp of coffee grinds. She is very healthy and growing fast. Cant wait for her to be ready. :)


Likes
8
Share

@ThomFoolery
Follow
2/2
Week 4 flowering. Just changed her over to bloom nutes. I love that this is a different pheno than the chocolope in my other grow. And they look totally different. They both smell like cantaloupes though! What I am loving about coco; I can give the plants exactly what they need. I've so long loved living soil, but it's always hit or miss.
Ok... I went by the directions on the label. But I had to up each one by one to get the EC about where I wanted it. I am doing this to preserve the NER. No imbalances. She's been on it for almost 3 days and looking good so far.
I was having issues with the EC spiking so I increased flo after a flush. I brought her down to 1.9 and the EC now is 2.3.. input is 1.8. so.. still having some issues but it's early. I'm going to give her a few days and see if she bounces back. If not I'll try something else. Shit, worse case scenario, I'll flush her once per week. I'm thinking it's all to do with previous channelling.
I think I'm already seeing a difference in flower size. This plant is stacked really tight. Each little bud has 2 tiny leaves and they must be a thousand of them. Lol. It makes me worry some for bud rot. I run a tight ship but you can't always be perfect. It's something to be hyper aware of. I'll be pulling her out daily from here on in!
2/7
3 days since last reset and the EC went up to 6.3. it's got to be due to the size of the cup. I will just do a manual reset every 3 days down to 1.9 if I have to. But being that I am not experienced with coco. I'm guessing. I'm already pushing extra through it to wash away excess but it ain't working. Hopefully flushing so often will not harm her. I turned her around to get some sun on the other side. I'll leave her for a week then return.
More to come...


Likes
14
Share


@TheDankofScotland
Follow
Royal haze in the 11th week It's supposed to be a 12 week finisher but think it may go a week longer I've just done a major defoliation to allow all the bud sites to get nice and fat , I had started to cut the nutes down but have put them back upto 4ml a and b per litre again , the 6 photoperiod are on 2ml a and b and 4 ml per litre of rhisotonic , out of the NL , Wedding gelato and zkittles the zkittles has been the best strain so far

Likes
31
Share


@The_Doctor_Green
Follow
Hola a todos! Esta semana relice 2 riegos foliares una con aceite de neem para controlar unos trips que han aparecido y otro con un fertilizante organico MEN. Luego otro riego con PS.
La planta de tierra la voy llevando para los costados para que no crezca para arriba, ya que de noche la luz de la calle llega a donde esta.


Likes
9
Share


@newenglandgrowers
Follow
Scratch what I said at the end of last week pests are still around just had some bug fly at me and bite/sting me on the neck now a got a welt on my neck smh, not sure what the heck it was it was some sort of black bug maybe a thrip but I honestly have no idea, did another neem oil drench on the medium only and tomorrow I'm going to use a hydrogen peroxide mixture again that way I can also use it on the tops and undersides of the leaves as well. Some of the roots started to become exposed on the top soil so I added more an inch or two coco to cover the exposed roots. Another successful week I guess the plants aren't dead so onto week 9, Week 4 of flower

Likes
55
Share


@Mr_und_Ms_Lue_Roots
Follow
Hallo und herzlich willkommen am Anfang der 2ten Blütenwoche
Einiges viel zum Wochenende an. Darunter viel, dass wir eine große Population an Trauermücken durch eine Nematoden- Kur und Gelb wie auch Blautafeln in den Griff bekommen mussten. Bisher obwohl wir es auch schon mal erwähnten, haben wir bis hierher von dem Neemöl- Extrakt noch nichts verwendet, da die Pflanzen ohnehin schon zu dem Zeitpunkt arg angeschlagen waren. Dahingehend haben sie sich alle gut erholt.
Da unsere Liter Vorräte an Dünger nun doch kurz vor Ende nicht mehr alle samt top waren, sind wir jetzt auf das JU JU Royal Programm von Biobizz umgestiegen.
Was soll man sagen, wenn man wem Vertrauen kann auf dieser Ebene, dann sicher Julian Marley 😇
Gestern Abend dann haben wir das Lollipopping unter der Voraussetzung Sauberes bzw. Desinfiziertes Arbeitswerkzeug wie natürlich auch Handschuhe vollzogen.
Es war jetzt das insgesamt 3te mal das wir sie entlaubt/ gestresst haben. Was aber auch wichtig ist, es tut ihr ja gut und daher verwöhnt man sie auch wieder rum^^
Wir haben ca. 20 % entfernt, alles was Licht abbekommt und Sonnensegel blieben stehen. So ist bewerkstelligt, dass ausreichend Photosynthese betrieben werden kann.
Sie waren alle schon sehr dicht gewachsen und schöner wäre letzte Woche gewesen zu Entlauben um so besser, für Luftzirkulation zu Sorgen und auch die Raumfeuchte runter zubekommen. Dennoch haben wir uns dafür entschieden, den Beschnitt genau zum Übergang in die 2te Blütewoche umzusetzen. Grund dafür auch, den Streck abzuwarten. Jetzt Anfang der 2ten Blütewoche ist die Bildung von Blütenansetzen voll im Gange und schon gut ausgeprägt. Demnach auch der Streck bald Stagnieren.
Gießverhalten, sehr unberechenbar... man kann in die Pötte geben und nächsten Tag sind die Nährstoffe bis auf ein geringes quasi verpufft. In der Regel versuchen wir alle 2 Tage Nährstoffe zu verabreichen, ansonsten Wasser in auch PH angepassten Wasser. Ab der Blütephase fahren wir mit mind. einem PH von 6.5 bis höchstens 6,8
Da wie eben genannt nichts in die Pötte zu bekommen war, haben wir gestern auch mit 1 ml/ L ne leichte Blattdüngung mit Green Mystic vorgenommen. Nur erreichbare Sonnensegel bzw. Blätter wurden besprüht. Andere Blätter darunter bzw. daneben wurde versucht so gut wie möglich abzudecken (Küchentuch).
Ja soweit wäre es jetzt erstmal. Wie immer, hinterher fällt einem immer wieder noch was ein was man sicher Schreiben wollte ;-) Aja Gesternhatten wir dann auch auf 720 Watt umgestellt.
Wir freuen uns auf die kommende Woche und wünsch somit allen Growmies einen tollen Start in die neue Woche!
Vielen Dank auch an alle die vorbeischauen, kommentieren und oder Liken!
VG 👋
Likes
14
Share


@Kakui
Follow
15 Noviembre:
-Hoy se instaló el sistema de riego "Drip to Waste" que me permitirá hacer riego de precisión, con protocolo "Crop Steering".
-Se instalaron sensores de humedad de suelo, para saber cuándo y cuánto regar, el sistema manda datos de humedad de suelo, temperatura y humedad ambiente, etc vía internet a mi celular.
-Mañana se comienza con el primer riego de precisión.
17 Noviembre: Segundo día de riego automático, 3.0EC y 5.9pH, las plantas crecen a buen ritmo, las raíces ya están saliendo por los orificios de drenaje a 2 días de transplantadas.
20 Noviembre: Se realizó una pequeña defoliacion de las hojas tipo abanico muy grandes.
